На сайте 123325 инструкций общим размером 499.1 Гб , которые состоят из 6232232 страниц
Фото
Руководство пользователя LG L320. Основные функции, характеристики и условия эксплуатации изложены на 2 страницах документа в pdf формате.
Доступно к просмотру 2 страницы. Рекомендуем вам скачать файл инструкции, поскольку онлайн просмотр документа может сильно отличаться от оригинала.
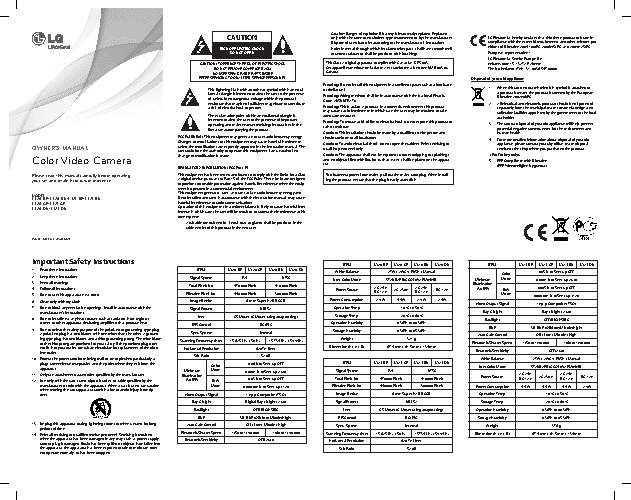
CAUTION • Caution: Danger of explosion if battery is incorrectly replaced. Replaced LG Electronics hereby declares that this/these product(s) is/are in only with the same or equivalent type recommended by the manufacturer. Dispose of used batteries according to the manufacturer’s instructions. compliance with the essential requirements and other relevant pro- RISK OF ELECTRIC SHOCK • Holes in metal, through which insulated wires pass, shall have smooth well visions of Directive 2004/108/EC, 2006/95/EC, and 2009/125/EC. DO NOT OPEN rounded surfaces or shall be provided with brushings. European representative : LG Electronics Service Europe B.V. CAUTION: TO REDUCE THE RISK OF ELECTRIC SHOCK This Class A digital apparatus complies with Canadian ICES-003. Veluwezoom 15, 1327 AE Almere, DO NOT REMOVE COVER (OR BACK) Cet appareil numerique de la classe A est conforme a la norme NMB-003 du The Netherlands (Tel : +31-(0)36-547-8888) NO USER-SERVICEABLE PARTS INSIDE Canada. REFER SERVICING TO QUALIFIED SERVICE PERSONNEL. Disposal of your old appliance Warning: Do not install this equipment in a confined space such as a bookcase This lightning flash with arrowhead symbol within an equi- or similar unit. 1. When this crossed-out wheeled bin symbol is attached to lateral triangle is intended to alert the user to the presence Warning: Wiring methods shall be in accordance with the National Electric a product it means the product is covered by the European of uninsulated dangerous voltage within the product’s Code, ANSI/NFPA 70. Directive 2002/96/EC. enclosure that may be of sufficient magnitude to constitute 2. All electrical and electronic products should be disposed of a risk of electric shock to persons. Warning: This is a class A product. In a domestic environment this product separately from the municipal waste stream via designated may cause radio interference in which case the user may be required to take collection facilities appointed by the government or the local The exclamation point within an equilateral triangle is adequate measures. authorities. intended to alert the user to the presence of important Warning: To reduce a risk of fire or electric shock, do not expose this product to operating and maintenance (servicing) instructions in the rain or moisture. 3. The correct disposal of your old appliance will help prevent literature accompanying the product. potential negative consequences for the environment and Caution: This installation should be made by a qualified service person and human health. FCC WARNING: This equipment may generate or use radio frequency energy. should conform to all local codes. 4. For more detailed information about disposal of your old Changes or modifications to this equipment may cause harmful interference Caution: To avoid electrical shock, do not open the cabinet. Refer servicing to appliance, please contact your city office, waste disposal OWNER'S MANUAL unless the modifications are expressly approved in the instruction manual. The qualified personnel only. service or the shop where you purchased the product. user could lose the authority to operate this equipment if an unauthorized Caution: The apparatus shall not be exposed to water (dripping or splashing)Color Video Camera change or modification is made. and no objects filled with liquids, such as vases, shall be placed on the appara- 5. EEE Compliance with Directive. REGULATORY INFORMATION: FCC Part 15 tus. (EEE Yonetmeligine Uygundur.) Please read this manual carefully before operating This equipment has been tested and found to comply with the limits for a Class To disconnect power from mains, pull out the mains cord plug. When install- your set and retain it for future reference. A digital device, pursuant to Part 15 of the FCC Rules. These limits are designed ing the product, ensure that the plug is easily accessible. to provide reasonable protection against harmful interference when the equip- ment is operated in a commercial environment. This equipment generates, uses, and can radiate radio frequency energy and, MODEL L320-BP/L320-BN/L321-BP/L321-BN if not installed and used in accordance with the instruction manual, may cause L320-CP/L321-CP harmful interference to radio communications. L320-DN/L321-DN Operation of this equipment in a residential area is likely to cause harmful inter- ference in which case the user will be required to correct the interference at his own expense. • A suitable conduit entries, knock-outs or glands shall be provided in the cable entries of this product in the end user. P/NO : MFL63745106(A) AB28 Important Safety Instructions Specification ITEM L320-BP L320-CP L320-BN L320-DN ITEM L321-BP L321-CP L321-BN L321-DN 1. Read these instructions. ITEM L320-BP L320-CP L320-BN L320-DN White Balance ATW / AWC b PUSH / Manual 0.05 lx @ Sens-up OFF Color 2. Keep these instructions. Signal System PAL NTSC Minimum Mode 3. Heed all warnings. User Color Mode STANDARD/COOL/WARM/VIVID Illumination 0.0001 lx @ Sens-up Auto Total Pixels No. 470 000 Pixels 410 000 Pixels 4. Follow all instructions. Power Source AC 24 V, AC 230 V AC 24 V, DC 12 V (30 IRE) B/W 0.005 lx @ Sens-up OFF DC 12 V DC 12 V 5. Do not use this apparatus near water. Effective Pixels No. 440 000 Pixels 380 000 Pixels Mode 0.000 001 lx @ Sens-up x128 6. Clean only with dry cloth. Image Device 6 mm Super HAD II CCD Power Consumption 2.9 W 4.4 W 2.9 W 2.4 W Video Output Signal 1 Vp-p Composite (75 ?) 7. Do not block any ventilation openings. Install in accordance with the Signal Process XDI-S2 Operation Temp. -10 ?C to 50 ?C manufacturer’s instructions. Storage Temp. -20 ?C to 60 ?C Day & Night Day / Night / Auto 8. Do not install near any heat sources such as radiators, heat registers, Lens CS Mount (C Mount using adaptor ring) Backlight OFF/BLC/HSBLC stoves, or other apparatus (including amplifiers) that produce heat. IRIS Control DC/ELC Operation Humidity 0 %RH to 80 %RH 9. Do not defeat the safety purpose of the polarized or grounding-type plug. Storage Humidity 0 %RH to 85 %RH DNR 3D-DNR (Off/Low/Middle/High) A polarized plug has two blades with one wider than the other. A ground- Sync. System Internal Auto Gain Control Off / Low / Middle / High ing type plug has two blades and a third grounding prong. The wide blade Scanning Frequency (H/V) 15.625 kHz / 50 Hz 15.734 kHz / 59.94 Hz Weight 321 g or the third prong are provided for your safety. If the provided plug does Electronic Shutter Speed 1/50 to 1/90 000 1/60 to 1/90 000 not fit into your outlet, consult an electrician for replacement of the obso- Horizontal Resolution 620 TV Lines Dimension (H x V x D) 67.4 mm x 61.5 mm x 134 mm lete outlet. Electronic Sensitivity OFF/Auto 10. Protect the power cord from being walked on or pinched particularly at S/N Ratio 52 dB White Balance ATW / AWC b PUSH / Manual plugs, convenience receptacles, and the point where they exit from the Color 0.06 lx @ Sens-up OFF ITEM L321-BP L321-CP L321-BN L321-DN apparatus. Minimum Mode 0.0001 lx @ Sens-up Auto Signal System PAL NTSC User Color Mode STANDARD/COOL/WARM/VIVID 11. Only use attachments/accessories specified by the manufacturer. Illumination Power Source AC 24 V, AC 230 V AC 24 V, DC 12 V 12. Use only with the cart, stand, tripod, bracket, or table specified by the (30 IRE) B/W 0.03 lx @ Sens-up OFF Total Pixels No. 470 000 Pixels 410 000 Pixels DC 12 V DC 12 V manufacturer, or sold with the apparatus. When a cart is used, use caution Mode 0.000 001 lx @ Sens-up x128 Effective Pixels No. 440 000 Pixels 380 000 Pixels Power Consumption 4.4 W 4.4 W 4.4 W 2.9 W when moving the cart/apparatus combination to avoid injury from tip- over. Video Output Signal 1 Vp-p Composite (75 ?) Image Device 6 mm Super HAD II CCD Operation Temp. -10 ?C to 50 ?C Day & Night Digital Day / Night / Auto Signal Process XDI-S2 Storage Temp. -20 ?C to 60 ?C Backlight OFF/BLC/HSBLC Lens CS Mount (C Mount using adaptor ring) Operation Humidity 0 %RH to 80 %RH DNR 3D-DNR (Off/Low/Middle/High) IRIS Control DC/ELC Storage Humidity 0 %RH to 85 %RH 13. Unplug this apparatus during lightning storms or when unused for long Auto Gain Control Off / Low / Middle / High Sync. System Internal Weight 376 g periods of time. 14. Refer all servicing to qualified service personnel. Servicing is required Electronic Shutter Speed 1/50 to 1/90 000 1/60 to 1/90 000 Scanning Frequency (H/V) 15.625 kHz / 50 Hz 15.734 kHz / 59.94 Hz Dimension (H x V x D) 67.4 mm x 61.5 mm x 134 mm when the apparatus has been damaged in any way, such as power-supply Electronic Sensitivity OFF/Auto Horizontal Resolution 620 TV Lines cord or plug is damaged, liquid has been spilled or objects have fallen into the apparatus, the apparatus has been exposed to rain or moisture, does S/N Ratio 52 dB not operate normally, or has been dropped.
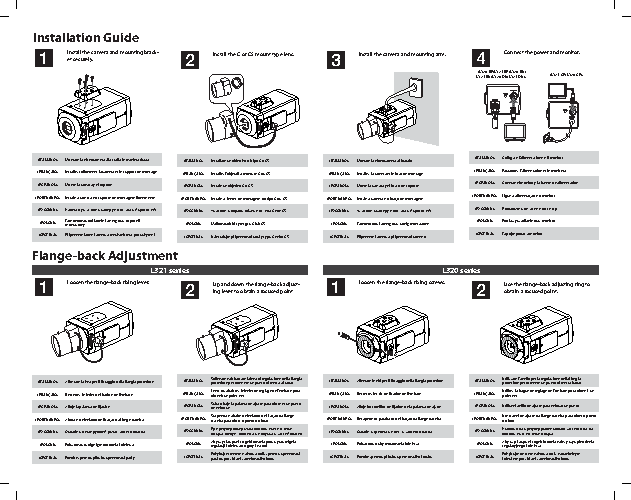
Installation Guide a Install the camera and mounting brack- b Install the C or CS mount type lens. c Install the camera and mounting arm. d Connect the power and monitor. et securely.Montare la videocamera alla staffa in maniera sicura. Installare un obiettivo di tipo C o CS. Montare la videocamera al braccio. Collegare l’alimentazione e il monitor. Raccordez l’alimentation et le moniteur. Installez solidement la camera et le support de montage. Installez l’objectif a monture C ou CS. Installez la camera et le bras de montage. Monte la camara y el soporte. Instale un objetivo C o CS. Monte la camara y el brazo de soporte. Conecte el monitor y la fuente de alimentacion. Instale a camera e o suporte de montagem firmemente. Instale as lentes de montagem do tipo C ou CS. Instale a camera e o braco de montagem. Ligue a alimentacao e o monitor. Подключить питание и монитор. Надежно установить камеру и монтажный кронштейн. Установить оправы объектива типа C или CS. Установить камеру и монтажный кронштейн. Zamontowac dokladnie kamere oraz wspornik Podlaczyc zasilanie oraz monitor. Mailowac obiektyw typu C lub CS. Zamontowac kamere oraz ramie montazowe. montazowy. Pripevnete radne kameru a mechanismus pro uchyceni. Nainstalujte pripevnovaci cocky typu C nebo CS. Pripevnete kameru a pripevnovaci rameno. Zapojte proud a monitor. Flange-back Adjustment L321 series L320 series a Loosen the flange-back fixing lever. b Up and down the flange-back adjust- a Loosen the flange-back fixing screws. b Use the flange-back adjusting ring to obtain a focused point. ing lever to obtain a focused point Sollevare e abbassare la leva di regolazione della flangia Utilizzare l’anello per la regolazione della flangia Allentare la leva per il fissaggio della flangia posteriore. posteriore per ottenere un punto di messa a fuoco. Allentare le viti per il fissaggio della flangia posteriore. posteriore per ottenere un punto di messa fuoco. Levez ou abaissez le levier de reglage de l’embase pour Utilisez la bague de reglage de l’embase pour obtenir un Desserrez le levier de fixation de l’embase. obtenir un point net. Desserrez les vis de fixation de l’embase. point net. Suba o baje la palanca de ajuste para obtener un punto Afloje la palanca de fijacion. de enfoque Afloje los tornillos de fijacion de la palanca de ajuste. Utilice el anillo de ajuste para enfocar un punto. Suspenda e abaixe o nivelador de fixacao da flange Use o anel de ajuste da flange traseira para obter o ponto Afrouxe o nivelador de fixacao da flange traseira. traseira para obter o ponto do foco. Desaperte os parafusos de fixacao da flange traseira. do foco Ослабить фиксирующий рычаг заднего фланца. При регулировке рычага для достижения точки Ослабить крепежные винты заднего фланца. Использовать регулирующее кольцо заднего фланца фокуса, следует поднимать и опускать задний фланец. для достижения точки фокуса. Aby uzyskac punkt ogniskowania poruszyc dzwignia Aby uzyskac punkt ogniskowania nalezy uzyc pierscienia Poluzowac dzwignie mocowania kolnierza. regulacji kolnierza do gory i na dol. Poluzowac sruby mocowania kolnierza. regulacyjnego kolnierza. Pohybujte smerem nahoru a dolu zpetnou upevnovaci Pohybujte smerem nahoru a dolu nastavitelnym Povolte zpetnou prirubu upevnovaci packy. packou pro ziskani zamerovaciho bodu. Povolte zpetnou prirubu upevnovaciho sroubu. koleckem pro ziskani zamerovaciho bodu.