На сайте 123387 инструкций общим размером 499.28 Гб , которые состоят из 6234324 страниц
Фото
Руководство пользователя NEC Integrated Protective Glass. Основные функции, характеристики и условия эксплуатации изложены на 2 страницах документа в pdf формате.
Доступно к просмотру 2 страницы. Рекомендуем вам скачать файл инструкции, поскольку онлайн просмотр документа может сильно отличаться от оригинала.
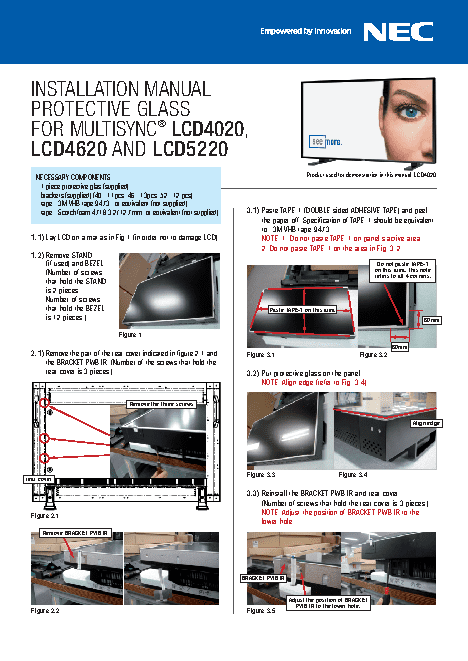
INSTALLATION MANUAL
PROTECTIVE GLASS
®
FOR MULTISYNC LCD4020,
LCD4620 AND LCD5220
NECESSARY COMPONENTS:                                                                             Product used for demonstration in this manual: LCD4020
- 1 piece protective glas (supplied)
- brackets (supplied) (40"-11pcs, 46"-13pcs, 52"-12 pcs)
- tape, "3M VHB tape 9473" or equivalent (not supplied)
- tape, "Scotchfoam 4718 3,2/12,7mm"or equivalent (not supplied)            3.1) Paste TAPE-1 (DOUBLE sided ADHESIVE TAPE) and peel
the paper off. Specification of TAPE-1 should be equivalent
to "3M VHB tape 9473".
1.1) Lay LCD on a mat as in Fig.1 (in order not to damage LCD).                    NOTE: 1. Do not paste TAPE-1 on panel's active area.
2. Do not paste TAPE-1 on the area in Fig. 3.2.
1.2) Remove STAND
(if used) and BEZEL                                                                                                    Do not paste TAPE-1
(Number of screws                                                                                                     on this area. This note
refers to all 4 corners.
that hold the STAND
is 2 pieces.
Number of screws
that hold the BEZEL                                                             Paste TAPE-1 on this area
is 12 pieces.)                                                                                                                          60mm
Figure 1
60mm
2.1) Remove the part of the rear cover indicated in figure 2.1 and            Figure 3.1                              Figure 3.2
the BRACKET PWB IR. (Number of the screws that hold the
rear cover is 3 pieces.)                                                3.2) Put protective glass on the panel.
NOTE: Align edge (refer to Fig. 3.4).
Remove the three screws
Align edge
Figure 3.3                       Figure 3.4
rear cover
3.3) Reinstall the BRACKET PWB IR and rear cover.
(Number of screws that hold the rear cover is 3 pieces.)
NOTE: Adjust the position of BRACKET PWB IR to the
Figure 2.1
lower hole.
Remove BRACKET PWB IR
BRACKET PWB IR
Adjust the position of BRACKET
PWB IR to the lower hole.
Figure 2.2                                                                    Figure 3.5
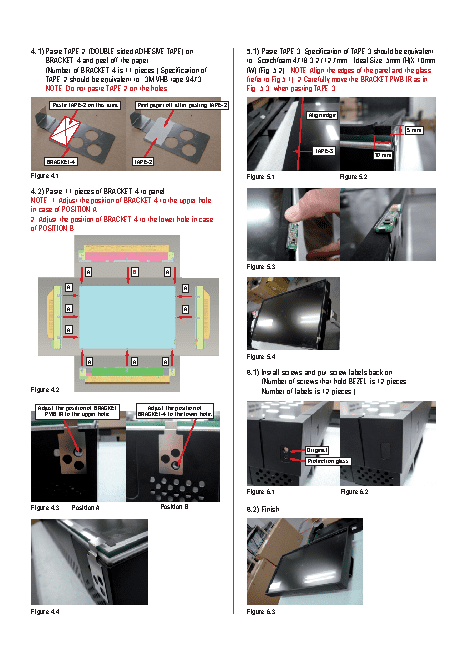
4.1) Paste TAPE-2 (DOUBLE sided ADHESIVE TAPE) on                             5.1) Paste TAPE-3. Specification of TAPE-3 should be equivalent
BRACKET-4 and peel off the paper.                                       to "Scotchfoam 4718 3,2 / 12,7mm". Ideal Size: 5mm (H)X 10mm
(Number of BRACKET-4 is 11 pieces.) Specification of                    (W) (Fig. 5.2) NOTE: Align the edges of the panel and the glass
TAPE-2 should be equivalent to "3M VHB tape 9473".                      (refer to Fig.5.1). 2.Carefully move the BRACKET PWB IR as in
NOTE: Do not paste TAPE-2 on the holes.                                 Fig. 5.3, when pasting TAPE-3.
Paste TAPE-2 on this area      Peel paper off after pasting TAPE-2
Align edge
5 mm
TAPE-3
10 mm
BRACKET-4                      TAPE-2
Figure 4.1                                                                    Figure 5.1                       Figure 5.2
4.2) Paste 11 pieces of BRACKET-4 to panel.
NOTE: 1. Adjust the position of BRACKET-4 to the upper hole
in case of POSITION A.
2. Adjust the position of BRACKET-4 to the lower hole in case
of POSITION B.
Figure 5.3
A                B           A
A                                         A
A                                         A
A
Figure 5.4
A               A          A
6.1) Install screws and put screw labels back on.
(Number of screws that hold BEZEL is 12 pieces.
Figure 4.2                                                                         Number of labels is 12 pieces.)
Adjust the position of BRACKET         Adjust the position of
PWB IR to the upper hole.         BRACKET-4 to the lower hole.
Original
Protection glass
Figure 6.1                        Figure 6.2
Figure 4.3     Position A                      Position B                     6.2) Finish
Figure 4.4                                                                    Figure 6.3