На сайте 123396 инструкций общим размером 499.32 Гб , которые состоят из 6234837 страниц
Фото
Руководство пользователя NEC Slot-In PC with Intel Core i3 2 x 2.4 GHz CPU OPS. Основные функции, характеристики и условия эксплуатации изложены на 2 страницах документа в pdf формате.
Доступно к просмотру 2 страницы. Рекомендуем вам скачать файл инструкции, поскольку онлайн просмотр документа может сильно отличаться от оригинала.
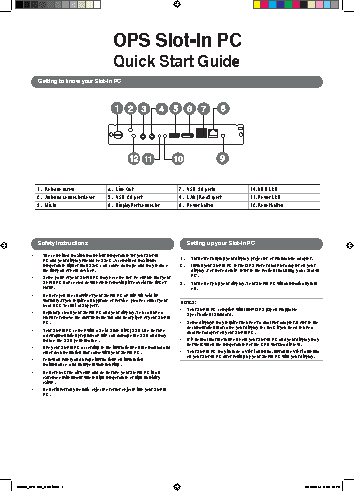
OPS Slot-In PC
Quick Start Guide
Getting to know your Slot-In PC
1.  Release screw         4.  Line Out              7.  USB 3.0 ports        10. HDD LED
2.  Antenna connector/cover  5.  USB 2.0 port       8.  LAN (RJ-45) port     11. Power LED
3.  Mic In                6.  DisplayPort connector  9.  Power button        12. Reset button
Safety Instructions                                  Setting up your Slot-In PC
•   The combined maximum ambient temperature for your Slot-In
PC and your display should be 35oC. A combined maximum   1.   Turn off or unplug your display, projector, or standalone adapter.
temperature higher than 35oC can cause damage and may reduce   2.   Install your Slot-In PC to the OPS slot or dual slot adapter on your
the lifespan of both devices.                         display. For more details, refer to the section Installing your Slot-In
•   Some parts of your Slot-In PC may become hot, so ensure that your   PC.
Slot-In PC has cooled down before removing it to avoid the risk of   3.   Turn on or plug your display. Your Slot-In PC will automatically turn
burns.                                                on.
•   Do not open the chassis of your Slot-In PC as this will void its
warranty. If you require an upgrade or service, please contact your
local NEC Technical Support.                      NOTES:
®
•  Your Slot-In PC complies with Intel  OPS (Open Pluggable
•   Regularly clean your Slot-In PC and your display. You can use a   Specification) Standard.
brush to remove the dust from the fan and heat pipes of your Slot-In
PC.                                               •  Some displays may require the use of a dual slot adapter. Refer to the
•   Your Slot-In PC comes with a Solid State Disk (SSD). Do not use   documentation that came your display to check if you need to use a
dual slot adapter on your Slot-In PC.
a defragmentation program as this can damage the SSD and may
reduce the SSD performance.                       •  It is normal that the fans on both your Slot-In PC and your display may
•   Use your Slot-In PC according to the instructions on the manual and   not work when the temperatures or the CPU workload is low.
other documentation that came with your Slot-In PC.  •  Your Slot-In PC may include a Wi-Fi antenna. Install the Wi-Fi antenna
•   Follow all safety and usage instructions on installation,   on your Slot-In PC after setting up your Slot-In PC with your display.
maintenance, and transport/warehousing.
•   Do not block the air vents and do not use your Slot-In PC in an
extreme environment where high temperature or high humidity
exists.
•   Do not insert any metallic objects or other objects into your Slot-In
PC.
E9999_NPS-002_QSG.indd   1                                                                             12/10/2014   5:59:19 PM
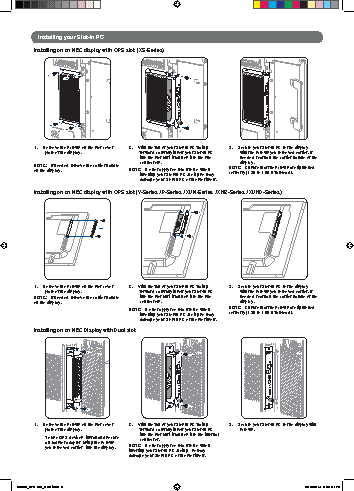
Installing your Slot-In PC
Installing on an NEC display with OPS slot  (XS-Series)
1.     Remove the screws on the slot cover   2.     With the fan of your Slot-In PC facing   3.     Secure your Slot-In PC to the display
plate of the display.             forward, carefully insert your Slot-In PC   with the screws you removed earlier. If
into the slot until it latches into the two   needed, reattach the carrier handle of the
connectors.                         display.
NOTE:   If needed, remove the carrier handle                          NOTE:   Ensure that the screws are tightened
on the display.                   NOTE:   Do not apply too much force when
inserting your Slot-In PC. Doing so may   correctly (1.39 to 1.89 N full-load).
damage your Slot-In PC or the slot itself.
Installing on an NEC display with OPS slot (V-Series / P-Series / XUN-Series / XHB-Series / XUHD-Series)
1.     Remove the screws on the slot cover   2.     With the fan of your Slot-In PC facing   3.     Secure your Slot-In PC to the display
plate of the display.             forward, carefully insert your Slot-In PC   with the screws you removed earlier. If
NOTE:   If needed, remove the carrier handle   into the slot until it latches into the two   needed, reattach the carrier handle of the
on the display.                       connectors.                         display.
NOTE:   Do not apply too much force when   NOTE:   Ensure that the screws are tightened
inserting your Slot-In PC. Doing so may   correctly (1.39 to 1.89 N full-load).
damage your Slot-In PC or the slot itself.
Installing on an NEC Display with Dual slot
1.     Remove the screws on the slot cover   2.     With the fan of your Slot-In PC facing   3.     Secure your Slot-In PC to the display with
plate of the display.             forward, carefully insert your Slot-In PC   screws.
To use OPS devices, install and secure   into the slot until it latches into the internal
a Dual slot adapter, using the screws   connector.
you removed earlier,  into the display.  NOTE:   Do not apply too much force when
inserting your Slot-In PC. Doing   so may
damage your Slot-In PC or the slot itself.
E9999_NPS-002_QSG.indd   2                                                                             12/10/2014   5:59:21 PM