На сайте 123390 инструкций общим размером 499.31 Гб , которые состоят из 6234587 страниц
Фото

Руководство пользователя NEC Slot-In PC with Intel Core i3 2 x 2.4 GHz CPU OPS (configurable). Основные функции, характеристики и условия эксплуатации изложены на 2 страницах документа в pdf формате.
Доступно к просмотру 2 страницы. Рекомендуем вам скачать файл инструкции, поскольку онлайн просмотр документа может сильно отличаться от оригинала.
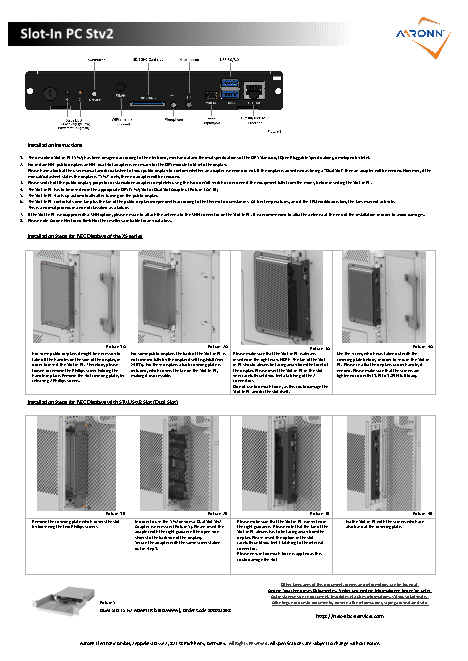
Installation Instructions
1.  The described Slot-in PC (STv2) has been designed according to the electronic, mechanical and thermal specifications of the OPS Standard, (Open Pluggable Specification), developed by Intel.
2.  For certain NEC public displays an NEC dual slot adapter is necessary for the OPS module to fit into the display.
Please have a look at the user manual and/or datasheet of your public display to confirm whether an adapter is needed or not. If the display is advertised as being a “Dual Slot” then an adapter will be needed. However, if the
manual/datasheet states the display is “STv2” only, then no adapter will be required.
3.  Please switch off the public display, projector or standalone adapter completely using the hard on/off switch or disconnect the equipment fully from the mains, before inserting the Slot-in PC.
4.  The Slot-in PC has to be inserted in the appropriate OPS (STv2) Slot or Dual Slot Adapter. (Picture 3A / 3B)
5.  The Slot-In PC starts up automatically after turning on the public display.
6.  The Slot-In PC controls its own fan plus the fan of the public display independently according to the thermal circumstances.  At low temperatures, and if the CPU workload is low, the fans may not activate.
This is a normal procedure and not classified as a failure.
7.  If the Slot-In PC is equipped with a WIFI option, please ensure to attach the antenna to the WIFI connector on the Slot-In PC. It is recommended to affix the antenna at the end of the installation in order to avoid damages.
8.  Please note Aaronn Electronic GmbH or the resellers are liable for any data loss.
Installation Steps for NEC Displays of the XS series
Picture 1A                           Picture  2A                          Picture  3A                          Picture  4A
For some public displays it might be necessary to   For some public displays the back of the Slot-in PC is   Please make sure that the Slot-in PC is always   Use the screw, which was taken out with the
take off the handles on the side of the display, in   not covered fully by the display itself (e.g.MultiSync   inserted in the right way. NOTE: The fan of the Slot-  covering plate before, in order to secure the Slot-in
order to insert the Slot-in PC. Therefore, please   X401S). For these displays a back covering plate is   in PC should always be facing away from the front of   PC. Please re-affix the displays carrier handle, if
loosen or remove the Phillips screw holding the   included, which covers the fan on the Slot-In PC,   the display. Please insert the Slot-in PC in the slot   needed. Please make sure that the screws are
handle in place. Remove the slot covering plate, by   making it inaccessible.    very carefully until you feel a latching of the 2   tightened correctly (1.39 to 1.89 N full-load).
releasing 2 Phillips screws.                                            connectors.
Do not use too much force, as this could damage the
Slot-In PC and/or the slot itself.
Installation Steps for NEC Displays with STv1/Stv2 Slot (Dual Slot)
Picture  1B                          Picture  2B                          Picture  3B                          Picture  4B
Remove the covering plate which covers the slot   In order to use the STv2 devices a Dual Slot Stv2   Please make sure that the Slot-in PC is inserted in   Fix the Slot-in PC with the screws which are
by loosening the two Phillips screws.   Adapter is necessary (Picture 5). Please insert the   the right guidance.  Please note that the fan of the   also fixed at the covering plate.
adapter with the right guidance (the open side   Slot-in PC always has to be facing away from the
shows to the backside of the display).   display. Please insert the option in the slot
Secure the adapter with the same screws taken   carefully until you feel it latching to the internal
out in step 1.                      connector.
Please ensure too much force is applied as this
could damage the slot
Other languages of this document, drivers and information, can be found at:
Andere Sprachen dieses Dokumentes, Treiber und weitere Informationen finden Sie unter:
Autres langues de ce document, les pilotes et autres informations, s'il vous plait visitez:
Picture 5                                                     Altre lingue di questo documento, driver e altre informazioni, si prega di visitare il sito:
DUAL SLOT STv2 ADAPTER (SB-02AMW), Order Code 100012868
http://nec-sbc-service.com
Aaronn Electronic GmbH, Zeppelinstrasse 2, 82178 Puchheim, Germany.  All Rights Reserved. All specifications are subject to change without notice.
Safety Instructions
1.  Please note that the maximum ambient temperature for the combination of Slot-In PC and display is 35° C. Higher temperatures than this can cause damage to the display and the Slot-In PC respectively,
reducing the overall life time. The operating altitude must lie between 0 m (0 ft.) and 3000 m (9842 ft.) above sea level.
2.  If you want to remove the Slot-In PC out of the option slot please make sure that the Slot-In PC is cooled down before touching it. Some parts of the Slot-In PC can become more than 100 ° C.
There is a danger of burning, so please take care when removing the Slot-In PC.
3.  It is not permitted to open the chassis of the Slot-In PC, either for maintenance purposes nor to upgrade or exchange the memory. The warranty expires immediately by opening the Slot-In PC.
Please contact your local NEC representative, if you require an upgrade and/or a service.
4.  Remove the dust from the Slot-In PC (and if necessary from the display also) on a regular bases (e.g. every 3 months).The frequency of cleaning heavily depends on the hours of operation, the ambient
temperature and the heaviness of the dust. For the cleaning. a brush can be used in order to remove dust from the fan and the heat pipes. Do not open the chassis of the Slot-In PC!
5.  This Slot-In PC is equipped with a Solid State Disk (SSD) mass storage. Do not use a defragmentation program. These programs are intended for conventional hard disks and can damage the SSDs or reduce
their performance.
6.  The device has to be used in accordance with the manual/datasheet.
7.  All instructions concerning installation, maintenance, and transport or warehousing, which are necessary for the safety and the use of the device, need to be followed.
8.  In order to guarantee an appropriate air flow for the cooling of the device please make sure that the air vents are not covered. Furthermore make sure that the system is not installed in areas where an
appropriate air flow is not guaranteed. Make sure that the distance between air vents of the system and environment is at least 10 cm. Do not install the system close to a heat source or in a location prone
to moist.
9.  Only connect devices or parts to the interface given which are defined according to the requirement IEC/EN 60950-1
10. Do not insert any metal object or other contaminant into the device!
Troubleshooting
1.  The Slot-In PC does not start up
a.  Does the Slot-In PC fit properly in the Option Slot? Are the screws tightened properly?
b.  The BIOS settings in the Slot-In PC may have been changed in that way that the SLOT-IN PC only starts up if the on/off switch is pressed.
Press the on/off switch or reset the original BIOS settings.
2.  The Slot-in PC starts up but there is no picture on the display
a.   Did you choose “option” as input on the display?
b.  If you have connected an external display, the internal display could be deactivated.
Please connect an external display again and configure the monitor controls under display, in the control panel.– the internal display has to be primary.
c.   If you changed the BIOS settings the consequences described in 2b could occur. Therefore please reset the BIOS settings.
3.  The picture is out of focus.
a.   Is the resolution set correctly?
The native resolution of your display/projector is described in the datasheet or manual of your device. This resolution should also be chosen in the operating system of the Slot-In PC.
b.  The display might have been set to another size. Push the button “size” or “aspect” of your remote control until you see a green “standard” on the screen.
4.  After installation / de-installation of software the system is slow / unstable.
a.   The operation system is limited by the software and/or parts of the software concerning functionality and performance. Please install the operating system again.
The image of the operating system can be downloaded here: http://www.nec-sbc-service.com
Remark 1: All stored data will be lost
Remark 2: The installation / reboot process can take 15 minutes.
Remark 3: Please make sure that you only download the image of the operating system you own a license for.
5.  A device connected by USB does not work properly
a.   Make sure that all drivers have been installed successfully for your USB device.
b.  Please contact the manufacturer of the USB device
c.   Please download the operating system again  (please see 4b)
Remark 1: All stored data will be lost
Remark 2: The installation / reboot process can take 15 minutes.
d.  Please ensure there is nothing else connected to the USB sockets, which could be drawing additional power (for example a touch panel), thus rendering your USB device undetectable
6.  After a short operation time the performance of the system decreases significantly, a blue screen is seen or the system switches off.
a.   This issue could occur due to overheating of the system. Therefore please make sure that there is appropriate cooling around the system. If the display with Slot-In PC is too close to the wall this can
cause insufficient space for appropriate ventilation. Dust build up can also cause the system to overheat. Thus please ensure there is sufficient ventilation around the unit, and dust build up has been
removed.
7.  By using the mini display port no picture is shown / the picture is defective
a.   Make sure that the mini display port cable is connected correctly to the mini display port interface on the Slot-In PC. Ensure the cable is connected fully.
b.  Please check whether there is any dirt on the cable or on the display port interface of the Slot-in PC. Dirt can be removed with contact cleaner and a small brush.
8.  By using the mini display port the native resolution of the display is not recognized.
a.   Please try and reboot the Slot-In PC, to ensure successful EDID handshaking. Once rebooted, please go into the graphics properties, to check if the native resolution of the connected monitor can be
selected.
b.  There could be a restriction of the graphic drivers for your configuration. Please contact your NEC support.
Available Accessory:
Picture 6
STv2 Standalone Adapter ( NEC Order Code 100013143 )
Other languages of this document, drivers and information, can be found at:
Andere Sprachen dieses Dokumentes, Treiber und weitere Informationen finden Sie unter:
Autres langues de ce document, les pilotes et autres informations, s'il vous plait visitez:
Altre lingue di questo documento, driver e altre informazioni, si prega di visitare il sito:
http://nec-sbc-service.com
Aaronn Electronic GmbH, Zeppelinstrasse 2, 82178 Puchheim, Germany.  All Rights Reserved. All specifications are subject to change without notice.