На сайте 123381 инструкция общим размером 499.28 Гб , которые состоят из 6234181 страницы
Фото

Руководство пользователя SONY M-950. Основные функции, характеристики и условия эксплуатации изложены на 4 страницах документа в pdf формате.
Доступно к просмотру 4 страницы. Рекомендуем вам скачать файл инструкции, поскольку онлайн просмотр документа может сильно отличаться от оригинала.
English
3-858-734-33 (1)
B                                                 Welcome!                                          z Operating the Unit
HOLD                    Thank you for purchasing the Sony Microcassette-Corder.
Microcassette -                                                                                     Some features are:                                Recording (see Fig. D-a)
TM
• Super-mini size Microcassette-Corder with automatic  You can record right away with the built-in microphone, with
Corder                                                                                              • Supplied detachable speaker.                    or without the speaker unit.
reverse function and feather-touch buttons.
Make sure that nothing is connected to the EAR/MIC jack.
• LCD (Liquid Crystal Display) that shows tape counter,
remaining battery power and tape transport direction.  1  Slide OPEN on the cassette compartment in the direction
•Zero stop counter that stops the tape automatically at 000 in  of the arrow and open the lid.
Operating Instructions                                                                               rewind and review mode.                          2  Take out any slack in the tape and insert the cassette with
• VOR (Voice Operated Recording) system that starts and
Mode d'emploi                                                                                        stops recording automatically in response to the sound, to  the side to start recording facing the lid.
save tapes and batteries.                        3  Close the cassette compartment lid until it clicks.
Иino?oeoeя ii yenieoaoaoee                        C                                                                                                   4  Make sure that VOR L or VOR H is not displayed in the
display window. For normal recording, if VOR L or VOR
H is displayed, make it disappear. Refer to “VOR (Voice
z Getting Started
a                                                                                                5  Operated Recording)”.
Slide the RECORD PROTECT cover so that r REC and
P PAUSE buttons appear.
1                      2                    Preparing a Power Source                          6  Press r REC.
Recording starts.
Choose one of the following power sources.
While recording, the REC indicator lights and  REC
Dry Batteries                                       appears in the display window.
Make sure that nothing is connected to the DC IN 1.5V jack.  Note
Make sure the tab on the upper (forward) side is not removed;
M-950                                                                                               For the main unit (see Fig. A-a)                  otherwise, recording cannot be made.
1
Slide OPEN on the battery compartment in the direction
of the  arrow to open the battery compartment lid.  If you start recording from  the upper side (9 FWD appears
Sony Corporation ©1997 Printed in Japan                                                             2  Insert one R03 (size AAA) battery (not supplied) with  in the display window), recording automatically goes on to
b                                                correct polarity.                               the reverse side (REV ( appears in the display window) and
Note                                            the unit turns off automatically when the tape comes to the
end of the reverse side.  If the tab is removed, however, you
Make sure that the battery is inserted with correct polarity.
You may not be able to distinguish between ‘ and ’ with  cannot record on that side.
some batteries.
3  Close the lid until it clicks.                 To               Press or slide
A                                                                                                                                                     Stop recording   p STOP
For the speaker unit (see Fig. A-b)               Pause recording  P PAUSE
1  Push and slide OPEN on the speaker unit in the direction        To release pause recording, press
a                                                                                                  of the arrow as illustrated to open the battery                  r REC.
compartment lid.
D                                                 2  Insert two R03 (size AAA) batteries (not supplied) with         cassette compartment lid in the
1                        2                                                                                                                          Take out a cassette  Press p STOP and slide OPEN on the
correct polarity.
3  Close the lid until it clicks.                                  direction of the arrow.
a                                                                                                Notes
To take out the batteries (see Fig. A-c)          • Before taking out the cassette, make sure that the sound of the
p STOP                        Display window                                                         unit operating has stopped.
Fenetre d’affichage  To attach the battery compartment lid if it is   • When earphones or an external microphone is connected to the
Иiaeeaoi?           accidentally detached (see Fig. A-d)               EAR/MIC jack, the built-in microphone does not work.
Insert a wire, push the OPEN button-side and then push the
opposite side of the OPEN button.                 To prevent a tape from being accidentally
recorded over (see Fig. D-b)
VOR
b                                                                                                Battery life (Approximate hours)                  Break out and remove the cassette tabs. To reuse the cassette
for recording, cover the tab hole with adhesive tape.
1                     2                         OPEN                                              Battery     Recording Recording  Playback
(when speaker (when speaker
without
speaker  speaker unit  unit is
EAR/                  unit     is installed*)  installed*)
RECORD                                  MIC                                                         Playing a Tape (see Fig. E)
PROTECT                                           Sony alkaline  5.5   22          24
REC indicator    LR03 (SG)                                         1  Slide OPEN on the cassette compartment in the direction
r REC                            Indicateur REC   Sony R03 (SB)  1.5   10          11.5               of the arrow and open the lid.
Иiaeeaoi?                                                          2  Take out any slack in the tape and insert the cassette with
P PAUSE                                                                                               the side to start playing facing the lid.
REC              * When one battery is installed in the main unit and two batteries
are installed in the speaker unit                3  Close the cassette compartment lid until it clicks.
We recommend to use long-life alkaline batteries.  4  Press 9( PLAY/DIR.
Adjust the volume using VOLUME.
b                                                                                                5 If the playback starts from the upper side (9 FWD appears
c                                                                                                Notes                                             in the display window), playback goes on to the reverse side
• Do not charge a dry battery.
• Do not use a new battery with an old one.       (REV ( appears in the display window) and the unit turns
• Do not use different types of batteries.        off automatically.
• When you do not use the unit for a long time, remove the
batteries to avoid any damage caused by battery leakage and  To      Press or slide
subsequent corrosion.
• Dry batteries will not be expended when another power source  Stop playback  p STOP
is connected.                                    Pause playback      P PAUSE
To release pause playback, press
When to replace the batteries (see Fig. A-e)                          9( PLAY/DIR*.
The battery indicator in the display window shows the
remaining battery power.                          Fast forward**      FF/CUE during stop
E                                                 When the battery is used up, i appears in the display  Rewind**       REW/REVIEW during stop
window. Replace all the batteries (one battery in the main unit
if the speaker is not installed) with new ones.   Fast forward while listening FF/CUE during Playback
The i lamp changes as illustrated:                to the sound (CUE)
d
p STOP
9( PLAY/DIR
Notes                                             Rewind while listening to  REW/REVIEW during playback
• When you have changed the batteries to new ones, the battery  the sound (REVIEW)
FF/CUE                        Display window       indicator appears in the display window after running the tape  Play the other side  9( PLAY/DIR
Fenetre d’affichage  once.                                            during playback
REW/REVIEW                    Иiaeeaoi?           • If you insert exhausted batteries (especially manganese
batteries), i may not appear even though the other indicators  Play the other side  p STOP for more than 2 seconds
/                 /                                                                      appear properly. If the unit does not operate properly, replace  during stop
the batteries with new ones.
• While the tape runs rapidly (fast forward or rewind), i may  Take out a cassette  Press p STOP and slide OPEN
appear. Replace the batteries only when the tape does not run        in the direction of the arrow.
OPEN                                               properly.
e                                                                                                • During playback, the battery indicator may temporarily flicker  * The P PAUSE button is released automatically when the
p STOP button is pressed (stop-pause-release function).
when you turn up the volume.
• The tape will run for a while after i appears; however, a  big  ** The tape stops at the end of the tape and the power is turned off
light
When batteries               s’allume             P PAUSE                              VOLUME        noise may be heard from the speaker or recording may not be  automatically (automatic shut-off mechanism).
are new                      naao                                                                    made. When i appears, replace all the batteries at once.
Lorsque les piles sont                                                                              • At the beginning or end of the tape i may momentarily  Note
neuves                       go off one segment                                                      appear. If the indicator disappears, you do not need to replace  Before taking out the cassette, make sure that the sound of the unit
Кiaaa aaoa?aeee              un segment s’eteint                                                     the batteries.                                   operating has stopped.
iiaua                        en?acaao iaia
ieanoeia                                                               House Current (see Fig. A-f)
When batteries                                                                                      1  Connect the AC-E15HG AC power adaptor (not supplied)
become weak                  go off another                                                           to DC IN 1.5V of the speaker.
Lorsque les piles            segment                                                                2  Connect the other end of the AC power adaptor to a wall
faiblissent                  un autre segment                                                         outlet.
Кiaaa aaoa?aeee              s’eteint
noaiiaяonя neaai             en?acaao a?oaaя                                                        Note
ca?я?aiiuie                  ieanoeia                                                               Use the AC-E15HG AC power adaptor.
Do not use any other AC power adaptor.  Polarity of the plug
light
Replace batteries
Remplacez les piles          s’allume
Зaiaia aaoa?aae              naao
Releasing HOLD (see Fig. B)
f                                                                                                Unlock the unit before operating by sliding HOLD in the
opposite direction of the arrow.
Installing the Speaker Unit
(see Fig. C-a)
DC IN 1.5V
1  Attach the speaker unit to the main unit.
2  Slide the speaker unit as illustrated until it clicks.
AC-E15HG AC power adaptor
(not supplied)                                                                                 To remove the speaker unit (see Fig. C-b)
Adaptateur secteur AC-E15HG
(non fourni)                                                                                   1  Keep holding both the main unit and the speaker unit
Пa?aoiaiee ia?aiaiiiai oiea                                                                      with your both hands, release the speaker lock.
AC-E15HG (ia iinoaaeяaonя)                                                                     2  With the speaker locked released, remove the speaker unit
straight out from the main unit.
Notes
• When removing the speaker unit, make sure you are holding
both the speaker unit and the main unit firmly; otherwise,
the speaker unit may drop out.
• Before removing the speaker unit, make sure the tape has
stopped completely; otherwise, noise may be heard or a tape
may stop running.
Continued to the back c
Francais Рonneee Pour enlever le haut-parleur (voir Fig. C-b) Кae niяou aeiaiee (ni. ?en. C-b) Felicitations ! 1 Maintenez l’appareil principal et le haut-parleur des deux Пica?aaeяai n iieoieie! 1 П?iaie?aя aa??aou iniiaiie aeie e aeiaiee a mains et deverrouillez la fixation du haut-parleur. ?oeao, ioionoeoa caoai? aeiaieea. Nous vous remercions d’avoir fait l’acquisition d’un 2 La fixation du haut-parleur etant deverrouillee, degagez Вeaaiaa?ei aan ca iieoieo iee?ieannaoiiai aeeoioiia 2 Оoionoea caoai?, nieieoa aeiaiee n iniiaiiai magnetophone a microcassettes stereo Sony. Voici quelques- le haut-parleur de l’appareil principal d’un mouvement eiiiaiee Sony. Аiia?ao eiaao neaao?uea aeiea. unes des caracteristiques fonctionnelles de cet l’appareil : rectiligne. oa?aeoa?enoeee: • Enregistreur super-mini a microcassettes dote d’une • Мeieao??iue eannaoiue aeeoioii n aaoiiaoe?aneie П?eia?aieя fonction d’inversion automatique et de touches a Remarques ia?aiioeie e eaaei ia?eiaaiuie eiiieaie. • П?e niяoee aeiaieea, oaaaeoanu a oii, ?oi au e?aiei effleurement. • Lorsque vous retirez le haut-parleur, maintenez fermement le • Сuaiiue aeiaiee. aa??eoa e aeiaiee e iniiaiie aeie; a i?ioeaiii • Haut-parleur amovible fourni. haut-parleur et l’appareil principal; sinon, vous risquez de • ЖКИ (?eaeie?enoaeee?aneee eiaeeaoi?) neo?aa aeiaiee ii?ao oianou. • Ecran LCD (affichage a cristaux liquides) indiquant le laisser tomber le haut-parleur. aini?iecaiaeo n?ao?ee, o?iaaiu ca?яaa aaoa?ae e • Пa?aa oai, eae niяou aeiaiee, oaaaeoanu a oii, ?oi compteur de bande, la charge residuelle de la pile et le sens • Avant de retirer le haut-parleur, assurez-vous que la bande iai?aaeaiea aae?aieя eannaou. eannaoa iieiinou? inoaiiaeaia; a i?ioeaiii neo?aa aoaao de defilement de la bande magnetique. magnetique est a l’arret complet; sinon, il se peut que vous • С?ao?ee aaoiiaoe?anee inoaiaaeeaaao eannaoo ia neuoai ooi, eee inoaiiaeonя ieaiea. • Compteur a arret sur zero qui arrete automatiquement la entendiez des parasites ou que la bande magnetique s’arrete. onoaiiaea 000 ai a?aiя ia?aiioee e i?inooeaaieя. bande magnetique sur 000 dans les modes de rembobinage • VOR (Сenoaia ?a?aaie caiene), eioi?aя aaoiiaoe?anee et de controle d’enregistrement. ia?eiaao e inoaiaaeeaaao caienu, ?aaae?oя ia caoe, n z Иino?oeoeя e iieuciaaie? • Le systeme VOR (enregistrement commande par frequence ” Utilisation oaeu? yeiiiiee eannao e aaoa?aae. vocale) demarre et arrete automatiquement l’enregistrement aiia?aoii en fonction des impulsions sonores de facon a economiser les bandes et la pile. z Пiaaioiaea e yenieoaoaoee Enregistrement (voir Fig. D- Зaienu (ni. ?en. D-a) ” Preparation a) Пiaaioiaea enoi?ieea ieoaieя Вu ii?aoa n?aco ?a ia?aou caienu ?a?ac ano?iaiiue Vous pouvez enregistrer directement a l’aide du microphone iee?ioii i?e iaee?ee aeiaieea eee aac iaai. Selection de la source integre, que le haut-parleur soit raccorde ou non. Вuaa?eoa ec neaao?ueo enoi?ieeia ieoaieя: Уaaaeoanu, ?oi ie?aai ia iianiaaeiaii e aiacao EAR/ MIC. Assurez-vous que rien n’est branche sur la prise EAR/MIC. d’alimentation Сooea aaoa?aeee 1 Faites coulisser OPEN sur le compartiment a cassette dans 1 Пa?aaaeiuoa eiiieo OPEN ia eannaoiii ionaea a Choisissez l’une des sources d’alimentation presentees ci- le sens de la fleche et ouvrez le couvercle. Уaaaeoanu a oii, ?oi e aiacao iinoiяiiiai oiea iai?aaeaiee no?aeee e ioe?ieoa e?uoeo. dessous. 2 Tendez la bande magnetique et introduisez la cassette iiuiinou? DC IN 1.5V ie?aai ia iiaee??aii. 2 Нaoяieoa ieaieo e anoaauoa eannaoo io?iie noi?iiie avec la face a enregistrer en premier lieu orientee vers le e e?uoea, ?oiau ia?aou caienu. Piles seches couvercle. Оniiaiie aeie (ni. ?en. A-a) 3 Зae?ieoa e?uoeo eannaoiiai ionaea ai uae?ea. 3 Refermez le couvercle du compartiment a cassette jusqu’a 1 Чoiau ioe?uou e?uoeo ionaea aeя aaoa?aeee, 4 Уaaaeoanu a oii, ?oi ia eiaeeaoi?a ia iiяaeeenu Assurez-vous que rien n’est raccorde a la prise DC IN 1.5 V. ce qu’il s’encliquette. ia?aaaeiuoa eiiieo OPEN a iai?aaeaiee no?aeee. iaicia?aieя VOR L eee VOR H. Еnee VOR L eee VOR Pour l’appareil principal (voir Fig. A-a) 4 Assurez-vous que VOR L ou VOR H n’apparait pas dans 2 Уnoaiiaeoa iaio aaoa?aeeo R03 (aaee?eiie ААА) H iiяaeeenu ia eiaeeaoi?a i?e iau?iie caiene, 1 Faites coulisser OPEN sur le compartiment a piles dans le la fenetre d’affichage. Pour un enregistrement normal, niioaaonoao?uae iieя?iinou? (aaoa?aeea ia iinoa?aeoanu ecaaaeounя io yoeo iaicia?aiee. Сi. aee??aia). sens de la fleche pour ouvrir le couvercle du desactivez l’indication VOR L ou VOR H si elle est П?eia?aiea ?acaae “VOR (Сenoaia ?a?aaie caiene).” compartiment a piles. affichee. Voir “VOR (enregistrement commande par Уaaaeoanu, ?oi aaoa?aeea anoaaeaia i?aaeeuii. У 5 Вuaaeiuoa e?uoeo RECORD PROTECT 2 Introduisez une pile R03 (AAA) (non fournie) en en frequence vocale)”. iaeioi?uo aaoa?aae o?oaii ii?aaaeeou iieя?iinou‘ e ’. (caueoa caiene) , ?oiau iiяaeeenu eiiiee r REC e respectant la polarite. 5 Faites coulisser le couvercle RECORD PROTECT de facon 3 Зae?ieoa e?uoeo ai uae?ea. P PAUSE. Remarque a ce que les touches r REC et P PAUSE apparaissent. 6 Нa?ieoa r REC. Assurez-vous que la pile est installee conformement a sa 6 Appuyez sur r REC. Зaienu ia?eiaaonя. polarite. Il se peut que vous ne puissiez distinguer les poles ‘ L’enregistrement demarre. Дeiaiee (ni. ?en. A-b) Вi a?aiя caiene ia eiaeeaoi?a caai?eonя eiaeeaoi? et ’ sur certaines piles. Pendant l’enregistrement, l’indicateur REC s’allume et 1 Чoiau ioe?uou ionae aeя aaoa?aeee ia aeiaieea, REC e iiяaeonя iaaienu REC . 3 Refermez le couvercle jusqu’a ce qu’il s’encliquette. aaeaaeoa eiiieo ОPEN a iai?aaeaiee no?aeee, eae REC apparait dans la fenetre d’affichage. iieacaii ia ?enoiea. П?eia?aieя Remarque Уaaaeoanu a oii, ?oi ieanoeiea ia oaaeaia n ia?aie noi?iiu Pour le haut-parleur (voir Fig. A-b) Verifiez si l’onglet de la face superieure (avant) n’est pas brise; 2 Уnoaiiaeoa aaa aaoa?aeee R03 (aaee?eiie ААА) eannaou (iai?aaeaiea aia?aa); a i?ioeaiii neo?aa caienu ia 1 Pressez et faites coulisser OPEN sur le haut-parleur dans sinon, l’enregistrement ne peut etre realise. niioaaonoao?uae iieя?iinou? (aaoa?aeee ia ii?ao auou i?iecaaaaia. le sens de la fleche comme illustre de facon a ouvrir le aee??aiu). couvercle du compartiment a pile. Si vous commencez l’enregistrement par la face superieure 3 Зae?ieoa e?uoeo ai uae?ea. Еnee au ia?iaoa caienuaaou n ia?aie noi?iiu (ia 2 Introduisez deux piles R03 (AAA) (non fournies) en en (9 FWD apparait dans la fenetre d’affichage), eiaeeaoi?a iiяaeonя 9 FWD), oi caienu aaoiiaoe?anee respectant la polarite. l’enregistrement se poursuit automatiquement sur la face Кae auoaueou aaoa?aeee (ni. ?en. A-c) ia?aoiaeo ia a?oao? noi?iio (ia eiaeeaoi?a iiяaeonя 3 Refermez le couvercle jusqu’a ce qu’il s’encliquette. arriere (REV ( apparait dans la fenetre d’affichage) et REV (), e aiia?ao aaoiiaoe?anee ioee??aaonя, eiaaa l’appareil se met automatiquement hors tension lorsque la Кae anoaaeou e?uoeo aaoa?aeiiai ionaea, anee ieaiea aioiaeo ai eiioa aoi?ie noi?iiu. Оaiaei, anee Pour retirer les piles (voir Fig. A-c) cassette arrive a la fin de la face arriere. Vous ne pouvez iia neo?aeii ioniaaeieeanu (ni. ?en. A-d) ieanoeiea niяoa, au ia nii?aoa i?iecaiaeou caienu ia cependant pas enregistrer sur cette face si l’onglet en a ete Пianiaaeieoa i?iaia, ia?ieoa iaio noi?iio ?aaoeяoi?a yoie noi?iia. Pour reinstaller le couvercle du compartiment brise. OPEN, a caoai aai i?ioeaiiiei?io? noi?iio. Дeя oiai, ?oiau Нa?ieoa eee ia?aaaeiuoa a piles s’il s’enleve accidentellement (voir Fig. Pour Pressez ou faites coulisser A-d) С?ie aiaiinoe (i?eia?iia eiee?anoai ?ania) Оnoaiiaeou caienu p STOP Introduisez un fil, appuyez sur le cote OPEN de la touche et Arreter l’enregistrement p STOP В?aiaiii P PAUSE poussez ensuite sur le cote oppose de la touche OPEN. Бaoa?aeea Зaienu Зaienu Вini?iecaaaaiea i?einoaiiaeou Чoiau aiciaiiaeou a?aiaiio? Activer une pause P PAUSE aac (i?e caoeicaiene d’enregistrement Pour desactiver une pause aeiaieea onoaiiaeaiiii (i?e onoaiiaeaiiii caienu inoaiiaeo caiene, ia?ieoa r REC. Autonomie des piles (approximative, en heures) d’enregistrement, appuyez sur aeiaieea*) aeiaieea*) Уaaeeou eannaoo Нa?ieoa p STOP e ia?aaaeiuoa r REC. Piles Enregistrement Enregistrement Lecture Щaei?iaя 5,5 22 24 eiiieo OPEN ia e?uoea sans le haut- (le haut-parleur (le haut- Retirer une cassette Appuyez sur p STOP et faites aaoa?aeea eannaoiiai ionaea a iai?aaeaiee parleur etant installe*) parleur coulisser OPEN sur le couvercle Sony LR03 (SG) no?aeee. etant du compartiment a cassette dans installe*) le sens de la fleche. Sony R03 (SB) 1,5 10 11,5 П?eia?aieя • Пa?aa oai, eae auoaueou eannaoo, oaaaeoanu a oii, ?oi Sony alcaline 5,5 22 24 * Кiaaa iaia aaoa?aeea anoaaeaia a iniiaiie aeie e aaa caoe ?aaioa?uaai aiia?aoa ionoonoaoao. LR03 (SG) Remarques aaoa?aeee anoaaeaiu a aeiaiee. • Кiaaa e aiacao EAR/MIC iiaee??aiu iaooieee eee • Avant de retirer la cassette, assurez-vous que le son de Мu ?aeiiaiaoai eniieuciaaou uaei?iua aaoa?aeee n aiaoiee iee?ioii, oi ano?iaiiue iee?ioii ia ?aaioaao. Sony R03 (SB) 1,5 10 11,5 l’appareil en cours de fonctionnement a cesse. aeeoaeuiui n?ieii aiaiinoe. • Si un casque d’ecoute ou un microphone externe est branche sur * Avec une pile installee dans l’appareil principal et deux piles la prise EAR/MIC, le microphone integre est inoperant. Кae ecaa?aou neo?aeiia iaei?aiea caiene ia dans le haut-parleur П?eia?aieя o?a eia?uo?nя caienu (ni. ?en. D-b) Nous preconisons l’emploi de piles alcalines longue duree. Pour eviter l’enregistrement accidentel d’une • Нa ca?я?aeoa nooo? aaoa?aeeo. Уaaeeoa ieanoeiee ia eannaoa. Чoiau aoi?e?ii • Нa eniieucoeoa iiao? aaoa?aeeo aianoa ni noa?ie cassette (voir Fig. D-b) aaoa?aeeie. eniieuciaaou eannaoo aeя caiene, cae?ieoa Remarques Brisez et retirez les onglets de la cassette. Pour pouvoir ia?aciaaaoaanя ioaa?noea eeaeeie eaioie. • Ne chargez pas une pile seche. • Пieucoeoanu aaoa?aeeaie iaiiai oeia. • N’utilisez pas une pile neuve et une pile usagee en meme temps. reutiliser la cassette en vue d’un enregistrement, recouvrez de • Еnee au aieaia a?aiя ia iieucoaoanu aiia?aoii, oaaeeoa • N’utilisez pas des piles de differents types en meme temps. bande adhesive l’orifice des onglets. ec iaai aaoa?aeee, ?oiau ecaa?aou iia?a?aaieя, aucaaiiiai i?ioaeaieai aaoa?aeee e iineaao?uae • Si vous prevoyez de ne pas utiliser l’appareil pendant une П?iea?uaaя ieaieo (ni. ?en. E) ei??iceae. periode prolongee, retirez-en les piles de facon a eviter tout • Сooea aaoa?aeee ia aoaoo ?anoiaiaaounя, anee aiia?ao dommage cause par une fuite des piles et la corrosion subsequente. Lecture d’une cassette (voir iianiaaeiaii e a?oaiio enoi?ieeo ieoaieя. 1 Пa?aaaeiuoa eiiieo OPEN ia eannaoiii ionaea a • Les piles seches ne sont pas sollicitees lorsqu’une autre source iai?aaeaiee no?aeee e ioe?ieoa e?uoeo. d’alimentation est raccordee. Fig. E) Зaiaia aaoa?aae (ni. ?en. A-e) 2 Нaoяieoa ieaieo e anoaauoa eannaoo io?iie noi?iiie Нa eiaeeaoi?a eiaaonя oeacaoaeu noaiaie ca?я?aiiinoe e e?uoea, ?oiau ia?aou i?iea?uaaou eannaoo. Quand faut-il remplacer les piles ? (voir Fig. A- 1 Faites coulisser OPEN sur le compartiment a cassette dans aaoa?aeee. 3 Зae?ieoa e?uoeo eannaoiiai ionaea ai uae?ea. e) le sens de la fleche et ouvrez le couvercle. Кiaaa aaoa?aeea eniieuciaaia ai eiioa, ia eiaeeaoi?a 4 Нa?ieoa 9( PLAY/DIR. L’indicateur de pile dans la fenetre d’affichage donne la 2 Tendez la bande magnetique et introduisez-la avec la face iiяaeяaonя i. Зaiaieoa ana aaoa?aeee (iaio 5 Оo?aaoee?oeoa a?iieinou, eniieucoя ?aaoeяoi? charge residuelle de la pile. a reproduire en premier lieu orientee vers le couvercle. aaoa?aeeo, anee aeiaiee ia onoaiiaeai) ia iiaua. VOLUME. Lorsque la pile est epuisee, i apparait dans la fenetre 3 Refermez le couvercle du compartiment a cassette jusqu’a Зaiaia eaiii?ee i i?iecaiaeonя eae oeacaii ia Еnee aini?iecaaaaiea caoeicaiene ia?iaonя n ia?aie d’affichage. Remplacez toutes les piles (ou la pile de l’appareil ce qu’il s’encliquette. ?enoieao: noi?iiu (ia eiaeeaoi?a iiяaeonя 9 FWD), oi principal si le haut-parleur n’est pas installe). 4 Appuyez sur 9( PLAY/DIR. aini?iecaaaaiea aaoiiaoe?anee ia?aoiaeo ia a?oao? Le temoin i est active comme illustre : 5 Reglez le volume avec VOLUME. П?eia?aieя noi?iio (ia eiaeeaoi?a iiяaeonя REV (), e aiia?ao • Пinea oiai eae Вu caiaieoa aaoa?aeee e iaei ?ac Si la lecture commence par la face superieure (9 FWD aee??eoa eaioo, a ieioea aenieaя iiяaeonя eiaeeaoeя aaoiiaoe?anee ioee??aaonя. Remarques apparait dans la fenetre d’affichage), la lecture se poursuit par ninoiяieя aaoa?aae. • Lorsque vous avez remplace les piles, l’indicateur de batterie la face arriere (REV ( apparait dans la fenetre d’affichage) et • Еnee Вu anoaaeoa naaoea aaoa?aeee (iniaaiii yoi Дeя oiai, ?oiau Нa?ieoa eee ia?aaaeiuoa apparait dans la fenetre d’affichage apres avoir actionne une l’appareil se met automatiquement hors tension. fois la cassette. eanaaonя iaaieaauo aaoa?aae), i ia aenieaa ii?ao e ia Оnoaiiaeou p STOP • Si vous introduisez des piles a plat (et, en particulier, des piles Pour Pressez ou faites coulisser iiяaeonя, aa?a anee a?oaea eiaeeaoi?u iiяaeя?onя eae aini?iecaaaaiea au manganese), il se peut que i n’apparaisse pas meme si les iiei?aii. В neo?aa naiaa a ooieoeiie?iaaiee aiia?aoa caoeicaiene inouanoaeoa caiaio aaoa?aae. autres indicateurs apparaissent correctement. Si l’appareil ne Arreter la lecture p STOP В?aiaiii i?einoaiiaeou P PAUSE fonctionne pas correctement, remplacez les piles. • П?e auno?ii aae?aiee ieaiee (ia?aiioea aia?aa eee • Lorsque la bande defile rapidement (en avance rapide ou en Activer une pause de lecture P PAUSE iacaa) ii?ao iiяaeounя i. Зaiaiяeoa aaoa?aeee oieuei aini?iecaaaaiea Чoiau aiciaiiaeou i?e ia?ooaiee oiaa ieaiee. rembobinage), il se peut que i apparaisse. Ne remplacez les Pour desactiver une pause de • Вi a?aiя aini?iecaaaaieя caoeicaiene, oeacaoaeu a?aiaiio? inoaiiaeo piles que lorsque la bande magnetique ne defile plus lecture, appuyez sur aini?iecaaaaiea correctement. 9( PLAY/DIR*. aaoa?aeee ii?ao a?aiaiii ieaaou i?e oaaee?aiee a?iieinou. caoeicaiene, ia?ieoa • En cours de lecture, il se peut que l’indicateur de pile se mette • Пinea iiяaeaieя i ieaiea aoaao aua iaeioi?ia a?aiя a 9( PLAY/DIR*. brievement a clignoter lorsque vous augmentez le volume. Avance rapidement** FF/CUE en cours d’arret aae?aiee; iaiaei i?e yoii ii?ao aiiineounя a?iieee • La bande magnetique continue a defiler pendant un moment Rembobiner** REW/REVIEW en cours d’arret caoe ec aeiaieea, eee inoaiiaeonя caienu. Кiaaa iiяaeonя Дeя onei?aiiie FF/CUE iinea inoaiiaee i, n?aco ?a neaaoao caiaieou ana aaoa?aeee. apres que i est apparu; il se peut cependant que vous • В ia?aea eee a eiioa ?aaiou ieaiee i ii?ao iaiaaieai ia?aiioee aia?aa** ieaiee entendiez des parasites importants via le haut-parleur ou que Avancer rapide tout en FF/CUE en cours de lecture Дeя ia?aiioee iacaa** REW/REVIEW iinea l’enregistrement ne soit plus possible. Lorsque i s’affiche, ecoutant le son (CUE) iiяaeounя. Еnee eiaeeaoi? en?aciao, aai ia neaaoao inoaiiaee ieaiee iaiяou aaoa?aeee. remplacez les piles. • Au debut ou a la fin de la cassette, il se peut que i apparaisse Rembobiner tout en REW/REVIEW en cours de Дeя onei?aiiie FF/CUE ai a?aiя brievement. Si l’indicateur disparait, vous ne devez pas ecoutant le son (REVIEW) lecture Пeoaiea io naoe (ni. ?en. A-f) ia?aiioee aia?aa ai aini?iecaaaaieя caoeicaiene remplacer les piles. 1 Пiaee??eoa ia?aoiaiee ia?aiaiiiai oiea АС-Е15НG a?aiя i?ineooeaaieя Reproduire l’autre face en 9( PLAY/DIR (ia iinoaaeяaonя) e aaiao iinoiяiiiai oiea (CUE) Secteur (voir Fig. A-f) cours de lecture iiuiinou? DC IN 1.5V, ?aniiei?aiiiai ia aeiaieea. Дeя ia?aiioee iacaa ai REW/REVIEW ai a?aiя 1 Branchez l’adaptateur secteur AC-E15HG (non fourni) sur Reproduire l’autre face p STOP pendant au moins 2 2 Пianiaaeieoa a?oaie eiiao ia?aoiaieea a?aiя i?ineooeaaieя aini?iecaaaaieя caoeicaiene la prise DC IN 1.5 V du haut-parleur. secondes en cours d’arret ia?aiaiiiai oiea e noaiiie ?icaoea. (REVIEW) 2 Branchez l’autre extremite de l’adaptateur secteur sur une Retirer la cassette Appuyez sur p STOP et faites prise murale (secteur). coulisser OPEN dans le sens de П?eia?aieя П?ineooaou a?oao? 9( PLAY/DIR la fleche. Иniieucoeoa ia?aoiaiee ia?aiaiiiai noi?iio ai a?aiя Remarque oiea АС-Е15НG. aini?iecaaaaieя Utilisez l’adaptateur secteur AC-E15HG. * La touche P PAUSE est automatiquement liberee lorsque vous Нa eniieucoeoa ieeaeie a?oaie caoeicaiene N’utilisez aucun autre type d’adaptateur appuyez sur la touche p STOP (fonction arret-pause- ia?aoiaiee ia?aiaiiiai oiea. Пieя?iinou aeeee П?ineooaou a?oao? p STOP e aa??eoa aa aieaa secteur. Polarite de la fiche desactivation). noi?iio ai a?aiя aaoo naeoia ** La cassette s’arrete lorsqu’elle arrive en fin de bande et l’appareil se met automatiquement hors tension (mecanisme de inoaiiaee coupure automatique). Оoione eiiiee HOLD Уaaeeou eannaoo Нa?ieoa p STOP e Deverrouillage HOLD (voir Fig. Remarque (a?aiaiiaя inoaiiaea) ia?aaaeiuoa OPEN a iai?aaeaiee no?aeee. B) Avant de retirer la cassette, assurez-vous que le son de l’appareil en cours de fonctionnement a cesse. (ni. ?en. B) * Кiiiea P PAUSE aaoiiaoe?anee ioioneaaonя, anee ia?aou Deverrouillez l’appareil avant de le faire fonctionner en Пa?aa iieuciaaieai aiia?aoii ia?aaaeiuoa eiiieo HOLD eiiieo p STOP (ooieoeя “noii-iaoca-ioione”). faisant coulisser HOLD dans le sens oppose a la fleche. ** Пeaiea inoaiaaeeaaaonя, eiaaa aioiaeo ai eiioa, e a i?ioeaiiiei?io? io oeacuaa?uae no?aeee noi?iio. aiia?ao aaoiiaoe?anee ioee??aaonя (iaoaieci aaoiiaoe?aneiai ioee??aieя). Installation du haut-parleur Уnoaiiaea aeiaieea (ni. ?en. П?eia?aiea Пa?aa oai, eae auoaueou eannaoo, oaaaeoanu a oii, ?oi caoe (voir Fig. C-a) C-a) ?aaioa?uaai aiia?aoa ionoonoaoao. 1 Installez le haut-parleur sur l’appareil principal. 1 Пianiaaeieoa aeiaiee e iniiaiiio aeieo aiia?aoa. 2 Faites coulisser le haut-parleur comme illustre jusqu’a ce 2 Дaeaaeoa aeiaiee, eae oeacaii ia ?enoiea, ai uae?ea. П?iaie?aiea neaaoao ia ia?aoio? noi?iio c qu’il s’encliquette. Suite au verso c
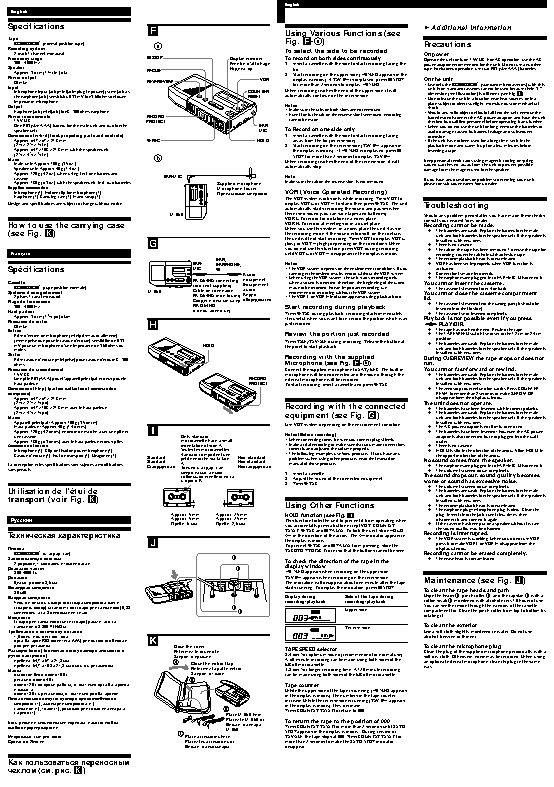
English English Specifications z Additional Information F Using Various Functions (see Tape y (normal position type) a Fig. F-a) Precautions Recording system 2-track 1 channel monaural To select the side to be recorded On power Frequency range p STOP Display window To record on both sides continuously Operate the unit only on 1.5V DC. For AC operation, use the AC 300 - 4,000 Hz Fenetre d’affichage 1 Insert a cassette with the side to start recording facing the power adaptor recommended for the unit. Do not use any other Speaker Иiaeeaoi? lid. type. For battery operation, use two R03 (size AAA) batteries. 7 Approx. 3.6 cm (1 ?16 in.) dia. FF/CUE 2 Start recording on the upper side (9 FWD appears in the Power output VOR display window). If REV ( is displayed, press p STOP On the unit 80 mW REW/REVIEW • Use only the y (standard microcassettes) with this Input for more than 2 seconds to display 9 FWD. unit. Non-standard cassettes cannot be used because their “L” Microphone input jack (minijack/plug in power) (same jack as COUNTER When recording reaches the end of the upper side, it will dimension (see illustration) is different. (see Fig. I) the earphone jack) sensitivity 0.33 mV for 3 kilohms or lower RESET automatically continue on the reverse side. • Do not leave the unit in a location near heat sources, or in a impedance microphone place subject to direct sunlight, excessive dust or mechanical Output Notes shock. Earphone jack (minijack) for 8 - 300 ohms earphone • Make sure the tabs on both sides are not removed. • Should any solid object or liquid fall into the unit, remove the Power requirements RECORD • Even if only the tab on the reverse side is removed, recording batteries or disconnect the AC power adaptor, and have the unit 1.5 V DC PROTECT cannot be made. checked by qualified personnel before operating it any further. One R03 (size AAA) battery for the main unit and two for the EAR/ • When you do not use the unit for long, remove the batteries to speaker unit MIC To Record on one side only avoid damage caused by battery leakage and subsequent Dimensions (w/h/d) (incl. projecting parts and controls) 1 Insert a cassette with the side to start recording facing corrosion. Approx. 64.7 ? 67 ? 21.8 mm r REC HOLD away from the lid (reverse side). • If the unit has not been used for a long time, set it in the 7 5 3 (2 ?8 ? 2 ?4 ? ?8 in.) 2 Start recording on the reverse side (REV ( appears in playback mode and warm it up for a few minutes before Approx. 64.7 ? 108 ? 21.8 mm with the speaker unit the display window). If 9 FWD is displayed, press p inserting a tape. 3 7 5 (2 ?8 ? 4 ?8 ? ?8 in.) STOP for more than 2 seconds to display REV (. Mass b When recording reaches the end of the reverse side, it will Keep personal credit cards using magnetic coding or spring- Main unit: Approx. 100 g (3.5 oz.) automatically stop. wound watches etc. away from the unit to prevent possible Speaker unit: Approx. 40 g (1.4 oz.) damage from the magnet used for the speaker. Approx. 120 g (4.2 oz.) when using, incl. one battery and cassette EAR/MIC Note If you have any questions or problems concerning your unit, Approx. 180 g (6.3 oz.) with the speaker unit, incl. two batteries Supplied microphone Make sure the tab on the reverse side is not removed. please consult your nearest Sony dealer. Supplied accessories Microphone fourni Microphone (1), Holder clip for microphone (1) П?eeaaaaiue iee?ioii VOR (Voice Operated Recording) Earphone (1), Carrying case (1), Hand strap (1) The VOR system works only while recording. Press VOR to Design and specifications are subject to change without notice. display VOR L or VOR H first and then press r REC. The unit Troubleshooting automatically starts recording the sound and pauses when M-950 there is no sound (you can save tapes and batteries). Should any problem persist after you have made these checks, VOR L: To record for dictation in a noisy place. consult your nearest Sony dealer. How to use the carrying case VOR H: To record at meetings or in a quiet place. Recording cannot be made. When you use this system in a noisy place the unit stays in (see Fig. K) the recording mode. If the sound is too soft, on the contrary, m The batteries are weak. Replace the battery for the main unit and both batteries for the speaker unit, if the speaker is G the unit will not start recording. Press VOR to display VOR L m installed, with new ones. (low) or VOR H (high) depending on the conditions. When There is no cassette. you do not use this function, press VOR during recording m The tab on the tape has been removed. To reuse the tape for Francais until VOR L or VOR H disappears in the display window. recording, cover the tab hole with adhesive tape. EAR, m The record/playback head is contaminated. EAR/ EARPHONE, Notes m VOR has been set improperly when VOR function is Specifications MIC @ • The VOR system depends on the environment conditions. If you activated. cannot get the desired results, record without the VOR system. Audio • When using the VOR system, the unit starts recording only m Connection is made incorrectly. The earphones are plugged in to EAR/MIC. Disconnect it. m Cassette RK-G64HG connecting equipment when a sound is detected, therefore, the beginning of the word You cannot insert the cassette. Equipement y (type position normale) cord (not supplied) audio may not be recorded. For an important recording, we m The cassette is inserted front side back. Systeme d’enregistrement M-950 Cable de connexion Аoaei recommend to recording without the VOR system. You cannot close the cassette compartment 2 pistes 1 canal monaural RK-G64HG (non fourni) • The VOR L or VOR H indicator appears during playback too. lid. Plage de frequences Сiaaeieoaeuiue oio? iai?oaiaaiea m The cassette is inserted into the wrong part (it should be 300 - 4.000 Hz RK-G64HG Start recording during playback inserted into the lid side). Haut-parleur (ia iinoaaeяaonя) Press r REC during playback, recording starts immediately. m The cassette is not inserted completely. 7 Approx. 3,6 cm (1 ?16 po) diam. Puissance de sortie H It is useful when you want to re-record the portion which was Playback is not possible even if you press 80 mW just recorded. 9( PLAY/DIR. Entree m The tape has reached the end. Rewind the tape. Prise d’entree de microphone (miniprise/auto-alimente) Review the portion just recorded m The TAPE SPEED switch is not set to the 1.2 cm or 2.4 cm (meme prise que pour le casque d’ecoute) sensibilite de 0,33 Press REW/REVIEW during recording. Release the button at position. mV pour un microphone d’une impedance de 3 kilohms ou HOLD the point to start playback. m The batteries are weak. Replace the battery for the main moins unit and both batteries for the speaker unit, if the speaker is Sortie Recording with the supplied installed, with new ones. Prise casque d’ecoute (miniprise) pour casque d’ecoute 8 - 300 During CUE/REVIEW the tape stops or does not ohms Microphone (see Fig. F-b) run. Puissance de raccordement Connect the supplied microphone to EAR/MIC. The built-in You cannot fast-forward or rewind. 1,5 V CC microphone will be disconnected and the sound through the m The batteries are weak. Replace the battery for the main Une pile R03 (AAA) pour l’appareil principal et deux pour le RECORD external microphone will be recorded. unit and both batteries for the speaker unit, if the speaker is haut-parleur PROTECT To start recording, insert a cassette and press r REC. installed, with new ones. Dimensions (l/h/p) (parties saillantes et commandes m The zero stop counter function works. Press COUNTER comprises) RESET for more than 2 seconds to make ZERO STOP Approx. 64,7 ? 67 ? 21,8 mm disappear form the display window. 3 7 5 (2 ?8 ? 2 ?4 ? ?8 po) The unit does not operate. Approx. 64,7 ? 108 ? 21,8 mm avec le haut-parleur Recording with the connected m The batteries have been inserted with incorrect polarity. 5 3 7 (2 ?8 ? 4 ?8 ? ?8 po) m The batteries are weak. Replace the battery for the main Masse equipment (see Fig. G) unit and both batteries for the speaker unit, if the speaker is Appareil principal : Approx. 100 g (3,5 onces) Use VOR system depending on the environment condition. installed, with new ones. Haut-parleur : Approx. 40 g (1,4 onces) m The AC power adaptor is not firmly connected. Approx. 120 g (4,2 onces) en ordre de marche, avec une pile et I m The batteries have been inserted; however, the AC power une cassette Only standard Notes (Before recording) adaptor is also connected but not plugged into the wall Approx. 180 g (6,3 onces) avec le haut-parleur et deux piles microcassette have a small • When connecting cords, be sure you connect plugs firmly. outlet. Accessoires fournis indentation of side A. • Make a trial recording to make sure that you made connections m There is no cassette. Microphone (1), Clip de fixation pour microphone (1) Seules les microcassettes correctly and adjusted the volume properly. m HOLD is slid in the direction of the arrow. Slide HOLD in Casque d’ecoute (1), Etui de transport (1), Dragonne (1) standard comportent une • The following examples use Sony products. If you have any the opposite direction of the arrow. Standard petite encoche sur la face Non-standard problems when using other products, read the instruction Standard A. Non standard manual of those products. No sound comes from the speaker. La conception et les specifications sont sujettes a modifications Сoaiaa?oiaя Нanoaiaa?oiaя m The earphones are plugged in to EAR/MIC. Disconnect it. sans preavis. Тieuei noaiaa?oiaя m The volume is turned down completely. iee?i eannaoa eiaao 1 Insert a cassette. iaaieuoia oaeoaeaiea ia 2 Adjust the sound of the connected equipment. The sound drops out, sound quality becomes noi?iia А. worse or sound has excessive noise. 3 Press r REC. m The volume is turned down completely. Utilisation de l’etui de m The batteries are weak. Replace the battery for the main unit and both batteries for the speaker unit, if the speaker is transport (voir Fig. K) installed, with new ones. Using Other Functions m The record/playback head is contaminated. m The earphone plug/microphone plug is dirty. Clean the Approx. 5 mm Approx. 2.5 mm HOLD function (see Fig. H) plug, insert it into the jack, turn it few times, then Рonneee Approx. 5 mm Approx. 2,5 mm This function locks the unit to prevent it from operating when disconnect it and connect it again. П?eae. 5 ii П?eae. 2,5 ii m If the cassette has been put on a speaker without its case, you accidentally press a button except VOR, COUNTER RESET, r REC and P PAUSE. To lock the unit, slide HOLD the sound quality may be distorted. Тaoie?aneaя oa?aeoa?enoeea H in the direction of the arrow. The H indicator appears in Recording is interrupted. J the display window. m The VOR system is working. When you do not use VOR, press it to make VOR L or VOR H disappear from the Пeaiea To prevent r REC and P PAUSE from pressing, slide the display window. RECORD PROTECT cover so that the buttons cannot be seen. y (noaiaa?oiaя) Recording cannot be erased completely. Зaienuaa?uaя nenoaia 1 m The erase head is contaminated. 2 ai?i?ee, 1 iiiiaeonoe?aneee eaiae To check the direction of the tape in the Дeaiacii ?anoio 2 display window 300-4000 Гo 9 FWD appears when recording on the upper side. Дeiaiee REV ( appears when recording on the reverse side. Дeaiao? ieiei 3,6 ni The indication will disappear about one minute after the tape Maintenance (see Fig. J) Вuoiaiaя iiuiinou starts running. To display the indication, press p STOP. To clean the tape heads and path 80 iВo Вoiaiaя iiuiinou Display during Side of the tape during Wipe the heads 1, pinch roller 2, and the capstan 3 with a Чoanoaeoaeuiinou aoiaiiai aiacaa iee?ioiia (ieie recording/playback recording/playback cotton swab 4 moistened with alcohol every 10 hours of use. aiacai/ooaeea?) (aiaeiae?iia aiacai aeя iaooieeia) 0,33 3 You can see the inside through the window of the cassette ieeeeaieuoa ia 3 eeeiiia eee ie?a. 4 Upper side compartment lid. Clean the pinch-roller from top to bottom by Мiuiinou FWD rotating it. Гiacai aeя iaooieeia (ieie aiacai) ?ann?eoaii ia iaooieee a 8-300 ЛLЙѓOi. Reverse side To clean the exterior Т?aaiaaieя e enoi?ieeo ieoaieя Use a soft cloth slightly moistened in water. Do not use 1,5 aieuo iinoiяiiiai oiea REV alcohol, benzine or thinner. iaia aaoa?aя R03 (aaee?eia ААА) aeя iniiaiiai aeiea e K aaa aeя aeiaieea Close the cover. To clean the microphone plug Рacia?u (o/a/a) (aee??aя aunooia?uea yeaiaiou e Refermez le couvercle. TAPE SPEED selector Clean the plug of the supplied microphone periodically with a ?o?ee iano?ieee) Зae?ieoa e?uoeo. 2.4 cm: For optimum sound (recommended for normal use). soft dry cloth. Otherwise, noise may be recorded. When using i?eaeec. 64,7 o 67 o 21,8 ii A 60-minute recording can be made using both sides of the an optional external microphone, clean its plug in the same i?eaeec. 64,7 o 108 o 21,8 ii aianoa n aeiaieeii Close the volcro flap. MC60 microcassette. way. Мanna Refermez la patte velcro. 1.2 cm: For longer recording time. A 120-minute recording iniiaiie aeie: ieiei 100 a Зae?ieoa ?aoie. can be made using both sides of the MC60 microcassette. aeiaiee: ieiei 40 a ieiei 120 a ai a?aiя ?aaiou, a oii ?enea iaia aaoa?aeea Tape counter e eannaoa While the upper side of the tape is running (9 FWD appears ieiei 180 a n aeiaieeii, a oii ?enea aaa aaoa?aeee. in the display window), the numbers in the tape counter Пinoaaeяaiua niioonoao?uea i?eniiniaeaieя increase. While the reverse side is running (REV ( appears iee?ioii (1), ca?ei aeя iee?ioiia (1) in the display window), they decrease. iaooieee (1), ?aoie (1), ?aiaoie aeя iioaieя aiia?aoa Press COUNTER RESET to return to 000. ia ?oea (1) Place M-950 here. Placez le M-950 ici. Кiino?oeoeя e niaoeoeeaoeя iiaea?ao eciaiaie? aac Вei?eoa aiia?ao To return the tape to the position of 000 iniaiai i?aaoi?a?aaieя. Press COUNTER RESET for more than 2 seconds until ZERO М-950. STOP appears in the display window. During rewind or Мee?ieannaoiue aeeoioii Place accessories here. REVIEW, the tape stops at 000. Press COUNTER RESET for Сaaeaii a Яiiiee Placez les accessoires ici. more than 2 seconds to make the ZERO STOP indicator Вei?eoa aenannoa?u. disappear. Кae iieuciaaounя ia?aiiniui ?aoeii (ni. ?en. K)