На сайте 123475 инструкций общим размером 499.56 Гб , которые состоят из 6237619 страниц
Фото

Руководство пользователя PHILIPS 23PF5320. Основные функции, характеристики и условия эксплуатации изложены на 36 страницах документа в pdf формате.
Доступно к просмотру 33 страницы. Рекомендуем вам скачать файл инструкции, поскольку онлайн просмотр документа может сильно отличаться от оригинала.
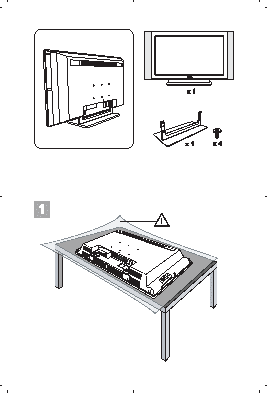
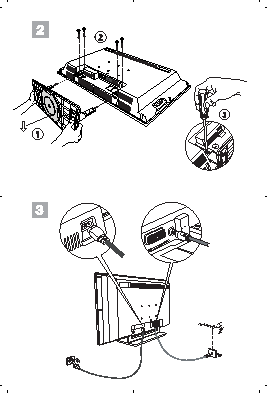
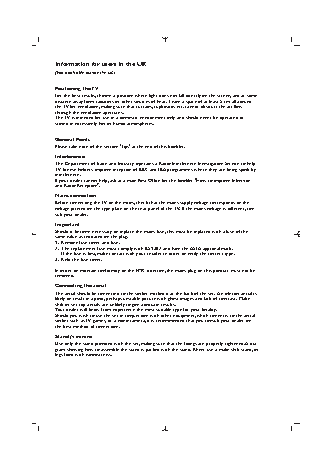
info uk 2005  28-01-2005  13:48  Pagina 1
Information for users in the UK
(Not applicable outside the UK)
Positioning the TV
For the best results, choose a position where light does not fall directly on the screen, and at some
distance away from radiators or other sources of heat. Leave a space of at least 5 cm all around
the TV for ventilation, making sure that curtains, cupboards etc. cannot obstruct the air flow
through the ventilation apertures.
The TV is intended for use in a domestic environment only and should never be operated or
stored in excessively hot or humid atmospheres.
General Points
Please take note of the section 'Tips' at the end of this booklet.
Interference
The Department of Trade and Industry operates a Radio Interference Investigation Service to help
TV license holders improve reception of BBC and IBA programmes where they are being spoilt by
interference.
If your dealer cannot help, ask at a main Post Office for the booklet "How to improve Television
and Radio Reception".
Mains connection
Before connecting the TV to the mains, check that the mains supply voltage corresponds to the
voltage printed on the type plate on the rear panel of the TV. If the mains voltage is different, con-
sult your dealer.
Important
Should it become necessary to replace the mains fuse, this must be replaced with a fuse of the
same value as indicated on the plug.
1. Remove fuse cover and fuse.
2. The replacement fuse must comply with BS 1362 and have the ASTA approval mark.
If the fuse is lost, make contact with your retailer in order to verify the correct type.
3. Refit the fuse cover.
In order to maintain conformity to the EMC directive, the mains plug on this product must not be
removed.
Connecting the aerial
The aerial should be connected to the socket marked x at the back of the set. An inferior aerial is
likely to result in a poor, perhaps unstable picture with ghost images and lack of contrast. Make-
shift or set-top aerials are unlikely to give adequate results.
Your dealer will know from experience the most suitable type for your locality.
Should you wish to use the set in conjunction with other equipment, which connects to the aerial
socket such as TV games, or a video camera, it is recommended that you consult your dealer on
the best method of connection.
Stand (if provided)
Use only the stand provided with the set, making sure that the fixings are properly tightened.A dia-
gram showing how to assemble the stand is packed with the stand. Never use a make-shift stand, or
legs fixed with woodscrews.
Wstep
Dziekujemy za zakup naszego odbiornika telewizyjnego.
Niniejsza instrukcja zostala opracowana aby ulatwic instalacje i uzytkowanie
Twojego odbiornika.
Prosimy o szczegolowe zapoznanie sie z instrukcja.
Mamy nadzieje, ze nasza technologia spelnia Twoje oczekiwania.
Spis tresci
Instalacja
Opis telewizora LCD . . . . . . . . . . . . . . . . . . . . . . . . . . . . . . . . . . . . . . . . . . . . . . . .2
Przyciski na odbiorniku  . . . . . . . . . . . . . . . . . . . . . . . . . . . . . . . . . . . . . . . . . . . . . .2
Przyciski pilota   . . . . . . . . . . . . . . . . . . . . . . . . . . . . . . . . . . . . . . . . . . . . . . . . . . . .3
Przyciski magnetowid lub DVD  . . . . . . . . . . . . . . . . . . . . . . . . . . . . . . . . . . . . . . .4
Instalacja odbiornika   . . . . . . . . . . . . . . . . . . . . . . . . . . . . . . . . . . . . . . . . . . . . . . . .5
Szybkie instalowanie   . . . . . . . . . . . . . . . . . . . . . . . . . . . . . . . . . . . . . . . . . . . . . . . .5
Sortowanie programow   . . . . . . . . . . . . . . . . . . . . . . . . . . . . . . . . . . . . . . . . . . . . .6
Strojenie reczne   . . . . . . . . . . . . . . . . . . . . . . . . . . . . . . . . . . . . . . . . . . . . . . . . . . .6
Inne ustawienia w menu Instalacja   . . . . . . . . . . . . . . . . . . . . . . . . . . . . . . . . . . . . .6
Uzytkowanie
Ustawienia obrazu  . . . . . . . . . . . . . . . . . . . . . . . . . . . . . . . . . . . . . . . . . . . . . . . . . .7
Ustawienia dzwieku   . . . . . . . . . . . . . . . . . . . . . . . . . . . . . . . . . . . . . . . . . . . . . . . .7
Ustawienia poszczegolnych opcji   . . . . . . . . . . . . . . . . . . . . . . . . . . . . . . . . . . . . . .7
Format 16:9.  . . . . . . . . . . . . . . . . . . . . . . . . . . . . . . . . . . . . . . . . . . . . . . . . . . . . . .8
Teletekst   . . . . . . . . . . . . . . . . . . . . . . . . . . . . . . . . . . . . . . . . . . . . . . . . . . . . . . . . .9
Tryb monitora komputerowego  . . . . . . . . . . . . . . . . . . . . . . . . . . . . . . . . . . . . . .10
Uzywajac tyrybu HD (wysokiej rozdzielczosci)  . . . . . . . . . . . . . . . . . . . . . . . . . .11
Urzadzenia peryferyjne
Magnetowid  . . . . . . . . . . . . . . . . . . . . . . . . . . . . . . . . . . . . . . . . . . . . . . . . . . . . . .12
Inny osprzet  . . . . . . . . . . . . . . . . . . . . . . . . . . . . . . . . . . . . . . . . . . . . . . . . . . . . . .13
Podlaczania urzadzen peryferyjnych  . . . . . . . . . . . . . . . . . . . . . . . . . . . . . . . . . . .13
Amplitunera/innych HD . . . . . . . . . . . . . . . . . . . . . . . . . . . . . . . . . . . . . . . . . . . . .13
Komputer . . . . . . . . . . . . . . . . . . . . . . . . . . . . . . . . . . . . . . . . . . . . . . . . . . . . . . . .13
Informacje praktyczne
Porady   . . . . . . . . . . . . . . . . . . . . . . . . . . . . . . . . . . . . . . . . . . . . . . . . . . . . . . . . . .14
Slowniczek   . . . . . . . . . . . . . . . . . . . . . . . . . . . . . . . . . . . . . . . . . . . . . . . . . . . . . .14
PL
Wskazowki dotyczace utylizacji
Twoj odbiornik wykonany jest z materialow, ktore moga byc ponownie
°            wykorzystane lub poddane recyklingowi.W celu ograniczenia ilosci odpadow w
srodowisku naturalnym specjalne zaklady odbieraja zuzyte odbiorniki,
rozmontowuja je na czesci i gromadza materialy do ponownego wykorzystania
(informacji udzieli sprzedawca).
1
Opis telewizora LCD
& Przyciski telewizora:
• POWER: sluzy do wlaczania i wylaczenia
telewizora.
• VOLUME -/+: sluzy do regulacji poziomu
glosnosci.
• MENU:aby wywolac lub opuscic menu.
Przyciski PROGRAM -/+ umozliwiaja wybor
pozadanego ustawienia, a przyciski
VOLUME -/+ dokonanie regulacji.
• PROGRAM -/+: sluzy do wyboru programow.
Scianka tylna:
Podstawowe podlaczenia wykonywane sa od spodu
telewizora.
Wiecej informacji na temat podlaczen - patrz strona 12.
e Zasilanie
“ Wejscie DVI oraz audio do podlaczenia
urzadzen HD (wysokiej rozdzielczosci) lub
komputera z wyjsciem DVI.
‘ Gniazda SCART EXT1/EXT2
( Gniazdo anten telewizyjnej
§ Podlaczania urzadzen peryferyjnych
Pilot
Zdejmij material izolacyjny z baterii pilota
CR 2025        zdalnego streowania.
Z mysla o ochronie srodowiska naturalnego, baterie
dostarczane z urzadzeniem nie zawieraja rteci,
kadmu ani niklu. Zuzytych baterii nie nalezy
wyrzucac, lecz przeznaczyc do ponownego
wykorzystania (recyklingu) zgodnie z obowiazujacymi
przepisami.
2