На сайте 123413 инструкций общим размером 499.36 Гб , которые состоят из 6235398 страниц
Фото


Руководство пользователя PHILIPS 15HF5234/10. Основные функции, характеристики и условия эксплуатации изложены на 25 страницах документа в pdf формате.
Доступно к просмотру 25 страниц. Рекомендуем вам скачать файл инструкции, поскольку онлайн просмотр документа может сильно отличаться от оригинала.
Hospitality Television
20/26/32HF5335D
15/20HF5234
- 1 -
Installation of your Philips Hotel TV
1.   Introduction
This addendum has been designed to help you install programmes on this Digital TV and activating the hotel
mode.
Use this addendum in conjunction with the User Manual of this television.
Please handle the TV with care and wipe with a soft cloth to ensure your TV keeps looking new.
2.   The benefits of the Philips hotel TV
This TV is specially designed for hotels.  The Philips hotel TV offers all kind of features to
Maximise the convenience for the hotel and meet the needs for the guest
Welcome message to give a friendly welcome to your guest when activating the tv
Remote control features like low battery detection and an anti-theft screw for preventing of theft for
batteries
Access to the user menu can be blocked. This prevents users (e.g. guests) from deleting or changing
program settings and/or modifying picture and sound settings. This ensures that TVs are always set up
correctly.
A switch-on volume and programme can be selected. After switching on, the TV will always start on the
specified program and volume level.
The maximum volume can be limited in order to prevent disturbance.
The television keys VOLUME +/- , PROGRAM +/- and MENU can be blocked.
Screen information can be suppressed.
Programmes can be blanked
3.   Installing the channels
Installing Digital Programs (only applicable for 20/26/32HF5335D)
Ensure the TV is in Digital mode. If it is in Analogue mode, press the A/D (Analogue/Digital) key on the
Remote Control to enter the Digital mode.
1. Press the           (Menu Digital) key on the Remote Control
2.  Press the Up/Down Arrow Key to scroll to the item called INSTALLATION and press the Right Arrow
Key
3.  Press the Up/Down Arrow Key to scroll to the item called SERVICE SETUP and press the Right Arrow
Key
4.  Press the Up/Down Arrow Key to scroll to the item called REINSTALL ALL SERVICES and press the Right
Arrow Key
5.  Press the Up/Down Arrow Key to scroll to the item called SEARCH and press OK to start the scan. The
TV will now start to scan and install all available (Digital) TV channels and Radio stations automatically.
When the scan is completed, the TV menu will indicate the number of digital services found.
6.  Press the OK key again to Store all the services that have been found.
- 2 -
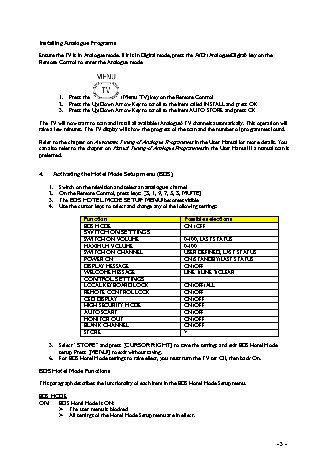
Installing Analogue Programs
Ensure the TV is in Analogue mode. If it is in Digital mode, press the A/D (Analogue/Digital) key on the
Remote Control to enter the Analogue mode.
1. Press the           (Menu TV) key on the Remote Control
2.  Press the Up/Down Arrow Key to scroll to the item called INSTALL and press OK
3.  Press the Up/Down Arrow Key to scroll to the item AUTO STORE and press OK
The TV will now start to scan and install all available (Analogue) TV channels automatically. This operation will
take a few minutes. The TV display will show the progress of the scan and the number of programmes found.
Refer to the chapter on Automatic Tuning of Analogue Programmes in the User Manual for more details. You
can also refer to the chapter on Manual Tuning of Analogue Programmes in the User Manual if a manual scan is
preferred.
4.   Activating the Hotel Mode Setup menu (BDS)
1.  Switch on the television and select an analogue channel
2.  On the Remote Control, press keys: [3, 1, 9, 7, 5, 3, MUTE]
3. The BDS HOTEL MODE SETUP MENU becomes visible
4.  Use the cursor keys to select and change any of the following settings:
Function                            Possible selections
BDS MODE                            ON /OFF
SWITCH ON SETTINGS
SWITCH ON VOLUME                    0-100, LAST STATUS
MAXIMUM VOLUME                      0-100
SWITCH ON CHANNEL                   USER DEFINED, LAST STATUS
POWER ON                            ON/STANDBY/LAST STATUS
DISPLAY MESSAGE                     ON/OFF
WELCOME MESSAGE                     LINE 1/LINE 2/CLEAR
CONTROL SETTINGS
LOCAL KEYBOARD LOCK                 ON/OFF/ALL
REMOTE CONTROL LOCK                 ON/OFF
OSD DISPLAY                         ON/OFF
HIGH SECURITY MODE                  ON/OFF
AUTO SCART                          ON/OFF
MONITOR OUT                         ON/OFF
BLANK CHANNEL                       ON/OFF
STORE                               >
5. Select “STORE” and press [CURSOR RIGHT] to save the settings and exit BDS Hotel Mode
setup. Press [MENU] to exit without saving.
6.  For BDS Hotel Mode settings to take effect, you must turn the TV set Off, then back On.
BDS Hotel Mode Functions
This paragraph describes the functionality of each item in the BDS Hotel Mode Setup menu.
BDS MODE
ON     BDS Hotel Mode is ON:
The user menu is blocked.
All settings of the Hotel Mode Setup menu are in effect.
- 3 -