На сайте 123424 инструкции общим размером 499.44 Гб , которые состоят из 6235949 страниц
Фото
Руководство пользователя 4M Супер скутер (00-03277). Основные функции, характеристики и условия эксплуатации изложены на 2 страницах документа в pdf формате.
Доступно к просмотру 2 страницы. Рекомендуем вам скачать файл инструкции, поскольку онлайн просмотр документа может сильно отличаться от оригинала.
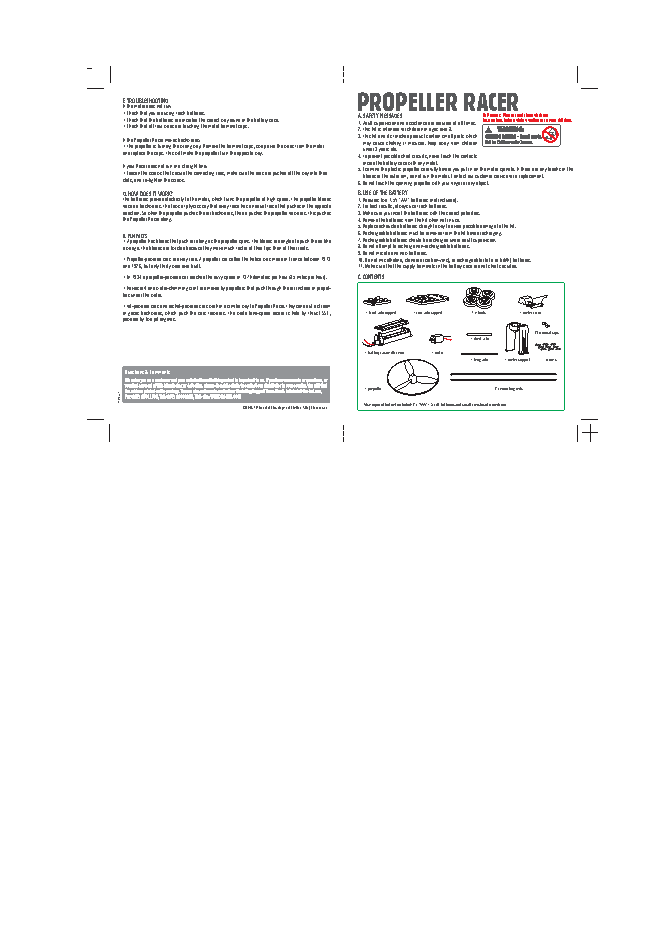
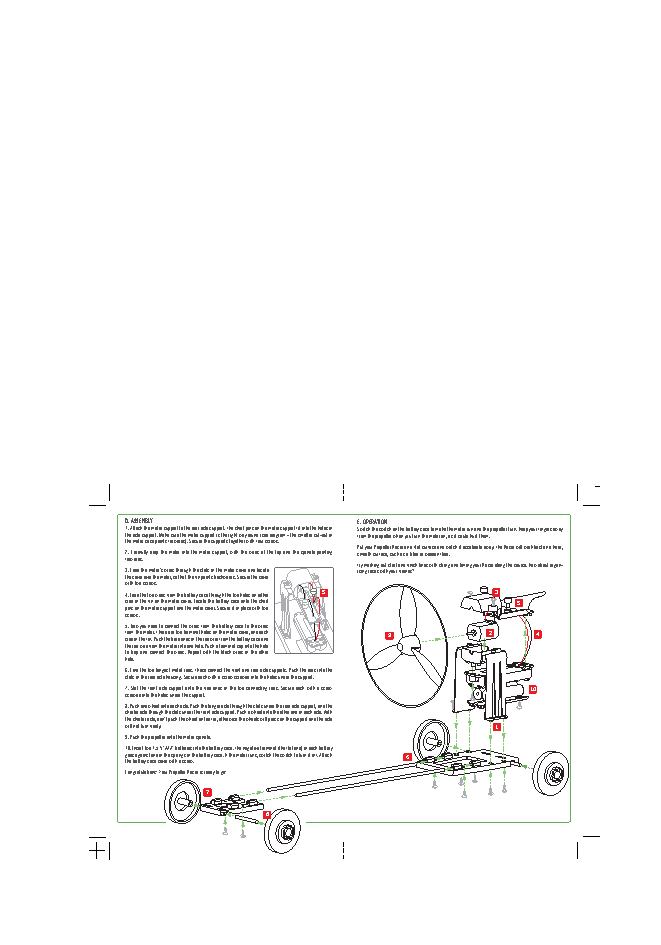
F. TROUBLESHOOTING                                                                  PROPELLER RACER
If the motor does not run:
• Check that you are using fresh batteries.                                          A. SAFETY MESSAGES                           To Parents: Please read through these
• Check that the batteries are inserted the correct way round in the battery case.   1. Adult supervision and assistance are required at all times.  instructions before giving gudiance to your children.
• Check that all four wires are touching the metal terminal caps.
2. This kit is intended for children of ages over 8.
3. This kit and its finished product contain small parts which
If the Propeller Racer moves backwards:                                                may cause choking if misused. Keep away from children
• The propeller is turning the wrong way. Remove the terminal caps, swap over the wires from the motor   under 3 years old.
and replace the caps. This will make the propeller turn the opposite way.
4. To prevent possible short circuits, never touch the contacts
inside the battery case with any metal.
If your Racer does not run in a straight line:                                       5. Examine the plastic propeller carefully before you put in on the motor spindle. If there are any breaks in the
• Loosen the screws that secure the connecting rods, make sure the rods are pushed all the way into their   blades or the outer rim, do not run the motor. Contact our customer service for a replacement.
slots, and re-tighten the screws.
6. Do not touch the spinning propeller with your finger or any object.
G. HOW DOES IT WORK?                                                                 B. USE OF THE BATTERY
The batteries provide electricity to the motor, which turns the propeller at high speed. The propeller blades   1. Requires two 1.5V "AAA" batteries (not included).
force air backwards. The laws of physics say that every force has an equal force that pushes in the opposite   2. For best results, always use fresh batteries.
direction. So when the propeller pushes the air backwards, the air pushes the propeller forwards. This pushes   3. Make sure you insert the batteries with the correct polarities.
the Propeller Racer along.                                                           4. Remove the batteries from the kit when not in use.
5. Replace exhausted batteries straight away to avoid possible damage to the kit.
H. FUN FACTS                                                                         6. Rechargeable batteries must be removed from the kit before recharging.
• A propeller has blades that push air along as the propeller spins. The blades are angled to push the air like   7. Rechargeable batteries should be recharged under adult supervision.
a wedge. The blades are twisted because they move much faster at their tips than at their roots.  8. Do not attempt to recharge non-rechargeable batteries.
9. Do not mix old and new batteries.
• Propeller-powered cars are very rare. A propeller car called the Helica was made in France between 1913   10. Do not mix alkaline, standard (carbon-zinc), or rechargeable (NiCd or NiMH) batteries.
and 1926, but only thirty were ever built.                                           11. Make sure that the supply terminals in the battery case are not short circuited.
• In 1934 a propeller-powered car reached the dizzy speed of 137 kilometres per hour (85 miles per hour).  C. CONTENTS
• Hovercraft and water-skimming craft are moved by propellers that push through the air instead of propel-
lers under the water.
• Jet-powered cars and rocket-powered cars work in a similar way to Propeller Racer. They send out a stream
of gases backwards, which push the cars forwards. The world land-speed record is held by Thrust SSC,   1 front axle support  1 rear axle support  4 wheels  1 motor cover
powered by two jet engines.
2 terminal caps
1 short axle
1 battery case with cover  1 motor
1 long axle  1 motor support  screws
Questions & Comments
Questions & Comments
We value you as a customer and your satisfaction with this product is important to us. If you have comments or questions, or
you find any part of this kit missing or defective, please do not hesitate to contact our distributor in your country. You will find
the address printed on the package. You are also welcome to contact our Marketing Support Team: Email: infodesk@4m-ind.com,   1 propeller  2 connecting rods
41-03277/1  Fax (852) 25911566, Tel: (852) 28936241, Web site: WWW.4M-IND.COM
©2008 4M Industrial Development Limited. All rights reserved.  Also required but not included: 2 x  'AAA' 1.5 volt batteries and small crosshead screwdriver.
D. ASSEMBLY                                                                         E. OPERATION
1. Attach the motor support to the rear axle support. The short pins on the motor support fit into the holes in   Switch the switch on the battery case to make the motor run and the propeller turn. Keep your fingers away
the axle support. Make sure the motor support is the right way round (see diagram - the smaller cut-out in   from the propeller when you turn the motor on, as it could hurt them.
the motor case points forwards). Secure the supports together with four screws.
Put your Propeller Racer on a flat surface and watch it accelerate away. The Racer will work best on a hard,
2. Carefully drop the motor into the motor support, with the wires at the top and the spindle pointing   smooth surface, such as a tiled or wooden floor.
forwards.
Try marking out start and finish lines with string and timing your Racer along the course. How about organ-
3. Feed the motor’s wires through the slots in the motor cover and locate           ising races with your friends?
the cover over the motor, so that the fin points backwards. Secure the cover
with two screws.
4. Feed the two wires from the battery case through the two holes on either   5                                                      3
side of the fin on the motor cover. Locate the battery case onto the short                                                                   5
pins on the motor support and the motor cover. Secure it in place with two
screws.
5. Now you need to connect the wires from the battery case to the wires
from the motor. There are two terminal holes on the motor cover, one each                      9                                   2                4
side of the fin. Push the bare ends of the red wire from the battery case and
the red wire from the motor into one hole. Push a terminal cap into the hole
to trap and connect the wires. Repeat with the black wires in the other
hole.
6. Find the two longest metal rods. These connect the front and rear axle supports. Push the rods into the
slots in the rear axle housing. Secure each with a screw screwed into the holes under the support.
7. Slot the front axle support onto the free ends of the two connecting rods. Secure each with a screw                                            10
screwed into the holes under the support.
8. Push one wheel onto each axle. Push the longer axle through the slots under the rear axle support, and the
shorter axle through the slots under the front axle support. Push a wheel onto the other end of each axle. With
the shorter axle, don’t push the wheel on too far, otherwise the wheels will press on the support and the axle
will not turn freely.                                                                                                                1
9. Push the propeller onto the motor spindle.
10. Insert two 1.5 V "AAA" batteries into the battery case. The negative terminal (the flat end) of each battery
goes against one of the springs in the battery case. If the motor runs, switch the switch to turn it off. Attach   6
the battery case cover with a screw.
Congratulations! Your Propeller Racer is ready to go!
7
8