На сайте 123418 инструкций общим размером 499.4 Гб , которые состоят из 6235582 страниц
Фото
Руководство пользователя 4M Турбопускатель (00-03906). Основные функции, характеристики и условия эксплуатации изложены на 2 страницах документа в pdf формате.
Доступно к просмотру 2 страницы. Рекомендуем вам скачать файл инструкции, поскольку онлайн просмотр документа может сильно отличаться от оригинала.
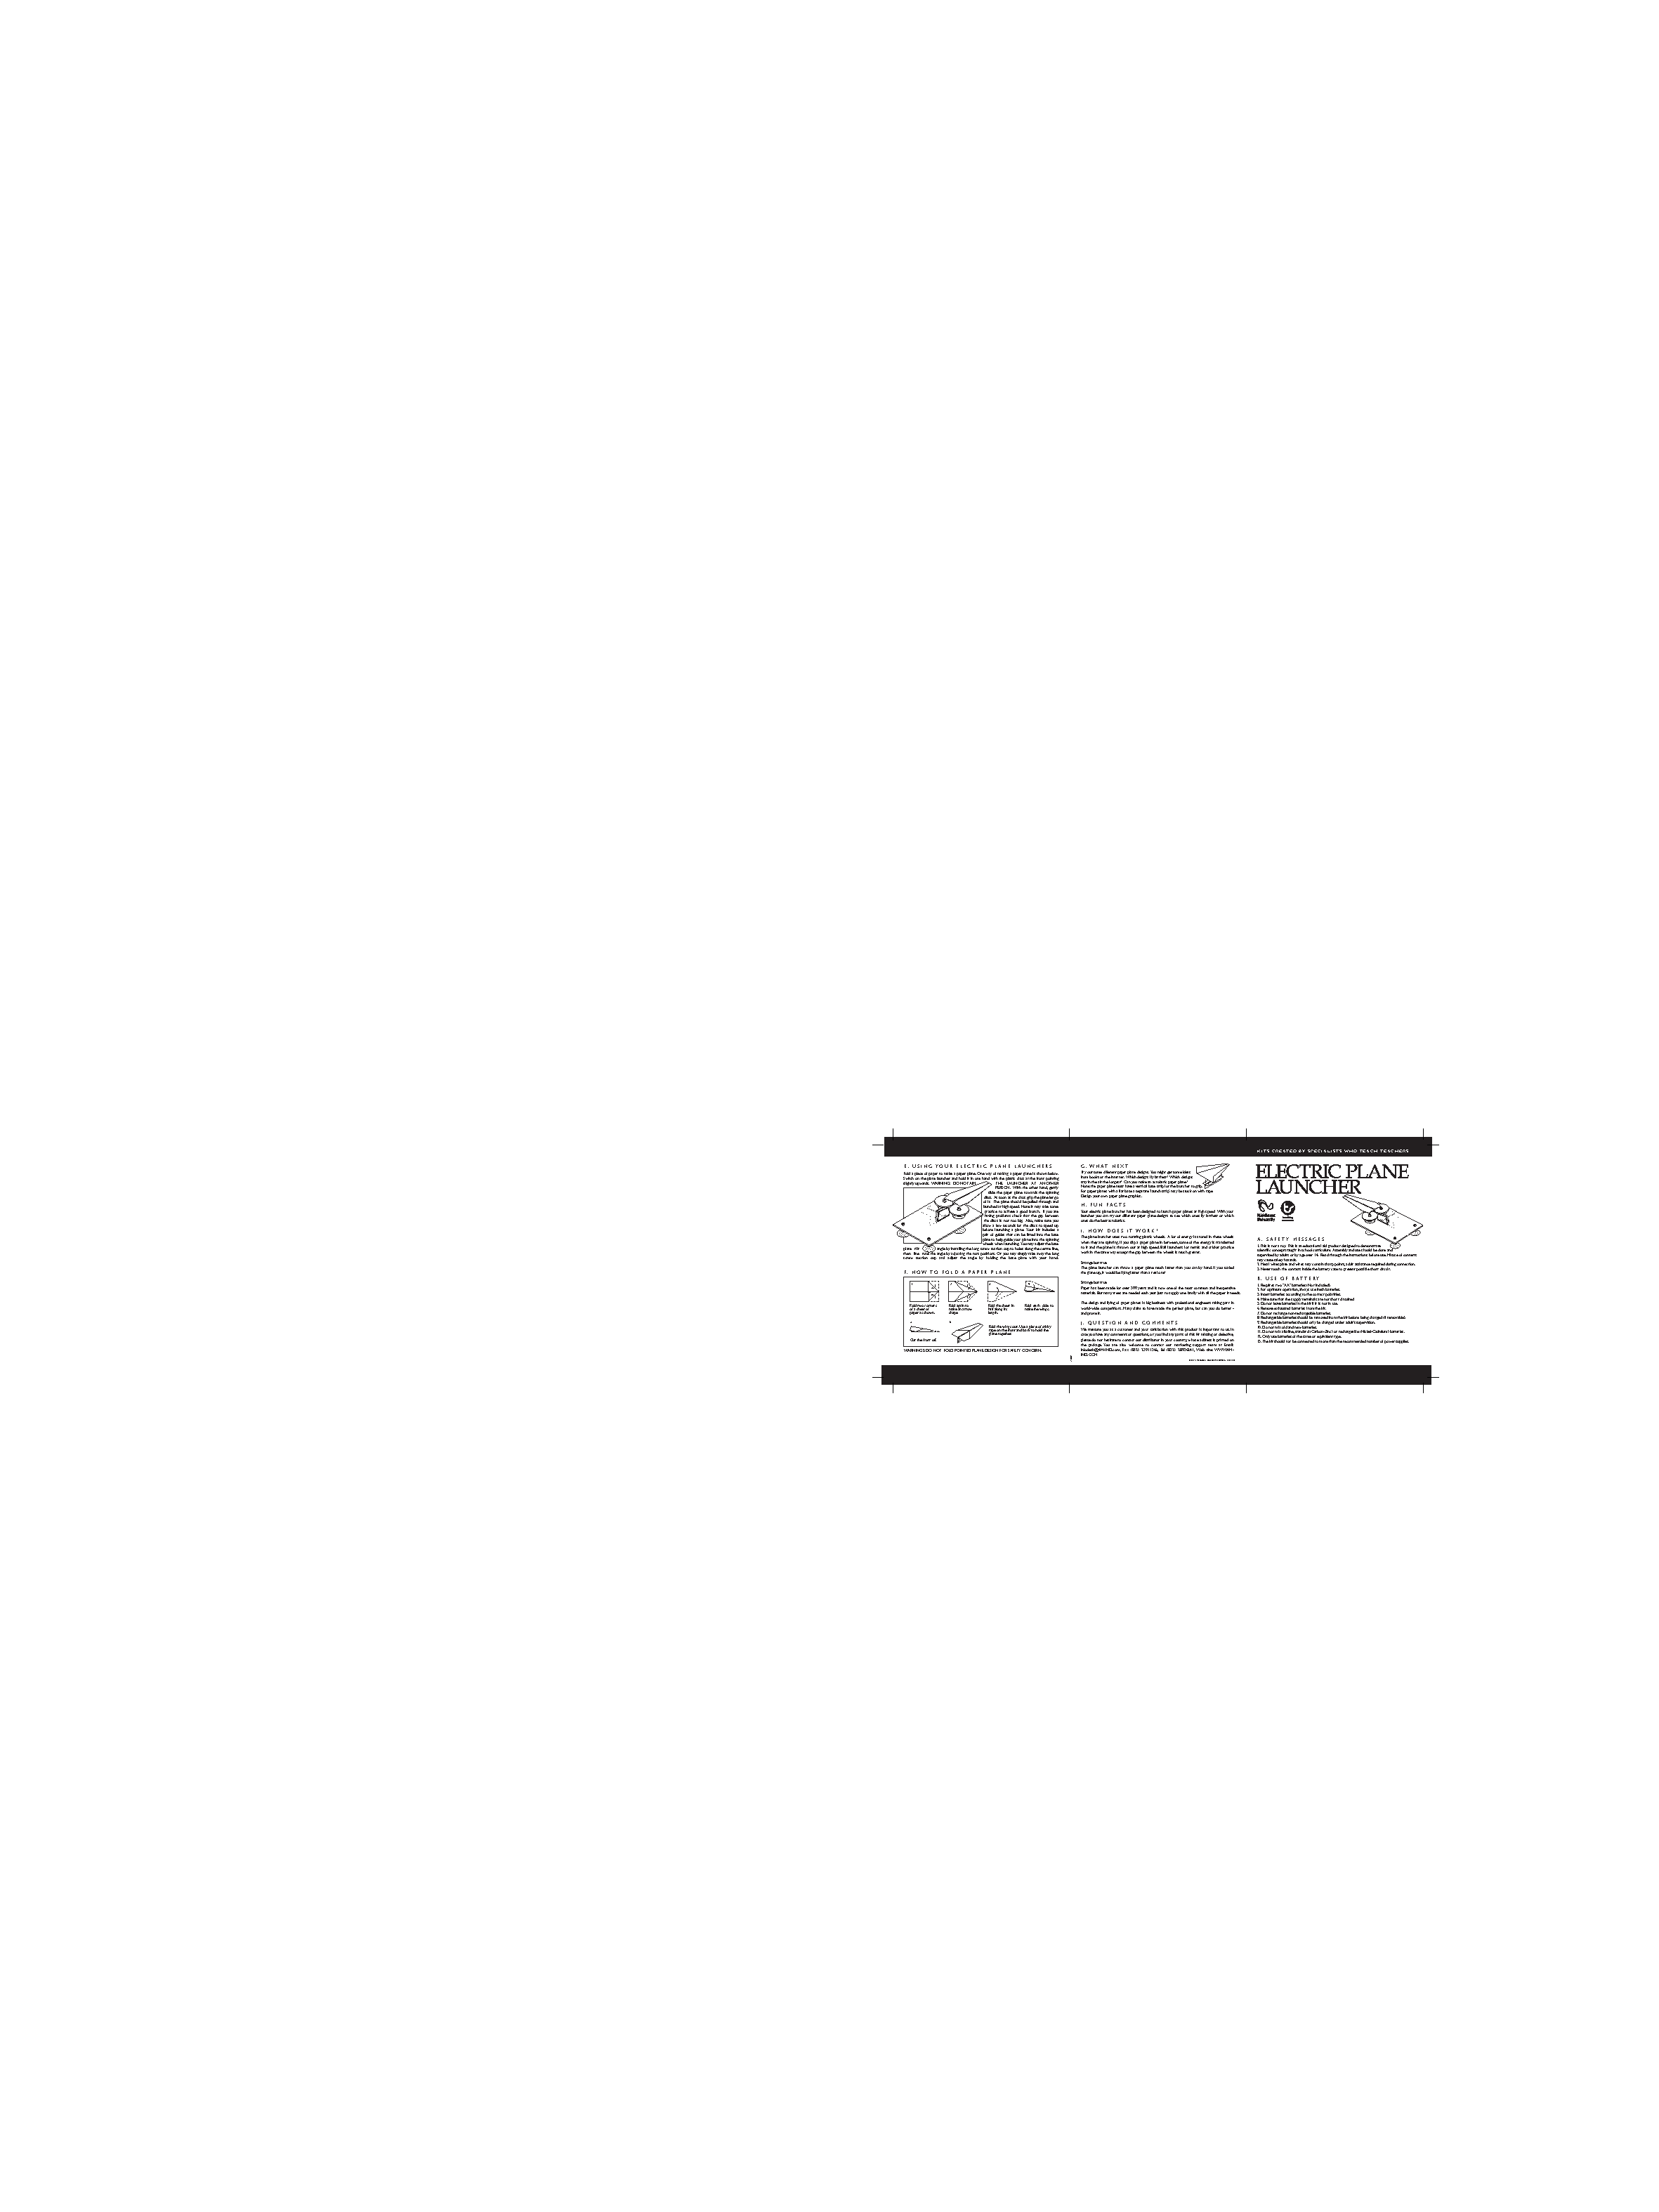
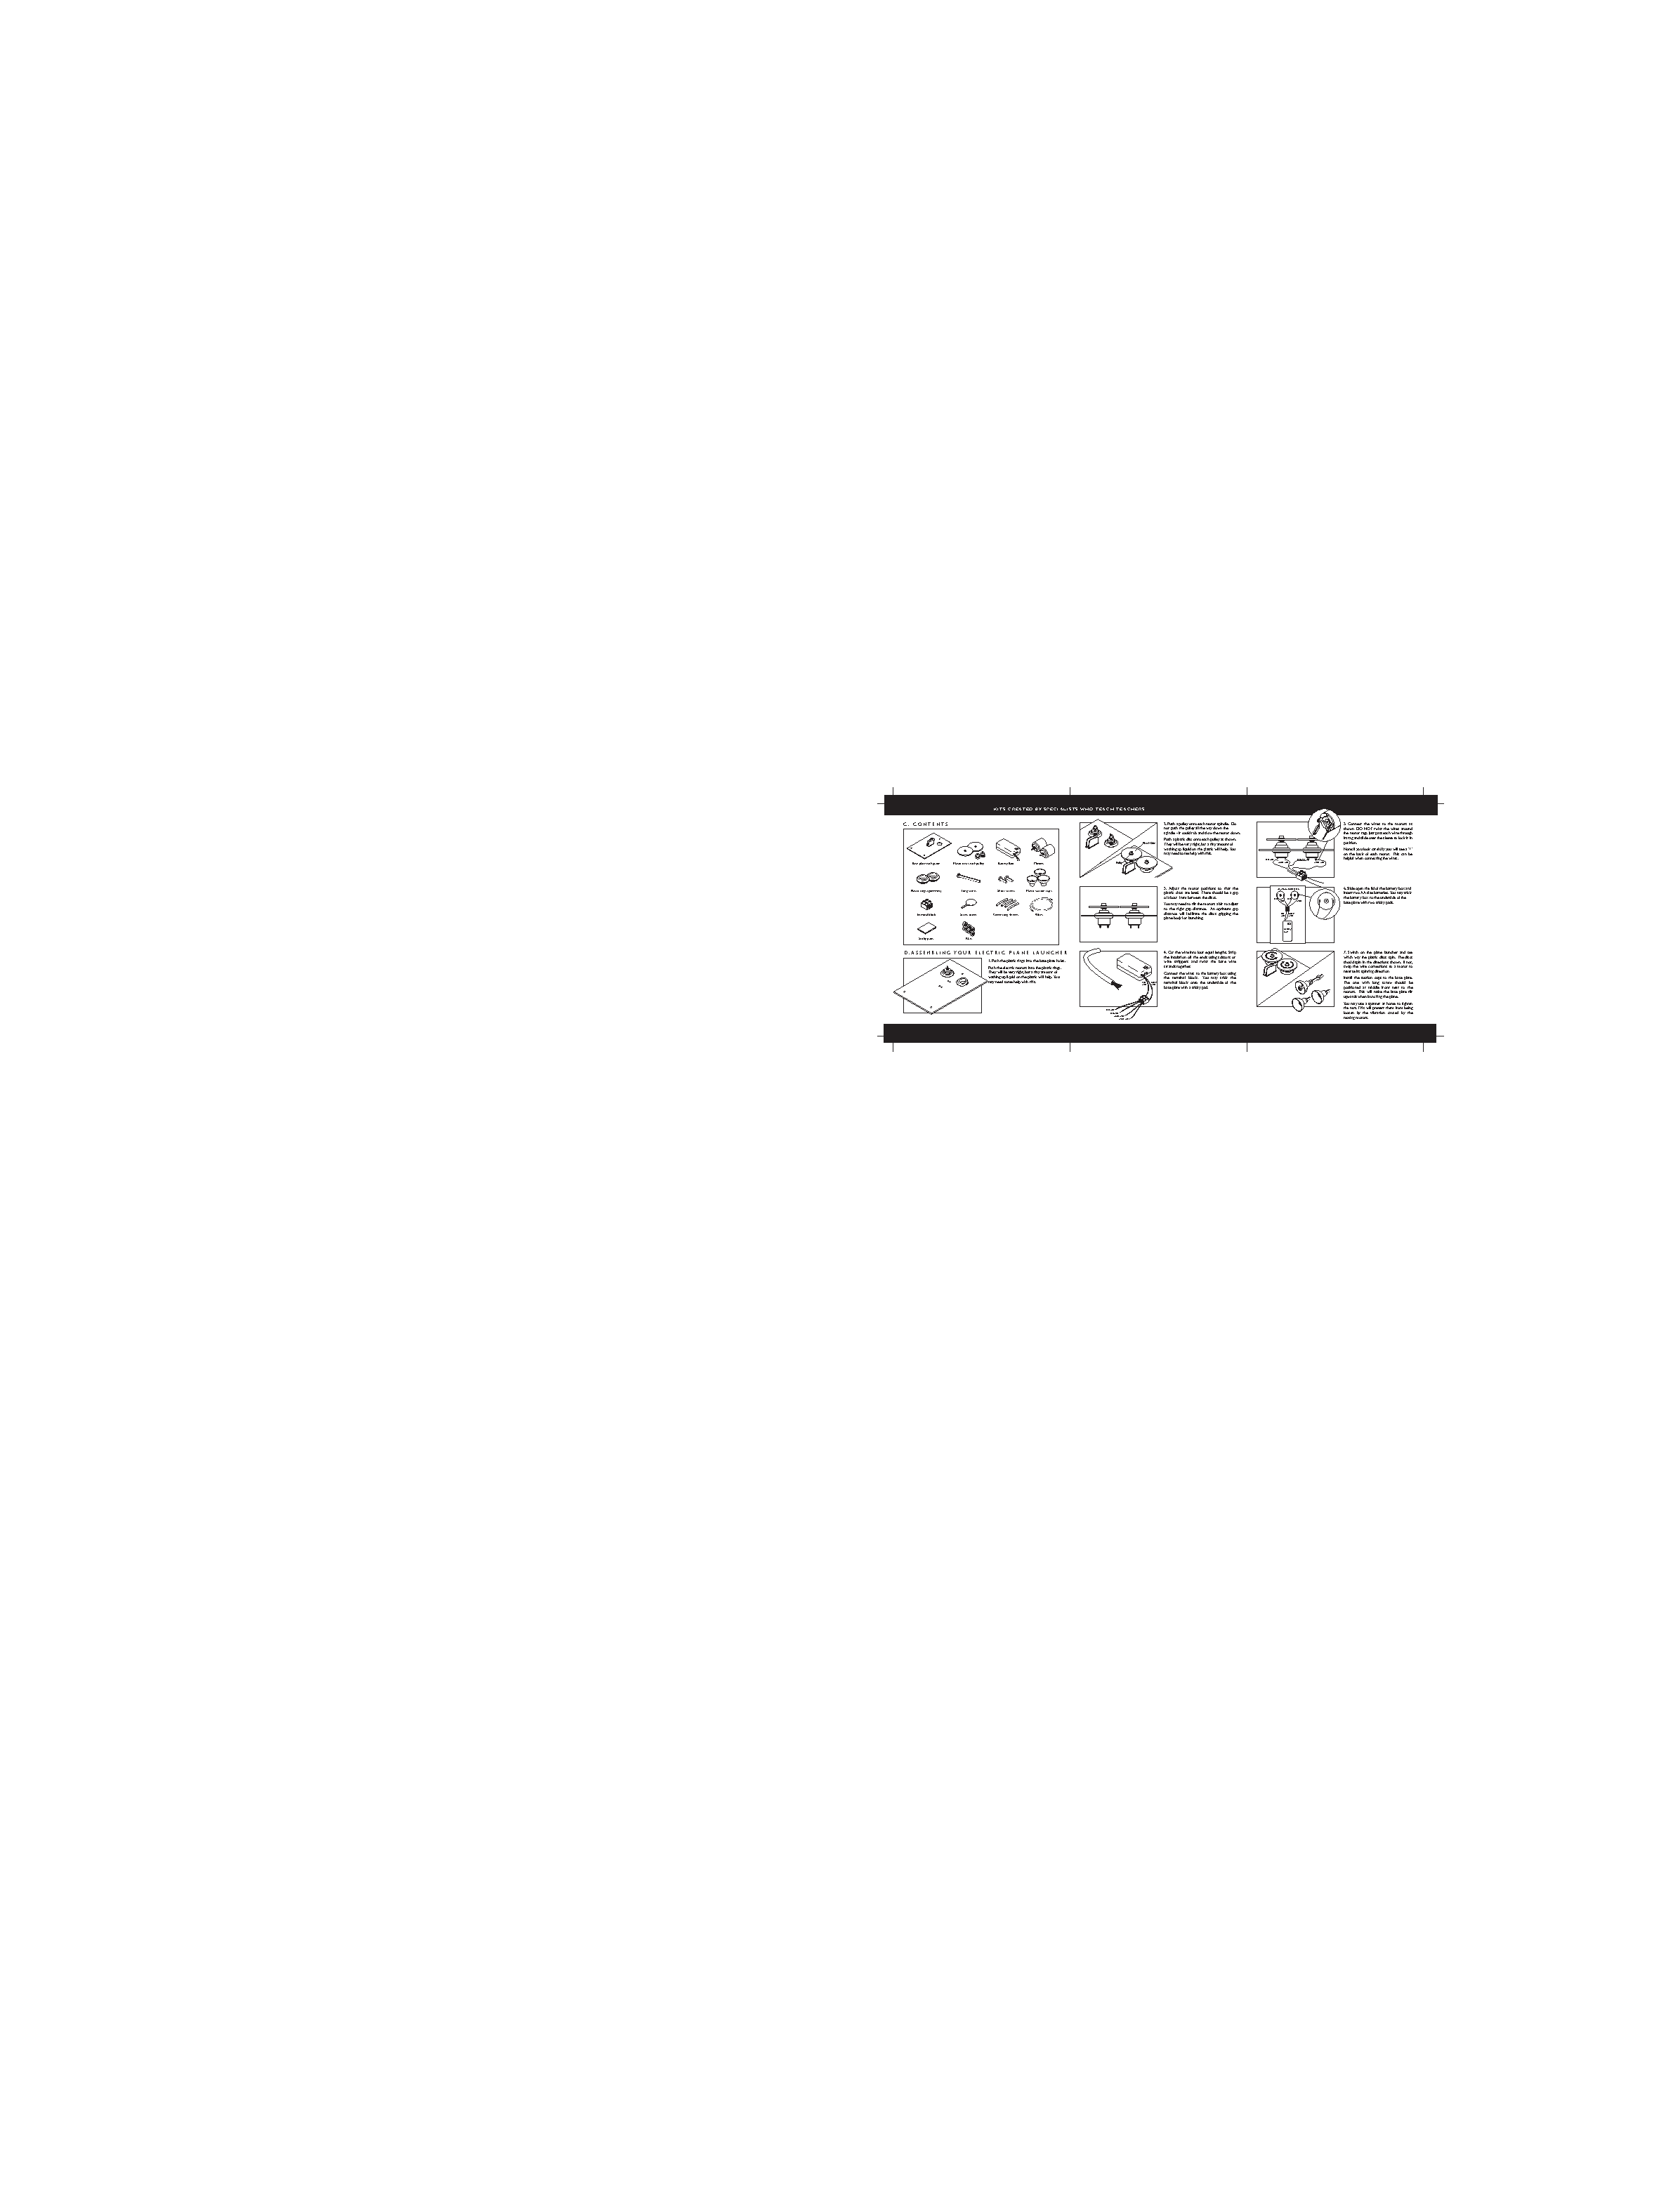
Push  a  pulley  onto  each  motor  spindle.    Do
not  push  the  pulley  all  the  way  down  the
spindle  -  it  could  rub  and  slow  the  motor
down.
Push a rubber disc onto each pulley as shown.
KITS CREATED BY  SPECIALISTS WHO TEACH TEACHERS
C .  CONTENTS                                                                                                                         2. Push a pulley onto each motor spindle.  Do                                               5.  Connect  the  wires  to  the  motors  as
not push the pulley all the way down the                                                    shown.  DO  NOT  twist  the  wires  around
spindle - it could rub and slow the motor down.                                             the motor tags. Just pass each wire through
Push a plastic disc onto each pulley as shown.                                              its tag and slide over the sleeve to lock it in                                                           +
Plastic Disc  They will be very tight, but a tiny amount of                                            position.
washing up liquid on the plastic will help.  You                                            Note: if you look carefully you will see a '+'
OFF – ON
may need some help with this.                                                               on  the  back  of  each  motor.  This  can  be
red wire        red wire                helpful when connecting the wires.
Base plate with guide  Plastic discs with pulley  Battery Box  Motors                                   Pulley                                                                             white wire         white wire
3.  Adjust  the  motor  positions  so  that  the          view from underneath              6. Slide open the lid of the battery box and
Plastic rings (grommet)   Long screw        Short screws   Plastic suction cups
plastic discs are level.  There should be a gap           +         +                       insert two AA size batteries.  You may stick
of about 1mm between the discs.                                                      +      the battery box to the underside of the
red   white  red   white            base plate with two sticky pads.
You may need to tilt the motors a bit to adjust
to  the  right  gap  distance.    An  optimum  gap
Terminal block        Screw driver     Connecting sleeves   Wires                                                              distance  will  facilitate  the  discs  gripping  the      red   black
wire
wire
plane body for launching.
battery
box
Sticky pads             Nuts
D .ASSEMBLING Y OUR ELECTRIC PLANE LA UNCHER                                                                                          4. Cut the wire into four equal lengths. Strip                                              7.  Switch  on  the  plane  launcher  and  see
the insulation off the ends using scissors or                                               which way the plastic discs spin.  The discs
1. Push the plastic rings into the base plate holes.                                       wire  strippers  and  twist  the  bare  wire                                                should spin in the directions shown.  If not,
Push the electric motors into the plastic rings.                                 OFF – ON  strands together.                                                                           swap the wire connections to a motor to
They will be very tight, but a tiny amount of                                              Connect the wires to the battery box using                                                  reverse its spinning direction.
washing up liquid on the plastic will help.  You                                           the  terminal  block.    You  may  stick  the                                               Install  the  suction  cups  to  the  base  plate.
may need some help with this.                                                  red   black  terminal  block  onto  the  underside  of  the                                             The  one  with  long  screw  should  be
wire  wire
base plate with a sticky pad.                                                               positioned  at  middle  front  near  to  the
motors.  This will make the base plate tilt
upwards when launching the plane.
You may use a spanner at home to tighten
the nuts. This will prevent them from being
red wire
red wire                                                                                                                loosen  by  the  vibration  caused  by  the
white wire                                                                                                            moving motors.
white wire
KITS CREATED BY  SPECIALISTS WHO TEACH TEACHERS
E.  USING Y OUR ELECTRIC PLANE LA UNCHERS                                                  G.   WHA T NEXT
Fold a piece of paper to make a paper plane. One way of making a paper plane is shown below.    Try out some different paper plane designs.  You might get some ideas
Switch on the plane launcher and hold it in one hand with the plastic discs at the front pointing   from books or the internet.  Which designs fly farthest?  Which designs
slightly upwards.  WARNING:  DO NOT AIM        THE  LAUNCHER  AT  ANOTHER                  stay in the air the longest?  Can you make an acrobatic paper plane?
PERSON.  With the other hand, gently        Note: the paper plane must have a vertical base strip for the launcher to grip.
slide  the  paper  plane  towards  the  spinning   For paper planes with a flat base a separate 'launch strip' may be stuck on with tape.
discs.  As soon as the discs grip the plane let go   Design your own paper plane graphics.
of it.  The plane should be pulled through and
launched at high speed. Note: It may take some    H.  FUN F A CTS
practice to achieve a good launch.  If you are   Your electric plane launcher has been designed to launch paper planes at high speed.  With your
having  problems  check  that  the  gap  between   launcher you can try out different paper plane designs to see which ones fly farthest or which
the discs is not too big.  Also, make sure you    ones do the best acrobatics.
allow a few seconds for the discs to speed up
before  launching  a  plane.  Your  kit  includes  a   I.  HO W DOES IT  W ORK?
pair of guides that can be fitted into the base
plate to help guide your plane into the spinning   The plane launcher uses two rotating plastic wheels.  A lot of energy is stored in these wheels   A.  SAFETY MESSA GES
wheels when launching. You may adjust the base     when they are spinning. If you slip a paper plane in between, some of the energy is transferred   1. This is not a toy.  This is an educational aid product designed to demonstrate
plate  tilt      angle by installing the long screw suction cup to holes along the centre line,   to it and the plane is thrown out at high speed. Ball launchers for tennis and cricket practice   scientific concepts taught in school curriculum.  Assembly and use should be done and
then  fine  tune the angle by adjusting the nuts positions. Or you may simply take away the long   work in the same way except the gap between the wheels is much greater.           supervised by adults or by age over 14.  Read through the instructions before use. Misuse of contents
screw  suction  cup  and  adjust  the  angle  by  holding  the  base  plate  with  your  hand.                                                                                       may cause safety hazards.
Strange but true                                                                          2. Metal wires plate and wires may contain sharp points, adult assistance required during connection.
The plane launcher can throw a paper plane much faster than you can by hand. If you scaled   3. Never touch the contacts inside the battery case to prevent possible short circuit.
F .  HO W  T O FOLD  A P APER PLANE                                                        the plane up, it would be flying faster than a real one!
B.  USE OF B A TTER Y
1                   2                   3                   4                          Strange but true                                                                          1. Requires two "AA" batteries (Not included).
Paper has been made for over 500 years and is now one of the most common and inexpensive   2. For optimum operation, always use fresh batteries.
materials. But many trees are needed each year just to supply one family with all the paper it needs.   3. Insert batteries according to the correct polarities.
4. Make sure that the supply terminals are not short circuited.
The design and flying of paper planes is big business with professional engineers taking part in   5. Do not leave batteries in the kit if it is not in use.
Fold two corners    Fold again to       Fold the sheet in   Fold  each  side  to
of a sheet of       make an arrow       half along its     make the wings.              world-wide competitions. Many claim to have made the perfect plane, but can you do better -   6. Remove exhausted batteries from the kit.
paper as shown.     shape.              length.                                         and prove it.                                                                             7. Do not recharge non-rechargeable batteries.
8. Rechargeable batteries should be removed from the kit before being charged (if removable).
5                    6                                                                  J.  QUESTION  AND COMMENTS                                                                9. Rechargeable batteries should only be charged under adult's supervision.
Fold the wings out. Use a piece of sticky                                                                                                10. Do not mix old and new batteries.
tape on the front and back to hold the         We treasure you as a customer and your satisfaction with this product is important to us. In   11. Do not mix alkaline, standard (Carbon-Zinc) or rechargeable (Nickel-Cadmium) batteries.
plane together.                                case you have any comments or questions, or you find any parts of this kit missing or defective,   12. Only use batteries of the same or equivalent type.
Cut the front off.                                                                      please do not hesitate to contact our distributor in your country, whose address is printed on   13. The kit should not be connected to more than the recommended number of power supplies.
the  package. You  are  also  welcome  to  contact  our  marketing  support  team  at  Email:
WARNINGS: DO NOT  FOLD POINTED PLANE DESIGN FOR SAFETY CONCERN.                            infodesk@4M-IND.com,  Fax  (852)  25911566,  Tel  (852)  28936241,  Web  site:  WWW.4M-
IND.COM
41-03906/1                                                   © 2005  4M INDUSTRIAL DEVELOPMENT LIMITED