На сайте 123396 инструкций общим размером 499.32 Гб , которые состоят из 6234837 страниц
Фото
Руководство пользователя 4M Эко энергия (00-03287). Основные функции, характеристики и условия эксплуатации изложены на 6 страницах документа в pdf формате.
Доступно к просмотру 6 страниц. Рекомендуем вам скачать файл инструкции, поскольку онлайн просмотр документа может сильно отличаться от оригинала.
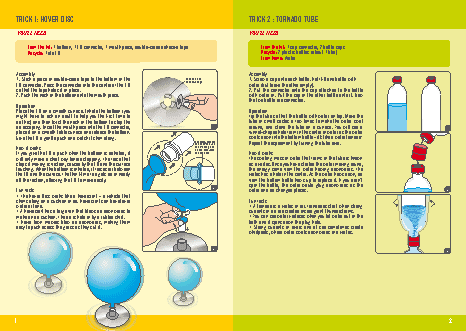
Trick 1: Hover Disc                                                                 Trick 2 : TorNADo TUBe
YOU’LL NEED                                                                         YOU’LL NEED
From the kit: 1 balloon, 1 CD connector, 1 mouth piece, double-sided adhesive tape  From the kit: 1 cap connector, 2 bottle caps
Recycle: 1 old CD                                                                   Recycle: 2 plastic bottles (about 1 liter)
From home: Water
Assembly                                                                            Assembly
1. Stick a piece of double-sided tape to the bottom of the   Double-sided           1. Screw a cap onto each bottle. Half fill one bottle with
adhesive tape
CD connector. Press the connector into the centre of the CD                         water (but leave the other empty).
so that the tape holds it in place.                                                 2. Put the connector onto the cap attached to the bottle
2. Push the neck of the balloon onto the mouth piece.                               with water in. Put the cap of the other bottle onto it. Now
the two bottle are connected.
Operation
Place the CD on a smooth surface. Inflate the balloon (you                          Operation
might have to ask an adult to help you the first time to                            Tip the tube so that the bottle with water on top. Move the
do this) and then twist the neck of the balloon to stop the                         tube in small circles a few times to make the water swirl
air escaping. Insert the mouth piece into the CD connector,            1            around, and stand the tube on a surface. You will see a                1
place it on a smooth table surface and release the balloon.                         funnel-shaped hole form in the centre of water as the water
Give the CD a gentle push and watch it skim along.                                  swirls down into the bottom bottle - it’s like a water tornado!
carefully stretch   Repeat the experiment by turning the tube over.
the balloon over
How it works                                                    the mouth piece
on the side with
If you give the CD a push when the balloon is deflated, it      the big hole.       How it works
will only move a short way before stopping. The force that                          The swirling mass of water that forms in the tube is known
stops it moving is friction, caused by the CD and the surface                       as a vortex. Once you have started the water moving round,
touching. When the balloon is inflated, it forces air between                       the energy come from the water flowing downwards. The
the CD and the surface. The thin film of air gets rid of nearly                     vortex has a hole in the centre. As the water flows down, air
all the friction, allowing the CD to move easily.                                   from the bottom bottle flows up to replace it. If you didn’t
spin the bottle, the water would glug downwards as the
Fun facts                                                              2            water and air changed places.                                          2
• The Hover Disc works like a hovercraft - a vehicle that
skims along on a cushion of air. Hovercraft can travel over                         Fun facts
water or land.                                                                      • A tornado is a vortex of air. Tornadoes start when strong
• A hovercraft has a large fan that blows air downwards to                          currents of air are created inside giant thunderstorms.
make an air cushion. The air is held in by a rubber skirt.                          • You can see water vortexes when you let water out of the
• Hover lawn mowers blow air downwards, making them                                 bath and it spins down the plug hole.
easy to push across the grass as they cut it.                                       • Strong currents in rivers and at sea sometimes create
whirlpools, where water swirls downwards in a vortex.
3
3
1                                                                                                                                                            2
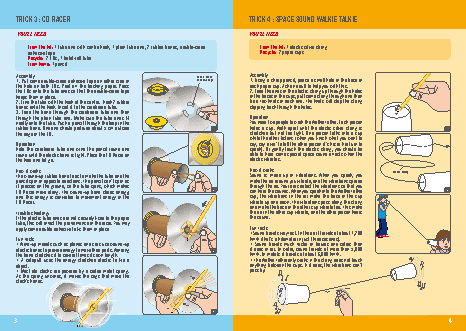
Trick 3 : cD rAcer                                                                  Trick 4 : sPAce soUND WALkie TALkie
YOU’LL NEED                                                                         YOU’LL NEED
From the kit: 1 tube end with centre hook, 1 plain tube end, 2 rubber bands, double-sided   From the kit: 1 elastic silver string
adhesive tape                                                                       Recycle:  2 paper cups
Recycle:  2 CDs, 1 toilet-roll tube
From home: 1 pencil
Assembly                                                         Double-sided       Assembly
1. Put some double-sided adhesive tape on either side of         adhesive tape      1. Using a sharp pencil, pierce a small hole in the base of
the hole on both CDs. Peel off the backing paper. Press                             each paper cup. Ask an adult to help you with this.
the CDs onto the tube ends so that the double-sided tape                            2. Feed the ends of the elastic string up through the holes
keeps them in place.                                                                in the bases of the cups, pull some string through and then
2. Find the tube with the hook at the centre.  Hook 2 rubber                        tie a few knots in each end. The knots will stop the string
bands onto the hook. Insert it to the cardboard tube.                               slipping back through the holes.
3.  Feed  the  band  through  the  cardboard  tube  and  then
through the plain tube end. Make sure the tube ends fit                             Operation
neatly onto the tube. Push a pencil through the loop in the                         You need two people to work the Walkie Talkie. Each person
rubber band. One end should protrude about 5 cm outside                1            holds a cup. Walk apart until the elastic silver string is             1
the edge of the CD.                                                                 stretched but not too tight. One person talks into a cup
while the other listens (when you finish what you want to
Operation                                                                           say, say ‘over’ to tell the other person it’s his or her turn to
Hold the cardboard tube and wind the pencil round and                               speak). Or gently touch the elastic string, you should be
round until the elastic band is tight. Place the CD Racer on                        able to hear some special space sound effects when the
the floor and let go.                                                               elastic vibrates.
How it works                                                                        How it works                                       elastic string
The wound-up rubber band tries to make the tube and the                             Sound  is  made  up  of  vibrations.  When  you  speak,  you
pencil spin in opposite directions. The pencil can’t spin as                        make the air around you vibrate, and the vibrations spread
it presses on the ground, so the tube spins, which makes                            through the air. Your ears detect the vibrations so that you
CD Racer move along. The wound-up band stores energy,                  2            can hear the sounds. When you speak into the Walkie Talkie             2
and this energy is converted to movement energy in the                              cup, the vibrations in the air make the base of the cup
CD Racer.                                                                           vibrate up and down. The vibrations pass along the string
and make the base of the other cup vibrate too. This make
Trouble shooting:                                                                   the air in the other cup vibrate, and the other person hears
If the plastic tube ends are not securely fixed to the paper                        the sound.
tube, this will affect the  performance of the racer. You may
apply some double adhesive to fix them in place                                     Fun facts
•Sound travels very fast. In the air it travels at about 1,200
Fun facts                                                                           km/h (that’s a kilometer in just three seconds).
• Wind-up models such as planes and cars use wound-up                               • Sound travels much faster in liquids and solids than
elastic bands to provide energy to move their parts. Winding           3            it does in air. In water, sound travels at more than 5,000
the band stretches it to several times its own length.                              km/h. In metals it travels at about 6,000 km/h.
• A catapult uses the energy stretched elastic to fire a                            • The Walkie Talkie only works if the string does not touch
object.                                                                             anything between the cups. If it does, the vibrations can’t
• Most old clocks are powered by a coiled metal spring.                             pass by.
As the spring unwinds, it moves the cogs that move the
clock’s hands.
4
3                                                                                                                                                            4
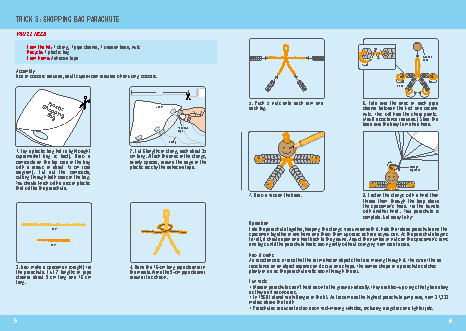
2NCUVKE
$CI
2NCUVKE
5JQRRKPI
$CI
Trick 5 : sHoPPiNG BAG PArAcHUTe                                                                         5JQRRKPI
2NCUVKE
YOU’LL NEED                                         2NCUVKE    5JQRRKPI
$CI
From the kit: 1 string, 1 pipe cleaner, 1 wooden bead, nuts  5JQRRKPI
2NCUVKE
$CI
Recycle: 1 plastic bag                         5JQRRKPI
$CI
From home: Adhesive tape                                     2NCUVKE                                                                          Wooden
bead
Assembly                                                        5JQRRKPI
$CI
Use of scissors required, adult supervision required when using scissors.
Bend
5.  Push  5  nuts  onto  each  arm  and   6.  Fold  over  the  ends  of  each  pipe
2NCUVKE
35cm
each leg.                                cleaner between the first and second
5JQRRKPI
$CI
2NCUVKE
nuts. This will hide the sharp points.
5JQRRKPI
(Adult assistance required.) Slide the
$CI
bead over the body to make a head.
Adhesive
tape
string
1. Lay a plastic bag flat (a lightweight   2. Cut 6 lengths of string, each about 35
supermarket  bag  is  best).  Draw  a    cm long. Attach the ends of the strings,
semicircle on the top side of the bag    evenly spaced, around the edge of the
with  a  radius  of  about  15  cm  (see   plastic disc by the adhesive tape.                                                                 strings
diagram).  Cut  out  the  semicircle,                                                                                                         together
cutting through both sides of the bag.
You should finish with a disc of plastic
that will be the parachute.
7. Draw a face on the bead.              8. Fasten the strings with a knot then
thread  them  through  the  loop  above
the  spaceman’s  head.  Tie  the  bundle
with another knot . Your parachute is
complete. Get ready to fly!
Operation
16cm                                                                    Fold the parachute together, keeping the strings free underneath it. Hold the folded parachute and the
spaceman together in one hand and throw them upwards as hard as you can. As the parachute begins
to fall, it should open and float back to the ground. Adjust the number of nuts on the spaceman’s arms
9cm                                                                     and legs until the parachute floats down gently without swinging from side to side.
How it works
Air resistance is a force that the air makes on objects that are moving through it. The size of the air
3. Now make a spaceman (weight) for      4. Bend the 16-cm long pipe cleaner in     resistance on an object depends on its size and shape. The domed shape of a parachute catches
the parachute. Cut 2 lengths of pipe     the middle. Wind the 9-cm pipe cleaner     plenty of air as the parachute falls down through the air.
cleaner  about  9  cm  long  and  16  cm   around it as shown.
long.                                                                               Fun facts
• Modern parachutes don’t float down to the ground vertically. They are blow-up wings that glide along
as they drift downwards.
• In 1960 Colonel Joe Kittenger of the US Air Force made the highest parachute jump ever, from 31,333
metres above the Earth
• Parachutes are used to slow down fast-moving vehicles, including dragsters and fighter jets.
5                                                                                                                                                            6