На сайте 123431 инструкция общим размером 499.45 Гб , которые состоят из 6236163 страниц
Фото

Руководство пользователя YAMAHA RX-V463. Основные функции, характеристики и условия эксплуатации изложены на 185 страницах документа в pdf формате.
Доступно к просмотру 185 страниц. Рекомендуем вам скачать файл инструкции, поскольку онлайн просмотр документа может сильно отличаться от оригинала.
F
OWNER’S MANUAL ИНСТРУКЦИЯ ПО ЭКСПЛУАТАЦИИ
RX-V463   AV Receiver
RX-V463
1003, 1042  1007, 1042, 1043,   1046, 1066  1044, 1048  1005, 1007  1004, 1048  1003, 1004, 1005  1043  1043  1050  1042, 1045, 1050  1044, 1048  1043, 1058  1043, 1047  1002, 1014  1045, 1050  1050  1013, 1024, 1029,   1043, 1046, 1066,   1075  1002, 1003, 1014  1050  1050  1045  1002, 1014  1042, 1045, 1046  1000  1044, 1048  1002, 1014  1002, 1003, 1004,   1005, 1006, 1008,   1010, 1014  1045  1013  1004, 1005, 1006  1000, 1001, 1007  1050  1050  1045, 1050  1013, 1026, 1037    WN25750
Tashiko  Tatung  TCM  Teac  Technics  Teknika  Teleavia  Telefunken  Tenosal  Tensai  Tevion  Thomson  Thorn  TMK  Tokai  Tonsai  Toshiba  Totevision  Towada  Towika  Uher  Unitech  Universum  Vector Research 1000  Video Concepts  Videon  Videosonic  Wards  Weltblick  White Westinghouse  XR-1000  Yamaha  Yamishi  Yokan  Yoko  Zenith  © 2008                                         All rights reserved.  Printed in China
1044, 1050  1047  1002, 1014, 1021,   1027, 1052, 1068,   1070  1008  1007, 1011, 1013,   1043  1001, 1002, 1014,   1047  1046  1042, 1043, 1047  1042, 1044, 1045,   1046, 1050  1012  1001, 1003, 1004,   1010  1050  1046  1043  1050  1008, 1023, 1028,   1053, 1073  1006, 1047, 1050  1045  1002, 1014  1045, 1047  1008  1045  1004, 1006  1046  1045  1016, 1019, 1055,   1060, 1064, 1074  1004, 1010  1044  1042  1042  1050  1004, 1005, 1031,   1041  1005  1044  1001
Saisho  Salora  Samsung  Sanky  Sansui  Sanyo  SBR  Schaub Lorenz  Schneider  Scott  Sears  SEG  SEI-Sinudyne  Seleco  Sentron  Sharp  Shintom  Shivaki  Shogun  Siemens  Signature 2000  Silva  Singer  Sinudyne  Sontec  Sony  STS  Sunkai  Sunstar  Suntronic  Sunwood  Sylvania  Symphonic  Taisho  Tandy
1004, 1020, 1034,   1040, 1048, 1054,   1072  1043  1010, 1014  1010, 1049  1042  1004, 1051  1004, 1025, 1033,   1046, 1056, 1057,   1059, 1062, 1063  1018  1046  1003  1011, 1046  1042  1050  1014  1042  1009  1044  1006  1046, 1056  1001  1001, 1047  1004, 1035  1042, 1046, 1047  1003  1001, 1002, 1003,   1004, 1005, 1008  1046  1003  1003  1002, 1004, 1009,   1010, 1014, 1015,   1022, 1032  1001, 1002, 1003,   1004, 1005, 1008  1043  1046  1045, 1050, 1066  1043
RX-V463_F-cv.fm  Page 1  Monday, January 28, 2008  6:09 PM
Panasonic  Pathe Marconi  Penney  Pentax  Perdio  Philco  Philips  Philips Magnavox  Phonola  Pilot  Pioneer  Prinz  Profex  Profitronic  Proline  Proscan  Prosonic  Protec  Pye  Quarter  Quartz  Quasar  Quelle  Radio Shack  Radio Shack/Realistic  Radiola  Radix  Randex  RCA  Realistic  Rex  RFT  Roadstar  Saba  YAMAHA ELECTRONICS CORPORATION, USA 6660 ORANGETHORPE AVE., BUENA PARK, CALIF. 90620, U.S.A. YAMAHA ELECTRONIK EUROPA G.m.b.H. SIEMENSSTR. 22-34, 25462 RELLINGEN BEI HAMBURG, GERMANY YAMAHA ELECTRONIQUE FRANCE S.A. RUE AMBROISE CROIZAT BP70 CROISSY-BEAUBOURG 77312 MARNE-LA-VALLEE CEDEX02, FRANCE YAMAHA ELECTRONICS (UK) LTD. YAMAHA HOU
1044, 1048  1001, 1002, 1003,   1004, 1005, 1008,   1013, 1014, 1042,   1045, 1047  1002, 1014  1044, 1048  1044, 1048  1011, 1042, 1046  1004, 1008  1002, 1014  1002, 1005, 1006,   1042, 1046, 1050  1000, 1001, 1007,   1011, 1043, 1051  1043, 1046  1002, 1014  1043, 1047  1042, 1043  1003, 1008  1012, 1013, 1044,   1042, 1045, 1050  1043, 1045, 1050  YAMAHA CANADA MUSIC LTD. 135 MILNER AVE., SCARBOROUGH, ONTARIO M1S 3R1, CANADA
1046  1004  1050  1048  1014  1042  1010  1008  1042  1048  1046  1050  1003  1043  1044  1004  1065  1042  1046
Mediator  Medion  MEI  Memorex  Memphis  Metz  MGA  MGN Technology  Micromaxx  Microstar  Migros  Minolta  Mitsubishi  Montgomery Ward  Motorola  MTC  Multitech  Murphy  National  NEC  Neckermann  NEI  Nesco  Nikko  Noblex  Nokia  Nordmende  Oceanic  Okano  Olympus  Optimus  Orion  Orson  Osaki  Otto Versand  Palladium  Black process 45.0° 240.0 LPI
CAUTION: READ THIS BEFORE OPERATING YOUR UNIT.
Caution: Read this before operating your unit.
1 To assure the finest performance, please read this manual   20 Excessive sound pressure from earphones and headphones can
carefully. Keep it in a safe place for future reference.  cause hearing loss.
2 Install this sound system in a well ventilated, cool, dry, clean   21 The batteries shall not be exposed to excessive heat such as
place – away from direct sunlight, heat sources, vibration,   sunshine, fire or the like.
dust, moisture, and/or cold. Allow ventilation space of at least
30 cm on the top, 20 cm on the left and right, and 20 cm on   WARNING
the back of this unit.                      TO REDUCE THE RISK OF FIRE OR ELECTRIC
3 Locate this unit away from other electrical appliances, motors,   SHOCK, DO NOT EXPOSE THIS UNIT TO RAIN
or transformers to avoid humming sounds.
OR MOISTURE.
4 Do not expose this unit to sudden temperature changes from
cold to hot, and do not locate this unit in a environment with
high humidity (i.e. a room with a humidifier) to prevent   This unit is not disconnected from the AC power
condensation inside this unit, which may cause an electrical   source as long as it is connected to the wall outlet, even
shock, fire, damage to this unit, and/or personal injury.
if this unit itself is turned off by ASTANDBY/ON.
5 Avoid installing this unit where foreign object may fall onto
this unit and/or this unit may be exposed to liquid dripping or   This state is called the standby mode. In this state, this
splashing. On the top of this unit, do not place:  unit is designed to consume a very small quantity of
– other components, as they may cause damage and/or   power.
discoloration on the surface of this unit.
– burning objects (i.e. candles), as they may cause fire,   ¦ For U.K. customers
damage to this unit, and/or personal injury.
– containers with liquid in them, as they may fall and liquid   If the socket outlets in the home are not suitable for the
may cause electrical shock to the user and/or damage to   plug supplied with this appliance, it should be cut off and
this unit.                              an appropriate 3 pin plug fitted. For details, refer to the
6 Do not cover this unit with a newspaper, tablecloth, curtain,   instructions described below.
etc. in order not to obstruct heat radiation. If the temperature
inside this unit rises, it may cause fire, damage to this unit,
and/or personal injury.                    Note
7 Do not plug in this unit to a wall outlet until all connections   The plug severed from the mains lead must be destroyed, as a
are complete.                             plug with bared flexible cord is hazardous if engaged in a live
8 Do not operate this unit upside-down. It may overheat,   socket outlet.
possibly causing damage.                  ¦ Special Instructions for U.K. Model
9 Do not use force on switches, knobs and/or cords.
10 When disconnecting the power cable from the wall outlet,   IMPORTANT
grasp the plug; do not pull the cord.       THE WIRES IN MAINS LEAD ARE COLOURED IN
11 Do not clean this unit with chemical solvents; this might   ACCORDANCE WITH THE FOLLOWING CODE:
damage the finish. Use a clean, dry cloth.
12 Only voltage specified on this unit must be used. Using this   Blue: NEUTRAL
unit with a higher voltage than specified is dangerous and may   Brown: LIVE
cause fire, damage to this unit, and/or personal injury. Yamaha
As the colours of the wires in the mains lead of this apparatus
will not be held responsible for any damage resulting from use
may not correspond with the coloured markings identifying
of this unit with a voltage other than specified.
the terminals in your plug, proceed as follows:
13 To prevent damage by lightning, keep the power cord and   The wire which is coloured BLUE must be connected to the
outdoor antennas disconnected from a wall outlet or the unit   terminal which is marked with the letter N or coloured
during a lightning storm.                   BLACK. The wire which is coloured BROWN must be
connected to the terminal which is marked with the letter L or
14 Do not attempt to modify or fix this unit. Contact qualified
coloured RED.
Yamaha service personnel when any service is needed. The
Making sure that neither core is connected to the earth
cabinet should never be opened for any reasons.
terminal of the three pin plug.
15 When not planning to use this unit for long periods of time
(i.e. vacation), disconnect the AC power plug from the wall
outlet.                                               This symbol mark is according to the
16 Install this unit near the AC outlet and where the AC power   EU directive 2002/96/EC.
plug can be reached easily.
17 Be sure to read the “Troubleshooting” section on common   This symbol mark means that electrical
operating errors before concluding that this unit is faulty.
and electronic equipment, at their end-
18 Before moving this unit, press ASTANDBY/ON to set this   of-life, should be disposed of separately
unit in the standby mode, and disconnect the AC power plug   from your household waste.
from the wall outlet.
19 VOLTAGE SELECTOR (Asia and General models only)      Please act according to your local rules
The VOLTAGE SELECTOR on the rear panel of this unit   and do not dispose of your old products
must be set for your local main voltage BEFORE plugging   with your normal household waste.
into the AC wall outlet. Voltages are:
Asia model ............................ 220/230–240 V AC, 50/60 Hz
General model  ........ 110/120/220/230–240 V AC, 50/60 Hz
En
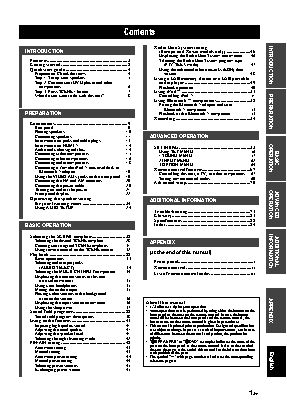
Contents
Radio Data System tuning
INTRODUCTION                                    (Europe and Russia models only) ....................46
Displaying the Radio Data System information...... 46
Features ................................................................... 2  Selecting the Radio Data System program type
Getting started ........................................................ 3  (PTY SEEK mode).............................................. 47  INTRODUCTION
Quick start guide .................................................... 4  Using the enhanced other networks (EON) data
Preparation: Check the items..................................... 4  service.................................................................. 48
Step 1: Set up your speakers...................................... 5  Using a USB memory device or a USB portable
Step 2: Connect your DVD player and other    audio player .......................................................49
components............................................................ 6  Playback operation .................................................. 49
Step 3: Press SCENE 1 button................................... 7  Using iPod™ ..........................................................51
What do you want to do with this unit?..................... 8  Controlling iPod™................................................... 51
Using Bluetooth™ components............................53
Pairing the Bluetooth™ adapter and your
Bluetooth™ component....................................... 53
PREPARATION                                     Playback of the Bluetooth™ component................. 53  PREPARATION
Recording...............................................................54
Connections............................................................. 9
Rear panel.................................................................. 9
Placing speakers....................................................... 10
Connecting speakers................................................ 11  ADVANCED OPERATION
Information on jacks and cable plugs...................... 13
Information on HDMI™.......................................... 14  SET MENU............................................................55
Audio and video signal flow.................................... 14  Using SET MENU................................................... 56
Connecting video components................................. 15  1 SOUND MENU.................................................... 57
Connecting other components ................................. 16  2 INPUT MENU...................................................... 62  OPERATION  BASIC
Connecting audio components................................. 18  3 OPTION MENU................................................... 64
Connecting a Yamaha iPod™ universal dock or   Remote control features........................................67
Bluetooth™ adapter............................................. 19  Controlling this unit, a TV, or other components.... 67
Using the VIDEO AUX jacks on the front panel .... 19  Setting remote control codes ................................... 69
Connecting the FM and AM antennas..................... 20  Advanced setup......................................................70
Connecting the power cable..................................... 20
Turning on and off the power.................................. 21
Front panel display .................................................. 22
Optimizing the speaker setting             ADDITIONAL INFORMATION
for your listening room .................................... 24                      OPERATION
Using AUTO SETUP .............................................. 24                     ADVANCED
Troubleshooting.....................................................71
Glossary..................................................................81
Specifications .........................................................83
BASIC OPERATION                                Index.......................................................................84
Selecting the SCENE templates........................... 28
Selecting the desired SCENE template.................... 28  APPENDIX
Creating your original SCENE templates................ 31
Using remote control on the SCENE feature........... 32
Playback ................................................................ 33  (at the end of this manual)  INFORMATION  ADDITIONAL
Basic operations....................................................... 33
Selecting audio input jacks                 Front panel................................................................i
(AUDIO SELECT).............................................. 34  Remote control ....................................................... ii
Selecting the MULTI CH INPUT component......... 34  List of remote control codes ................................. iii
Displaying the current status of this unit
on a video monitor............................................... 35
Using your headphones............................................ 35
Muting the audio output........................................... 35
Playing video sources in the background
of an audio source................................................ 36
Displaying the input source information ................. 36  About this manual
Using the sleep timer ............................................... 37  • y indicates a tip for your operation.
Sound field programs........................................... 38  • Some operations can be performed by using either the buttons on the   APPENDIX
front panel or the ones on the remote control. In case the button
Sound field program descriptions............................ 38  names differ between the front panel and the remote control, the
Using audio features............................................. 41  button name on the remote control is given in parentheses.
Enjoying high quality sound.................................... 41  • This manual is printed prior to production. Design and specifications
Adjusting the tonal quality....................................... 41  are subject to change in part as a result of improvements, etc. In case
Adjusting the speaker level...................................... 41  of differences between the manual and product, the product has
Selecting the night listening mode........................... 42  priority.
FM/AM tuning...................................................... 43  •“JSPEAKERS” or “3DVD” (example) indicates the name of the
parts on the front panel or the remote control. Refer to the attached
Automatic tuning ..................................................... 43  sheet or the pages at the end of this manual for the information about
Manual tuning.......................................................... 43  each position of the parts.
Automatic preset tuning........................................... 44  • The symbol “?  ” with page number(s) indicates the corresponding
Manual preset tuning ............................................... 44  reference page(s).  English
Selecting preset stations........................................... 45
Exchanging preset station........................................ 45
1 En