На сайте 123390 инструкций общим размером 499.31 Гб , которые состоят из 6234587 страниц
Фото

Руководство пользователя YAMAHA R-S201. Основные функции, характеристики и условия эксплуатации изложены на 193 страницах документа в pdf формате.
Доступно к просмотру 193 страницы. Рекомендуем вам скачать файл инструкции, поскольку онлайн просмотр документа может сильно отличаться от оригинала.
G G
Integrated AmplifierReceiver
Amplificateur IntegreAmpli-Tuner
OWNER’S MANUALOWNER’S MANUAL
MODE D’EMPLOIMODE D’EMPLOI
BEDIENUNGSANLEITUNGBEDIENUNGSANLEITUNG
BRUKSANVISNINGBRUKSANVISNING
MANUALE DI ISTRUZIONIMANUALE DI ISTRUZIONI
MANUAL DE INSTRUCCIONESMANUAL DE INSTRUCCIONES
GEBRUIKSAANWIJZINGGEBRUIKSAANWIJZING
ИНСТРУКЦИЯ ПО ЭКСПЛУАТАЦИИ
© 2013 Yamaha Corporation                                                Printed in Malaysia ZH10650
CAUTION: READ THIS BEFORE OPERATING YOUR UNIT.
CAUTION: READ THIS BEFORE OPERATING YOUR UNIT.
1  To assure the finest performance, please read this manual   17 Before moving this unit, press A (power) to set this unit
carefully. Keep it in a safe place for future reference.  to standby mode, and then disconnect the AC power plug
2  Install this sound system in a well ventilated, cool, dry,   from the AC wall outlet.
clean place - away from direct sunlight, heat sources,   18 Condensation will form when the surrounding
vibration, dust, moisture, and/or cold. For proper   temperature changes suddenly. Disconnect the power
ventilation, allow the following minimum clearances   cable from the outlet, then leave this unit alone.
around this unit.                         19 When using this unit for a long time, this unit may
Top: 30 cm (11-3/4 in)                       become warm. Turn the power off, then leave this unit
Rear: 20 cm (7-7/8 in)                       alone for cooling.
Sides: 20 cm (7-7/8 in)                   20 Install this unit near the AC wall outlet and where the AC
3  Locate this unit away from other electrical appliances,   power plug can be reached easily.
motors, or transformers to avoid humming sounds.  21 The batteries shall not be exposed to excessive heat such
4  Do not expose this unit to sudden temperature changes   as sunshine, fire or the like.
from cold to hot, and do not locate this unit in an   22 Excessive sound pressure from earphones and
environment with high humidity (i.e. a room with a   headphones can cause hearing loss.
humidifier) to prevent condensation inside this unit,
which may cause an electrical shock, fire, damage to this   This unit is not disconnected from the AC power source as long as
unit, and/or personal injury.              it is connected to the AC wall outlet, even if this unit itself is turned
off by A. This state is called the standby mode. In this state, this
5  Avoid installing this unit where foreign object may fall
onto this unit and/or this unit may be exposed to liquid   unit is designed to consume a very small quantity of power.
dripping or splashing. On the top of this unit, do not
place:                                     WARNING
– Other components, as they may cause damage and/or   TO REDUCE THE RISK OF FIRE OR ELECTRIC SHOCK, DO
discoloration on the surface of this unit.  NOT EXPOSE THIS UNIT TO RAIN OR MOISTURE.
– Burning objects (i.e. candles), as they may cause fire,
damage to this unit, and/or personal injury.
– Containers with liquid in them, as they may fall and
liquid may cause electrical shock to the user and/or
damage to this unit.
6  Do not cover this unit with a newspaper, tablecloth,
curtain, etc. in order not to obstruct heat radiation. If the   This label is required to be attached to a product of which
temperature inside this unit rises, it may cause fire,   the temperature of the top cover may be hot during
damage to this unit, and/or personal injury.  operation.
7  Do not plug in this unit to an AC wall outlet until all
connections are complete.                 ¦ For U.K. customers
8  Do not operate this unit upside-down. It may overheat,   If the socket outlets in the home are not suitable for the
possibly causing damage.                  plug supplied with this appliance, it should be cut off and
9  Do not use force on switches, knobs and/or cords.  an appropriate 3 pin plug fitted. For details, refer to the
10 When disconnecting the power cable from the AC wall   instructions described below.
outlet, grasp the plug; do not pull the cable.
11 Do not clean this unit with chemical solvents; this might   Note
damage the finish. Use a clean, dry cloth.
12 Only voltage specified on this unit must be used. Using   The plug severed from the mains lead must be destroyed,
this unit with a higher voltage than specified is dangerous   as a plug with bared flexible cord is hazardous if engaged
and may cause fire, damage to this unit, and/or personal   in a live socket outlet.
injury. Yamaha will not be held responsible for any
damage resulting from use of this unit with a voltage   ¦ Special Instructions for U.K. Model
other than specified.
13 To prevent damage by lightning, keep the power cable   IMPORTANT
and outdoor antennas disconnected from an AC wall   THE WIRES IN MAINS LEAD ARE COLOURED IN
outlet or this unit during a lightning storm.   ACCORDANCE WITH THE FOLLOWING CODE:
14 Do not attempt to modify or fix this unit. Contact   Blue: NEUTRAL
Brown: LIVE
qualified Yamaha service personnel when any service is
As the colours of the wires in the mains lead of this apparatus may
needed. The cabinet should never be opened for any
not correspond with the coloured markings identifying the
reasons.
terminals in your plug, proceed as follows:
15 When not planning to use this unit for long periods of
The wire which is coloured BLUE must be connected to the
time (i.e. vacation), disconnect the AC power plug from
the AC wall outlet.                        terminal which is marked with the letter N or coloured BLACK.
The wire which is coloured BROWN must be connected to the
16 Be sure to read the “TROUBLESHOOTING” section on   terminal which is marked with the letter L or coloured RED.
common operating errors before concluding that this unit
Make sure that neither core is connected to the earth terminal of the
is faulty.
three pin plug.
i En
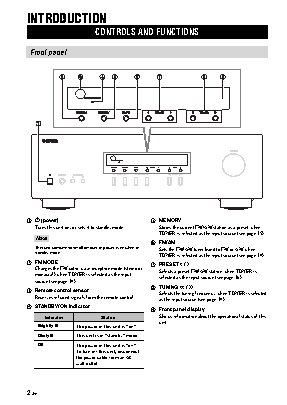
CONTENTS
INTRODUCTION                                 BASIC OPERATION
USEFUL FEATURES............................................ 1  PLAYBACK ..........................................................12
SUPPLIED ACCESSORIES ................................. 1  Playing a source....................................................... 12  INTRODUCTION
CONTROLS AND FUNCTIONS ......................... 2  Using the sleep timer ............................................... 13
Front panel................................................................. 2  FM/AM TUNING..................................................14
Front panel display .................................................... 4  Using preset functions ............................................. 14
Rear panel.................................................................. 5  Receiving Radio Data System information
Remote control........................................................... 6  (Only for Europe model) ..................................... 18
Using the remote control ........................................... 8
ADVANCED OPERATION
PREPARATION
SETTING THE OPTION MENU FOR EACH         PREPARATION
CONNECTIONS .................................................... 9  INPUT SOURCE...............................................19
Connecting speakers and source components............ 9  Option menu items................................................... 19
Connecting the FM and AM antennas..................... 11
Connecting power cable .......................................... 11
ADDITIONAL INFORMATION
TROUBLESHOOTING .......................................20
SPECIFICATIONS...............................................23
¦ About this manual                                                                       OPERATION  BASIC
• y indicates a tip for your operation.
• The instructions in this manual describe the operation of this unit with the supplied remote control. You can also use the buttons or
knobs on the front panel if they have the same or similar names as those on the remote control.
USEFUL FEATURES
This unit allows you to:                                                                  OPERATION  ADVANCED
? Listen to FM and AM radio stations (see page 14)  ? Save power by using the AUTO POWER STANDBY
? Use the remote control of this unit to operate a Yamaha   function (see page 19)
CD player (see page 7)
SUPPLIED ACCESSORIES
Please check that you received all of the following parts.                                INFORMATION
Remote control                       Indoor FM antennas                       ADDITIONAL
* One of the above is supplied depending on the region of purchase.
AM loop antenna            Batteries (x2)
(AA, R6, UM-3)
1 En   English