На сайте 123408 инструкций общим размером 499.34 Гб , которые состоят из 6235299 страниц
Фото
Руководство пользователя YAMAHA NS-C444. Основные функции, характеристики и условия эксплуатации изложены на 12 страницах документа в pdf формате.
Доступно к просмотру 12 страниц. Рекомендуем вам скачать файл инструкции, поскольку онлайн просмотр документа может сильно отличаться от оригинала.
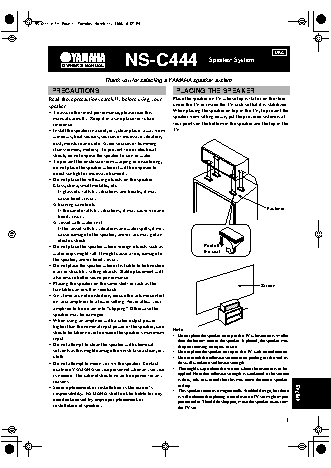
URG
NS-C444                       Speaker System
OWNER’S MANUAL
Thank you for selecting a YAMAHA speaker system.
.
PRECAUTIONS                                 PLACING THE SPEAKER
Read these precautions carefully before using your   Place the speaker on TV whose top is flat or on the floor
speaker.                                    under the TV or inside the TV rack so that it is stabilized.
• To assure the finest performance, please read this   When placing the speaker on top of the TV, to prevent the
manual carefully. Keep it in a safe place for future   speaker from falling down, put the provided fasteners at
reference.                                 four points on the bottom of the speaker and the top of the
• Install the speaker in a cool, dry, clean place - away from   TV.
windows, heat sources, sources of excessive vibration,
dust, moisture and cold. Avoid sources of humming
(transformers, motors). To prevent fire or electrical
shock, do not expose the speaker to rain or water.
• To prevent the enclosure from warping or discoloring,
do not place the speaker where it will be exposed to
direct sunlight or excessive humidity.
• Do not place the following objects on the speaker:
Glass, china, small metallic, etc.
If glass etc. falls by vibrations and breaks, it may
cause bodily injury.
A burning candle etc.
If the candle falls by vibrations, it may cause fire and                   Fastener
bodily injury.
A vessel with water in it
If the vessel falls by vibrations and water spills, it may
cause damage to the speaker, and/or you may get an
electric shock.
• Do not place the speaker where foreign objects such as   Peel off
the seal
water drips might fall. It might cause a fire, damage to
the speaker, and/or bodily injury.
• Do not place the speaker where it is liable to be knocked
over or struck by falling objects. Stable placement will
also ensure better sound performance.
• Placing the speaker on the same shelf or rack as the                      Screen
turntable can result in feedback.
• Any time you note distortion, reduce the volume control
on your amplifier to a lower setting. Never allow your
amplifier to be driven into “clipping”. Otherwise the
speaker may be damaged.
• When using an amplifier with a rated output power
higher than the nominal input power of the speaker, care
Note
should be taken never to exceed the speaker’s maximum   • Do not place the speaker on top of the TV whose area is smaller
input.
than the bottom area of the speaker. If placed, the speaker may
• Do not attempt to clean the speaker with chemical   drop out causing an injury to you.
solvents as this might damage the finish. Use a clean, dry   • Do not place the speaker on top of the TV with an inclination.
cloth.                                     • Do not touch the adhesive surface after peeling off the seal as
• Do not attempt to modify or fix the speaker. Contact   this will weaken its adhesive strength.
qualified YAMAHA service personnel when any service   • Thoroughly wipe clean the surface where the fastener is to be
is needed. The cabinet should never be opened for any   applied. Note that adhesive strength is weakened if the surface
reasons.                                     is dirty, oily or wet and that this may cause the center speaker
to drop.
• Secure placement or installation is the owner’s
• This speaker features a magnetically shielded design, but there
responsibility. YAMAHA shall not be liable for any                                     English
is still a chance that placing it too close to a TV set might impair
accident caused by improper placement or
picture color. Should this happen, move the speaker away from
installation of speaker.                     the TV set.
1
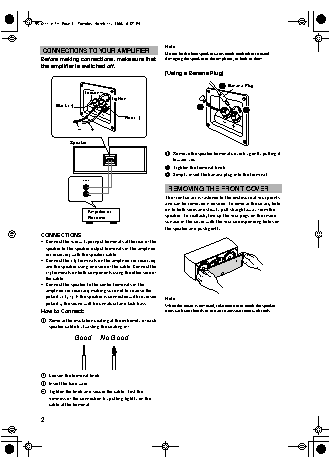
Note
CONNECTIONS TO YOUR AMPLIFIER
Do not let the bare speaker wires touch each other to avoid
Before making connections, make sure that   damaging the speaker or the amplifier, or both of them.
the amplifier is switched off.
[Using a Banana Plug]
2 Banana Plug
Loosen
Tighten
Black (–)
1
3
Red (+)
Speaker
1 Remove the speaker terminal cover by gently pulling it
toward you.
2 Tighten the terminal knob.
3 Simply insert the banana plug into the terminal.
CENTER
+
REMOVING THE FRONT COVER
The front cover is fastened to the enclosure at four points
and can be removed if desired. To remove the cover, hold
on to both sides and slowly pull straight away from the
Amprifier or
Receiver                   speaker. To reattach, line up the four pegs on the inside
surface of the cover with the four corresponding holes on
the speaker and push gently.
CONNECTIONS
• Connect the screw-type input terminals at the rear of the
speaker to the speaker output terminals of the amplifier
(or receiver) with the speaker cable.
• Connect the (+) terminals on the amplifier (or receiver)
and the speaker using one side of the cable. Connect the
(–) terminals on both components using the other side of
the cable.
• Connect the speaker to the center terminals of the
amplifier (or receiver) making sure not to reverse the
polarity (+, –). If the speaker is connected with reversed   Note
polarity, the sound will be unnatural and lack bass.
When the cover is removed, take care not to touch the speaker
How to Connect:                             units with your hands or to exert excessive force with tools.
1 Remove the insulation coating at the extremity of each
speaker cable by twisting the coating off.
Good     No Good
2 Loosen the terminal knob.
3 Insert the bare wire.
4 Tighten the knob and secure the cable. Test the
firmness of the connection by pulling lightly on the
cable at the terminal.
2
SPECIFICATIONS
Type............... 2-way acoustic suspecsion speaker system
magnetic shielding type
Driver.....................................13 cm (5") cone woofer x 2
2.5 cm (1") dome tweeter
Frequency response ..................................55 Hz – 35 kHz
Nominal impedance............................................... 6 ohms
Nominal input power.............................................. 100 W
Maximum input power ........................................... 250 W
Sensitivity................................................ 89 dB/2.83 V/m
Crossover frequency................................................ 3 kHz
Dimensions (W x H x D)... 514 mm x 190 mm x 213 mm
(20.2"x 7.5" x 8.4")
Weight ..............................................7.3 kg (16 lbs. 1 oz.)
Accessories.................................................... Fastener x 4
• Specifications subject to change without notice due to
product improvements.
• Care should be taken not to exceed the input power
values noted above.
3  English