На сайте 123439 инструкций общим размером 499.47 Гб , которые состоят из 6236258 страниц
Фото
Руководство пользователя YAMAHA NS-AW294 / NS-AW194. Основные функции, характеристики и условия эксплуатации изложены на 2 страницах документа в pdf формате.
Доступно к просмотру 2 страницы. Рекомендуем вам скачать файл инструкции, поскольку онлайн просмотр документа может сильно отличаться от оригинала.
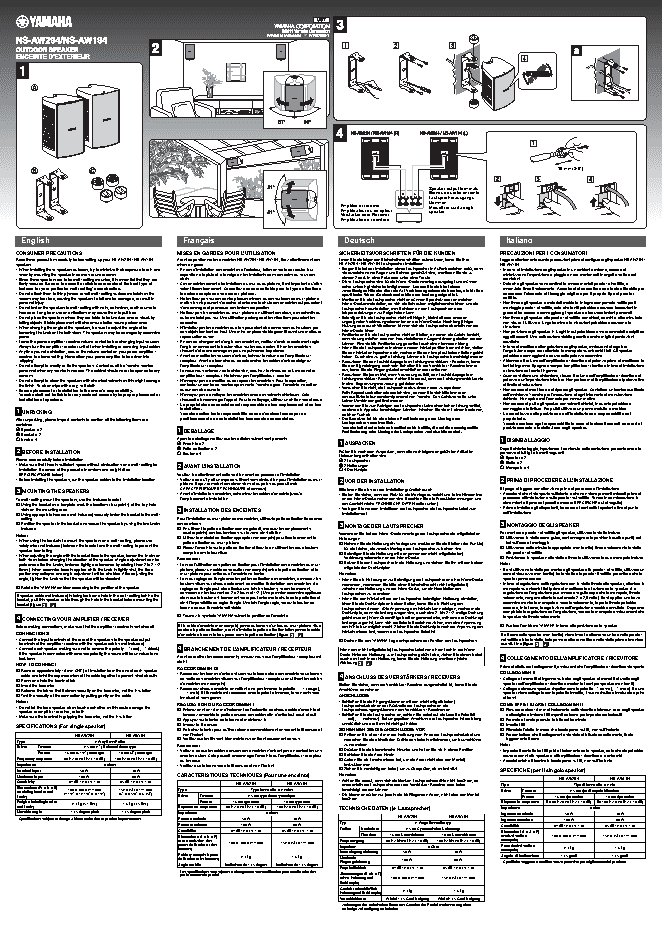
10 mm (3/8") Speaker output terminals Bornes de sortie enceinte Lautsprecherausgangs- klemmen Amplifier or receiver Morsetti di uscita degli Amplificateur ou recepteur speaker Verstarker oder Receiver Amplificatore o ricevitore English Francais Deutsch Italiano CONSUMER PRECAUTIONS MISES EN GARDES POUR L’UTILISATION SICHERHEITSVORSCHRIFTEN FUR DIE KUNDEN PRECAUZIONI PER I CONSUMATORI Read these precautions carefully before setting up your NS-AW294 / NS-AW194 Avant de positionner les enceintes NS-AW294 / NS-AW194, lisez attentivement ces Lesen Sie die folgenden Sicherheitsvorschriften aufmerksam, bevor Sie Ihre Leggere attentamente queste precauzioni prima di configurare gli speaker NS-AW294 / speakers. mises en garde. NS-AW294 / NS-AW194 Lautsprecher installieren. NS-AW194. • When installing these speakers outdoors, try to minimize their exposure to rain and • En cas d’installation des enceintes a l’exterieur, faites en sorte de reduire leur • Sorgen Sie bei der Installation dieser Lautsprecher in Au?enbereichen dafur, dass • In caso di installazione degli speaker in un ambiente esterno, cercare di snow by mounting the speaker in corners or under eaves. exposition a la pluie et a la neige en les installants dans des coins ou sous des sie ausreichend vor Regen und Schnee geschutzt sind; montieren Sie sie zu minimizzarne l’esposizione a pioggia e neve montandoli in angoli o sotto a dei diesem Zweck in einer Ecke oder unter einer Traufe. • Since these speakers are to be wall / ceiling mounted, it is essential that they are abris. cornicioni. • Diese Lautsprecher sind fur die Wand-/Deckenmontage ausgelegt und mussen firmly secured. Be sure to consult a reliable source about the best type of • Ces enceintes devant etre installees au mur ou au plafond, il est important qu’elles daher unbedingt sicher befestigt werden. Lassen Sie sich bei einem • Dato che gli speaker sono destinati a essere montati parete / al soffitto, e fastener for your particular wall / ceiling’s construction. soient fixees fermement. Consultez une source fiable pour le type de fixations essenziale fissarli saldamente. Accertarsi di consultare una fonte affidabile per zuverlassigen Handler uber die Art Verbindungselemente beraten, die fur Ihre • Do not attach them to thin plywood or soft wall / ceiling surface materials as the les mieux adaptees a vos murs / plafond. spezifische Wand-/Deckenkonstruktion am besten geeignet ist. conoscere l’elemento di fissaggio migliore per il proprio tipo di parete / screws may tear free, causing the speakers to fall and be damaged, or result in • Ne les fixez pas sur des contre-plaques minces ou des surfaces de mur / plafond • Montieren Sie die Lautsprecher nicht an dunnem Sperrholz oder an weichen soffitto. personal injury. molles les vis pouvant s’arracher et entrainer la chute des enceintes qui pourraient Wand-/Deckenmaterialien, da sich die Schrauben moglicherweise losen und die • Non fissare gli speaker a materiali morbidi o in legno compensato sottile per il • Do not fasten the speakers to wall / ceiling with nails, adhesives, or other unsafe s’endommager et provoquer des lesions corporelles. Lautsprecher herunterfallen, was Schaden an den Lautsprechern oder montaggio parete / al soffitto, dato che le viti potrebbero causare lacerazioni in hardware. Long-term use and vibrations may cause them to pull free. • Ne fixez pas les enceintes au mur / plafond en utilisant des clous, des adhesifs ou Korperverletzungen zur Folge haben kann. grado di far cadere e danneggiare gli speaker o di causare lesioni personali. • Do not place the speakers where they are liable to be knocked over or struck by autre materiel peu sur. Une utilisation prolongee et les vibrations pourraient les • Befestigen Sie die Lautsprecher nicht mit Nageln, Klebstoff oder anderen • Non fissare gli speaker alla parete / al soffitto con chiodi, adesivi o altre minuterie falling objects. Stable placement will also ensure better sound performance. decrocher. ungeeigneten Verbindungselementen an der Wand/Decke. Nach langjahriger non sicure. L’utilizzo a lungo termine e le vibrazioni potrebbero causarne la Nutzung oder durch Vibrationen konnen sich die Lautsprecher ebenfalls von der • When changing the angle of the speakers, be sure to adjust the angle after • N’installez pas les enceintes ou elles pourraient etre renversees ou heurtees par rimozione. Wand/Decke losen. loosening the knob on the both sides. The speakers may be damaged by excessive des objets tombant de haut. Une mise en place stable garantit aussi une meilleure • Positionieren Sie die Lautsprecher nicht an Stellen, an denen die Gefahr besteht, • Non posizionare gli speaker in luoghi in cui potrebbero essere rovesciati o colpiti da power. reproduction du son. oggetti cadenti. Una collocazione stabile garantira anche migliori prestazioni dass sie umgesto?en oder von herunterfallenden Gegenstanden getroffen werden • Lower the power amplifier / receiver volume control before changing input sources. • En cas de changement d’angle des enceintes, verifiez d’avoir correctement regle konnen. Eine stabile Positionierung garantiert auch einen besseren Klang. acustiche. Always turn the amplifier / receiver unit off when installing or removing input cables. l’angle en desserrant le bouton situe sur les deux cotes. Sinon les enceintes • Wenn Sie die Lautsprecher in einem anderen Winkel positionieren mochten, stellen • In fase di modifica dell’angolazione degli speaker, assicurarsi di regolare • Anytime you note distortion, reduce the volume control on your power amplifier / risquent d’etre endommagees par une puissance trop elevee. Sie den Winkel entsprechend ein, nachdem Sie den Knopf auf beiden Seiten gelost l’angolazione dopo aver allentato la manopola su entrambi i lati. Gli speaker receiver to a lower setting. Never allow your power amplifier to be driven into • Avant de modifier les sources d’entree, baissez le volume de l’amplificateur / haben. Durch eine zu gro?e Leistung konnen die Lautsprecher beschadigt werden. potrebbero danneggiarsi a causa della potenza eccessiva. “clipping”. recepteur. Avant de brancher ou de debrancher les cables d’entree eteignez • Reduzieren Sie den Lautstarkepegel des Leistungsverstarkers / Receivers, bevor • Abbassare il volume dell’amplificatore / ricevitore di potenza prima di modificare le • Do not attempt to modify or fix the speakers. Contact qualified Yamaha service l’amplificateur / recepteur. Sie den Signaleingang wechseln. Schalten Sie der Verstarker / Receiver immer fonti di ingresso. Spegnere sempre l’amplificatore / ricevitore in fase di installazione personnel when any service is needed. The cabinet should never be opened for any • Lorsque vous entendez de la distorsion, reduisez le niveau de volume de votre aus, bevor Sie die Eingangskabel anschlie?en oder entfernen. o rimozione dei cavi di ingresso. reasons. amplificateur / recepteur. Ne laissez pas l’amplificateur «ecreter». • Reduzieren Sie jedes Mal, wenn Verzerrung auftritt, den Lautstarkepegel am • Quando si rileva una distorsione, ridurre il volume dell’amplificatore / ricevitore di • Do not attempt to clean the speakers with chemical solvents as this might damage • N’essayez pas de modifier ou de reparer les enceintes. Pour la reparation, Leistungsverstarker / Receiver. Achten Sie darauf, dass der Leistungsverstarker nie potenza a un’impostazione inferiore. Non portare mai l’amplificatore di potenza fino the finish. To clean wipe with a dry, soft cloth. contactez un centre de service apres-vente Yamaha agree. L’enceinte ne doit en in eine „Begrenzungsverzerrung“ getrieben wird. al livello di saturazione. • Secure placement or installation is the owner’s responsibility. aucun cas etre ouverte. • Versuchen Sie nicht, die Lautsprecher abzuandern oder zu reparieren. • Non cercare di modificare o di riparare gli speaker. Contattare un tecnico qualificato Falls Reparaturarbeiten erforderlich sind, wenden Sie sich bitte immer an Yamaha shall not be liable for any accident caused by improper placement or • N’essayez pas de nettoyer les enceintes avec des solvants chimiques. Cela das qualifizierte Kundendienstpersonal von Yamaha. Das Gehause sollte unter dell’assistenza Yamaha per l’esecuzione di ogni intervento di manutenzione installation of speakers. risquerait d’endommager l’appret. Pour le nettoyage, utilisez un chiffon sec et doux. keinen Umstanden geoffnet werden. richiesto. Non aprire mai l’armadio per nessun motivo. • Le proprietaire des enceintes est responsable de leur emplacement et de leur • Verwenden Sie zum Reinigen der Lautsprecher keine chemischen Losungsmittel, • Non cercare di pulire gli speaker con solventi chimici, in quanto potrebbero installation. da diese die Appretur beschadigen konnten. Wischen Sie sie mit einem trockenen, danneggiare le finiture. Per pulirli utilizzare un panno asciutto e morbido. 1 UNPACKING Yamaha decline toute responsabilite en cas d’accident cause par un weichen Tuch ab. • La correttezza della posizione e dell’installazione e responsabilita del positionnement ou une installation inadequate des enceintes. • Der Benutzer ist fur die sichere Positionierung oder Montage der proprietario. After unpacking, please inspect contents to confirm all the following items are contained. Lautsprecher verantwortlich. Yamaha esclude ogni responsabilita in caso di incidenti causati da errori di Yamaha haftet unter keinen Umstanden fur Unfalle, die auf die unsachgema?e posizionamento o installazione degli speaker. A Speaker ? 2 1 DEBALLAGE Positionierung oder Montage der Lautsprecher zuruckzufuhren sind. B Bracket ? 2 C Knob ? 4 Apres le deballage verifiez que les articles suivant sont presents. 1 DISIMBALLAGGIO A Enceinte ? 2 1 AUSPACKEN B Patte de fixation ? 2 Dopo il disimballaggio, ispezionare il contenuto della confezione per confermare la 2 BEFORE INSTALLATION Prufen Sie nach dem Auspacken, dass alle nachfolgend angefuhrten Artikel im presenza di tutti gli elementi seguenti. C Bouton ? 4 Lieferumfang enthalten sind. Please read carefully before installation. A 2 Lautsprecher A Speaker ? 2 • Make sure that there is sufficient space without obstructions on a wall / ceiling for 2 AVANT L’INSTALLATION B 2 Halterungen B Staffa ? 2 installation. Be aware of the product dimensions and weight (See C 4 Drehknopfe C Manopola ? 4 SPECIFICATIONS below). Veuillez lire attentivement cette section avant de proceder a l’installation. • Before installing the speakers, run the speaker cables to the installation location. • Veillez a ce qu’il y ait un espace suffisant sans obstruction pour l’installation au mur / 2 VOR DER INSTALLATION 2 PRIMA DI PROCEDERE ALL’INSTALLAZIONE plafond. Soyez conscient des dimensions et du poids du produit (voir CARACTERISTIQUES TECHNIQUES ci-dessous). Bitte lesen Sie dies vor der Installation grundlich durch. Si prega di leggere con attenzione prima di procedere all’installazione. 3 MOUNTING THE SPEAKERS • Avant d’installer les enceintes, acheminez les cables d’enceinte jusqu’a • Stellen Sie sicher, dass der Platz fur die Montage ausreicht und keine Hindernisse • Accertarsi che vi sia spazio sufficiente e che non siano presenti ostacoli prima di To wall / ceiling mount the speakers, use the included bracket. l’emplacement d’installation. an der Wand/Decke vorhanden sind. Beachten Sie die Produktabmessungen und procedere all’installazione sulla parete / sul soffitto. Tenere in considerazione le ! Using the bracket as a template mark the locations (four points) of the key hole das Gewicht (siehe TECHNISCHE DATEN weiter unten). dimensioni e il peso del prodotto (vedere SPECIFICHE qui di seguito). slots on the mounting area. 3 INSTALLATION DES ENCEINTES • Verlegen Sie vor dem Installieren der Lautsprecher die Lautsprecherkabel zum • Prima d'installare gli altoparlanti, far correre i cavi dell'altoparlante fino al punto ± Using appropriate hardware (not included) securely fasten the bracket to the wall / Installationsort. dell'installazione. ceiling. Pour l’installation au mur / plafond des enceintes, utilisez la patte de fixation livree avec # Position the speaker in the bracket and secure the speaker by using the two knobs ces dernieres. 3 MONTAGE DER LAUTSPRECHER 3 MONTAGGIO DEGLI SPEAKER included. ! En utilisant la patte de fixation comme gabarit, marquez les emplacements (quatre points) des boutonnieres sur la zone d’installation. Verwenden Sie bei der Wand-/Deckenmontage der Lautsprecher die mitgelieferten Per montare a parete / al soffitto gli speaker, utilizzare la staffa inclusa. Notes: ± Utilisez le materiel de fixation approprie (non compris) pour fixer fermement la Halterungen. ! Utilizzando la staffa come guida, contrassegnare le posizioni (quattro punti) dei • When using the brackets to mount the speakers on a wall / ceiling, please use patte de fixation au mur / plafond. ! Nehmen Sie die Halterung als Vorlage und markieren Sie die Stellen (vier Punkte) fori sull’area di montaggio. safety wire (not included) between the bracket and the wall / ceiling to prevent the # Placez l’enceinte sur la patte de fixation et fixez-la en utilisant les deux boutons fur die Locher, die zwecks Montage der Lautsprecher zu bohren sind. ± Utilizzando della minuteria appropriata (non fornita) fissare saldamente la staffa speaker from falling. compris dans la fourniture. ± Befestigen Sie die Halterung mit den passenden (nicht mitgelieferten) alla parete / al soffitto. • When adjusting the angle with the bracket fixed to the speaker, loosen the knobs on # Posizionare lo speaker nella staffa e fissarlo utilizzando le due manopole incluse. both sides before changing the direction of the speaker. (Angle adjustment can be Remarques : Verbindungselementen an der Wand/Decke. performed after the knobs, fastened tightly, are loosened by rotating them 2 to 2-1/2 • Lors de l’utilisation des pattes de fixation pour l’installation des enceintes au mur / # Setzen Sie den Lautsprecher in die Halterung und sichern Sie ihn mit den beiden Note: times.) When excessive force is applied while the knob is tightly shut, the fixed plafond, placez un cable de securite (non compris) entre la patte de fixation et le mitgelieferten Drehknopfen. • Se si utilizzano le staffe per montare gli speaker alla parete / al soffitto, utilizzare un portion may collapse and angle adjustment will be disabled. After adjusting the mur / plafond pour eviter que l’enceinte ne tombe. Hinweise: cavo di sicurezza (non fornito) tra la staffa e la parete / il soffitto per evitare che lo angle, tighten the knob so that the speaker will be steadfast. • Lors du reglage de l’angle avec les pattes de fixation des enceintes, desserrez les • Wenn Sie die Halterungen zur Befestigung der Lautsprecher an einer Wand/Decke speaker possa cadere. boutons situes sur chaque cote avant de modifier l’orientation des enceintes. (Le verwenden, verwenden Sie bitte einen Sicherheitsdraht (nicht mitgeliefert) • In fase di regolazione dell’angolazione con la staffa fissata allo speaker, allentare le $ Rotate the YAMAHA emblem according to the position of the speaker. reglage de l’angle peut etre effectue une fois les boutons, serres fermement, zwischen der Halterung und der Wand/Decke, um ein Herabfallen des manopole su entrambi i lati prima di modificare la direzione dello speaker. (La desserres en les tournant de 2 a 2 tours et 1/2.) Une pression excessive appliquee Lautsprechers zu vermeiden. regolazione dell’angolazione puo essere eseguita dopo che le manopole, fissate If speaker cable (not included) is being fed from a hole in the wall / ceiling behind the alors que le bouton est fermement serre peut entrainer la chute de la partie fixe et • Wenn Sie den Winkel mit der am Lautsprecher befestigten Halterung einstellen, saldamente, vengono allentate ruotandole 2 o 2,5 volte.) Se si applica una forza bracket, pull this speaker cable through the hole in the bracket before mounting the ainsi l’impossibilite de regler l’angle. Une fois l’angle regle, serrez le bouton de eccessiva mentre la manopola e serrata saldamente, la parte fissata potrebbe bracket [figure 3 - a ]. losen Sie die Drehknopfe an beiden Seiten, bevor Sie die Richtung des facon a ce que l’enceinte soit stable. Lautsprechers andern. (Die Anpassung des Winkels kann erfolgen, nachdem die cedere e, in tal caso, la regolazione dell’angolazione sarebbe annullata. Dopo aver Drehknopfe, wenn sie fest angezogen sind, durch eine 2- bis 2 1/2-malige Drehung completato la regolazione dell’angolazione, serrare la manopola assicurandosi che $ Tournez le symbole YAMAHA suivant la position de l’enceinte. gelost wurden.) Wenn uberma?ige Kraft angewendet wird, wahrend der Drehknopf lo speaker sia fissato saldamente. 4 CONNECTING YOUR AMPLIFIER / RECEIVER fest angezogen ist, kann sich der fixierte Bereich verziehen, was eine Anpassung Si le cable d’enceinte (non compris) passe au travers d’un trou du mur / plafond situe $ Ruotare l’emblema YAMAHA in base alla posizione dello speaker. Before making connections, make sure that the amplifier / receiver is switched off. des Winkels unmoglich macht. Ziehen Sie die Drehknopfe nach der Anpassung des derriere la patte de fixation, avant d’installer la patte de fixation faites passer le cable CONNECTIONS d’enceinte a travers le trou perce dans la patte de fixation [figure 3 - a ]. Winkels wieder fest, sodass der Lautsprecher fixiert ist. Se il cavo dello speaker (non fornito) viene inserito attraverso un foro nella parete / • Connect the input terminals at the rear of the speakers to the speaker output nel soffitto dietro la staffa, farlo passare attraverso il foro nella staffa prima di montare $ Drehen Sie das YAMAHA-Logo entsprechend der Position des Lautsprechers. terminals of the amplifier / receiver with the speaker cables (not included). quest’ultima [figura 3 - a ]. • Connect each speaker making sure not to reverse the polarity “+” (red), “–” (black). 4 BRANCHEMENT DE L’AMPLIFICATEUR / RECEPTEUR Wenn das (nicht mitgelieferte) Lautsprecherkabel von einem Loch in der Wand/ If the speaker is connected with reversed polarity, the sound will be unnatural and Decke hinter der Halterung zum Lautsprecher gefuhrt wird, ziehen Sie dieses Kabel Avant de realiser les raccordements, assurez-vous que l’amplificateur / recepteur est lack bass. durch das Loch in der Halterung, bevor Sie die Halterung montieren [siehe 4 COLLEGAMENTO DELL’AMPLIFICATORE / RICEVITORE eteint. Abbildung 3 - a ]. HOW TO CONNECT Prima di effettuare i collegamenti, assicurarsi che l’amplificatore / ricevitore sia spento. RACCORDEMENTS ! Remove approximately 10 mm (3/8?) of insulation from the end of each speaker COLLEGAMENTI cable and twist the exposed wires of the cable together to prevent short circuits. • Raccordez les bornes d’entree situees sur la face arriere des enceintes aux bornes 4 ANSCHLUSS DES VERSTARKERS / RECEIVERS de sortie des enceintes situees sur l’amplificateur / recepteur en utilisant les cables • Collegare i morsetti di ingresso sul retro degli speaker ai morsetti di uscita degli ± Press and hold the terminal tab. d’enceintes (non compris). speaker dell’amplificatore / ricevitore mediante i cavi per speaker (non forniti). # Insert the bare wire. Stellen Sie sicher, dass der Verstarker / Receiver ausgeschaltet ist, bevor Sie die • Raccordez chaque enceinte en veillant a ne pas inverser la polarite « + » (rouge), • Collegare ciascuno speaker rispettandone la polarita “+” (rosso), “–” (nero). Se uno $ Release the tab so that it closes security on the bare wire, not the insulation. Anschlusse vornehmen. « – » (noir). Si l’enceinte est raccordee avec la polarite inversee, le son emis sera speaker viene collegato con la polarita invertita, il suono risultera innaturale e privo % Test the security of the connection by pulling gently on the cable. ANSCHLUSSE innaturel et sans graves. di bassi. Notes: • Schlie?en Sie die Eingangsklemmen mit den (nicht mitgelieferten) REALISATION DU RACCORDEMENT Lautsprecherkabeln an der Ruckseite der Lautsprecher an die COME EFFETTUARE I COLLEGAMENTI • Do not let the bare speaker wires touch each other as this could damage the Lautsprecherausgangsklemmen des Verstarkers / Receivers an. speaker or amplifier / receiver, or both. ! Enlevez environ 10 mm d’isolement de l’extremite de chaque cable d’enceinte et ! Rimuovere circa 10 mm di isolamento dall’estremita di ciascun cavo degli speaker torsadez ensemble la partie denudee des cables afin d’eviter tout court-circuit. • Schlie?en Sie die Lautsprecher an; achten Sie dabei auf die korrekte Polaritat e attorcigliare insieme i fili esposti del cavo per impedire cortocircuiti. • Make sure the terminal is gripping the bare wire, not the insulation. ± Appuyez sur le levier de la borne et maintenez-le. „+“ (rot), „–“ (schwarz). Bei umgepoltem Anschluss der Lautsprecher ist der Klang ± Premete e tenete premuta l’aletta del terminale. unnaturlich und der Bass ist nicht gut horbar. # Inserez le fil denude. # Inserite i fili. SPECIFICATIONS (For single speaker) $ Relachez le levier pour qu’il se referme convenablement en serrant le fil denude et SO NEHMEN SIE DIE ANSCHLUSSE VOR $ Rilasciate l’aletta in modo che faccia presa sui fili, non sull’isolante. NS-AW294 NS-AW194 non l’isolant. ! Entfernen Sie circa 10 mm der Isolierung vom Ende der Lautsprecherkabel und % Per controllare che il collegamento sia stato effettuato correttamente, tirate % Verifiez que les fils sont bien maintenus en tirant doucement dessus. verdrehen Sie die abisolierten Drahte des Kabels miteinander, um Kurzschlusse leggermente il cavo. Type 2-Way Bass Reflex Remarques : zu vermeiden. Note: Driver Tweeter 2.5 cm (1?) Balanced dome type • Veillez a ce que les cables denudes des enceintes n’entrent pas en contact les uns ± Drucken Sie die Klemmlasche hinunter und halten Sie sie in dieser Position. • Impedire il contatto tra i fili privi di isolamento dello speaker, dato che cio potrebbe Woofer 16 cm (6-1/2?) cone type 10 cm (4?) cone type avec les autres. Cela pourrait endommager l’enceinte ou l’amplificateur / recepteur # Schieben Sie die Ader hinein. causare danni allo speaker o all’amplificatore / ricevitore o a entrambi. Frequency response 80 Hz to 20 kHz (–10 dB) 100 Hz to 20 kHz (–10 dB) $ Geben Sie die Lasche wieder frei, um die Ader (nicht aber den Mantel) ou les deux. • Accertatevi che il terminale faccia presa sui fili, non sull’isolante. Impedance 8 ohms • Verifiez que la borne serre le fil denude et non l’isolant. festzuklemmen. % Ziehen Sie vorsichtig am Kabel, um zu uberprufen, ob es fest sitzt. Nominal input 50 W 30 W SPECIFICHE (per il singolo speaker) Maximum input 100 W 80 W CARACTERISTIQUES TECHNIQUES (Pour une enceinte) Hinweise: NS-AW294 NS-AW194 • Achten Sie darauf, dass sich die blanken Lautsprecherdrahte nicht beruhren, da Sensitivity 87 dB / 2.83 V, 1 m 85 dB / 2.83 V, 1 m NS-AW294 NS-AW194 anderenfalls der Lautsprecher oder der Verstarker / Receiver oder beide Tipo Tipo di bass reflex a 2 vie Dimensions (W ? H ? D) 190 ? 308 ? 217 mm 152 ? 243 ? 171 mm Type Type bass reflex a 2 voies beschadigt werden konnen. (excluding bracket and (7-1/2? ? 12-1/8? ? 8-1/2?) (6? ? 9-5/8? ? 6-3/4?) • Die Klemmen durfen nur jeweils die blo?liegenden Adern, nicht aber den Mantel Driver Tweeter 2,5 cm tipo di cupola bilanciata knobs) Driver Tweeter 2,5 cm type dome symetrique Woofer 16 cm tipo conico 10 cm tipo conico beruhren. Weight (including bracket 2.3 kg (5.1 lbs.) 1.6 kg (3.5 lbs.) Woofer 16 cm type cone 10 cm type cone Risposta in frequenza Da 80 Hz a 20 kHz (–10 dB) Da 100 Hz a 20 kHz (–10 dB) and knobs) Reponse en frequence 80 Hz a 20 kHz (–10 dB) 100 Hz a 20 kHz (–10 dB) TECHNISCHE DATEN (je Lautsprecher) Impedenza 8 ohm Movable angle 13.5 degree pitch 13.5 degree pitch Impedance 8 ohms Ingresso nominale 50 W 30 W NS-AW294 NS-AW194 * Specifications subject to change without notice due to product improvements. Entree nominale 50 W 30 W Ingresso massimo 100 W 80 W Typ 2-Wege Bassreflextyp Entree maximum 100 W 80 W Sensibilita 87 dB / 2,83 V, 1 m 85 dB / 2,83 V, 1 m Treiber Hochtoner 2,5 cm Symmetrischer Kalottentyp Sensibilite 87 dB / 2,83 V, 1 m 85 dB / 2,83 V, 1 m Dimensioni (L ? A ? P) Tieftoner 16 cm Konustieftoner 10 cm Konustieftoner Dimensions (L ? H ? P) (esclusi staffa e 190 ? 308 ? 217 mm 152 ? 243 ? 171 mm (avec exclusion des 190 ? 308 ? 217 mm 152 ? 243 ? 171 mm Frequenzgang 80 Hz bis 20 kHz (–10 dB) 100 Hz bis 20 kHz (–10 dB) manopole) pattes de fixation et des Impedanz 8 Ohm Peso (inclusi staffa e boutons) manopole) 2,3 kg 1,6 kg Nenneingangsleistung 50 W 30 W Poids (y compris la patte 2,3 kg 1,6 kg Angolo di inclinazione 13,5 gradi 13,5 gradi de fixation et les boutons) Maximale 100 W 80 W Eingangsleistung * Specifiche soggette a modifica senza preavviso per miglioramenti al prodotto. Angle mobile inclinaison de 13,5 degres inclinaison de 13,5 degres Empfindlichkeit 87 dB / 2,83 V, 1 m 85 dB / 2,83 V, 1 m * Les specifications sont sujettes a changement sans notification pour amelioration des performances du produit. Abmessungen (B ? H ? T) (ohne Halterung und 190 ? 308 ? 217 mm 152 ? 243 ? 171 mm Drehknopfe) Gewicht (einschlie?lich 2,3 kg 1,6 kg Halterung und Drehknopfe) Verschiebbarer Winkel 13,5 Grad Neigung Winkel 13,5 Grad Neigung * Anderungen der technischen Daten aus Grunden der Produktverbesserung ohne vorherige Ankundigung vorbehalten.
10 mm Terminales de salida del altavoz Выходные зажимы колонок ?????? Amplificador o receptor Усилитель или ресивер ??????? Espanol Русский ?? EN Warranty policy for European Economic Area (EEA) and Switzerland, PRECAUCIONES QUE EL CONSUMIDOR TIENE QUE TOMAR МЕРЫ ПРЕДОСТОРОЖНОСТИ ДЛЯ ПОЛЬЗОВАТЕЛЯ ?????? Australia customer In the unlikely event that your Yamaha product needs guarantee service, please contact the Leer estas precauciones atentamente antes de montar los altavoces NS-AW294 / Внимательно прочтите эти предупреждения до настройки колонок NS-AW294 / ?? NS-AW294/NS-AW194 ????,???????????? dealer from whom it was purchased. If you experience any difficulty, please contact NS-AW194. NS-AW194. • ?????????,??????????,???????????? Yamaha representative office in your country. You can find full details on our website • Si hay que instalar estos altavoces al aire libre, tratar de reducir la exposicion de los • При установке колонок снаружи примите меры по максимальной защите их от • ????????? / ????,??????????????????? / EEA and Switzerland: (http://europe.yamaha.com/warranty/). дождя и снега, устанавливая колонки в углу или под навесом. mismos a la lluvia y a la nieve montando los altavoces en esquinas o debajo de • Поскольку эти колонки предназначены для настенного / потолочного монтажа, ?????,??????????,?????????????? Australia: (http://au.yamaha.com/) aleros. важно надежно закрепить их. Проверьте, что вы проконсультировались • ?????????????????? / ????????,?????? Warranty policy for U.S. and Canada customer • Puesto que estos altavoces deben montarse en la pared o en el techo, es esencial снадежным источником по выбору наилучшего типа крепления для ????????,??????,????????????? Your Yamaha product is covered by a limited warranty for two years from the date of que esten fijados firmemente. Asegurarse de consultar con una fuente fiable конкретной стены / потолка. • ???????????????????????????? / ????? purchase. In the unlikely event of failure due to defective materials or workmanship, acerca del mejor tipo de soporte para el techo o pared especifico. • Не крепите их к тонкой фанере или мягким материалам стенного / потолочного ???????????,????????? Yamaha will repair or replace them at no charge. Please visit our website for full details. • No montarlos en contrachapado delgado o en materiales de superficie de techo o покрытия, так как винты могут оторваться, в результате чего колонки упадут • ?????????????????????????????????? U.S.: (http://usa.yamaha.com/), Canada: (http://ca.yamaha.com/) de pared debiles puesto que los tornillos pueden romperlos, causando que los исломаются или нанесут травму. ?????? Information for Users on Collection and Disposal of Old Equipment altavoces se caigan y se danen u ocasionando lesiones personales. • Не закрепляйте колонки на стене / потолке гвоздями, клеем или иными • ????????,????????????,???????????? This symbol specified in the Directives 2002/96/EC indicates that used • No fijar los altavoces a la pared o al techo con clavos, adhesivos u otros elementos ненадежными способами. Длительное пользование и вибрации могут ????????? electrical and electronic products should not be mixed with general household que no son seguros. El uso a largo plazo y las vibraciones pueden causar que los ослабить такие крепления. • ???????,??????? / ?????????????????? waste. mismos se caigan. • Не размещайте колонки там, где о них можно споткнуться или где их могут ??,??????? / ???? For proper treatment to avoid harmful effect on human health and • No colocar los altavoces en lugares donde puedan volcarse o ser golpeados por повредить упавшие предметы. Прочное крепление также обеспечивает • ????????????????? / ???????????????? environment, please contact your local municipality, your waste disposal наилучшее звучание. objetos que caen. Un lugar estable asegura tambien un mejor rendimiento del • При изменении угла колонок проверьте, что ручки отвинчены с обеих сторон ? “??”??? service or the point of sale where you purchased the items. sonido. прежде, чем регулировать угол. Чрезмерная мощность может повредить • ?????????????????????? Yamaha ????????? ??????????? • Al cambiar el angulo de los altavoces, asegurarse de ajustar el angulo tras haber колонки. • ?????????????????????????????????? FR aflojado la rueda en ambos lados. Los altavoces pueden danarse por demasiada • Понизьте мощность усилителя / ресивера до изменения входных источников. ?? potencia. Всегда выключайте усилитель / ресивер при установке или демонтаже • ??????????????????? Conditions de garantie pour la Communaute economique europeenne (CEE) • Bajar el control de volumen del amplificador / receptor antes de cambiar las fuentes входных кабелей. ????????????????????? Yamaha ??????? et la Suisse de entrada. Apagar siempre el amplificador / receptor al instalar o quitar los cables • Если замечено искажение звука, понизьте уровень громкости на усилителе / Si votre produit Yamaha a besoin d’une reparation pendant sa periode de garantie, veuillez de entrada. ресивере. Никогда не допускайте срезания звука ресивером. contacter votre revendeur. En cas de difficulte, veuillez contacter le representant Yamaha de votre pays. Vous trouverez toutes les informations necessaires sur notre site Web (CEE • Cuando se nota que hay distorsion, reducir el control de volumen en el amplificador / • Не пытайтесь модифицировать или чинить колонки. При необходимости 1 ???? et Suisse) a l’adresse suivante : (http://europe.yamaha.com/warranty/). receptor a un ajuste mas bajo. No permitir nunca que el amplificador de potencia обратитесь к квалифицированному сотруднику сервисного центра Yamaha. Garantie Canadienne llegue al “recorte”. Ни в коем случае не следует вскрывать корпус аппарата. ??????,???????,??????????? Votre produit Yamaha est couverts par une garantie limitee de deux annees a compter de • No intentar modificar o fijar los altavoces. Contactar con personal de servicio • Не пытайтесь очистить колонки химическими составами, так как они могут A ???? 2 la date d’achat. Dans le cas improbable d’un echec du aux materiaux ou a l’execution повредить их отделку. Пользуйтесь для очистки сухой мягкой тряпочкой. cualificado de Yamaha, cuando sea necesario. El armario no debe abrirse por • Ответственность за безопасность размещения и установку несёт B ??? 2 defectueux, Yamaha les reparera ou les remplacera gratuit. ningun motivo. владелец. C ??? 4 Veuillez visiter notre site Web pour les details complets (http://ca.yamaha.com/). • No intentar limpiar los altavoces con productos quimicos disolventes puesto que Компания Yamaha не несёт ответственности за какие-либо несчастные Information concernant la Collecte et le Traitement des piles Usagees et des esto podria danar el acabado. Para limpiarlos, usar un pano suave y seco. случаи, вызванные ненадлежащим размещением или установкой dechets d’equipements electriques et electroniques • El emplazamiento o instalacion segura es responsabilidad del propietario. колонок. 2 ???? Ce symbole, specifie dans la Directive 2002/96/CE, signifie que les produits Yamaha no es responsable por accidentes a causa de un emplazamiento o electriques ou electroniques usages ne doivent pas etre mis au rebut avec les instalacion inadecuada de los altavoces. ?????,?????? dechets menagers. Pour traiter ces equipements de maniere appropriee, et 1 РАСПАКОВКА • ????? / ?????????????????????????? (? eviter ainsi les effets nefastes sur la sante humaine et sur l’environnement, ??????)? contactez votre municipalite, votre service de traitement des dechets ou le 1 DESEMBALAJE После распаковки проверьте наличие следующих деталей в комплекте поставки. • ????????,??????????????????? point de vente ou vous avez achete les produits. A Колонка ? 2 Tras el desembalaje, inspeccionar el contenido para comprobar que estan los B Кронштейн ? 2 siguientes elementos. C Ручка ? 4 3 ????? DE A Altavoces ? 2 Garantieanwendung fur den Europaischen Wirtschaftsraum (EWR) und B Soporte ? 2 ???????????????? / ????? Schweiz C Rueda ? 4 2 ПЕРЕД УСТАНОВКОЙ ! ??????,???????????????????? (4 ?)? Falls Sie im unwahrscheinlichen Fall fur Ihr Yamaha-Produkt eine Garantie-Dienstleistung ± ???????? (??)???????? / ????? in Anspruch nehmen mussen, kontaktieren Sie bitte den Handler, bei dem Sie das Produkt Прочтите внимательно перед установкой. gekauft haben. Sollten dabei Schwierigkeiten auftreten, bitte den Yamaha-Importeur Ihres 2 ANTES DE LA INSTALACION • Убедитесь, что на стене / потолке достаточно свободного места и отсутствуют # ????????,?????????????? Landes benachrichtigen. Sie konnen die gesamten Informationen auf unserer Webseite помехи. Выясните размеры и вес устройства (см. раздел ТЕХНИЧЕСКИЕ ??: EWR und Schweiz finden: Lealo con atencion antes de la instalacion. ХАРАКТЕРИСТИКИ ниже). • ?????????????/?????,???????/??????? (http://europe.yamaha.com/warranty/). • Asegurese de que en la pared o el techo hay un espacio suficiente y despejado de • Перед установкой колонок проложите к месту установки кабели колонок. ????? (??)????????? Verbraucherinformation zur Sammlung und Entsorgung alter Elektrogerate obstaculos antes de realizar la instalacion. Tenga en cuenta las dimensiones y el • ???????????????,????????,???????? und Benutzter Batterien peso del producto (veanse las ESPECIFICACIONES). 3 МОНТАЖ КОЛОНОК ??(??????? 2 ? 2-1/2 ?????,????????)???? Dieses Symbol, das in den Richtlinien 2002/96/EC spezifiziert wird, gibt an, • Antes de instalar los altavoces, tienda los cables del altavoz hasta el lugar de la ?,????????,??????????????????????? dass elektrische und elektronische Produkte nicht im allgemeinen Hausmull instalacion. Пользуйтесь кронштейном из комплекта для настенного / потолочного монтажа. ?,??????????? entsorgt werden durfen. Fur Einzelheiten zur korrekten Entsorgung, um ! Пользуясь кронштейном как шаблоном, разметьте четыре точки главных schadliche Wirkungen auf die menschliche Gesundheit und Umwelt zu отверстий на участке монтажа. vermeiden, bitte Ihre lokale Gemeinde-/Stadtverwaltung, Ihr 3 MONTAJE DE LOS ALTAVOCES ± С помощью креплений (не входят в комплект поставки) надежно закрепите $ ?????????? YAMAHA ??? Abfallbeseitigungsunternehmen oder die Verkaufsstelle, wo Sie das Produkt кронштейн на стене / потолке. erworben haben, kontaktieren. Para el montaje en la pared o en el techo de los altavoces, usar el soporte que se # Установите колонку на кронштейне и зафиксируйте колонку двумя ручками ???????? (??)???????? / ????????,???? incluye. из комплекта. ?,????????????????? [ ? 3 - a ]? ! Usando el soporte como plantilla, marcar los lugares (4 puntos) de las ranuras Примечания: IT para los orificios en el area de montaje. Norme di garanzia per lo Spazio economico europeo (SEE) e la Svizzera ± Usando los elementos apropiados (no se incluyen) fijar firmemente el soporte a la • При использовании кронштейнов для настенного / потолочного монтажа 4 ????? / ??? Nell’improbabile eventualita che il prodotto Yamaha richieda un intervento di assistenza in колонок применяйте крепежную проволоку (не входит в поставку) между pared o al techo. кронштейном и стеной / потолком для предупреждения падения колонки. garanzia, rivolgersi al rivenditore presso cui il prodotto e stato acquistato. Se si dovessero # Colocar el altavoz en el soporte y fijar el altavoz mediante las dos ruedas que se • При регулировке угла колонки, когда к ней прикреплен кронштейн, перед ???,????? / ??????? incontrare difficolta, rivolgersi al rappresentante Yamaha nel proprio paese. Per incluyen. изменением положения колонки ослабьте ручки с обеих сторон. (Регулировку ?? informazioni dettagliate consultare il sito Web per SEE e Svizzera: http:// europe.yamaha.com/warranty/. Notas: угла можно выполнить после того, как туго затянутые ручки будут ослаблены • ??????? (??)???????????????? / ?????? Informazioni per gli utenti sulla raccolta e lo smaltimento di vecchia на 2 - 2-1/2 оборота.) Если применить чрезмерную силу, когда ручки туго ????? • Si se usan los soportes para montar los altavoces en la pared o en el techo, usar attrezzatura e batterie Usate cables de seguridad (no se incluyen) entre el soporte y la pared o el techo para затянуты, зафиксированная часть может выйти из строя и регулировка угла • ?????,????? “+”? (??)? “-”? (??)?????? Il presente simbolo, previsto dalla direttiva 2002/96/CE, indica che i prodotti будет невозможна. После регулировки угла затяните ручку, чтобы надежно evitar que el altavoz se caiga. зафиксировать колонку. ????????,???????????????? elettrici ed elettronici usati non devono essere smaltiti con i rifiuti domestici. • Al cambiar el angulo con el soporte fijado al altavoz, afloje las ruedas en ambos ???? Per il corretto smaltimento al fine di prevenire effetti nocivi sulla salute e lados antes de modificar la direccion del altavoz. (El ajuste del angulo puede $ Поверните эмблему YAMAHA в зависимости от положения колонки. ! ????????????????? 10 mm,????????????? sull’ambiente, rivolgersi alle autorita locali, alla societa di smaltimento dei rifiuti o al punto vendita presso cui i prodotti sono stati acquistati. realizarse aflojando las ruedas, apretadas con fuerza, girandolas entre dos vueltas ± ??????? y dos vueltas y media.) Si se aplica demasiada fuerza a una rueda muy apretada, Если кабель колонки (не входит в поставку) подводится из отверстия на стене / la pieza fija podria desprenderse y el ajuste del angulo no podria realizarse. потолке сзади кронштейна, проденьте кабель колонки через отверстие на # ????? Despues de ajustar el angulo, apriete la rueda de modo que el altavoz quede bien кронштейне до монтажа кронштейна [рис. 3 - a ]. $ ????,????????,?????? ES fijado. % ??????,????????? Condiciones de garantia para paises del Espacio Economico Europeo (EEE) y ??: Suiza $ Girar el emblema de YAMAHA segun la posicion del altavoz. En el caso poco probable de que su producto Yamaha necesite una reparacion cubierta 4 ПОДКЛЮЧЕНИЕ К УСИЛИТЕЛЮ / РЕСИВЕРУ • ?????????????,???????????? / ???,??? por la garantia, pongase en contacto con el distribuidor en el que lo haya adquirido. Si tiene Si el cable del altavoz (no se incluye) se extiende desde un orificio en la pared o en Перед выполнением подключений убедитесь в том, что усилитель / ресивер ???????? cualquier problema, pongase en contacto con la delegacion de Yamaha de su pais. Podra el techo detras del soporte, hacer pasar este cable del altavoz a traves del orificio en отключен. • ???????????,??????? encontrar mas informacion en el sitio web para el EEE y Suiza (http://europe.yamaha.com/ el soporte antes de montar el soporte [figura 3 - a ]. warranty/). СОЕДИНЕНИЯ ?? (?????) Informacion para Usuarios sobre Recoleccion y Disposicion de Equipamiento • Соедините входные зажимы на задней стороне колонок с выходными Viejo y Baterias Usadas зажимами колонок усителя / ресивера с помощью кабелей колонок (не входят 4 CONEXION DEL AMPLIFICADOR / RECEPTOR NS-AW294 NS-AW194 Este simbolo de las Directivas 2002/96/CE indica que los productos в поставку). electricos y electronicos utilizados no deben mezclarse con residuos • Соедините каждую колонку, проверяя правильность полярности “+” (красный), ?? 2 ?????? Antes de realizar las conexiones, asegurarse de que el amplificador / receptor esta domesticos generales. Para conocer el tratamiento correcto para evitar apagado. “–” (черный). Если полярность колонки перепутана, то звук будет ???? ???? 2.5 cm ????? perjudicar la salud humana y el medio ambiente, pongase en contacto con неестественным и без низких частот. ?????? 16 cm ??? 10 cm ??? su ayuntamiento, el servicio de recogida de residuos de su municipio o el CONEXIONES establecimiento en el que compro el producto. КАК ВЫПОЛНИТЬ СОЕДИНЕНИЕ • Conectar los terminales de entrada de la parte trasera de los altavoces a los ! Снимите примерно 10 мм изоляции с конца каждого кабеля колонок и ???? 80 Hz - 20 kHz (-10 dB) 100 Hz - 20 kHz (-10 dB) terminales de salida del altavoz del amplificador / receptor mediante los cables del скрутите голые провода кабеля вместе во избежание коротких замыканий. ?? 8 ? altavoz (no se incluyen). ± Нажмите и удерживайте защелку терминала. ?????? 50 W 30 W RU • Conectar los altavoces asegurandose de que no se invierte la polaridad “+” (rojo), # Вставьте оголенную часть провода. ?????? 100 W 80 W Информация для пользователей по сбору и утилизации старой “–” (negro). Si el altavoz esta conectado con la polaridad invertida, el sonido es $ Отпустите защелку таким образом, чтобы она надежно прижала оголенную аппаратуры и Использованных батареек poco natural y sin bajos. часть провода, а не изоляцию. ??? 87 dB/2.83 V, 1 m 85 dB/2.83 V, 1 m Этот символ, указанный в Директивах 2002/96/EC, означает, что % Проверьте надежность подключения, слегка потянув кабели. ?? (?????) используемые электрические и электронные изделия необходимо REALIZACION DE LA CONEXION 190 ? 308 ? 217 mm 152 ? 243 ? 171 mm Примечания: ( ???????) утилизировать отдельно от остальных бытовых отходов. Для получения ! Quitar unos 10 mm de aislamiento del extremo de cada cable del altavoz y torcer дополнительной информации о правильном обращении с изделиями с los cables expuestos del cable juntos para evitar cortocircuitos. • Не допускайте, чтобы голые провода колонок соприкасались, так как это ?? (??????) 2.3 kg 1.6 kg целью предотвращения вредного влияния на здоровье человека и ± Mantenga pulsada la lengueta del terminal. может повредить колонку или усилитель / ресивер, или и то, и другое. ????? 13.5 ? 13.5 ? окружающую среду обратитесь в местные муниципальные органы, # Inserte el cable pelado. • Убедитесь в том, что в терминале зажата оголенная часть провода, а не * ???????????????? службу сбора отходов и по месту приобретения данных изделий. изоляция. $ Suelte la lengueta para que sujete correctamente el cable por su extremo pelado, no la parte del aislamiento. ТЕХНИЧЕСКИЕ ХАРАКТЕРИСТИКИ % Compruebe que la conexion sea segura tirando ligeramente del cable. (для отдельной колонки) Notas: NS-AW294 NS-AW194 • No dejar que los cables desnudos del altavoz se toquen entre ellos puesto que esto podria danar el altavoz o el amplificador / receptor, o ambos. Тип 2-полосный фазоинверторный тип ? : ????????????????????????? SJ/T 11363-2006 ?? • Compruebe que el terminal sujete los cables pelados y no la parte aislada. Драйвер Высоко- ?????????? частотный 2,5 см сбалансированный купольный тип ? : ???????????????????????????? SJ/T 11363-2006 ESPECIFICACIONES (Para cada altavoz) динамик ?????????? Низкочас- NS-AW294 NS-AW194 тотный 16 см конический тип 10 см конический тип ???? ????????? Tipo Tipo Bass Reflex de 2 vias динамик ? ? ? ??? ???? ????? Driver Tweeter 2,5 cm cupula balanceada tipo Частотные от 80 Гц до 20 кГц (–10 дБ) от 100 Гц до 20 кГц (–10 дБ) (Pb) (Hg) (Cd) (Cr(VI)) (PBB) (PBDE) характеристики ? ? ? ? ? ? Woofer 16 cm tipo cono 10 cm tipo cono ???? Импеданс 8 Ом ? ? ? ? ? ? Respuesta de de 80 Hz a 20 kHz (–10 dB) de 100 Hz a 20 kHz (–10 dB) ????? frecuencia Номинальный вход 50 Вт 30 Вт Impedancia 8 ohmios Максимальный вход 100 Вт 80 Вт Entrada nominal 50 W 30 W Чувствительность 87 дБ / 2,83 В, 1 м 85 дБ / 2,83 В, 1 м Entrada maxima 100 W 80 W Габариты (шир. выс. глуб.) 190 ? 308 ? 217 мм 152 ? 243 ? 171 мм Sensibilidad 87 dB / 2,83 V, 1 m 85 dB / 2,83 V, 1 m (без кронштейна и ручек) Dimensiones Вес (с кронштейном и (An ? A ? P) 190 ? 308 ? 217 mm 152 ? 243 ? 171 mm ручками) 2,3 кг 1,6 кг (sin el soporte ni las ruedas) Угол наклона 13,5 градусов 13,5 градусов Peso (con el soporte y las 2,3 kg 1,6 kg * В результате усовершенствования изделия технические характеристики могут ruedas) изменяться без предварительного уведомления. Angulo movil Inclinacion de 13,5 grados Inclinacion de 13,5 grados * Las especificaciones estan sujetas a cambio sin previo aviso debido a mejoras del producto.