На сайте 123449 инструкций общим размером 499.5 Гб , которые состоят из 6236897 страниц
Фото

Руководство пользователя SONY WS-DAVLFS. Основные функции, характеристики и условия эксплуатации изложены на 2 страницах документа в pdf формате.
Доступно к просмотру 2 страницы. Рекомендуем вам скачать файл инструкции, поскольку онлайн просмотр документа может сильно отличаться от оригинала.
2-348-779-12(1)
Precautions                  Sicherheitsma?nahmen                                       Specifications
This product is for DAV-LF1 only. Use with  Dieses Produkt ist ausschlie?lich fur die   Plate
other products or for other purposes than those  DAV-LF1 konzipiert. Bei Verwendung mit
specified may cause damage or injury.  anderen Produkten oder zu einem anderen als      Dimensions
dem vorgesehenen Zweck besteht die Gefahr                  Approx. 90 ? 90 ? 29 mm (w/h/d)
To customers
von Verletzungen bzw. Sachschaden.                         Mass
Wall Mounting Brackets                                     Sufficient expertise is required for installing  Hinweis an Kunden                      Approx. 0.12 kg (per fully-assembled unit)
this product. Be sure to subcontract the
installation to qualified service personnel and  Zur Installation dieses Produkts sind
pay adequate attention to safety during the  Fachkenntnisse erforderlich. Lassen Sie die  Design and specifications are subject to change
installation.                Installationsarbeiten unbedingt von                        without notice.
qualifizierten Fachleuten ausfuhren und
Operating Instructions (For the speakers)                  For qualified service personnel  beachten Sie bei der Installation die notigen
Sufficient expertise is required for installing  Sicherheitsvorkehrungen.               Specifications
Mode d’emploi (Pour les haut-parleurs)                     this product. Be sure to read this instruction  Fur qualifiziertes Fachpersonal
manual thoroughly to do the installation work                                           Applique
Bedienungsanleitung (fur die Lautsprecher)                 safely. We are not liable for any damage or  Zur Installation dieses Produkts sind
injury caused by mishandling or improper  Fachkenntnisse erforderlich. Lesen Sie diese  Dimensions
Manual de instrucciones (para los altavoces)               installation. After installation, please hand this  Gebrauchsanweisung unbedingt sorgfaltig  Approx. 90 ? 90 ? 29 mm (l/h/p)
installation manual to the customers.  durch, damit eine sichere Ausfuhrung der         Poids
Arbeiten gewahrleistet ist. Der Hersteller                 Approx. 0,12 kg (unite entierement assemblee)
On safety
ubernimmt keine Haftung fur Verletzungen bzw.
• Be sure to attach the speaker stand to a  wall  Sachschaden, die durch unsachgema?en
that is sufficiently thick and strong.  Umgang mit dem Produkt oder eine fehlerhafte   La conception et les specifications sont sujettes
• Do not lean or hang on the speaker, as the  Installation verursacht werden. Handigen Sie  a modification sans preavis.
speaker may fall down.      diese Gebrauchsanweisung nach der Installation
On cleaning                  dem Kunden aus.
WS-DAVLFS                                                  Clean the plate and the bracket with a soft cloth  Sicherheit                           Technische Daten
slightly moistened with a mild detergent  • Achten Sie darauf, dass die Wand, an der Sie  Platte
solution. Do not use any type of abrasive pad,  den Lautsprecherstander befestigen,     Abmessungen
Sony Corporation ? 2004  Printed in Malaysia               scouring powder or solvent such as thinner,  ausreichend stark und tragfahig ist.       ca. 90 ? 90 ?  29 mm (B/H/T)
benzine or alcohol.          • Lehnen Sie sich nicht an die Lautsprecher
und hangen Sie sich nicht daran. Andernfalls             Gewicht
konnen die Lautsprecher umkippen.                        ca. 0,12 kg (pro vollstandig montierter Einheit)
If you have any questions or problems
concerning your system, please consult your  Reinigung
nearest Sony dealer.                                                                    Anderungen, die dem technischen Fortschritt
Supplied Items                                                                          Reinigen Sie die Platte und die                            dienen, bleiben vorbehalten.
Montagehalterung mit einem weichen Tuch, das
Elements fournis                                                                        Sie leicht mit einer milden Reinigungslosung
Precautions                  angefeuchtet haben. Verwenden Sie keine
Mitgelieferte Teile                                                                     Scheuermittel, Scheuerschwamme oder                        Especificaciones
Ce produit est destine uniquement au DAV-LF1.  Losungsmittel wie Verdunnung, Benzin oder
Elementos suministrados                                    L’utilisation avec d’autres produits ou a des fins  Alkohol.                            Placa
autres que celles specifiees peut provoquer des
degats ou des blessures.                                                                Dimensiones
Sollten an der Anlage Probleme auftreten oder              Aprox. 90 ? 90 ? 29 mm
Avis aux clients
sollten Sie Fragen haben, wenden Sie sich bitte            (ancho/altura/profundidad)
Vous devez disposer d’un certain savoir-faire  an Ihren Sony-Handler.                   Peso
pour installer ce produit. Confiez l’installation a                                     Aprox. 0,12 kg (unidad completamente
A                            B                           du personnel qualifie et prenez toutes les                                              montada)
mesures de securite requises pendant  Precauciones
l’installation.
Este producto es solo para DAV-LF1. El uso                 Diseno y especificaciones sujetos a cambios sin
Avis au personnel qualifie                                                              previo aviso.
con otros productos o para otros fines distintos
Vous devez disposer d’un certain savoir-faire  de los especificados puede producir lesiones o
pour installer ce produit. Lisez integralement le  danos.
C                           mode d’emploi pour realiser le travail en toute  A los clientes
securite. Notre garantie ne couvre pas les degats
ni les blessures qui seraient provoques par une  La instalacion de este producto requiere una
fausse manipulation ou une installation  experiencia suficiente. Asegurese de
incorrecte. Apres l’installation, transmettez le  subcontratar la instalacion a personal tecnico
present mode d’emploi a votre client.  cualificado y preste la atencion adecuada a la
D                           Securite                     seguridad durante la instalacion.
• Ne fixez le support mural qu’a un mur  Para el personal tecnico
suffisamment epais et resistant.  cualificado
• Ne vous appuyez pas au haut-parleur et ne  La instalacion de este producto requiere una
vous y pendez pas ; vous risquez de le faire  experiencia suficiente. Lea detenidamente este
E             F              G            H               tomber.                     manual de instrucciones para realizar la
Nettoyage                    instalacion con seguridad. El fabricante del
producto no se responsabiliza de las lesiones o
Nettoyez le support et l’applique avec un  danos causados por la manipulacion incorrecta
chiffon doux legerement humidifie a l’aide  o la instalacion inadecuada. Despues de la
d’une solution detergente douce. N’utilisez
instalacion, devuelva este manual a los clientes.
aucun type de tampon abrasif, de poudre a
recurer ou de solvant comme du dissolvant, du  Seguridad
benzene ou de l’alcool.      • Asegurese de fijar el soporte de altavoz a una
pared que sea suficientemente gruesa y
Si vous avez des questions ou si vous  fuerte.
rencontrez des problemes avec votre systeme,  • No se apoye ni se cuelgue del altavoz, pues
consultez votre revendeur Sony le plus proche.  este se podria caer.
Limpieza
Limpie la placa y el soporte con un pano suave
ligeramente humedecido con una solucion de
detergente suave. No utilice estropajos o polvo
limpiador de ningun tipo, ni disolventes como
bencina o alcohol.
Si tiene cualquier pregunta o problema
relacionado con el sistema, consulte a su
distribuidor Sony mas cercano.
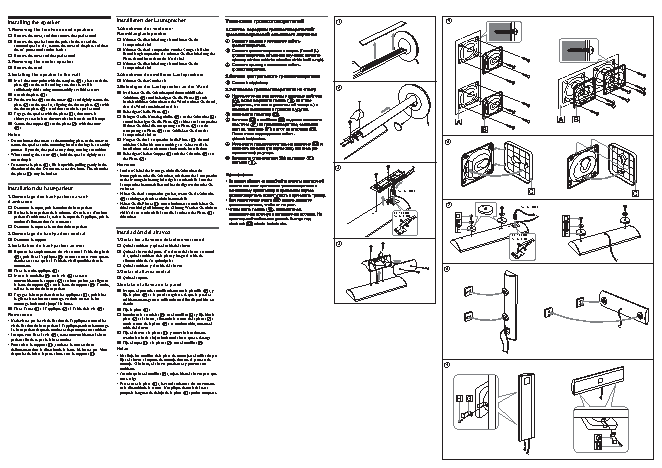
Installing the speaker                 Installieren der Lautsprecher                                                  1                                       5
1.Removing the front/surround speakers  1.Abnehmen der vorderen/
Raumklanglautsprecher
1 Remove the cover, and then remove the speaker cord.
1 Nehmen Sie die Abdeckung ab und losen Sie das
2 Remove the speaker from the pole. (In the case of the
Lautsprecherkabel.
surround speaker (L), remove the cover of the plate and then
the AC power cord (mains lead).)     2 Nehmen Sie den Lautsprecher von der Stange ab. Beim
Raumklanglautsprecher (L) nehmen Sie die Abdeckung der
3 Remove the cover and the speaker cord.
Platte ab und losen dann das Netzkabel.
2.Removing the center speaker
3 Nehmen Sie die Abdeckung ab und losen Sie das
4 Remove the stand.                      Lautsprecherkabel.
3.Installing the speaker to the wall   2.Abnehmen des mittleren Lautsprechers
5 Mark the screw point with the template (A), then attach the  4 Nehmen Sie den Stander ab.
plate (B) to the wall (making sure that the wall is  3.Befestigen der Lautsprecher an der Wand
sufficiently thick) using commercially available screws.                                                            2
5 Markieren Sie die Schraubenpositionen mithilfe der
6 Attach the plate (C).
Schablone (A) und befestigen Sie die Platte (B) mit
7 Put the washer (E) on the screw (D) and tightly secure the  handelsublichen Schrauben an der Wand. Achten Sie darauf,
plate (F) to the speaker, aligning the slot on plate (F) with  dass die Wand ausreichend stark ist.
the slot on plate (B). And then attach the speaker cord.
6 Befestigen Sie die Platte (C).
8 Engage the speaker with the plate (C), then move it
sideways (vertical) or downwards (horizontal) until it stops.  7 Bringen Sie die Unterlegscheibe (E) an der Schraube (D)
an und befestigen Sie die Platte (F) sicher am Lautsprecher.
9 Secure the stopper (G) to the plate (F) with the screw  Richten Sie dabei die Aussparung an Platte (F) an der
(H).
Aussparung an Platte (B) aus. Schlie?en Sie dann das
Notes                                    Lautsprecherkabel an.
• Do not loosen the screws at the mounting plate or the screw to  8 Hangen Sie den Lautsprecher in die Platte (C) ein und                                    6
secure the speaker to the mounting bracket during the assembly  schieben Sie ihn bis zum Anschlag zur Seite (vertikale
process. If you do, the speaker may drop, causing an accident.  Installation) oder nach unten (horizontale Installation).
• When securing the screw (H), hold the speaker tightly so as  9 Befestigen Sie den Stopper (G) mit der Schraube (H) an
not to drop it.                         der Platte (F).
•To remove the plate (C), lift it up while pulling gently in the  Hinweise
direction of the slot. Do not use excessive force. The tab under  • Lockern Sie bei der Montage nicht die Schrauben der  3
the plate (C) may be broken.
Montageplatte oder die Schrauben, mit denen der Lautsprecher
an der Montagehalterung befestigt ist. Andernfalls kann der
Lautsprecher herunterfallen und beschadigt werden oder Sie
Installation du haut-parleur            verletzen.
Surround (L)                                   C
• Halten Sie den Lautsprecher gut fest, wenn Sie die Schraube                                                                                                                            C
1.Demontage des haut-parleurs avant/
(H) anbringen, damit er nicht herunterfallt.
d’ambiance
• Heben Sie die Platte (C) zum Abnehmen an und ziehen Sie                                                              7
1 Demontez le capot, puis le cordon du haut-parleur.  dabei vorsichtig in Richtung der Offnung. Wenden Sie nicht zu                                                                     Surround (L)
2 Retirez le haut-parleur de la colonne. (Dans le cas d’un haut-  viel Kraft an. Andernfalls kann die Lasche an der Platte (C)             Front (L) (R)
parleur d’ambiance (L), retirez le capot de l’applique, puis le  abbrechen.                                                              Surround (R)
cordon d’alimentation CA (secteur).)
3 Demontez le capot et le cordon du haut-parleur.
2.Demontage du haut-parleur central    Instalacion del altavoz
Front (L) (R)
4 Demontez le support.                 1.Quitar los altavoces delantero/surround                                                                                                     Surround (R)
3.Installation du haut-parleur au mur  1 Quite la cubierta y quite el cable del altavoz.                              4
5 Reportez les emplacements des vis au mur a l’aide du gabarit  2 Quite el altavoz del poste. (En el caso del altavoz surround
(A), puis fixez l’applique (B) au mur (assurez-vous que ce  (L), quite la cubierta de la placa y luego el cable de
dernier est assez epais) a l’aide de vis disponibles dans le  alimentacion de CA (principal).)
commerce.                            3 Quite la cubierta y el cable del altavoz.
6 Fixez le cache-applique (C).         2.Quitar el altavoz central                                                                                           8
7 Mettez la rondelle (E) sur la vis (D) et serrez
4 Quite el soporte.
convenablement le support (F) au haut-parleur, en alignant
la fente du support (F) sur la fente du support (B). Ensuite,  3.Instalar el altavoz en la pared
refixez le cordon du haut-parleur.
5 Marque el punto de atornillamiento con la plantilla (A), y
8 Engagez le haut-parleur dans les appliques (C), puis faites-  fije la placa (B) a la pared (asegurese de que la pared es
le glisser lateralement (montage vertical) ou vers le bas  suficientemente gruesa) utilizando tornillos disponibles en
(montage horizontal) jusqu’a la butee.  tiendas.
9 Fixez l’arret (G) a l’applique (F) a l’aide de la vis (H).  6 Fije la placa (C).
Remarques                              7 Introduzca la arandela (E) en el tornillo (D) y fije bien la
placa (F) al altavoz, alineando la ranura de la placa (F)
• Ne devissez pas les vis de fixation de l’applique au mur ni les  con la ranura de la placa (B). A continuacion, conecte el
vis de fixation du haut-parleur a l’applique pendant le montage.  cable del altavoz.
Le haut-parleur risque de tomber et de provoquer un accident.
8 Fije el altavoz a la placa (C) y muevalo lateralmente
• Lorsque vous fixez la vis (H), tenez convenablement le haut-
parleur afin de ne pas le laisser tomber.  (vertical) o hacia abajo (horizontal) hasta que se detenga.
9 Fije el tope (G) a la placa (F) con el tornillo (H).
• Pour retirer le support (C), soulevez-le tout en tirant
delicatement dans la direction de la fente. Ne forcez pas. Vous  Notas
risqueriez de briser la patte situee sous le support (C).  • No afloje los tornillos de la placa de montaje o el utilizado para
fijar el altavoz al soporte de montaje durante el proceso de
montaje. Si lo hace, el altavoz puede caer y provocar un                                                             9
accidente.
• Cuando apriete el tornillo (H), sujete bien el altavoz para que
no se caiga.
•Para extraer la placa (C), levantela mientras tira suavemente
en la direccion de la ranura. No aplique demasiada fuerza
porque la lengueta de debajo de la placa (C) podria romperse.
H  G