На сайте 123424 инструкции общим размером 499.44 Гб , которые состоят из 6235949 страниц
Фото
Руководство пользователя SAMSUNG MM-ZJ8. Основные функции, характеристики и условия эксплуатации изложены на 8 страницах документа в pdf формате.
Доступно к просмотру 8 страниц. Рекомендуем вам скачать файл инструкции, поскольку онлайн просмотр документа может сильно отличаться от оригинала.
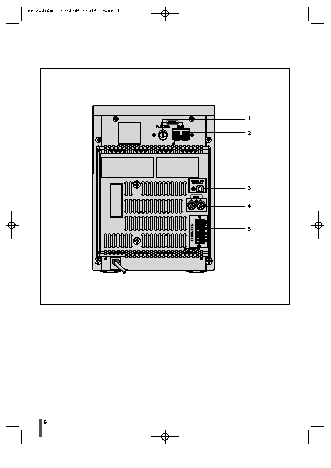
MM-ZJ8(GB)  1/18/04 11:34  Page 6
1
2
3
4
5
6
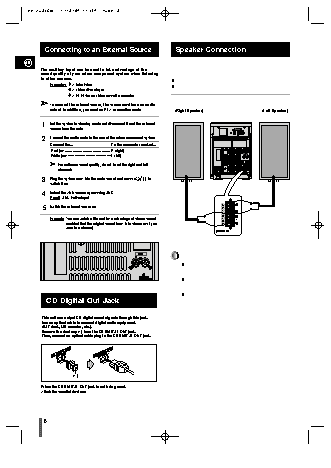
MM-ZJ8(GB)  1/18/04 11:34  Page 8
Connecting to an External Source               Speaker Connection
GB
The auxiliary input can be used to take advantage of the
sound quality of your micro component system when listening
to other sources.
Examples:  A television
A video disc player
A Hi-Fi stereo video cassette recorder
To connect the external source, the source must have an audio
output. In addition, you need an RCA connection cable.  (Right Speaker)     (Left Speaker)
1  Set the system to standby mode and disconnect it and the external
source from the main.
2  Connect the audio cable to the rear of the micro component system.
Connect the...        To the connector marked...
Red jack              R (right)
White jack            L (left)
For optimum sound quality, do not invert the right and left
channels.
3  Plug the system back into the main socket and press (          ) to
switch it on.                                  (+)  (-)                       (+)  (-)
4  Select the AUX source by pressing AUX.
Result: AUX is displayed.
5  Switch the external source on.                                     L
Example: You can watch a film and take advantage of stereo sound   R
provided that the original sound track is in stereo (as if you
were in a cinema).
CD Digital Out Jack
This unit can output CD digital sound signals through this jack.
Use an optical cable to connect digital audio equipment.
(DAT deck, MD recorder, etc.).
Remove the dust cap (1) from the CD DIGITAL OUT jack.
Then, connect an optical cable plug to the CD DIGITAL OUT jack.
(1)
When the CD DIGITAL OUT jack is not being used.
Attach the supplied dust cap.
8
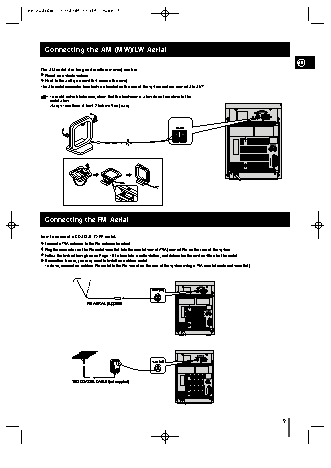
MM-ZJ8(GB)  1/18/04 11:34  Page 9
Connecting the AM (MW)/LW Aerial
GB
The AM aerial (for long and medium waves) can be:
Placed on a stable surface
Fixed to the wall (you must first remove the base)
The AM aerial connector terminals are located on the rear of the system and are marked AM ANT.
To avoid noise interference, check that the loudspeaker wires do not run close to the
aerial wires.
Always keep them at least 2 inches (5 cm) away.
Connecting the FM Aerial
How to connect a COAXIAL TYPE aerial.
Connect a 75? antenna to the FM antenna terminal.
Plug the connector on the FM aerial supplied into the coaxial socket (75?) marked FM on the rear of the system.
Follow the instructions given on Page 15 to tune into a radio station, and determine the best position for the aerial.
If reception is poor, you may need to install an outdoor aerial.
To do so, connect an outdoor FM aerial to the FM socket on the rear of the system using a 75? coaxial cable (not supplied).
9