На сайте 123429 инструкций общим размером 499.45 Гб , которые состоят из 6236153 страниц
Фото


Руководство пользователя PHILIPS AZ3010. Основные функции, характеристики и условия эксплуатации изложены на 12 страницах документа в pdf формате.
Доступно к просмотру 12 страниц. Рекомендуем вам скачать файл инструкции, поскольку онлайн просмотр документа может сильно отличаться от оригинала.
8 3 x 2 R14 • UM2 • C-CELLS 5 9 #
7 $
6 9 X
#
5
4 4 8 @
! NOTES This product complies with the radio interference requirements of the European Union. Ce materiel satisfait aux imperatifs de brouillage radio de la Communaute Europeenne. Este aparato satisface las normas relativas a la interferencia radioelectrica de la Comunidad Europea. Dieses Produkt entspricht den Funkentstorvorschriften der Europaischen Union. Dit apparaat voldoet aan de radio-ontstoringseisen van de Europese Unie. Questo prodotto e conforme ai requisiti delle interferenze radio della Unione Europea.
3 @
2 3 7 ! %
1
1 2 6 0 $
WARNING: Under no circumstances should you try to repair the set yourself, as this will invalidate the
If you are unable to remedy a problem by following these hints, consult your dealer or service centre.
If a fault occurs, first check the points listed below before taking the set for repair.
indication CD-RW inserted /No CD inserted Insert a CD or a CD-R CD badly scratched or dirty Replace/ clean CD, see Maintenance Laser lens steamed up Wait until lens has cleared CD-R is blank or the disc is not finalized Use a finalized CD-R CD playback does not work CD badly scratched/ dirty Replace/ clean CD (see maintenance) Laser lens steamed up Wait until lens has adjusted to room temperature The CD skips tracks CD damaged or dirty Replace or clean CD SHUFFLE or a program is active Quit SHUFFLE/ program mode(s) Indication no disc CD-RW dans l’appareil/ Pas de CD dans l’appareil Inserez un CD ou un CD-R CD serieusement raye ou contamine Remplacez/ nettoyez le CD, voir Entretien Lentille de laser embuee Attendez que la lentille se soit desembuee Le CD-R est vierge ou le disque n’est pas bien fini Utilisez un CD-R bien fini La lecture de CD ne fonctionne pas CD serieusement raye/ contamine Remplacez/ nettoyez le CD (voir Entretien) Lentille de laser embuee Attendez que la lentille s'acclimate Le lecteur de CD saute des plages CD endommage ou contamine Remplacez ou nettoyez le CD SHUFFLE ou un programme a ete active Mettez hors service le mode SHUFFLE / de programmation Indicacion no disc CD-RW insertado/ No CD insertado Inserte un CD o CD-R CD muy rayado o sucio Cambie/ limpie el CD, vease Mantenimiento Lente de laser empanada Espere a que la lente se haya desempanado CD-R esta en blanco o el disco no esta finalizado Utilice un CD-R finalizado La reproduccion de CD no funciona CD muy rayado o sucio Cambie/ limpie el CD (vease Mantenimiento Lente de laser empanada Espere a que la lente se haya ajustado a la temperatura ambiente El CD salta pistas CD danado o sucio Cambie/ limpie el CD SHUFFLE o un programa esta activado Salga del modo SHUFFLE/programa(s)
no disc – • – • – • – • – • – • – • – • We have done our best to reduce the packaging and make it easy to separate into 3 materials: cardboard, Your set consists of materials which can be recycled if disassembled by a specialized company. Please observe the local regulations regarding the disposal of packaging, exhausted batteries and old equipment. Si une panne se produit, verifiez d’abord les points enumeres ci-dessous avant de faire appel a un reparateur. N’ouvrez pas l’appareil, car il y a risque de chocs electriques. Si les problemes persistent apres avoir effectue les verifications suivantes, prenez contact avec votre concessionnaire ou un centre de service apres-vente. AVERTISSEMENT: En aucun cas, vous ne devez essayer de reparer vous-meme l’appareil, car vous perdriez le droit a la garantie. – • – • – • – • – • – • – • – • Nous avons fait au mieux pour reduire l’emballage et le rendre facile a separer en 3 materiaux: Les materiaux qui entrent dans la composition de cet appareil peuvent etre recycles ou recuperes par une entreprise specialisee. Veuillez respecter la legislation en vigueur dans votre pays relative a la mise au rebut Si ocurre una anomalia, antes de llevar el aparato a que se repare compruebe los puntos detallados a No abra el aparato ya que puede existir el riesgo de recibir una sacudida electrica. Si no puede remediar un problema siguiendo estos consejos, consulte a su distribuidor o centro de servicio. ADVERTENCIA: No debe intentar reparar el aparato usted mismo ya que esto anularia la garantia. – • – • – • – • – • – • – • – • Hemos hecho todo lo posible para reducir el material de embalaje y hacer que sea facil separarlo en Su aparato esta construido con materiales que pueden reciclarse si la unidad es desmontada por una compania especializada. Observe el reglamento local relacionado con la eliminacion de materiales de
TROUBLESHOOTING Troubleshooting Do not open the set as there is a risk of electric shock. guarantee. Problem – Solution • No sound /power Volume not adjusted – Adjust the VOLUME • Mains lead not securely connected – Connect the AC mains lead properly • Batteries exhausted/ incorrectly inserted – Insert (fresh) batteries correctly • Display does not function does not function properly/ No reaction to operation of any of the controls Electrostatic discharge – Switch off and unplug the set. Reconnect after a • few seconds Environmental information paper pulp and expandable polyethylene. DEPANNAGE Depannage Probleme – Remede • Absence de son/puissance VOLUME mal regle – Reglez le VOLUME • Cordon secteur mal branche – Branchez adequatement le cordon secteur • Piles a plat/ incorrectement inserees – Inserez de nouvelles piles correctement • L’affichage ne fonctionne pas correctement/ L’appareil ne reagit pas aux commandes Decharge electrostatique – Eteignez l’appareil et debranchez la fiche secteur. • Rebranchez au bout de quelques secondes Informations relatives a l’environnement carton, pate de papier et polyethylene expanse. des emballages, des piles usagees et des equipements inutilisables. RESOLUCION DE PROBLEMAS Resolucion de problemas continuacion. Problema – Solucion • No hay sonido/potencia El volumen no esta ajustado – Ajuste el VOLUME • El cable de alimentacion no esta conectado – correctamente Conecte correctamente el cable de alimentacion de • CA Pilas agotadas/insertadas incorrectamente – Inserte pilas (nuevas) correctamente • La pantalla no funciona o no funciona correctamente / No reacciona cuando se actua alguno de los controles Descarga electroestatica – Apague y desenchufe el aparato. • Reconectelo despues de unos segundos Informacion medioambiental 3 materiales: carton, pasta de papel y polietileno expandible. embalaje, pilas agotadas y equipo viejo
MAINTENANCE & SAFETY Precautions & General Maintenance (See $) Place the set on a hard and flat surface so that the • system does not tilt. Do not expose the set, batteries or CDs to • humidity, rain, sand or excessive heat caused by heating equipment or direct sunlight. Do not cover the set. Adequate ventilation with a • minimum gap of 6 inches between the ventilation holes and surrounding surfaces is necessary to prevent heat build-up. The mechanical parts of the set contain self- • lubricating bearings and must not be oiled or lubricated. To clean the set, use a soft dry cloth. Do not use • any cleaning agents containing alcohol, ammonia, benzene or abrasives as these may harm the housing. CD player and CD handling (See %) The lens of the CD player should never be touched! • Sudden changes in the surrounding temperature • can cause condensation to form and the lens of your CD player to cloud over. Playing a CD is then not possible. Do not attempt to clean the lens but leave the set in a warm environment until the moisture evaporates. Always close the CD door to keep the CD • compartment dust-free. To clean, dust the compartment with a soft dry cloth. To clean the CD, wipe in a straight line from the • centre towards the edge using a soft, lint-free cloth. Do not use cleaning agents as they may damage the disc. Never write on a CD or attach any stickers to it. • ENTRETIEN & SECURITE Precautions & Entretien General (Voir $) Placez l’appareil sur une surface dure et plane pour • lui eviter de basculer. N’exposez pas l’appareil, les CD ou piles a • l’humidite, a la pluie, au sable ou a une chaleur excessive causee par un equipement de chauffage ou par exposition directe aux rayons du soleil. Ne recouvrez pas l’appareil. Veillez a ce qu’il y ait • suffisamment de ventilation autour de l’appareil; il faut prevoir un espace minimum de 15 cm pour eviter la surchauffe de l’appareil. Les pieces mecaniques de l’appareil contiennent • des paliers lubrifies a vie qu’il ne faut
CD PLAYER Programming track numbers You may store up to 20 tracks in the desired sequence. If you like, store any track more than once. In the STOP mode, press ? or § for your desired 1 track. When your chosen track number appears, press 2 PROG MODE once to store the track. ™ The display shows prog and prog briefly followed by your selected track number. (See 9) ™ If you attempt to programme without first selecting a track number, no sel is shown. (See 0) Repeat steps 1 to 2 to select and store all desired 3 tracks in this way. ™ full is displayed if you attempt to programme more than 20 tracks.(See !) To play your programme, press 2;. 4 Reviewing your set programme In the STOP mode, press and hold down • PROG MODE for more than one second. ™ The display shows all your stored track numbers in sequence. Erasing a programme You can erase the contents of the memory by: – opening the CD door; – selecting TUNER source; – pressing 9 (twice during playback or in the stop position ™ Display: shows no prog briefly when the programme is cancelled.(See @) LECTEUR DE CD Pour revenir a la lecture normale, appuyez sur 2 CD MODE/ PROGRAM jusqu'a ce que les modes shuffle/ repeat ne s'affichent plus. Vous pouvez egalement appuyer sur 9 pour sortir • du mode de lecture. Programmation des numeros de plage Vous pouvez memoriser jusqu'a 20 plages dans l'ordre voulu. Si vous le voulez, vous pouvez memoriser une certaine plage plus d'une fois. En mode d'arret, appuyez sur ? ou § pour 1 selectionner la plage desiree. Lorsque le numero de plage voulu s'affiche, 2 appuyez une seule fois sur PROG MODE pour memoriser la plage. ™ L'afficheur indique un court instant prog et prog puis le numero de la plage selectionnee. (Voir 9) ™ Si vous essayez de programmer sans selectionner d’abord un numero de plage, no sel est affiche. (Voir 0) Repetez les etapes 1 et 2 pour selectionner et 3 memoriser toutes les plages desirees de la meme maniere. ™ full s'affiche si vous tentez de programmer plus de 20 pl
Selecting a different track During playback you can use ? or § to select a particular track. If you have selected a track number in the stop or • pause position, press 2; to start playback. Press § once briefly for the next track, or press • repeatedly until the desired track number appears in the display. Press ? once briefly to return to the beginning of • a current track. Press ? more than once briefly for a previous • track. Finding a passage within a track Press and hold down ? or §. 1 The CD is played at high speed and low volume. • When you recognize the passage you want release 2 ? or §. ™ Normal playback resumes. Different play modes: Shuffle and Repeat PROG MODE allows you to select various play modes. The modes can be selected or changed during playback of an entire CD/ CD programme in the following sequence: shuffle – all tracks are played in random order shuffle repeat all – repeats the entire CD in random order repeat – plays the current track continuously repeat all – plays the entire CD continuously During playback, select your play mode by pressing 1 PROG MODE once or more until the desired play mode is shown. ™ Display: your selected mode flashes 2 seconds before playback You can use ? or § to skip tracks during the • shuffle/ repeat modes. The shuffle/ repeat play options can be combined • and used with a programme: e.g. shuffle/ repeat all repeats the entire CD programme in random order. To return to normal playback press PROG MODE 2 until the shuffle/ repeat modes are no longer shown. You can also press 9 to quit the play mode. • Selection d’une autre plage Pendant la lecture, vous pouvez utiliser ? ou § pour selectionner la plage desiree. Si vous avez selectionne un numero de plage en • mode d'arret ou de pause, appuyez sur 2; pour demarrer la lecture. Appuyez une fois brievement sur § pour • selectionner la plage suivante ou appuyez a plusieurs reprises jusqu’a ce que le numero de plage desire apparaisse sur l’affichage. Appuyez une fois
PLAYER Display indication for CD functions CD open: CD door open (See 6) disc: CD inserted (See 7) – In stop mode: total track number and total playback time – During CD playback: elapsed playback time of current track and current track number – Pause: elapsed playback time freezes and flashes shuffle/ repeat modes: when the respective mode is activated prog: when CD programme active); prog also appears briefly when you store a track (See 9) no sel: programme activated but no tracks selected (See 0) full: programme memory full (See !) no prog: programme cancelled (See @) no disc: no disc/ error in CD operation /CD-R(W) is blank or the disc is not finalized (See # + Troubleshooting) This CD-player can play Audio Discs and CD- Recordables. Do not try to play CD-Rewritables, a CD-ROM, CDi, VCD, DVD or computer CD. Adjust the source selector to CD. ™ Display: shows Cd briefly. To open the CD door, lift the CD door at the edge marked LIFT TO OPEN. Insert a CD or CD-R with the printed side facing up and press the CD door gently close. Press 2; on the set to start playback. To pause playback press 2;. To resume, press 2; To stop CD playback, press STOP 9. Note: CD play will also stop when: – you open the CD compartment; – you select TUNER sound source; – the CD has reached to the end. LECTEUR DE CD Affichages pour les fonctions CD CD open: porte du CD ouverte (Voir 6) disc: lorsqu'un CD est insere (Voir 7) – En mode d’arret: nombre total de plages et temps total de lecture – Pendant la lecture du CD: temps de lecture ecoule de la plage en cours et numero de la plage en cours – En mode de pause: temps de lecture ecoule se gele et clignote (Voir 8) Lors des modes shuffle/ repeat: lorsque le mode respectif est active prog: lorsque la programmation de CD est activee; prog apparait egalement un court instant lorsque vous memorisez une plage (Voir 9) no sel: programme active mais aucune plage n'a ete selectionnee (Voir 0) full: memoire de programme pleine (Voir !) no prog: programme ann
CD CD Player – – (See 8) – – – – – – Playing a CD 1 2 3 4 5 again. 6 Lecteur de CD – – – – – – – – 1 2 3 4 lecture. 5 6 – – – respectivo – – – – – 1 2 3 cerrarla. 4 5 6 (TUNER);
TUNER TUNER SINTONIZADOR
– For FM, pull out the telescopic aerial. Incline and turn the aerial. Reduce its length if the signal is too strong (very close to a transmitter). – For MW (AM) the set is provided with a built-in aerial so the telescopic aerial is not needed. Direct the aerial by turning the whole set. Programming radio stations You can store up to a total of 32 radio stations in the memory: 20 FM and 12 MW(AM). Tune to your desired station (see Radio Reception). 1 Press PROG MODE to activate programming. 2 ™ Display: prog flashes. (See 5) Press PRESET + or – once or more to allocate a 3 number from 1 to 20 for FM or 1 to 12 for MW(AM). Press PROG MODE again to confirm the setting. 4 ™ Display: prog disappears, the preset number and the frequency of the preset station are shown. (See 3) Repeat steps 1-4 to store other stations. 5 You can erase a preset station by storing another • frequency in its place. – Pour FM, sortez l'antenne telescopique. Inclinez et tournez l'antenne. Reduisez sa longueur si le signal est trop fort (a proximite d'un emetteur). – Pour MW (AM) l'appareil est pourvu d'une antenne integree, donc l'antenne telescopique est inutile. Pour diriger cette antenne, il faut agir sur l'appareil dans sa totalite. Programmation de stations radio Vous pouvez programmer jusqu’a 32 stations radio dans la memoire: 20 FM et 12 MW(AM). Syntonisez la station desiree (voir Syntonisation 1 des stations radio). Appuyez sur PROG MODE pour activer la 2 programmation. ™ Affichage: prog clignote. (Voir 5) Appuyez une ou plusieurs fois sur PRESET + ou – 3 pour attribuer un numero de 1 a 20 a FM ou 1 a 12 a MW (AM). Appuyez a nouveau sur PROG MODE pour 4 confirmer le reglage. ™ Affichage: prog disparait, le numero de preselection et la frequence de la station preselectionnee apparaissent. (Voir 3) Repetez les etapes 1 a 4 pour memoriser d’autres 5 stations. Vous pouvez effacer une station preselectionnee en • memorisant a la place une autre frequence. – Para FM, desplieg
BASIC FUNCTIONS Switching power on/off: Save energy Whether you are using mains or battery supply, to avoid unnecessary energy consumption always adjust the source selector to off. General operation To select your sound source adjust the source 1 selector to CD/TUNER/OFF. Adjust the sound with the VOLUME and DBB 2 (Dynamic Bass Boost) controls. To switch off the set, adjust the source selector to 3 off position. Note: When the set is switched off the tuner presets will be retained in the set’s memory. Tuner Radio reception Adjust the source selector to TUNER. 1 ™ Display: shows tu briefly (See 2). Press FM•MW once or more to select the desired 2 waveband. ™ Display: shows your waveband and the preset number and the frequency of a preset station if already programmed (See 3) Press and hold down ? or § briefly to tune to a 3 radio station. Release when the frequency in the display starts to change. ™ The radio automatically tunes to a radio station of sufficient reception. Display shows Srch during automatic tuning. (See 4) FONCTIONS DE BASE Mise en/hors service: Economie d’energie Que vous utilisiez une alimentation secteur ou des piles, evitez de consommer trop de courant non necessaire; reglez toujours le selecteur de source en position off. Fonctionnement general Pour selectionner la source de son, reglez le 1 selecteur de source sur CD/TUNER/OFF. Reglez le son au moyen des commandes VOLUME 2 et DBB (Dynamic Bass Boost). Pour mettre l’appareil hors tension, reglez le 3 selecteur de source sur off (hors circuit). Remarque: Lorsque l’appareil est mis hors circuit, les stations preselectionnees du tuner seront retenues dans la memoire de l'appareil. Tuner Reception radio Reglez le selecteur de source sur TUNER. 1 ™ Affichage: tu est affiche brievement. (Voir 2). Appuyez une ou plusieurs fois sur FM•MW pour 2 selectionner la bande d’onde desiree. ™ Affichage: la bande d’onde est affichee et le numero de preselection et la frequence de la station preselectionnee
POWER SUPPLY Whenever convenient, use the power supply if you want to conserve battery life. Make sure you remove the plug from the set and wall socket before inserting For users in the U.K.: please follow the instructions in batteries, type R-14, UM-2 or C-cells, (preferably alkaline) with the correct polarity as indicated by the Batteries contain chemical substances, so they Incorrect use of batteries can cause electrolyte leakage and will corrode the compartment or cause • Do not mix battery types: e.g. alkaline with carbon zinc. Only use batteries of the same type for the • When inserting new batteries, do not try to mix old • Remove the batteries if the set is not to be used Check if the mains voltage, as shown on the type plate located on the bottom of the set, corresponds to your local mains supply. If it does not, consult Connect the mains lead to the AC MAINS inlet and the wall socket. The power supply is now To switch off completely, unplug the mains lead Unplug the mains lead from the wall socket to protect your set during heavy thunderstorms. The typeplate is located on the bottom of the set ALIMENTATION ELECTRIQUE Chaque fois que vous le pouvez, utilisez l'alimentation secteur pour prolonger la duree de vie des piles. Veillez a debrancher la fiche secteur de l’appareil et Ouvrez le compartiment de piles, puis inserez six piles de type R-14, UM-2 ou C (de preference des piles alcalines), en respectant la polarite correcte, comme indique par les symboles "+" et "–" a l’interieur du chimiques, en d'autres termes, il faut s'en Une utilisation inappropriee des piles peut entrainer une fuite d'electrolyte, provoquant une corrosion du • Ne melangez pas plusieurs types de piles : par ex. des piles alcalines et des piles zinc-carbone. N'utilisez dans l'appareil que des piles de meme • Lors de l'installation de piles neuves, ne melangez • Retirez les piles si vous ne devez pas utiliser l'appareil pendant une periode prolongee. Verifiez si la tension d'alimentation, figuran
Power Supply batteries. the box, Important notes for users in the U.K. Batteries (not included) Open the battery compartment and insert six "+" and "–" symbols inside the compartment. should be disposed of properly. the batteries to burst. Therefore: set. batteries with the new ones. for a long time. Using AC Power 1 your dealer or service centre. 2 connected and ready for use. 3 from the wall socket. • Alimentation electrique de la prise murale avant d'installer les piles. Piles (non fournies) compartiment. Les piles contiennent des substances debarrasser selon les regles en vigueur. compartiment, ou un eclatement de la pile. En consequence: type. pas les anciennes et des neuves. Utilisation de l'alimentation secteur 1 apres-vente. 2 sous tension et pret a fonctionner. 3 • Fuente de alimentacion insertar las pilas. Pilas (no incluidas) tipo R-14, UM-2 o celulas C, (preferiblemente compartimiento. antiguas largo, retire las pilas Utilizacion de CA 1 centro de servicio. 2 conectado y preparado para utilizarse. 3 tomacorriente de pared. • durante tormentas electricas.
CONTROLS – selects source of sound CD or TUNER. Also the – stops CD playback; erases a CD programme skips or searches a passage/track backwards or forward tunes to a station (up, down) – programmes and reviews programmed – plays tracks CD/ programme in random – repeats a track/CD/ programme – programmes preset stations COMMANDES – pour renforcer la restitution des graves – pour selectionner la source de son CD ou TUNER; – indique les fonctions du lecteur de CD et du – pour selectionner la bande d'onde FM/ MW (AM) – pour ouvrir/ fermer le compartiment de CD – pour demarrer ou interrompre provisoirement la – pour arreter la lecture du CD; pour effacer un pour sauter ou rechercher vers l'avant ou vers l'arriere un passage/ une plage pour regler la reception de stations radio – pour choisir une station preselectionnee (haut, bas) – pour programmer les plages et pour verifier la programmation; – pour la lecture en ordre aleatoire des plages d’un CD/ d’un programme; – pour repeter une plage/ un CD/ un – pour programmer des stations radio – pour ouvrir le compartiment des piles CONTROLES – selecciona la fuente de sonido CD o TUNER. – muestra las funciones de CD y sintonizador – selecciona banda de onda FM/ MW – inicia o hace una pausa en la reproduccion del CD – para la reproduccion del CD; borra un programa salta un pasaje/pista o realiza una busqueda en el mismo hacia atras o hacia delante sintoniza una emisora (arriba, abajo) – selecciona una emisora preestablecida – programa y revisa numeros de pista – reproduce en orden aleatorio pistas de – repite una pista/ CD/ programa – programa emisoras preestablecidas – para abrir el compartimiento de pilas – entrada para cable de alimentacion
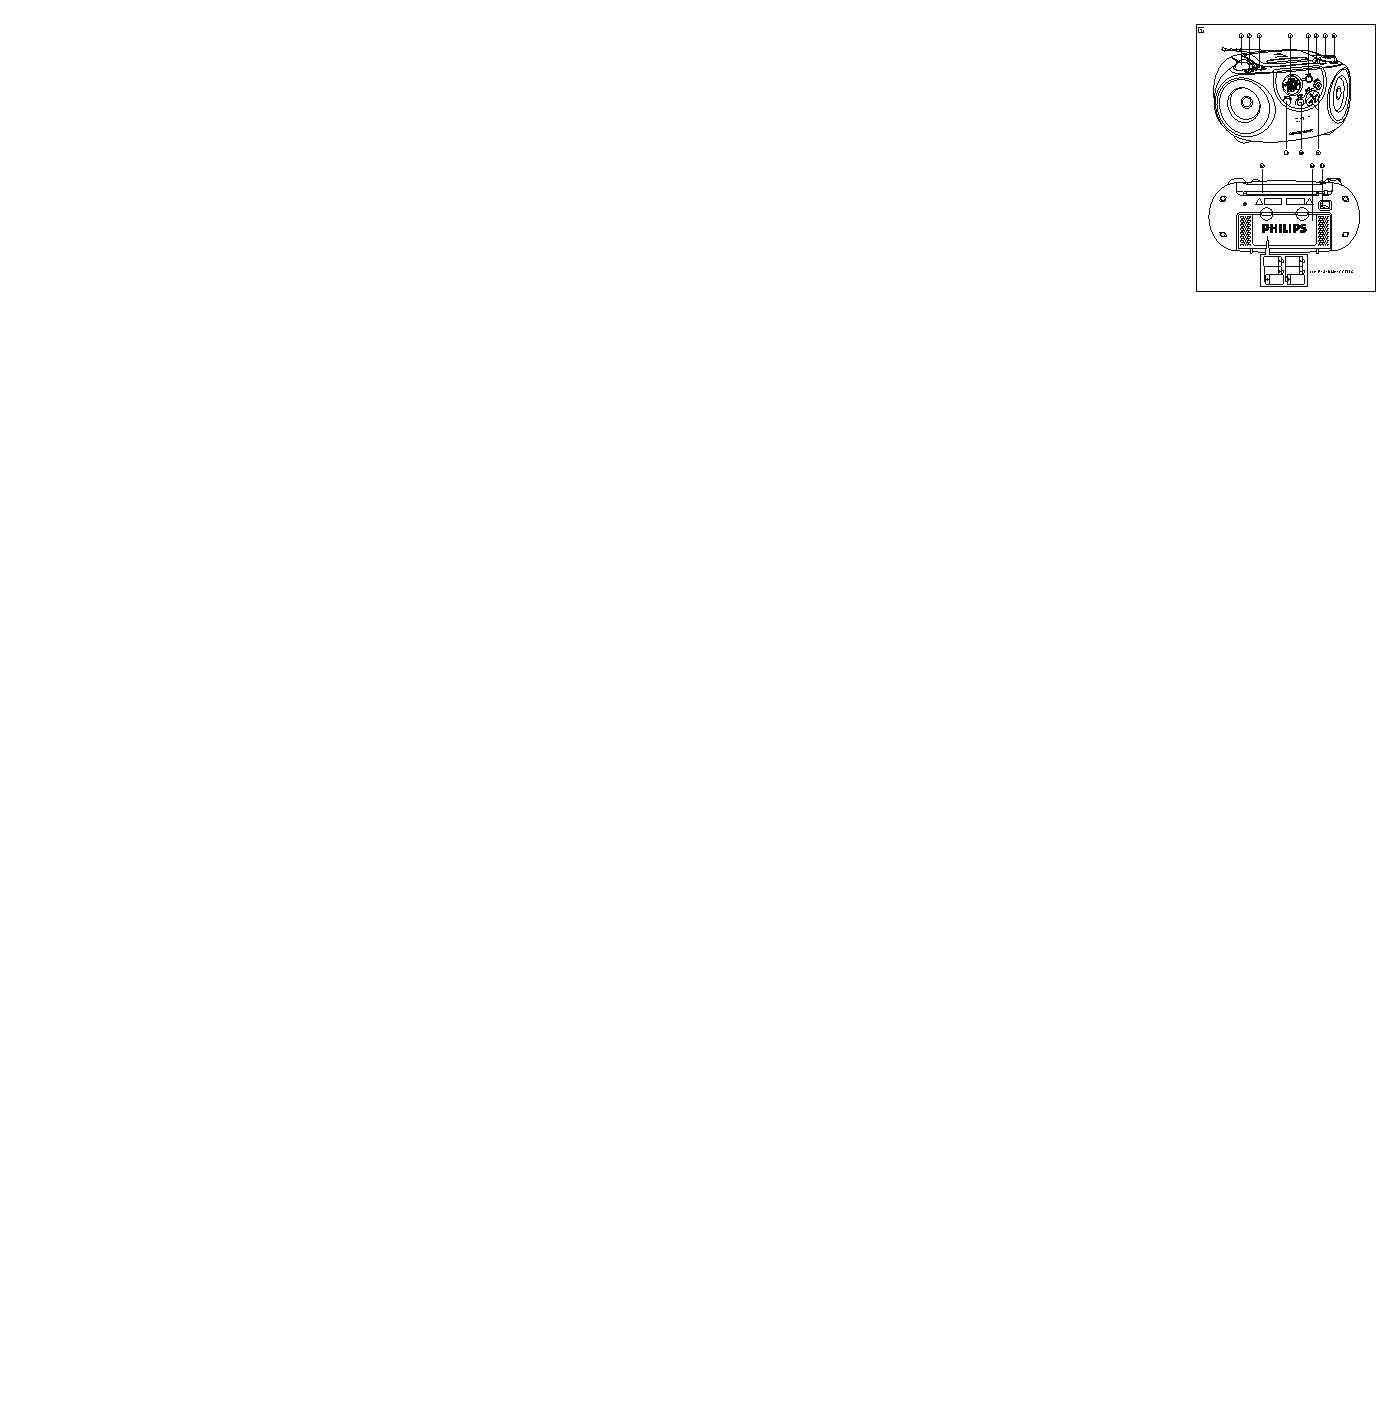
English Top and front panels (See 1) 1VOLUME – adjusts volume level 2DBB (Dynamic Bass Boost) – enhances bass response 3Source selector power off switch 4Display – shows the CD and tuner functions 5FM•MW (AM) – selects FM/ MW (AM) waveband 6LIFT TO OPEN – opens/ closes the CD door 7PRESS TO PLAY 2; – starts or pauses CD play 8STOP 9 9SEARCH ? , § CD: Tuner: 0PRESET +, – – selects a preset station (up, down) !PROG MODE CD: track numbers; order; Tuner: Back Panel (See 1) @Telescopic aerial – to improve FM reception #Battery door – to open battery compartment $AC MAINS – inlet for mains lead Francais Panneaux superieur et avant (Voir 1) 1VOLUME – pour ajuster le volume sonore 2DBB (Dynamic Bass Boost) 3Selecteur de source pour eteindre l'appareil 4Affichage tuner 5FM•MW (AM) 6LIFT TO OPEN 7PRESS TO PLAY 2; lecture du CD 8STOP 9 programme de CD 9SEARCH ? , § CD: Tuner: (haut, bas) 0PRESET +, – !PROG MODE CD: programme Tuner: Panneau arriere (Voir 1) @Antenne telescopique – pour ameliorer la reception en FM #Porte de piles $AC MAINS – prise d'entree du cordon secteur Espanol Paneles superior y frontal (Vease 1) 1VOLUME – ajusta el nivel del volumen 2DBB (Dynamic Bass Boost) – mejora la respuesta de graves 3Selector de fuente Y el interruptor de apagado 4Pantalla 5FM•MW (AM) 6LIFT TO OPEN – abre/cierra la puerta del CD 7PRESS TO PLAY 2; 8STOP 9 de CD 9SEARCH ? , § CD: Tuner: 0PRESET +, – (arriba, abajo) !PROG MODE CD: programados CD/ programa; Tuner: Panel trasero (Vease 1) @Antena telescopica – para mejorar la recepcion de FM #Puerta de compartimiento de pilas $AC MAINS
CMM/RB/0201
AZ 3010, AZ 3011, AZ 3012 CD Soundmachine
Audio Audio
Meet PHILIPS at the internet http://www.audio.philips.com
XP AZ 3010 7x3 1/2 07-01-2002 09:27 Pagina 1
CLASS 1 LASER PRODUCT Printed in Hong Kong Important notes for users in the U.K. This apparatus is fitted with an approved 13 Amp plug. To change a fuse in this type of plug proceed as Fix new fuse which should be a BS1362 5A, A.S.T.A. or BSI approved type. If the fitted plug is not suitable for your socket outlets, it should be cut off and an appropriate plug fitted in If the mains plug contains a fuse, this should have a value of 5A. If a plug without a fuse is used, the fuse at Note: The severed plug must be disposed to avoid a possible shock hazard should it be inserted into a As these colours may not correspond with the colour markings identifying the terminals in your plug, – Connect the BLUE wire to the terminal which is marked with the letter "N" or coloured BLACK. – Connect the BROWN wire to the terminal which is marked with the letter "L" or coloured RED. – Do not connect either wires to the earth terminal in the plug, marked "E" (or the safety earth symbol) or Before replacing the plug cover, make certain that the cordgrip is clamped over the sheath of the lead – not
CD Soundmachine AZ 3010, AZ 3011, AZ 3012 Remove fuse cover and fuse. Refit the fuse cover. the distribution board should not be greater than 5A. 13A socket elsewhere. How to connect a plug The wires in the mains lead are coloured with the following code: BLUE – "NEUTRAL" ("N") and BROWN – "LIVE" ("L"). proceed as follows: coloured green (or green-and-yellow). simply over the two wires. Copyright in the U.K. Recording and playback of material may require consent. See Copyright Act 1956 and The Performer’s Protection Acts 1958 to 1972.
English Francais Espanol Deutsch Nederlands Italiano Mains plug follows: 1 2 3 its place. •8 3 x 2 R14 • UM2 • C-CELLS 5 9 #
7 $
6 9 X
#
5
4 4 8 @
! NOTES This product complies with the radio interference requirements of the European Union. N‡IIOA UOU?OEOU‚O OOOU‚AUOU‚UAU U?A·O‚‡IE?I OO ?‡‰EOEIUA?UA?AI?EE, ‰AEOU‚EUAI?I?I ‚ O‚?OOAEOIOI eOO·?AOU‚A. Niniejszy produkt spe¬nia wymogi Unii Europejskiej dotyczace zak¬ocen radiowych. This apparatus is fitted with an approved 13 Amp plug. To change a fuse in this type of plug proceed as If the fitted plug is not suitable for your socket outlets, it should be cut off and an appropriate plug fitted in If the mains plug contains a fuse, this should have a value of 5A. If a plug without a fuse is used, the fuse at Note: The severed plug must be disposed to avoid a possible shock hazard should it be inserted into a As these colours may not correspond with the colour markings identifying the terminals in your plug, – Connect the BLUE wire to the terminal which is marked with the letter "N" or coloured BLACK. – Connect the BROWN wire to the terminal which is marked with the letter "L" or coloured RED. – Do not connect either wires to the earth terminal in the plug, marked "E" (or the safety earth symbol) or Before replacing the plug cover, make certain that the cordgrip is clamped over the sheath of the lead – not
3 @ Important notes for users in the U.K. Fix new fuse which should be a BS1362 5A, A.S.T.A. or BSI approved type. See Copyright Act 1956 and The Performer’s Protection Acts 1958 to 1972.
2 3 7 ! % The wires in the mains lead are coloured with the following code:
1 Remove fuse cover and fuse. the distribution board should not be greater than 5A. BLUE – "NEUTRAL" ("N") and BROWN – "LIVE" ("L"). coloured green (or green-and-yellow). Recording and playback of material may require consent.
Mains plug Refit the fuse cover. its place. 13A socket elsewhere. How to connect a plug proceed as follows: simply over the two wires. Copyright in the U.K.
1 2 6 0 $ follows: 1 2 3 •
WARNING: Under no circumstances should you try to repair the set yourself, as this will invalidate the
If you are unable to remedy a problem by following these hints, consult your dealer or service centre.
If a fault occurs, first check the points listed below before taking the set for repair.
indication CD-RW inserted /No CD inserted Insert a CD or a CD-R CD badly scratched or dirty Replace/ clean CD, see Maintenance Laser lens steamed up Wait until lens has cleared CD-R is blank or the disc is not finalized Use a finalized CD-R CD playback does not work CD badly scratched/ dirty Replace/ clean CD (see maintenance) Laser lens steamed up Wait until lens has adjusted to room temperature The CD skips tracks CD damaged or dirty Replace or clean CD SHUFFLE or a program is active Quit SHUFFLE/ program mode(s) c‡ ‰EOOIAA no disc iOU‡IO‚IAI CD-RW/ CD ‰EOI IA UOU‡IO‚IAI iOU‡IO‚EUA ‰EOI CD EIE CD-R NEOI OO‚pAE‰?I EIE „p?AI?E a‡IAIEUA/ O?EOUEUA (OI ixO‰) aEIA? I‡AAp‡ A‡OOUAIE N‡EUA EI ‚?OOxIUU? eUOUOE CD-R EIE IAA‡‚Ap??II?E. aOOOI?AUEUA A‡‚Ap??II?E ‰EOI CD-R NEOI IA OpOE„p?‚‡AUO? NEOI OO‚pAE‰?I EIE „p?AI?E a‡IAIEUA/ O?EOUEUA ‰EOI (OI ixO‰) aEIA? I‡AAp‡ A‡OOUAIE N‡EUA EI OpEOOOOO·EU?O? I UAIOAp‡UUpA NEOI OpOOUOI‡AU A‡OEOE NEOI OO‚pAE‰?I EIE „p?AI?E a‡IAIEUA/ O?EOUEUA ‰EOI e‡·OU‡AU SHUFFLE EIE OpO„p‡II‡ eUIAIEUA pAEEI SHUFFLE/OpO„p‡II? Sygnalizacja no disc W¬o?ona p¬yty CD-RW/ w¬o?ona brak p¬yta W¬o?y? p¬yte CD lub CD-R Uszkodzona lub brudna p¬yta CD Wymieni?/ oczy?ci? p¬yte, patrz Konserwacja Zaparowana soczewka lasera Odczeka? na wyschniecie soczewki Pusta lub niesfinalizowana p¬yta CD-R Stosowa? sfinalizowane p¬yty CD-R Nie dzia¬a odtwarzanie p¬yty CD Uszkodzona lub brudna p¬yta CD. Wymieni?/ oczy?ci? p¬yte, patrz Konserwacja Zaparowana soczewka lasera Odczeka? na przystosowanie soczewki do temperatury pomieszczenia Odtwarzacz CD przeskakuje utwory Uszkodzona lub brudna p¬yta CD Wymieni? lub oczy?ci? p¬yte Uaktywniono odtwarzanie losowe SHUFFLE lub wed¬ug programu Wy¬aczy? odtwarzanie losowe SHUFFLE/ wed¬ug
no disc – • – • – • – • – • – • – • – • We have done our best to reduce the packaging and make it easy to separate into 3 materials: cardboard, Your set consists of materials which can be recycled if disassembled by a specialized company. Please observe the local regulations regarding the disposal of packaging, exhausted batteries and old equipment. C OIU?‡A IAEOOp‡‚IOOUE OApA‰ UAI, I‡I IAOUE ‚ pAIOIU, OI‡?‡I‡ OpO‚Ap?UA OUIIU?, OpE‚A‰?II?A IEEA. OOIE OpE‚A‰?II?A IEEA OUIIU? IA OOIO„UU UOUp‡IEU? IAEOOp‡‚IOOU? OUIAOEUA UOUpOEOU‚O ‚ pAIOIU. eeONieeOUNOcaO: cE ‚ IOAI OIU?‡A IA pAIOIUEpUEUA UOUpOEOU‚O O‡IE, ‚ OpOUE‚IOI OIU?‡A ‚? OOUAp?AUA Op‡‚O I‡ „‡p‡IUE?. – • – • – • – • – • – • – • – • a? OOIp‡UEIE O·??I UO‡IO‚O?IO„O I‡UApE‡I‡ E p‡A·EIE A„O I‡ UpE UEO‡ I‡UApE‡IO‚: I‡pUOI, C‡?A UOUpOEOU‚O OO‰ApEEU I‡UApE‡I?, IOUOp?A IOEIO OApAp‡·OU‡U?, O‰‡‚ ‚ OOA?E‡I?IU? IOIO‡IE?. e·?A‡UAI?IO OO·I?‰‡EUA IAOUI?A Op‡‚EI‡ OUIOOEUAI?IO EA·‡‚IAIE? UO‡IO‚IE, EOOOI?AO‚‡II?x W przypadku wystapienia awarii, przed oddaniem sprzetu do naprawy nale?y sprawdzi?, czy nie zachodzi jeden z poni?szych przypadkow. Ze wzgledu na niebezpieczenstwo pora?enia pradem nie wolno otwiera? obudowy zestawu. Je?li postepujac wed¬ug poni?szych wskazowek nie uda sie rozwiaza? problemu, nale?y UWAGA: Pod ?adnym warunkiem nie wolno podejmowa? prob samodzielnego naprawiania zestawu, – • – • – • – • – • – • – • – • programu Do¬o?yli?my wszelkich staran, by zminimalizowa? opakowanie i u¬atwi? jego separacje na trzy materia¬y: Zestaw sk¬ada sie z materia¬ow poddajacych sie przerobowi wtornemu w wyspecjalizowanych zak¬adach. Przy likwidowaniu opakowania, zu?ytych baterii i starego sprzetu prosze postepowa? zgodnie z lokalnymi przepisami.
TROUBLESHOOTING Troubleshooting Do not open the set as there is a risk of electric shock. guarantee. Problem – Solution • No sound /power Volume not adjusted – Adjust the VOLUME • Mains lead not securely connected – Connect the AC mains lead properly • Batteries exhausted/ incorrectly inserted – Insert (fresh) batteries correctly • Display does not function does not function properly/ No reaction to operation of any of the controls Electrostatic discharge – Switch off and unplug the set. Reconnect after a • few seconds Environmental information paper pulp and expandable polyethylene. ieieAcOcaO cOaeeeACceeiO iOUp‡IAIEA IAEOOp‡‚IOOUAE cA OUIp?‚‡EUA UOUpOEOU‚O ‚O EA·AE‡IEA ?IAIUpO?OI‡. epO·IAI‡ – iOUp‡IAIEA • eUOUUOU‚UAU A‚UI/OEU‡IEA cA UOU‡IO‚IAI UpO‚AI? – iOU‡IO‚EUA UpO‚AI? • eAUA‚OE ?IUp OIOxO OO‰II???I – eO‰II??EUA OAUA‚OE ?IUp Op‡‚EI?IO • A‡U‡pAE OAIE/IA‚ApIO UOU‡IO‚IAI? – iOU‡IO‚EUA (IO‚?A) ·‡U‡pAE ‚ApIO • NEOOIAE IA p‡·OU‡AU Op‡‚EI?IO/ IA pA‡„EpUAU I‡ OOAp‡?E? IIOOOI uIAIUpOOU‡UE?AOIEE p‡Ap?‰ – C?II??EUA E OUOOA‰EIEUA UOUpOEOU‚O. • eOUOU? IAOIOI?IO OAIUI‰ OIO‚‡ OO‰II??EUA eOO·?AIEA O· OIpUE‡??AE OpA‰A ?AII?IOA‡ E OOIE?UEIAI. ·‡U‡pAE E OU‡pO„O O·OpU‰O‚‡IE?. ROZWIAZYWANIE PROBLEMOW Rozwiazywanie problemow skontaktowa? sie ze sprzedawca lub punktem serwisowym. gdy? powoduje to uniewa?nienie gwarancji Objawy – Rozwiazanie • Brak dYwieku /zasilania ?le ustawiony regulator g¬o?no?ci – Wyregulowa? g¬o?no?? • Niepoprawnie wetkniety przewod zasilajacy – Poprawnie przy¬aczy? przewod zasilajacy • Zu?yte/ niew¬a?ciwie wstawione baterie – Poprawnie wstawi? (nowe) baterie • Wy?wietlacz nie dzia¬a lub nie dzia¬a prawid¬owo / Brak reakcji na elementy sterujace Wy¬adowanie elektrostatyczne – Wy¬aczy? zestaw i od¬aczy? od sieci. Ponownie • pod¬aczy? po kilku sekundach Producent zastrzega mo?liwo?? wprowadzania zmian technicznych Ochrona ?rodowiska tekture, mase papiernicza i polietylen.
MAINTENANCE & SAFETY Precautions & General Maintenance (See $) Place the set on a hard and flat surface so that the • system does not tilt. Do not expose the set, batteries or CDs to • humidity, rain, sand or excessive heat caused by heating equipment or direct sunlight. Do not cover the set. Adequate ventilation with a • minimum gap of 6 inches between the ventilation holes and surrounding surfaces is necessary to prevent heat build-up. The mechanical parts of the set contain self- • lubricating bearings and must not be oiled or lubricated. To clean the set, use a soft dry cloth. Do not use • any cleaning agents containing alcohol, ammonia, benzene or abrasives as these may harm the housing. CD player and CD handling (See %) The lens of the CD player should never be touched! • Sudden changes in the surrounding temperature • can cause condensation to form and the lens of your CD player to cloud over. Playing a CD is then not possible. Do not attempt to clean the lens but leave the set in a warm environment until the moisture evaporates. Always close the CD door to keep the CD • compartment dust-free. To clean, dust the compartment with a soft dry cloth. To clean the CD, wipe in a straight line from the • centre towards the edge using a soft, lint-free cloth. Do not use cleaning agents as they may damage the disc. Never write on a CD or attach any stickers to it. • iieN aAp? OpA‰OOUOpOEIOOUE E O·?EE UxO‰ (OI $) iOU‡IO‚EUA UOUpOEOU‚O I‡ E?OUIU? OIOOIU? • OO‚ApxIOOU? , ?UO·? OIO IA I‡IIOI?IOO?. cA OO‰‚Ap„‡EUA UOUpOEOU‚O, ·‡U‡pAE, ‰EOIE • ‚OA‰AEOU‚E? ‚I‡„E, ‰OE‰?, OAOI‡ EIE EA·?UO?I?x UAIOAp‡UUp OU I‡„pA‚‡UAI?I?x OpE·OpO‚ EIE Op?IO„O OOIIA?IO„O O‚AU‡. cA I‡Ip?‚‡EUA UOUpOEOU‚O. NI? • OpA‰OU‚p‡?AIE? I‡IOOIAIE? UAOI‡ IAO·xO‰EIO O·AOOA?EU? ‡‰AI‚‡UIU? ‚AIUEI??E? O ‰I? IEIEI‡I?I?I A‡AOpOI 15 OI IAE‰U ‚AIUEI??EOII?IE OU‚ApOUE?IE E OIpUE‡??EIE OO‚ApxIOOU?IE. aAx‡IE?AOIEA ?‡OUE UOUpOEOU‚‡ EIA?U • O‡IOOI‡A?‚‡??EAO? OO‰?EOIEIE E IA ‰OIEI? OI‡A?‚‡U?O?. NI? O?EOUIE UOUpOEOU‚‡ EOOOI?A
CD PLAYER Programming track numbers You may store up to 20 tracks in the desired sequence. If you like, store any track more than once. In the STOP mode, press ? or § for your desired 1 track. When your chosen track number appears, press 2 PROG MODE once to store the track. ™ The display shows prog and prog briefly followed by your selected track number. (See 9) ™ If you attempt to programme without first selecting a track number, no sel is shown. (See 0) Repeat steps 1 to 2 to select and store all desired 3 tracks in this way. ™ full is displayed if you attempt to programme more than 20 tracks.(See !) To play your programme, press 2;. 4 Reviewing your set programme In the STOP mode, press and hold down • PROG MODE for more than one second. ™ The display shows all your stored track numbers in sequence. Erasing a programme You can erase the contents of the memory by: – opening the CD door; – selecting TUNER source; – pressing 9 (twice during playback or in the stop position ™ Display: shows no prog briefly when the programme is cancelled.(See @) eeeaEeoCAiOau CD TNI? ‚OA‚p‡?AIE? I IOpI‡I?IOIU 2 OpOE„p?‚‡IE? I‡EIEUA PROG MODE ‰O EO?AAIO‚AIE? pAEEIO‚ shuffle/ repeat. ‰I? ‚?xO‰‡ EA pAEEI‡ aOEIO U‡IEA I‡E‡U? 9 • OpOE„p?‚‡IE?. ‰I? I‡?‡I‡ epO„p‡IIEpO‚‡IEA IOIApO‚ A‡OEOAE aOEIO OOxp‡IEU? ‰O 20 ‚ IUEIOE OOOIA‰O‚‡UAI?IOOUE. OOIE xOUEUA, IOEIO U‡IEA OOxp‡IEU? O‰IU A‡OEO? IAOIOI?IO p‡A. EIE § C pAEEIA OOU‡IO‚IE I‡EIEUA ? 1 IUEIOE A‡OEOE. aO„‰‡ OO?‚EUO? IOIAp IUEIOE A‡OEOE, I‡EIEUA 2 PROG MODE O‰EI p‡A ‰I? OOxp‡IAIE? ?UOE A‡OEOE. E prog I‡ c‡ ‰EOOIAA ‚?‰‡?UO? prog ™ IOpOUIOA ‚pAI?, ‡ A‡UAI IOIAp ‚?·p‡IIOE A‡OEOE. (OI 9) OOIE ‚? OOO?U‡AUAO? OpO„p‡IIEpO‚‡U? ·AA ™ OpA‰‚‡pEUAI?IO„O ‚?·Op‡ IOIAp‡ A‡OEOE, OO?‚EUO? no sel. (OI 0) eO‚UOpEUA OO. 1 OO 2 ‰I? ‚?·Op‡ E OOxp‡IAIE? 3 ‚OAx IUEI?x A‡OEOAE. ™OOIE ‚? OOO?U‡AUAO? OOxp‡IEU? ·OIAA 20 A‡OEOAE, OO?‚EUO? full (OI !). NI? OpOE„p?‚‡IE? OpO„p‡II? I‡EIEUA 2;. 4 epOOIOUp A‡‰‡IIOE OpO„p‡II? C pAEEIA OOU‡IO‚IE I‡EIEUA E ‰ApEEUA • PROG
Selecting a different track During playback you can use ? or § to select a particular track. If you have selected a track number in the stop or • pause position, press 2; to start playback. Press § once briefly for the next track, or press • repeatedly until the desired track number appears in the display. Press ? once briefly to return to the beginning of • a current track. Press ? more than once briefly for a previous • track. Finding a passage within a track Press and hold down ? or §. 1 The CD is played at high speed and low volume. • When you recognize the passage you want release 2 ? or §. ™ Normal playback resumes. Different play modes: Shuffle and Repeat PROG MODE allows you to select various play modes. The modes can be selected or changed during playback of an entire CD/ CD programme in the following sequence: shuffle – all tracks are played in random order shuffle repeat all – repeats the entire CD in random order repeat – plays the current track continuously repeat all – plays the entire CD continuously During playback, select your play mode by pressing 1 PROG MODE once or more until the desired play mode is shown. ™ Display: your selected mode flashes 2 seconds before playback You can use ? or § to skip tracks during the • shuffle/ repeat modes. The shuffle/ repeat play options can be combined • and used with a programme: e.g. shuffle/ repeat all repeats the entire CD programme in random order. To return to normal playback press PROG MODE 2 until the shuffle/ repeat modes are no longer shown. You can also press 9 to quit the play mode. • C?·Op ‰pU„OE A‡OEOE CO ‚pAI? OpOE„p?‚‡IE? IOEIO EOOOI?AO‚‡U? ? ‰I? ‚?·Op‡ OOpA‰AI?IIOE A‡OEOE. EIE § OOIE ‚? ‚?·p‡IE IOIAp A‡OEOE ‚ pAEEIA • OOU‡IO‚IE EIE O‡UA?, I‡EIEUA 2; OpOE„p?‚‡IE?. O‰EI p‡A ‰I? OIA‰U??AE A‡OEOE c‡EIEUA § • EIE I‡EIEUA IAOIOI?IO p‡A ‰O OO?‚IAIE? IOIAp‡ IUEIOE A‡OEOE I‡ ‰EOOIAA. O‰EI p‡A ‰I? ‚OA‚p‡?AIE? I c‡EIEUA ? • I‡?‡IU UAIU?AE A‡OEOE. IAOIOI?IO p‡A ‰I? OpA‰?‰U?AE c‡EIEUA ? • A‡OEOE. c‡
PLAYER Display indication for CD functions CD open: CD door open (See 6) disc: CD inserted (See 7) – In stop mode: total track number and total playback time – During CD playback: elapsed playback time of current track and current track number – Pause: elapsed playback time freezes and flashes shuffle/ repeat modes: when the respective mode is activated prog: when CD programme active; prog also appears briefly when you store a track (See 9) no sel: programme activated but no tracks selected (See 0) full: programme memory full (See !) no prog: programme cancelled (See @) no disc: no disc/ error in CD operation /CD-R(W) is blank or the disc is not finalized (See # + Troubleshooting) This CD-player can play Audio Discs and CD- Recordables. Do not try to play CD-Rewritables, a CD-ROM, CDi, VCD, DVD or computer CD. Adjust the source selector to CD. ™ Display: shows Cd briefly. To open the CD door, lift the CD door at the edge marked LIFT TO OPEN. Insert a CD or CD-R with the printed side facing up and press the CD door gently close. Press 2; on the set to start playback. To pause playback press 2;. To resume, press 2; To stop CD playback, press STOP 9. Note: CD play will also stop when: – you open the CD compartment; – you select TUNER sound source; – the CD has reached to the end. eeeaEeoCAiOau CD epOE„p?‚‡UAI? CD NEOOIAE ‰I? UUII?EE CD CD open: ‰‚Ap?‡ CD OUIp?U‡ (OI 6) disc: CD ‚OU‡‚IAI (OI 7) – C pAEEIA OOU‡IO‚IE: O·?AA ?EOIO A‡OEOAE E O·?AA ‚pAI? OpOE„p?‚‡IE? – CO ‚pAI? OpOE„p?‚‡IE? CD: EOU?I?AA ‚pAI? OpOE„p?‚‡IE? UAIU?AE A‡OEOE E IOIAp UAIU?AE A‡OEOE – C pAEEIA O‡UA?: EOU?I?AA ‚pAI? OpOE„p?‚‡IE? OOOUO?IIOA E IE„‡AU (OI 8) eAEEI? shuffle/ repeat: OpE ‚II??AIEE OOOU‚AUOU‚U??A„O pAEEI‡ prog: OpE ‚II??AIEE OpO„p‡II? CD; prog U‡IEA OO?‚I?AUO? I‡ IOpOUIOA ‚pAI? OpE OOxp‡IAIEE A‡OEOE (OI 9) no sel: OpO„p‡II‡ ‚II??AI‡, IO A‡OEOE IA ‚?·p‡I? (OI 0) full: O‡I?U? OpO„p‡II? OOII‡? (OI !) no prog: OpO„p‡II‡ OUIAIAI‡ (OI @) no disc: IAU ‰EOI‡/ O?E·I‡ ‚ OOAp‡?EE CD/ CD-R(W) OUOUOE EIE I
CD CD Player – – (See 8) – – – – – – Playing a CD 1 2 3 4 5 again. 6 – – – – – – – – 1 ™ 2 3 4 5 6 – – – – – – – – 1 2 3 4 5 6 STOP 9. tak?e po:
TUNER iucOe O‰EI EIE IAOIOI?IO TUNER
– For FM, pull out the telescopic aerial. Incline and turn the aerial. Reduce its length if the signal is too strong (very close to a transmitter). – For MW (AM) the set is provided with a built-in aerial so the telescopic aerial is not needed. Direct the aerial by turning the whole set. Programming radio stations You can store up to a total of 32 radio stations in the memory: 20 FM and 12 MW(AM). Tune to your desired station (see Radio Reception). 1 Press PROG MODE to activate programming. 2 ™ Display: prog flashes. (See 5) Press PRESET + or – once or more to allocate a 3 number from 1 to 20 for FM or 1 to 12 for MW(AM). Press PROG MODE again to confirm the setting. 4 ™ Display: prog disappears, the preset number and the frequency of the preset station are shown. (See 3) Repeat steps 1-4 to store other stations. 5 You can erase a preset station by storing another • frequency in its place. – NI? FM, ‚?U?IEUA UAIAOIOOE?AOIU? ‡IUAIIU. c‡IIOIEUA E OO‚ApIEUA ‡IUAIIU. OOIE OE„I‡I O?AI? OEI?I?E, UIAI??EUA A? ‰IEIU (O?AI? ·IEAIO I Up‡IOIEUUApU). – NI? MW (AM) UOUpOEOU‚O EIAAU ‚OUpOAIIU? ‡IUAIIU, E UAIAOIOOE?AOI‡? IA IUEI‡. c‡Op‡‚?UA ‡IUAIIU, OO‚ApIU‚ O‡IO UOUpOEOU‚O. epO„p‡IIEpO‚‡IEA p‡‰EO OU‡I?EE C O‡I?U? IOEIO ‚IAOUE ‰O 20 FM E 12 MW(AM) OU‡I?EE. c‡OUpOEUAO? I‡ IUEIU? OU‡I?E? (OI e‡‰EO 1 OpE?I). c‡EIEUA PROG MODE ‰I? ‚II??AIE? 2 OpO„p‡IIEpO‚‡IE?. ™c‡ ‰EOOIAA IE„‡AU prog. (OI 5) c‡EIEUA PRESET + EIE – 3 p‡A ‰I? I‡AI‡?AIE? IOIAp‡ ‰I? ?UOE OU‡I?EE OU 1 ‰O 20 ‰I? FM or 1 ‰O 12. ‰I? MW(AM) c‡EIEUA PROG MODE OIO‚‡ ‰I? 4 OO‰U‚ApE‰AIE? UOU‡‚IE. ™ c‡ ‰EOOIAA program EO?AAIAU, ·U‰AU ‚?‰‡‚‡U?O? A‡‰‡II?E IOIAp E ?‡OUOU‡ A‡‰‡IIOE OU‡I?EE. (OI 3) eO‚UOpEUA OO. 1-4 ‰I? A‡IAOAIE? ‰pU„Ex 5 OU‡I?EE. NI? UEp‡IE? A‡‰‡IIOE OU‡I?EE IUEIO ‚IAOUE • ‰pU„U? ?‡OUOUU ‚IAOUO IA?. – Dla FM, wyciagna?, pochyli? i obroci? antene teleskopowa. Zmniejszy? d¬ugo?? anteny, je?li sygna¬ jest zbyt silny (bardzo blisko nadajnika). – Dla MW (AM) zestaw wykorzystuje antene wewnetrzna i antena te
BASIC FUNCTIONS Switching power on/off: Save energy Whether you are using mains or battery supply, to avoid unnecessary energy consumption always adjust the source selector to off. General operation To select your sound source adjust the source 1 selector to CD/TUNER/OFF. Adjust the sound with the VOLUME and DBB 2 (Dynamic Bass Boost) controls. To switch off the set, adjust the source selector to 3 off position. Note: When the set is switched off the tuner presets will be retained in the set’s memory. Tuner Radio reception Adjust the source selector to TUNER. 1 ™ Display: shows tu briefly (See 2). Press FM•MW once or more to select the desired 2 waveband. ™ Display: shows your waveband and the preset number and the frequency of a preset station if already programmed (See 3) Press and hold down ? or § briefly to tune to a 3 radio station. Release when the frequency in the display starts to change. ™ The radio automatically tunes to a radio station of sufficient reception. Display shows Srch during automatic tuning. (See 4) eeceCcoO iicanaa CII??AIEA/ OUII??AIEA OEU‡IE?: uIOIOIE? ?IAp„EE. NI? EOII??AIE? EAIE?IA„O p‡OxO‰‡ ?IAp„EE OpE EOOOI?AO‚‡IEE OAUA‚O„O OEU‡IE? EIE ·‡U‡pAE ‚OA„‰‡ UOU‡I‡‚IE‚‡EUA OAIAIUOp EOUO?IEI‡ I‡ off (‚?II). e·?‡? OOAp‡?E? NI? ‚?·Op‡ EOUO?IEI‡ A‚UI‡ UOU‡IO‚EUA 1 OAIAIUOp I‡ CD/TUNER/OFF. eUpA„UIEpUEUA A‚UI O OOIO??? pU?AI 2 VOLUME E DBB (Dynamic Bass Boost). NI? ‚?II??AIE? UOUpOEOU‚‡ UOU‡IO‚EUA 3 OAIAIUOp ‚ OOIOEAIEA off. epEIA?‡IEA: aO„‰‡ UOUpOEOU‚O ‚?II??AIO, UOU‡‚IE U?IAp‡ ‚ O‡I?UE UOUpOEOU‚A OOxp‡I??UO?. i?IAp e‡‰EO OpE?I iOU‡IO‚EUA OAIAIUOp EOUO?IEI‡ I‡ TUNER. 1 (OI 2). NEOOIAE ‚?‰‡OU tu ™ c‡EIEUA FM•MW O‰EI EIE IAOIOI?IO p‡A ‰I? 2 ‚?·Op‡ IUEIOE OOIOO?. NEOOIAE ‚?‰‡?U OOIOOU E A‡‰‡II?E IOIAp E ™ ?‡OUOUU A‡‰‡IIOE OU‡I?EE, AOIE OI‡ A‡OpO„p‡IIEpO‚‡I‡. (OI 3) ‚ UA?AIEA EIE § c‡EIEUA E ‰ApEEUA ? 3 IOpOUIO„O ‚pAIAIE ‰I? I‡OUpOEIE I‡ p‡‰EO OU‡I?E?. eO‚O·O‰EUA, IO„‰‡ ?‡OUOU‡ I‡ ‰EOOIAA I‡?I?U IAI?U?O?. e‡‰EO ‡‚UOI‡UE?AOIE I‡OUp‡E‚‡
POWER SUPPLY Whenever convenient, use the power supply if you want to conserve battery life. Make sure you remove the plug from the set and wall socket before inserting For users in the U.K.: please follow the instructions in batteries, type R-14, UM-2 or C-cells, (preferably alkaline) with the correct polarity as indicated by the Batteries contain chemical substances, so they Incorrect use of batteries can cause electrolyte leakage and will corrode the compartment or cause • Do not mix battery types: e.g. alkaline with carbon zinc. Only use batteries of the same type for the • When inserting new batteries, do not try to mix old • Remove the batteries if the set is not to be used Check if the mains voltage, as shown on the type plate located on the bottom of the set, corresponds to your local mains supply. If it does not, consult Connect the mains lead to the AC MAINS inlet and the wall socket. The power supply is now To switch off completely, unplug the mains lead Unplug the mains lead from the wall socket to protect your set during heavy thunderstorms. The typeplate is located on the bottom of the set eaiAcaO epE I?·OE ‚OAIOEIOOUE OOI?AUEUAO? OAUA‚?I OEU‡IEAI ‰I? U‚AIE?AIE? OpOI‡ OIUE·? ·‡U‡pAE. eApA‰ UOU‡IO‚IOE ·‡U‡pAE OUOOA‰EIEUA ?IUp OEU‡IE? OU ?UAOOAI? ‚ OUAIA E OU UOUpOEOU‚‡. eUIpOEUA OU‰AIAIEA ‰I? ·‡U‡pAE E UOU‡IO‚EUA (EAI‡UAI?IO ?AIO?I?A), OO·I?‰‡? OOI?pIOOU?, UI‡A‡IIU? ‚IUUpE OU‰AIAIE? OEI‚OI‡IE "+" E "–". A‡U‡pAE OO‰ApE‡U xEIE?AOIEA ‚A?AOU‚‡ E aOOOI?AUEUA ·‡U‡pAE O‰IO„O UEO‡: I‡Op., UOI?IO ?AIO?I?A EIE UOI?IO U„IApO‰IO- ?EIIO‚?A. cA OIA?E‚‡EUA p‡AI?A UEO?. epE UOU‡IO‚IA IO‚?x ·‡U‡pAE IA OIA?E‚‡EUA OOIE UOUpOEOU‚O IA ·U‰AU EOOOI?AO‚‡U?O? ‚ UA?AIEA OpO‰OIEEUAI?IO„O ‚pAIAIE, ‚?I?UA EA epO‚Ap?UA OOOU‚AUOU‚EA I‡Op?EAIE?, UI‡A‡IIO„O I‡ UAxIE?AOIOE U‡·IE?IA I‡ ‰IA UOUpOEOU‚‡, IAOUIOIU OAUA‚OIU I‡Op?EAIE?. OOIE OIO p‡AIOA, O‚?EEUAO? O ‰EIApOI EIE eO‰II??EUA OAUA‚OE I‡·AI? I ‚xO‰U AC MAINS E I‡OUAIIOE pOAAUIA. iAOAp? OEU‡IEA OO‰‡?UO? I‡ UOUpOEOU‚O E OIO „OUO‚O I EOOOI?AO‚‡IE?. N
Power Supply batteries. the box, Important notes for users in the U.K. Batteries (not included) Open the battery compartment and insert six "+" and "–" symbols inside the compartment. should be disposed of properly. the batteries to burst. Therefore: set. batteries with the new ones. for a long time. Using AC Power 1 your dealer or service centre. 2 connected and ready for use. 3 from the wall socket. • eEU‡IEA A‡U‡pAE (IA ‚II??AI?) ?AOU? ·‡U‡pAE UEO‡ R 14, UM-2 EIE C-, EA·‡‚I?U?O? OU EOOOI?AO‚‡II?x IUEIO OOOU‚AUOU‚U??EI O·p‡AOI. cA‚ApIOA EOOOI?AO‚‡IEA ·‡U‡pAE IOEAU OpE‚AOUE I UUA?IA ?IAIUpOIEU‡ E IOppOAEE OU‰AIAIE? EIE I ‚Ap?‚U ·‡U‡pAE. eO?UOIU: • • OU‡p?A E IO‚?A. • IA„O ·‡U‡pAE. aOOOI?AO‚‡IEA OAUA‚O„O OEU‡IE? 1 ?AIUpOI O·OIUEE‚‡IE?. 2 3 • UOUpOEOU‚‡. iAxIE?AOI‡? U‡·IE?I‡ I‡xO‰EUO? I‡ ‰IA UOUpOEOU‚‡. Zasilanie elektrycznego Baterie (brak w zestawie) wewnatrz pojemnika. baterii. Dlatego: nowych ze zu?ytymi. nieu?ywania go przez d¬u?szy okres. Korzystanie z sieci elektrycznej 1 napraw, je?li tak nie jest 2 3 zestaw od gniazdka elektrycznego • elektrycznego. zestawu.
CONTROLS – selects source of sound CD or TUNER. Also the – stops CD playback; erases a CD programme skips or searches a passage/track backwards or forward tunes to a station (up, down) – programmes and reviews programmed – plays tracks CD/ programme in random – repeats a track/CD/ programme – programmes preset stations aceeaa ieeACaOcau – ‚?·Ep‡AU EOUO?IEI A‚UI‡ CD, TUNER/off, E – OOI‡A?‚‡AU UUII?EE CD E U?IAp‡ – OUIp?‚‡AU/A‡Ip?‚‡AU ‰‚Ap?U CD 2; – I‡?EI‡AU EIE OpAp?‚‡AU OpOE„p?‚‡IEA CD OApAxO‰EU EIE E?AU OUp?‚OI/A‡OEO? ‚OAp?‰ EIE I‡A‡‰ I‡OUp‡E‚‡AU I‡ OU‡I?E? (‚‚Apx, ‚IEA) – ‚?·Ep‡AU A‡‰‡IIU? OU‡I?E? (‚‚Apx, ‚IEA) – OpO„p‡IIEpUAU E OpOOI‡UpE‚‡AU IOIAp‡ A‡OpO„p‡IIEpO‚‡II?x – OpOE„p?‚‡AU A‡OEOE/OpO„p‡IIU I‡ ‰EOIA CD / ‚ OpOEA‚OI?IOI OOp?‰IA; – OO‚UOp?AU A‡OEO?/CD/OpO„p‡IIU – OpO„p‡IIEpUAU A‡‰‡II?A OU‡I?EE – ‰I? OUIp?‚‡IE? OUOAI‡ ‰I? ·‡U‡pAE ELEMENTY STERUJACE – wybieranie Yrod¬a dYwieku CD lub TUNER – wy?wietlanie funkcji odtwarzacza CD i tunera – wybieranie zakresu fal FM/ MW (AM) – otwieranie/ zamykanie drzwiczek CD – uruchamianie lub wstrzymywanie odtwarzania – zatrzymywanie odtwarzania p¬yty CD; kasowanie przeskakiwanie lub wyszukiwanie fragmentu/utworu do przodu lub wstecz dostrajanie do stacji (zwiekszanie, zmniejszanie czestotliwo?ci) – wybieranie zaprogramowanej stacji – programowanie i przegladanie numerow zaprogramowanych utworow; – odtwarzanie utworow z CD/ programu w losowej kolejno?ci; – powtarzanie utworu/CD/programu – programowanie stacji
English Top and front panels (See 1) 1VOLUME – adjusts volume level 2DBB (Dynamic Bass Boost) – enhances bass response 3Source selector power off switch 4Display – shows the CD and tuner functions 5FM•MW (AM) – selects FM/ MW (AM) waveband 6LIFT TO OPEN – opens/ closes the CD door 7PRESS TO PLAY 2; – starts or pauses CD play 8STOP 9 9SEARCH ? , § CD: Tuner: 0PRESET +, – – selects a preset station (up, down) !PROG MODE CD: track numbers; order; Tuner: Back Panel (See 1) @Telescopic aerial – to improve FM reception #Battery door – to open battery compartment $AC MAINS – inlet for mains lead eUOOIEE CApxI?? E OApA‰I?? O‡IAIE (OI 1) 1VOLUME – pA„UIEpUAU UpO‚AI? A‚UI‡ 2DBB (Dynamic Bass Boost) – UIU??‡AU x‡p‡IUApEOUEIU 3eAIAIUOp EOUO?IEI‡ ‚II??‡AU/‚?II??‡AU OEU‡IEA 4NEOOIAE 5FM•MW (AM) – ‚?·Ep‡AU OOIOO? FM/ MW (AM) 6LIFT TO OPEN 7PRESS TO PLAY 8STOP 9 – OpAIp‡?‡AU OpOE„p?‚‡IEA CD; OUEp‡AU OpO„p‡IIU CD , § 9SEARCH ? CD: Tuner: 0PRESET +, – !PROG MODE CD: A‡OEOAE; Tuner: a‡‰I?? O‡IAI? (OI 1) @iAIAOIOOE?AOI‡? ‡IUAII‡ – ‰I? UIU??AIE? OpE?I‡ FM #B‰‚Ap?‡ OUOAI‡ ‰I? ·‡U‡pAE $AC MAINS – ‚xO‰ ‰I? OAUA‚O„O ?IUp‡ Polski P¬yty gorna i tylna (Patrz 1) 1VOLUME – regulacja g¬o?no?ci 2DBB (Dynamic Bass Boost) – uwypuklenie odtwarzania basow 3Selektor Yrod¬a Oraz wy¬aczanie zasilania 4wy?wietlacz 5FM•MW (AM) 6LIFT TO OPEN 7PRESS TO PLAY 2; p¬yty CD 8STOP 9 programu CD 9SEARCH ? , § CD: Tuner: 0PRESET +, – (nastepna, poprzednia) !PROG MODE CD: Tuner: P¬yta tylna (Patrz 1) @Antena teleskopowa – poprawianie odbioru FM #Drzwiczki pojemnika na baterie – otwieranie pojemnika baterii $AC MAINS – gniazdko przewodu sieciowego ?
CMM/RB/0202 iOaOiec (telephone) _________________________________ ANeOe (address) _____________________________________ eeaieAiOau (buyer) ________________________________ oU‡IO OA?‚EO-?AIU?‡
AZ 3010, AZ 3011, AZ 3012 CD Soundmachine
Audio Audio ( (T Th hi is s c ca ar rd d i is s o on nl ly y v va al li id d w wh he en n a al ll l i in nf fo or rm ma at ti io on n i is s f fi il ll le ed d i in n a an nd d t th he e s st ta am mp p i is s p pr re es se en nt t. .) ) ‚ ‚? ?? ?A A „ „? ?‡ ‡U U. . I I‡ ‡I IE E? ?E EE E O OA A? ?‡ ‡U UE E E E A A‡ ‡O OO OI II IA AI IE E? ? ‚ ‚O OA A? ? O O? ?E E‚ ‚A A‰ ‰A AI II I? ?? ? c c‡ ‡O OU UO O? ?? ?E EE E U U‡ ‡I IO OI I ‰ ‰A AE EO OU U‚ ‚E EU UA AI IA AI I U UO OI I? ?I IO O O O? ?E E __________________________________________________ eO‰OEO?
Meet PHILIPS at the internet http://www.audio.philips.com
XP AZ 3010 7x3 3/3 ("14") 09-01-2002 16:13 Pagina 1
CLASS 1 LASER PRODUCT Printed in Hong Kong eOoAiu eeeNACnA (seller’s stamp)______________________ eeNeaeu eeeNACnA (seller’s signature)__________________ iaeaA-eeeNACOn (seller)____________________________ NAiA eeeNAUa (date of purchase)_______________________ eOeaacoa ‹ (serial #)_______________________________ / ___________________________ CE‰ IAEOO?‡‚IOOUE: _________________________________ ‹ I‚EU‡I?EE: ______________________________________ N‡U‡ OIOI?‡IE? ?AIOIU‡: ____________________________ N‡U‡ OOOUUOIAIE? ‚ ?AIOIU:__________________________ oU‡IO OA?‚EO-?AIU?‡ eO‰OEO?
CD Soundmachine AZ 3010, AZ 3011, AZ 3012 A Ao oi ie eC CA Au u u ua aO Oa ai ie ee ec ca aa aA A aaNOaaO (item) ______________ aeNOau (type/version) ____ EAeAciaacoa iAaec (warranty card) __________________________________________________ CE‰ IAEOO?‡‚IOOUE: _________________________________ ‹ I‚EU‡I?EE: ______________________________________ N‡U‡ OIOI?‡IE? ?AIOIU‡: ____________________________
English Russian Polski Slovensky Eesky magyar eeeeau ‹ U‡IOI‡ (Card #) N‡U‡ OOOUUOIAIE? ‚ ?AIOIU:__________________________ N‡II?A O O?OEA‚A‰AIIOI ?AIOIUA:8 3 x 2 R14 • UM2 • C-CELLS 5 9 #
7 $
6 9 X
#
5
4 4 8 @
! NOTES This product complies with the radio interference requirements of the European Union. Ce materiel satisfait aux imperatifs de brouillage radio de la Communaute Europeenne. Este aparato satisface las normas relativas a la interferencia radioelectrica de la Comunidad Europea. Dieses Produkt entspricht den Funkentstorvorschriften der Europaischen Union. Dit apparaat voldoet aan de radio-ontstoringseisen van de Europese Unie. Questo prodotto e conforme ai requisiti delle interferenze radio della Unione Europea.
3 @
2 3 7 ! %
1
1 2 6 0 $
WARNING: Under no circumstances should you try to repair the set yourself, as this will invalidate the
If you are unable to remedy a problem by following these hints, consult your dealer or service centre.
If a fault occurs, first check the points listed below before taking the set for repair.
indication CD-RW inserted /No CD inserted Insert a CD or a CD-R CD badly scratched or dirty Replace/ clean CD, see Maintenance Laser lens steamed up Wait until lens has cleared CD-R is blank or the disc is not finalized Use a finalized CD-R CD playback does not work CD badly scratched/ dirty Replace/ clean CD (see maintenance) Laser lens steamed up Wait until lens has adjusted to room temperature The CD skips tracks CD damaged or dirty Replace or clean CD SHUFFLE or a program is active Quit SHUFFLE/ program mode(s) Indication no disc CD-RW dans l’appareil/ Pas de CD dans l’appareil Inserez un CD ou un CD-R CD serieusement raye ou contamine Remplacez/ nettoyez le CD, voir Entretien Lentille de laser embuee Attendez que la lentille se soit desembuee Le CD-R est vierge ou le disque n’est pas bien fini Utilisez un CD-R bien fini La lecture de CD ne fonctionne pas CD serieusement raye/ contamine Remplacez/ nettoyez le CD (voir Entretien) Lentille de laser embuee Attendez que la lentille s'acclimate Le lecteur de CD saute des plages CD endommage ou contamine Remplacez ou nettoyez le CD SHUFFLE ou un programme a ete active Mettez hors service le mode SHUFFLE / de programmation Indicacion no disc CD-RW insertado/ No CD insertado Inserte un CD o CD-R CD muy rayado o sucio Cambie/ limpie el CD, vease Mantenimiento Lente de laser empanada Espere a que la lente se haya desempanado CD-R esta en blanco o el disco no esta finalizado Utilice un CD-R finalizado La reproduccion de CD no funciona CD muy rayado o sucio Cambie/ limpie el CD (vease Mantenimiento Lente de laser empanada Espere a que la lente se haya ajustado a la temperatura ambiente El CD salta pistas CD danado o sucio Cambie/ limpie el CD SHUFFLE o un programa esta activado Salga del modo SHUFFLE/programa(s)
no disc – • – • – • – • – • – • – • – • We have done our best to reduce the packaging and make it easy to separate into 3 materials: cardboard, Your set consists of materials which can be recycled if disassembled by a specialized company. Please observe the local regulations regarding the disposal of packaging, exhausted batteries and old equipment. Si une panne se produit, verifiez d’abord les points enumeres ci-dessous avant de faire appel a un reparateur. N’ouvrez pas l’appareil, car il y a risque de chocs electriques. Si les problemes persistent apres avoir effectue les verifications suivantes, prenez contact avec votre concessionnaire ou un centre de service apres-vente. AVERTISSEMENT: En aucun cas, vous ne devez essayer de reparer vous-meme l’appareil, car vous perdriez le droit a la garantie. – • – • – • – • – • – • – • – • Nous avons fait au mieux pour reduire l’emballage et le rendre facile a separer en 3 materiaux: Les materiaux qui entrent dans la composition de cet appareil peuvent etre recycles ou recuperes par une entreprise specialisee. Veuillez respecter la legislation en vigueur dans votre pays relative a la mise au rebut Si ocurre una anomalia, antes de llevar el aparato a que se repare compruebe los puntos detallados a No abra el aparato ya que puede existir el riesgo de recibir una sacudida electrica. Si no puede remediar un problema siguiendo estos consejos, consulte a su distribuidor o centro de servicio. ADVERTENCIA: No debe intentar reparar el aparato usted mismo ya que esto anularia la garantia. – • – • – • – • – • – • – • – • Hemos hecho todo lo posible para reducir el material de embalaje y hacer que sea facil separarlo en Su aparato esta construido con materiales que pueden reciclarse si la unidad es desmontada por una compania especializada. Observe el reglamento local relacionado con la eliminacion de materiales de
TROUBLESHOOTING Troubleshooting Do not open the set as there is a risk of electric shock. guarantee. Problem – Solution • No sound /power Volume not adjusted – Adjust the VOLUME • Mains lead not securely connected – Connect the AC mains lead properly • Batteries exhausted/ incorrectly inserted – Insert (fresh) batteries correctly • Display does not function does not function properly/ No reaction to operation of any of the controls Electrostatic discharge – Switch off and unplug the set. Reconnect after a • few seconds Environmental information paper pulp and expandable polyethylene. DEPANNAGE Depannage Probleme – Remede • Absence de son/puissance VOLUME mal regle – Reglez le VOLUME • Cordon secteur mal branche – Branchez adequatement le cordon secteur • Piles a plat/ incorrectement inserees – Inserez de nouvelles piles correctement • L’affichage ne fonctionne pas correctement/ L’appareil ne reagit pas aux commandes Decharge electrostatique – Eteignez l’appareil et debranchez la fiche secteur. • Rebranchez au bout de quelques secondes Informations relatives a l’environnement carton, pate de papier et polyethylene expanse. des emballages, des piles usagees et des equipements inutilisables. RESOLUCION DE PROBLEMAS Resolucion de problemas continuacion. Problema – Solucion • No hay sonido/potencia El volumen no esta ajustado – Ajuste el VOLUME • El cable de alimentacion no esta conectado – correctamente Conecte correctamente el cable de alimentacion de • CA Pilas agotadas/insertadas incorrectamente – Inserte pilas (nuevas) correctamente • La pantalla no funciona o no funciona correctamente / No reacciona cuando se actua alguno de los controles Descarga electroestatica – Apague y desenchufe el aparato. • Reconectelo despues de unos segundos Informacion medioambiental 3 materiales: carton, pasta de papel y polietileno expandible. embalaje, pilas agotadas y equipo viejo
MAINTENANCE & SAFETY Precautions & General Maintenance (See $) Place the set on a hard and flat surface so that the • system does not tilt. Do not expose the set, batteries or CDs to • humidity, rain, sand or excessive heat caused by heating equipment or direct sunlight. Do not cover the set. Adequate ventilation with a • minimum gap of 6 inches between the ventilation holes and surrounding surfaces is necessary to prevent heat build-up. The mechanical parts of the set contain self- • lubricating bearings and must not be oiled or lubricated. To clean the set, use a soft dry cloth. Do not use • any cleaning agents containing alcohol, ammonia, benzene or abrasives as these may harm the housing. CD player and CD handling (See %) The lens of the CD player should never be touched! • Sudden changes in the surrounding temperature • can cause condensation to form and the lens of your CD player to cloud over. Playing a CD is then not possible. Do not attempt to clean the lens but leave the set in a warm environment until the moisture evaporates. Always close the CD door to keep the CD • compartment dust-free. To clean, dust the compartment with a soft dry cloth. To clean the CD, wipe in a straight line from the • centre towards the edge using a soft, lint-free cloth. Do not use cleaning agents as they may damage the disc. Never write on a CD or attach any stickers to it. • ENTRETIEN & SECURITE Precautions & Entretien General (Voir $) Placez l’appareil sur une surface dure et plane pour • lui eviter de basculer. N’exposez pas l’appareil, les CD ou piles a • l’humidite, a la pluie, au sable ou a une chaleur excessive causee par un equipement de chauffage ou par exposition directe aux rayons du soleil. Ne recouvrez pas l’appareil. Veillez a ce qu’il y ait • suffisamment de ventilation autour de l’appareil; il faut prevoir un espace minimum de 15 cm pour eviter la surchauffe de l’appareil. Les pieces mecaniques de l’appareil contiennent • des paliers lubrifies a vie qu’il ne faut
CD PLAYER Programming track numbers You may store up to 20 tracks in the desired sequence. If you like, store any track more than once. In the STOP mode, press ? or § for your desired 1 track. When your chosen track number appears, press 2 PROG MODE once to store the track. ™ The display shows prog and prog briefly followed by your selected track number. (See 9) ™ If you attempt to programme without first selecting a track number, no sel is shown. (See 0) Repeat steps 1 to 2 to select and store all desired 3 tracks in this way. ™ full is displayed if you attempt to programme more than 20 tracks.(See !) To play your programme, press 2;. 4 Reviewing your set programme In the STOP mode, press and hold down • PROG MODE for more than one second. ™ The display shows all your stored track numbers in sequence. Erasing a programme You can erase the contents of the memory by: – opening the CD door; – selecting TUNER source; – pressing 9 (twice during playback or in the stop position ™ Display: shows no prog briefly when the programme is cancelled.(See @) LECTEUR DE CD Pour revenir a la lecture normale, appuyez sur 2 CD MODE/ PROGRAM jusqu'a ce que les modes shuffle/ repeat ne s'affichent plus. Vous pouvez egalement appuyer sur 9 pour sortir • du mode de lecture. Programmation des numeros de plage Vous pouvez memoriser jusqu'a 20 plages dans l'ordre voulu. Si vous le voulez, vous pouvez memoriser une certaine plage plus d'une fois. En mode d'arret, appuyez sur ? ou § pour 1 selectionner la plage desiree. Lorsque le numero de plage voulu s'affiche, 2 appuyez une seule fois sur PROG MODE pour memoriser la plage. ™ L'afficheur indique un court instant prog et prog puis le numero de la plage selectionnee. (Voir 9) ™ Si vous essayez de programmer sans selectionner d’abord un numero de plage, no sel est affiche. (Voir 0) Repetez les etapes 1 et 2 pour selectionner et 3 memoriser toutes les plages desirees de la meme maniere. ™ full s'affiche si vous tentez de programmer plus de 20 pl
Selecting a different track During playback you can use ? or § to select a particular track. If you have selected a track number in the stop or • pause position, press 2; to start playback. Press § once briefly for the next track, or press • repeatedly until the desired track number appears in the display. Press ? once briefly to return to the beginning of • a current track. Press ? more than once briefly for a previous • track. Finding a passage within a track Press and hold down ? or §. 1 The CD is played at high speed and low volume. • When you recognize the passage you want release 2 ? or §. ™ Normal playback resumes. Different play modes: Shuffle and Repeat PROG MODE allows you to select various play modes. The modes can be selected or changed during playback of an entire CD/ CD programme in the following sequence: shuffle – all tracks are played in random order shuffle repeat all – repeats the entire CD in random order repeat – plays the current track continuously repeat all – plays the entire CD continuously During playback, select your play mode by pressing 1 PROG MODE once or more until the desired play mode is shown. ™ Display: your selected mode flashes 2 seconds before playback You can use ? or § to skip tracks during the • shuffle/ repeat modes. The shuffle/ repeat play options can be combined • and used with a programme: e.g. shuffle/ repeat all repeats the entire CD programme in random order. To return to normal playback press PROG MODE 2 until the shuffle/ repeat modes are no longer shown. You can also press 9 to quit the play mode. • Selection d’une autre plage Pendant la lecture, vous pouvez utiliser ? ou § pour selectionner la plage desiree. Si vous avez selectionne un numero de plage en • mode d'arret ou de pause, appuyez sur 2; pour demarrer la lecture. Appuyez une fois brievement sur § pour • selectionner la plage suivante ou appuyez a plusieurs reprises jusqu’a ce que le numero de plage desire apparaisse sur l’affichage. Appuyez une fois
PLAYER Display indication for CD functions CD open: CD door open (See 6) disc: CD inserted (See 7) – In stop mode: total track number and total playback time – During CD playback: elapsed playback time of current track and current track number – Pause: elapsed playback time freezes and flashes shuffle/ repeat modes: when the respective mode is activated prog: when CD programme active); prog also appears briefly when you store a track (See 9) no sel: programme activated but no tracks selected (See 0) full: programme memory full (See !) no prog: programme cancelled (See @) no disc: no disc/ error in CD operation /CD-R(W) is blank or the disc is not finalized (See # + Troubleshooting) This CD-player can play Audio Discs and CD- Recordables. Do not try to play CD-Rewritables, a CD-ROM, CDi, VCD, DVD or computer CD. Adjust the source selector to CD. ™ Display: shows Cd briefly. To open the CD door, lift the CD door at the edge marked LIFT TO OPEN. Insert a CD or CD-R with the printed side facing up and press the CD door gently close. Press 2; on the set to start playback. To pause playback press 2;. To resume, press 2; To stop CD playback, press STOP 9. Note: CD play will also stop when: – you open the CD compartment; – you select TUNER sound source; – the CD has reached to the end. LECTEUR DE CD Affichages pour les fonctions CD CD open: porte du CD ouverte (Voir 6) disc: lorsqu'un CD est insere (Voir 7) – En mode d’arret: nombre total de plages et temps total de lecture – Pendant la lecture du CD: temps de lecture ecoule de la plage en cours et numero de la plage en cours – En mode de pause: temps de lecture ecoule se gele et clignote (Voir 8) Lors des modes shuffle/ repeat: lorsque le mode respectif est active prog: lorsque la programmation de CD est activee; prog apparait egalement un court instant lorsque vous memorisez une plage (Voir 9) no sel: programme active mais aucune plage n'a ete selectionnee (Voir 0) full: memoire de programme pleine (Voir !) no prog: programme ann
CD CD Player – – (See 8) – – – – – – Playing a CD 1 2 3 4 5 again. 6 Lecteur de CD – – – – – – – – 1 2 3 4 lecture. 5 6 – – – respectivo – – – – – 1 2 3 cerrarla. 4 5 6 (TUNER);
TUNER TUNER SINTONIZADOR
– For FM, pull out the telescopic aerial. Incline and turn the aerial. Reduce its length if the signal is too strong (very close to a transmitter). – For MW (AM) the set is provided with a built-in aerial so the telescopic aerial is not needed. Direct the aerial by turning the whole set. Programming radio stations You can store up to a total of 32 radio stations in the memory: 20 FM and 12 MW(AM). Tune to your desired station (see Radio Reception). 1 Press PROG MODE to activate programming. 2 ™ Display: prog flashes. (See 5) Press PRESET + or – once or more to allocate a 3 number from 1 to 20 for FM or 1 to 12 for MW(AM). Press PROG MODE again to confirm the setting. 4 ™ Display: prog disappears, the preset number and the frequency of the preset station are shown. (See 3) Repeat steps 1-4 to store other stations. 5 You can erase a preset station by storing another • frequency in its place. – Pour FM, sortez l'antenne telescopique. Inclinez et tournez l'antenne. Reduisez sa longueur si le signal est trop fort (a proximite d'un emetteur). – Pour MW (AM) l'appareil est pourvu d'une antenne integree, donc l'antenne telescopique est inutile. Pour diriger cette antenne, il faut agir sur l'appareil dans sa totalite. Programmation de stations radio Vous pouvez programmer jusqu’a 32 stations radio dans la memoire: 20 FM et 12 MW(AM). Syntonisez la station desiree (voir Syntonisation 1 des stations radio). Appuyez sur PROG MODE pour activer la 2 programmation. ™ Affichage: prog clignote. (Voir 5) Appuyez une ou plusieurs fois sur PRESET + ou – 3 pour attribuer un numero de 1 a 20 a FM ou 1 a 12 a MW (AM). Appuyez a nouveau sur PROG MODE pour 4 confirmer le reglage. ™ Affichage: prog disparait, le numero de preselection et la frequence de la station preselectionnee apparaissent. (Voir 3) Repetez les etapes 1 a 4 pour memoriser d’autres 5 stations. Vous pouvez effacer une station preselectionnee en • memorisant a la place une autre frequence. – Para FM, desplieg
BASIC FUNCTIONS Switching power on/off: Save energy Whether you are using mains or battery supply, to avoid unnecessary energy consumption always adjust the source selector to off. General operation To select your sound source adjust the source 1 selector to CD/TUNER/OFF. Adjust the sound with the VOLUME and DBB 2 (Dynamic Bass Boost) controls. To switch off the set, adjust the source selector to 3 off position. Note: When the set is switched off the tuner presets will be retained in the set’s memory. Tuner Radio reception Adjust the source selector to TUNER. 1 ™ Display: shows tu briefly (See 2). Press FM•MW once or more to select the desired 2 waveband. ™ Display: shows your waveband and the preset number and the frequency of a preset station if already programmed (See 3) Press and hold down ? or § briefly to tune to a 3 radio station. Release when the frequency in the display starts to change. ™ The radio automatically tunes to a radio station of sufficient reception. Display shows Srch during automatic tuning. (See 4) FONCTIONS DE BASE Mise en/hors service: Economie d’energie Que vous utilisiez une alimentation secteur ou des piles, evitez de consommer trop de courant non necessaire; reglez toujours le selecteur de source en position off. Fonctionnement general Pour selectionner la source de son, reglez le 1 selecteur de source sur CD/TUNER/OFF. Reglez le son au moyen des commandes VOLUME 2 et DBB (Dynamic Bass Boost). Pour mettre l’appareil hors tension, reglez le 3 selecteur de source sur off (hors circuit). Remarque: Lorsque l’appareil est mis hors circuit, les stations preselectionnees du tuner seront retenues dans la memoire de l'appareil. Tuner Reception radio Reglez le selecteur de source sur TUNER. 1 ™ Affichage: tu est affiche brievement. (Voir 2). Appuyez une ou plusieurs fois sur FM•MW pour 2 selectionner la bande d’onde desiree. ™ Affichage: la bande d’onde est affichee et le numero de preselection et la frequence de la station preselectionnee
POWER SUPPLY Whenever convenient, use the power supply if you want to conserve battery life. Make sure you remove the plug from the set and wall socket before inserting For users in the U.K.: please follow the instructions in batteries, type R-14, UM-2 or C-cells, (preferably alkaline) with the correct polarity as indicated by the Batteries contain chemical substances, so they Incorrect use of batteries can cause electrolyte leakage and will corrode the compartment or cause • Do not mix battery types: e.g. alkaline with carbon zinc. Only use batteries of the same type for the • When inserting new batteries, do not try to mix old • Remove the batteries if the set is not to be used Check if the mains voltage, as shown on the type plate located on the bottom of the set, corresponds to your local mains supply. If it does not, consult Connect the mains lead to the AC MAINS inlet and the wall socket. The power supply is now To switch off completely, unplug the mains lead Unplug the mains lead from the wall socket to protect your set during heavy thunderstorms. The typeplate is located on the bottom of the set ALIMENTATION ELECTRIQUE Chaque fois que vous le pouvez, utilisez l'alimentation secteur pour prolonger la duree de vie des piles. Veillez a debrancher la fiche secteur de l’appareil et Ouvrez le compartiment de piles, puis inserez six piles de type R-14, UM-2 ou C (de preference des piles alcalines), en respectant la polarite correcte, comme indique par les symboles "+" et "–" a l’interieur du chimiques, en d'autres termes, il faut s'en Une utilisation inappropriee des piles peut entrainer une fuite d'electrolyte, provoquant une corrosion du • Ne melangez pas plusieurs types de piles : par ex. des piles alcalines et des piles zinc-carbone. N'utilisez dans l'appareil que des piles de meme • Lors de l'installation de piles neuves, ne melangez • Retirez les piles si vous ne devez pas utiliser l'appareil pendant une periode prolongee. Verifiez si la tension d'alimentation, figuran
Power Supply batteries. the box, Important notes for users in the U.K. Batteries (not included) Open the battery compartment and insert six "+" and "–" symbols inside the compartment. should be disposed of properly. the batteries to burst. Therefore: set. batteries with the new ones. for a long time. Using AC Power 1 your dealer or service centre. 2 connected and ready for use. 3 from the wall socket. • Alimentation electrique de la prise murale avant d'installer les piles. Piles (non fournies) compartiment. Les piles contiennent des substances debarrasser selon les regles en vigueur. compartiment, ou un eclatement de la pile. En consequence: type. pas les anciennes et des neuves. Utilisation de l'alimentation secteur 1 apres-vente. 2 sous tension et pret a fonctionner. 3 • Fuente de alimentacion insertar las pilas. Pilas (no incluidas) tipo R-14, UM-2 o celulas C, (preferiblemente compartimiento. antiguas largo, retire las pilas Utilizacion de CA 1 centro de servicio. 2 conectado y preparado para utilizarse. 3 tomacorriente de pared. • durante tormentas electricas.
CONTROLS – selects source of sound CD or TUNER. Also the – stops CD playback; erases a CD programme skips or searches a passage/track backwards or forward tunes to a station (up, down) – programmes and reviews programmed – plays tracks CD/ programme in random – repeats a track/CD/ programme – programmes preset stations COMMANDES – pour renforcer la restitution des graves – pour selectionner la source de son CD ou TUNER; – indique les fonctions du lecteur de CD et du – pour selectionner la bande d'onde FM/ MW (AM) – pour ouvrir/ fermer le compartiment de CD – pour demarrer ou interrompre provisoirement la – pour arreter la lecture du CD; pour effacer un pour sauter ou rechercher vers l'avant ou vers l'arriere un passage/ une plage pour regler la reception de stations radio – pour choisir une station preselectionnee (haut, bas) – pour programmer les plages et pour verifier la programmation; – pour la lecture en ordre aleatoire des plages d’un CD/ d’un programme; – pour repeter une plage/ un CD/ un – pour programmer des stations radio – pour ouvrir le compartiment des piles CONTROLES – selecciona la fuente de sonido CD o TUNER. – muestra las funciones de CD y sintonizador – selecciona banda de onda FM/ MW – inicia o hace una pausa en la reproduccion del CD – para la reproduccion del CD; borra un programa salta un pasaje/pista o realiza una busqueda en el mismo hacia atras o hacia delante sintoniza una emisora (arriba, abajo) – selecciona una emisora preestablecida – programa y revisa numeros de pista – reproduce en orden aleatorio pistas de – repite una pista/ CD/ programa – programa emisoras preestablecidas – para abrir el compartimiento de pilas – entrada para cable de alimentacion
English Top and front panels (See 1) 1VOLUME – adjusts volume level 2DBB (Dynamic Bass Boost) – enhances bass response 3Source selector power off switch 4Display – shows the CD and tuner functions 5FM•MW (AM) – selects FM/ MW (AM) waveband 6LIFT TO OPEN – opens/ closes the CD door 7PRESS TO PLAY 2; – starts or pauses CD play 8STOP 9 9SEARCH ? , § CD: Tuner: 0PRESET +, – – selects a preset station (up, down) !PROG MODE CD: track numbers; order; Tuner: Back Panel (See 1) @Telescopic aerial – to improve FM reception #Battery door – to open battery compartment $AC MAINS – inlet for mains lead Francais Panneaux superieur et avant (Voir 1) 1VOLUME – pour ajuster le volume sonore 2DBB (Dynamic Bass Boost) 3Selecteur de source pour eteindre l'appareil 4Affichage tuner 5FM•MW (AM) 6LIFT TO OPEN 7PRESS TO PLAY 2; lecture du CD 8STOP 9 programme de CD 9SEARCH ? , § CD: Tuner: (haut, bas) 0PRESET +, – !PROG MODE CD: programme Tuner: Panneau arriere (Voir 1) @Antenne telescopique – pour ameliorer la reception en FM #Porte de piles $AC MAINS – prise d'entree du cordon secteur Espanol Paneles superior y frontal (Vease 1) 1VOLUME – ajusta el nivel del volumen 2DBB (Dynamic Bass Boost) – mejora la respuesta de graves 3Selector de fuente Y el interruptor de apagado 4Pantalla 5FM•MW (AM) 6LIFT TO OPEN – abre/cierra la puerta del CD 7PRESS TO PLAY 2; 8STOP 9 de CD 9SEARCH ? , § CD: Tuner: 0PRESET +, – (arriba, abajo) !PROG MODE CD: programados CD/ programa; Tuner: Panel trasero (Vease 1) @Antena telescopica – para mejorar la recepcion de FM #Puerta de compartimiento de pilas $AC MAINS
CMM/RB/0201
AZ 3010, AZ 3011, AZ 3012 CD Soundmachine
Audio Audio
Meet PHILIPS at the internet http://www.audio.philips.com
XP AZ 3010 7x3 1/2 07-01-2002 09:27 Pagina 1
CLASS 1 LASER PRODUCT Printed in Hong Kong Important notes for users in the U.K. This apparatus is fitted with an approved 13 Amp plug. To change a fuse in this type of plug proceed as Fix new fuse which should be a BS1362 5A, A.S.T.A. or BSI approved type. If the fitted plug is not suitable for your socket outlets, it should be cut off and an appropriate plug fitted in If the mains plug contains a fuse, this should have a value of 5A. If a plug without a fuse is used, the fuse at Note: The severed plug must be disposed to avoid a possible shock hazard should it be inserted into a As these colours may not correspond with the colour markings identifying the terminals in your plug, – Connect the BLUE wire to the terminal which is marked with the letter "N" or coloured BLACK. – Connect the BROWN wire to the terminal which is marked with the letter "L" or coloured RED. – Do not connect either wires to the earth terminal in the plug, marked "E" (or the safety earth symbol) or Before replacing the plug cover, make certain that the cordgrip is clamped over the sheath of the lead – not
CD Soundmachine AZ 3010, AZ 3011, AZ 3012 Remove fuse cover and fuse. Refit the fuse cover. the distribution board should not be greater than 5A. 13A socket elsewhere. How to connect a plug The wires in the mains lead are coloured with the following code: BLUE – "NEUTRAL" ("N") and BROWN – "LIVE" ("L"). proceed as follows: coloured green (or green-and-yellow). simply over the two wires. Copyright in the U.K. Recording and playback of material may require consent. See Copyright Act 1956 and The Performer’s Protection Acts 1958 to 1972.
English Francais Espanol Deutsch Nederlands Italiano Mains plug follows: 1 2 3 its place. •