На сайте 123405 инструкций общим размером 499.33 Гб , которые состоят из 6235256 страниц
Фото

Руководство пользователя B&W Panorama 2. Основные функции, характеристики и условия эксплуатации изложены на 113 страницах документа в pdf формате.
Доступно к просмотру 112 страниц. Рекомендуем вам скачать файл инструкции, поскольку онлайн просмотр документа может сильно отличаться от оригинала.
ENGLISH  Welcome to Bowers & Wilkins and Panorama 2
ENGLISH
Panorama 2 is an integrated solution to home theatre sound that
is as simple to install as it is remarkable to experience. Rather
than require multiple speakers positioned around the room,
Panorama 2 uses sophisticated digital signal processing to steer
the sound from one source and create a genuine home theatre
Contents
audio experience without the complication of multiple speakers.                                                           ENGLISH          2
But Panorama 2 is not only simple to install and use, thanks                                                              Overview   3
1. Panorama 2 carton contents 3
to advanced acoustic technology borrowed directly from our
2. Installing Panorama 2   3
highest performance hi-fi designs, it offers sound quality more                                                           2.1 Panorama 2 Location and Mounting  3
often associated with the best hi-fi separates.                                                                           2.2 Panorama 2 Input Connections   4
2.3 Panorama 2 Subwoofer Connection
5
Before you immerse yourself in a great movie with Panorama 2,                                                             3. Using Panorama 2  5
please take a moment to read through this manual. Bowers &                                                                3.1 Panorama 2 Front Panel Controls   5
3.2 Remote Handset  6
Wilkins maintains a network of dedicated distributors in over
3.3 Switching On and Using Panorama 2 6
60 countries who will be able to help you should you have any                                                             3.4 Audio Decode Modes   6
problems your dealer cannot resolve. There is also further                                                                4. Panorama 2 setup  7
4.1 The Sound Menu  7
information and installation advice on all Bowers & Wilkins                                                               4.2 The Room Setup Menu   7
products at www.bowers-wilkins.com                                                                                        4.3 The Tuning Menu  7
4.4 The Device Menu  8
5. Aftercare  8
www.bowers-wilkins.com
2
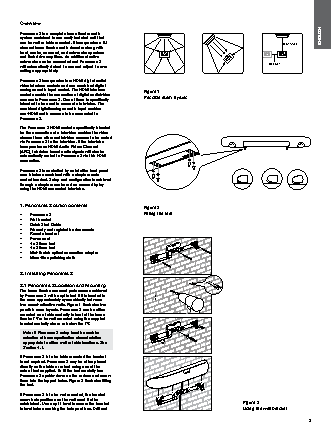
Overview
Panorama 2 is a complete home theatre audio
system contained in one easily installed unit that                                                           ENGLISH
can be wall or table mounted. It incorporates a 5.1                                            DISTANCE
channel home theatre audio decoder along with
front, centre, surround, and subwoofer speakers
and their drive amplifiers. An additional active
subwoofer can be connected and Panorama 2                                                 OFFSET
will automatically detect its use and adjust its own
settings appropriately.
Panorama 2 incorporates four HDMI digital audio/
video interface sockets and one combined digital/
analogue audio input socket. The HDMI interface   Figure 1
sockets enable the connection of digital audio/video   Possible room layouts
sources to Panorama 2. One of them is specifically
intended to be used to connect a television. The
combined digital/analogue audio input enables
non-HDMI audio sources to be connected to
Panorama 2.
The Panorama 2 HDMI sockets specifically intended
for the connection of a television enables the video
element from other audio/video sources to be routed
via Panorama 2 to the television. If the television
incorporates an HDMI Audio Return Channel
(ARC), television based audio signals will also be
automatically routed to Panorama 2 via this HDMI
connection.
Panorama 2 is controlled by an intuitive front panel
user interface combined with a simple remote
control handset. Setup and configuration is achieved
through a simple menu based on screen display
using the HDMI connected television.
1. Panorama 2 carton contents                Figure 2
•   Panorama 2                               Fitting the feet
•   Wall bracket
•   Quick Start Guide
•   Warranty and registration documents
•   Remote handset
•   Power cord
•   4 x 25mm feet
•   4 x 35mm feet
•     Mini-Toslink optical connection adaptor
•   Micro-fibre polishing cloth
2. Installing Panorama 2
2.1 Panorama 2 Location and Mounting
The home theatre surround performance achieved
by Panorama 2 will be optimised if it is located in
the room approximately symmetrically between
two sound-reflective walls. Figure 1 illustrates two
possible room layouts. Panorama 2 can be either
mounted on a table centrally in front of the home
theatre TV or be wall mounted using the supplied
bracket centrally above or below the TV.
Note: A Panorama 2 setup function enables
selection of bass equalisation characteristics
appropriate to either wall or table locations. See
Section 4.1.
If Panorama 2 is to be table mounted the bracket
is not required. Panorama 2 may be either placed
directly on the table or raised using one of the
sets of feet supplied. To fit the feet carefully turn
Panorama 2 upside-down on the surface and screw
them into the tapped holes. Figure 2 illustrates fitting
the feet.
If Panorama 2 is to be wall mounted, the bracket
screw hole positions on the wall must first be
established. Use a spirit level to ensure the bracket                           Figure 3
is level before marking the hole positions. Drill and                           Using the wall bracket
3
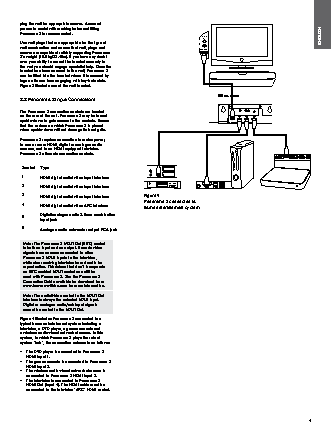
plug the wall for appropriate screws. A second
person to assist with marking holes and lifting
Panorama 2 is recommended.
AUDIO                                      ENGLISH
OUT
Use wall plugs that are appropriate for the type of
wall construction and ensure that wall, plugs and                HDMI (ARC)
screws are capable of reliably supporting Panorama
2’s weight (10.6kg/23.4lbs). If you have any doubt
over your ability to mount the bracket securely to
the wall you should engage specialist help. Once the
bracket has been secured to the wall, Panorama 2
can be lifted into the bracket where it is secured by
lugs on its rear face engaging with key-hole slots.
Figure 3 illustrate use of the wall bracket.
®
2.2 Panorama 2 Input Connections
The Panorama 2 connection sockets are located
optical/aux  sub out  service
on the rear of the unit. Panorama 2 may be turned
upside-down to gain access to the sockets. Ensure                           HDMI out  HDMI 1  HDMI 2  HDMI 3
that the surface on which Panorama 2 is placed
when upside-down will not damage its front grille.
Panorama 2 requires connection to mains power,
to one or more HDMI, digital or analogue audio
sources, and to an HDMI equipped television.
Panorama 2 offers six connection sockets.
Socket  Type
1      HDMI digital audio/video input interface
2      HDMI digital audio/video input interface                     HDMI
3      HDMI digital audio/video input interface  Figure 4
Panorama 2 connected to
4      HDMI digital audio/video ARC interface
home entertainment system
5      Digital/analogue audio 3.5mm combination
input jack
6      Analogue audio subwoofer output RCA jack
Note: The Panorama 2 HDMI Out (ARC) socket
is both an input and an output. It sends video
signals from sources connected to other
Panorama 2 HDMI inputs to the television,
while also receiving television based audio for
reproduction. Televisions that don’t incorporate
an ARC enabled HDMI socket can still be
used with Panorama 2. See the Panorama 2
Connection Guide available for download from
www.bowers-wilkins.com for more information.
Note: The audio/video routed to the HDMI Out
interface is always the selected HDMI input.
Digital or analogue audio jack input signals
cannot be routed to the HDMI Out.
Figure 4 illustrates Panorama 2 connected in a
typical home entertainment system including a
television, a DVD player, a games console and
a wireless audio-visual network streamer. In this
system, in which Panorama 2 plays the role of
system “hub”, the connection scheme is as follows:
•  The DVD player is connected to Panorama 2
HDMI Input 1.
•  The games console is connected to Panorama 2
HDMI Input 2.
•  The wireless audio-visual network streamer is
connected to Panorama 2 HDMI Input 3.
•  The television is connected to Panorama 2
HDMI Out (Input 4). The HDMI cable must be
connected to the television “ARC” HDMI socket.
4