На сайте 123381 инструкция общим размером 499.28 Гб , которые состоят из 6234181 страницы
Фото
Руководство пользователя VITEK VT-3515. Основные функции, характеристики и условия эксплуатации изложены на 28 страницах документа в pdf формате.
Доступно к просмотру 26 страниц. Рекомендуем вам скачать файл инструкции, поскольку онлайн просмотр документа может сильно отличаться от оригинала.
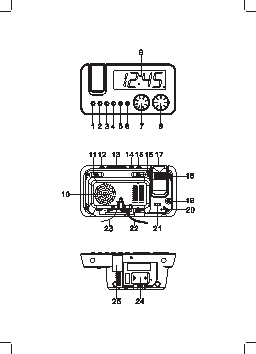
ENGLISH
RADIO CLOCK                            wire plug could be taken out from the socket
Before connection, usage and adjustment   immediately in case of malfunction.
read the instruction attentively. It is neces-  • Disconnect the device from the electric
sary to observe all preventions and recom-  network for additional protection during
mendations about operation of the device   a thunder-storm and also when you are
given in this manual.                  not going to use it for a long time. It will
Keep the present operation manual and use   prevent a device breakdown due to the
it further as a reference material.    lightning strokes or voltage jumps in the
network.
• To disconnect the network cord under-
ATTENTION!
RISK OF ELECTRIC SHOCK       take directly a network plug, do not pull
DO NOT OPEN              the cord.
• To avoid an electric shock do not open
Warning: To prevent fire or shock hazard do not   the device case yourself. Do not repair the
expose the appliance to rain or moisture.   device and do not make changes to it. In
To prevent shock hazard do not remove the cover
yourself. Apply to a service centre for repair and   case of malfunctions disconnect the de-
maintenance.                          vice from the network and address to the
This lightning flash with arrowhead   authorised service centre.
symbol, within an equilateral triangle, is   • Establish the device in places with suffi-
intended to alert the user to the presence   cient ventilation. Do not close the ventilat-
of uninsulated “dangerous voltage” within
the product’s enclosure that may be of   ing openings of the device.
sufficient magnitude to constitute a risk of   • Do not connect the FM-antenna to the ex-
electric shock to persons.     ternal antenna.
• Do not place the device near heat sources,
The exclamation point within an equilateral   e.g. radiators, electro heaters, ovens or
triangle is intended to alert the user to
the presence of important operating and   other devices which are sources of heat,
maintenance (servicing) instructions in the   and also in the places subject to the influ-
manual accompanying the appliance.  ence of direct sun rays, excessive dust,
to vibration or mechanical shocks. Do not
SAFETY MEASURES                        put the open flame sources, such as can-
• Make sure that the voltage specified on   dles, on the device.
the unit corresponds to the voltage in your   • Do not admit extraneous subjects to hit in
home socket.                         the device openings.
• To avoid fire or electric shock do not sub-  • Be especially attentive, if the device is
ject the device to rain or moisture influ-  used by children or disabled people.
ence.                              • Keep the device away from children.
• It is forbidden to immerse the device into   • Do not allow children to use the device as
the water. To avoid fire or electric shock do   a toy.
not place this device in the raised humidity   • The device is intended only for household
conditions (near baths, basins with water,   usage.
kitchen bowls, washing machines, near to
swimming pool, in crude cellars etc.) Do    DESCRIPTION
not admit drops or splashes to hit the de-  1. AL ON/OFF 1 button (of the first alarm)
vice.                              2. AL.SET (and actuation time display) but-
• Do not admit an overload of sockets or   ton
extension pieces as it can lead to fire or   3. << /Y-M-D (year-month-day) button
electric shock.                    4. >>/ DST(daylight saving time) button
•  Establish this device so that the network   5 MODE button
3
ENGLISH
6  AL ON/OFF 2 button (of the second   will hear a sound signal (even if radio is se-
alarm)                             lected as alarm signal) that will be switched
7 VOLUME control                     off automatically in 30 seconds. To switch
8 TUNING knob                        off the alarm press the ON/OFF button.
9 Display                            Remove the battery if you are not planning to
10 Speaker                           use the unit for a long time.
11 BAND button ( FM/АМ)
12 Radio ON/OFF button               Connecting the unit
13 SNOOZE/SLEEP/NAP button           Before connecting the unit, make sure, that
14 180° FLIP button                  the electricity supply in your home sockets
15 PROJECTION ON/OFF button          corresponds to the voltage specified on the
16 ALARM (  Buzz/Radio  )  switch    housing of the unit.
17 Projection                        Insert the plug into the socket and press the
18 FOCUS control                     RESET button, all indicator segments will be
19 AUX IN jack                       displayed (during 2 seconds), then the unit
20     RESET button                  will switch to the current time display mode
21 DIMMER (High/Low/Auto off) switch  (normal mode).
22 Power cord
23 FM-antenna cord                   Setting the current time
24 Battery compartment lid           In the current time mode, press and hold
the MODE button for more than 2 seconds
OPERATING INSTRUCTIONS               to enter the current time and date setting
Inserting batteries                  mode.
• Open the battery compartment lid and in-  Digits of the year will start flashing on the
sert a 3V CR2032 battery (not supplied),   display. Use the <> buttons to set the
following the polarity.            year.
• Close the battery compartment lid.  Press the MODE button. Digits of the month
will start flashing on the display. Use the
Attention! Battery leakage can lead to inju-  <> buttons to set the month.
ries or damages of the unit. In order to avoid   Press the MODE button. Digits of the day will
damaging of the unit follow the following in-  start flashing on the display. Use the <>
structions:                          buttons to set the day.
-  insert the battery properly;      Press the  MODE  button.  Format digits 24
-  remove the battery if you are not planning   hours or 12 hours will start flashing on the
to use the unit for a long time;   display. Use the <> buttons to set the
-  do not recharge, do not dismantle, and do   time format.
not expose the battery to high tempera-  Press the MODE button. Digits of the hour
tures;                             will start flashing on the display. Use the
-  replace the battery in time.      <> buttons to set the hour.
Press the MODE button. Digits of the min-
Note:                                utes will start flashing on the display. Use the
The unit is intended for operation from the   <> buttons to set the minutes.
mains, battery operation is a reserve option.
Batteries help to store the settings of the   Note:
current time and of the alarm in case of   If during 30 seconds the <> buttons are
power failure or absence of power. With the   not pressed, the unit will switch back to the
preset alarm actuation time in case of power   current time display mode.
failure when the preset time is reached you
4
ENGLISH
Displaying the date                  position. In this case when the alarm is actu-
In the current time mode pres the << button   ated the display will switch on as well.
once to display the year, twice – to display   To switch on the alarm press the AL ON/OFF
the date; In 5 seconds the unit will return to   1 or AL ON/OFF 2 button correspondingly.
the current time display mode.       The alarm actuation symbol (AL 1 or AL 2)
will appear on the display. To switch off the
Daylight saving time                 alarm press the corresponding button once
Press and hold the >> button for more than   again.
3 seconds to transfer to the daylight saving
time and back.                       Alarm snooze
Alarm signal will continue for 30 minutes if
Setting the alarm actuation time (AL.1   you do not press any buttons.
and AL.2)                            You can switch off the alarm signal for 9 min-
In the current time mode press and hold the   utes by pressing the SNOOZE button. In 9
AL.SET  button for more than 2 seconds   minutes the alarm signal will be repeated.
to enter the alarm actuation time setting   To switch off the alarm repeat press the ON/
mode.                                OFF button. If radio is selected as the signal,
Digits of the hour will start flashing on the   it will switch off automatically in 30 minutes.
display. Use the <> buttons to set the   Set the DIMMER switch to the AUTO OFF
hour.                                position. When switching on the display by
Press the AL.SET button. Digits of the min-  means of the  SNOOZE/SLEEP button,
utes will start flashing on the display. Use the   switch on the alarm repeat function, the
<> buttons to set the minutes.    alarm signal and the display will switch off.
Press the  AL.SET  button. Symbols of the
alarm actuation time will start flashing on the   Automatic switching off the radio
display. Use the <> buttons to select the   You can set the time after which the radio
desired mode:                        will be switch off automatically. In the radio
mode press the SNOOZE/SLEEP/NAP but-
1 – 5: alarm actuation from Monday to Fri-  ton, “90” will start flashing on the display; it
day;                                 means that the radio will be switch off au-
1 -7: alarm actuation from Monday to Sun-  tomatically in 90 minutes. To reduce time,
day;                                 press the  SNOOZE/SLEEP/NAP  button,
6 - 7: alarm actuation on Saturday and Sun-  symbols 60-30-15 will be displayed. In the
day;                                 preset time the radio will be switch off.  To
1 - 1: alarm actuation once a week.  switch off the radio before the preset time,
press the ON/OFF button.
The date and time of the second alarm is set
in the same way                      Timer
In the current time mode press the SNOOZE/
Note: If during 30 seconds the <> but-  SLEEP/NAP  button,  “n 90” will appear
tons are not pressed, the unit will switch to   on the display. To reduce the time after
the current time display mode.       which the timer will be actuated, press the
SNOOZE/SLEEP/NAP button. You can set
Alarm signal selection, alarms on/off  time from 90 to 10 minutes with a 10-minute
As the alarm signal you can select: radio   or   step. When the set time expires you will hear
buzz   , by setting the ALARM switch to the   a signal, which will continue for 30 minutes,
corresponding position.              and after that will be switched off automati-
Set the  DIMMER switch to the AUTO OFF   cally. To switch off the signal press the ON/
5