На сайте 123431 инструкция общим размером 499.45 Гб , которые состоят из 6236163 страниц
Фото

Руководство пользователя VITEK VT-3510. Основные функции, характеристики и условия эксплуатации изложены на 16 страницах документа в pdf формате.
Доступно к просмотру 12 страниц. Рекомендуем вам скачать файл инструкции, поскольку онлайн просмотр документа может сильно отличаться от оригинала.
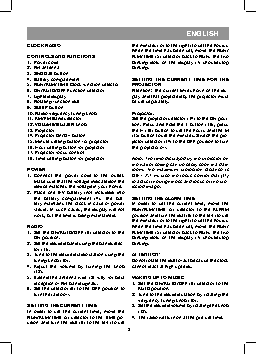
ENGLISH
CLOCK RADIO                          the minutes) or to the right (to set the hours).
When the time has been set, move the RUN/
CONTROLS AND FUNCTIONS               ALM/TIME (5) selector back to RUN. The two
1.  Power cord                       blinking dots on the display (7) should stop
2.  FM antenna                       blinking.
3.  SNOOZE button
4.  Battery compartment              SETTING THE CURRENT TIME FOR THE
5.  RUN/ALM/TIME Clock function selector  PROJECTOR
6.  ON/AUTO/OFF Function selector    Attention! The current time shown on the dis-
7.  Lighted display                  play and that projected by the projector must
8.  Rotating function dial           be set separately.
9.  SLEEP button
10. Radio frequency tuning knob      Projector:
11. AM/FM Band selector              Set the projector selector (14) to the ON posi-
12. VOLUME/BUZZER knob               tion. Press and hold the T button (18); press
13. Projector                        the H (16) button to set the hours and the M
14. Projector On/Off button          (15) button to set the minutes. Switch the pro-
15. Minute setting button for projector  jector selector (14) to the OFF position to turn
16. Hour setting button for projector  the projector off.
17. Projector focus control
18. Time setting button for projector  Note: The time displayed by the projector on
the wall or ceiling can be easily seen in a dark
POWER                                room. The maximum projection distance is
1.  Connect the power cord to the outlet.   0.6 – 2.7 m. Use the focus control dial (17)
Make sure that the voltage indicated on the   to adjust the brightness and focus of the pro-
device matches the voltage in your home.  jected image.
2.  Place one 9 V battery (not included) into
the battery compartment (4). The bat-  SETTING THE ALARM TIME
tery maintains the clock in case of power   In order to set the current time, move the
failure. In such cases, the display will not   RUN/ALM/TIME (5) selector to the ALARM
work, but the time is being maintained.  position and turn the dial (8) to the left (to set
the minutes) or to the right (to set the hours).
RADIO                                When the time has been set, move the RUN/
1.  Set the ON/AUTO/OFF (6) selector to the   ALM/TIME (5) selector back to RUN. The two
ON position.                       blinking dots on the display (7) should stop
2.  Set the desired band using the band selec-  blinking.
tor (11).
3.  Tune to the desired radio station using the   ATTENTION!
tuning knob (10).                  Do not rotate the dial to fast because the clock
4.  Adjust the volume by turning the knob   cannot react at high speeds.
(12).
5.  Extend the antenna wire (2) fully for best   WAKING UP TO MUSIC
reception of FM-band signals.      1.  Set the ON/AUTO/OFF (6) selector to the
6.  Set the selector (6) to the OFF position to   AUTO position.
turn the radio off.                2.  Tune to the desired station by rotating the
frequency-tuning knob (10).
SETTING THE CURRENT TIME             3.  Set the desired volume by rotating the knob
In order to set the current time, move the   (12).
RUN/ALM/TIME (5) selector to the TIME po-  4.  The radio will turn on at the pre-set time.
sition and turn the dial (8) to the left (to set
3
ENGLISH
WAKING UP TO THE BUZZER ALARM        CARE
1.  Set the ON/AUTO/OFF (6) selector to the   Wipe the device body with a soft cloth, mois-
AUTO position.                     tening with water if necessary. Unplug the de-
2.  Follow the instructions in the section enti-  vice from the power outlet while cleaning. Do
tled “Waking up to music”.         not use abrasive or other cleaning substances
3.  Rotate the VOLUME/BUZZER knob (12) to   as they can damage the device body.
the BUZZ position until it clicks. The alarm
will turn on at the pre-set time.  SPECIFICATIONS
Frequency Bands:
SNOOZE MODE                          AM - 530-1600 kHz,
The buzzer alarm or radio can be temporar-  FM - 88-108 MHz
ily silenced for 9 minutes by pressing the   Battery:  9 V (not included)
SNOOZE button (3). You can lightly sleep dur-  Power Source: 220-240 V ~ 50 Hz
ing this time.                       Speaker: 8 Ohms
The alarm will repeat itself in 9 minutes.
The manufacturer reserves the right to make
SLEEP TIMER                          changes to the characteristics of the device
1.  This clock radio features a “Sleep timer”   without prior notice.
that automatically turns the radio off after
a pre-set period of time – from 1 hour 59   Service life of  appliance -  3 years
minutes to 1 minute.
2.  To set the sleep time, press the SLEEP (9)   Guarantee
button and turn the dial (8) left (to reduce   Details regarding guarantee conditions can
the interval from 1 hr. 59 min.) or right (the   be obtained from the dealer from whom the
time 1 hr. 59 min.).               appliance was purchased. The bill of sale or
3.  When the pre-set time runs out, the ra-  receipt must be produced when making any
dio will turn off automatically. Press the   claim under the terms of this guarantee.
SNOOZE (3) button to turn the radio off
before the pre-set time runs out.          This product conforms to the EMC-
Requirements as laid down by the
If you want to fall asleep and wake up to    Council Directive 89/336/EEC
music                                        and to the Low Voltage Regulation
If you want to fall asleep and wake up to music,   (23/73 EEC)
set the alarm time as instructed in the section
entitled “Setting the wake up time,” then set
the selector (6) to the AUTO position.
Set the SLEEP time as instructed in the sec-
tion entitled “Sleep timer” and adjust the vol-
ume. The radio will automatically turn off when
the sleep time runs out and turn on again the
next day.
If you want to fall asleep and wake to the
buzzer alarm
Follow the instructions in the section entitled
“If you want to fall asleep and wake up to mu-
sic,” except switch the
VOLUME/BUZZER knob to the BUZZ posi-
tion.
4
РУССКИЙ
РАДИОЧАСЫ                            5.  Для лучшего приема передач в FM-диа-
пазоне вытяните шнур антенны (2) на
РЕГУЛЯТОРЫ УПРАВЛЕНИЯ И ФУНКЦИИ         полную длину.
1.   Сетевой шнур                    6.  Если вы хотите отключить радио, устано-
2.   Антенна FM                         вите переключатель (6) в положение OFF.
3.   Кнопка короткого сна SNOOZE
4.   Отсек для батареек              УСТАНОВКА ТЕКУЩЕГО ВРЕМЕНИ
5.   Переключатель настройки часов RUN/  Для установки текущего времени установи-
ALM/TIME                          те переключатель RUN/ALM/TIME (5) в пози-
6.   Функциональный  переключатель  ON/  цию TIME и вращайте кольцо (8) влево (для
AUTO/OFF                          установки минут) или вправо (для установки
7.   Световой дисплей                часов). Когда часы будут настроены, уста-
8.   Вращающееся кольцо настройки    новите переключатель RUN/ALM/TIME (5)
9.   Кнопка SLEEP                    в положение RUN. Две мигающие точки на
10.  Регулятор настройки радио       дисплее (7) должны остановиться.
11.  Переключатель диапазонов AM/FM
12.  Регулятор громкости/звонка      УСТАНОВКА ТЕКУЩЕГО ВРЕМЕНИ ДЛЯ
13.  Проектор                        ПРОЕКТОРА
14.  Кнопка включения/выключения проек-  Внимание! Текущее время, показанное на
тора                              дисплее и отражаемое проектором, должно
15.  Кнопка настройки минут M для проекто-  быть установлено раздельно.
ра                                Проектор:
16.  Кнопка настройки часов H для проекто-  Установите переключатель проектора (14)
ра                                в положение ON. Нажмите и удерживайте
17.  Настройка резкости проектора    кнопку T (18), при этом установите часы, на-
18.  Кнопка установки времени T для проек-  жимая на кнопку H (16), и минуты, нажимая
тора                              на кнопку M (15). Чтобы отключить проектор,
установите переключатель проектора (14) в
ПИТАНИЕ                              положение OFF.
Подключите сетевой шнур к сети. Убеди-
тесь, что напряжение, указанное на при-  Примечание: Время, отражаемое проекто-
боре, соответствует напряжению в вашем   ром на стене или потолке, хорошо видно в
доме.                                темной комнате. Максимальное расстояние
Вставьте одну батарейку 9 В (не входит в   проекции- 0,6-2,7 м. Для регулирования яр-
комплект) в отсек (4) для батареек. Бата-  кости и резкости проекции воспользуйтесь
рейка поддерживает работу часов, если   регулятором настройки резкости (17).
происходят
сбои в электросети. В этих случаях дисплей   УСТАНОВКА ВРЕМЕНИ ПРОБУЖДЕНИЯ
не высвечивает время, но оно поддержива-  Для установки текущего времени установи-
ется.                                те переключатель RUN/ALM/TIME (5) в пози-
цию ALM и вращайте кольцо (8) влево (для
РАДИО                                установки минут) или вправо (для установки
1.  Установите переключатель ON/AUTO/OFF   часов). Когда часы будут настроены, устано-
(6) в положение ON.                вите переключатель RUN/ALM/TIME (5) в
2.  Установите  переключатель  диапазонов   положение RUN. Две мигающие точки на
радио (11) на нужный диапазон.     дисплее (7) должны остановиться.
3.  Осуществите настройку на нужную пере-
дающую станцию, вращая регулятор на-  ВНИМАНИЕ!
стройки радио (10).                Не вращайте кольцо слишком быстро, так
4.  Отрегулируйте громкость звучания пово-  как часы не могут настраиваться с большой
ротом регулятора (12).             скоростью.
5