На сайте 123424 инструкции общим размером 499.44 Гб , которые состоят из 6235949 страниц
Фото
Руководство пользователя VITEK VT-3509 W. Основные функции, характеристики и условия эксплуатации изложены на 16 страницах документа в pdf формате.
Доступно к просмотру 12 страниц. Рекомендуем вам скачать файл инструкции, поскольку онлайн просмотр документа может сильно отличаться от оригинала.
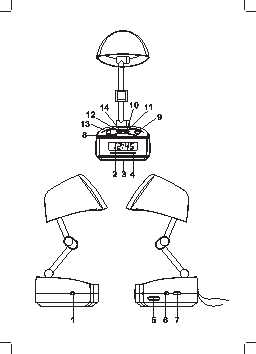
ENGLISH
CLOCK RADIO WITH NIGHT LIGHT         4.  Set the lighting switch (13) to the ON po-
sition.
LOCATION OF CONTROLS
1.   ON/OFF/AUTO Function selector   Note: Do not forget to set the lighting
2.   Display                         switch (13) to the OFF position before in-
3.   Battery compartment             stalling the lamp shade. Make sure the light
4.   Radio frequency scale           bulb has cooled before changing. Remove
5.   Radio frequency tuning knob     the old light bulb and install a new one (25
6.   Band selector                   Wt bulb).
7.   VOLUME/BUZZER knob
8.   SNOOZE button                   SETTING THE CURRENT TIME
9.   SLEEP button                    Press and hold the TIME button (11), set the
10. MINUTE setting button            hours by pressing the HOUR (12) button
11.  CLOCK setting button            and the minutes by pressing the MINUTE
12. HOUR setting button              button (10). The current time will be shown
13. “On/Off” switch for lamp         on the display (2).
14. ALARM button
RADIO
POWER                                1.  Set the function selector (1) to the ON
1.  Connect the power cord to the outlet.   position.
Make sure that the voltage indicated on   2.  Set the band selector (6) to the FM1 or
the device matches the voltage in your   FM2 position.
home.                              3.  Set the radio to the desired broadcasting
2.  Place one 9 V battery (not included) into   station using the TUNING knob (5).
the battery compartment (3). The bat-  4.  Adjust the volume using the VOLUME
tery maintains the clock in case of power   knob (7).
failure. In such cases, the display will not   5.  Extend the antenna wire fully in order to
work, but the time is being maintained.   achieve the best FM reception.
After long use, the battery can go bad
and leak. If you use the unit without a   WAKING UP TO MUSIC
battery, then you will be required to set   1.  Set the function selector (1) to the ON
the time, as instructed in the “Time Set-  position.
ting” section, each time the unit is dis-  2.  Set the band selector (6) to the FM1 or
connected from power.                 FM2 position.
3.  Set the desired station using the TUN-
TURNING ON THE LIGHTING                 ING knob (5).
1.   Connect   the   4.  Set the desired volume (7).
power cord to the   5.  Set the function selector (1) to the AUTO
outlet.              position.
2.   Lift the body of   6.  Press and hold the ALARM button (14),
the clock up from the   set the hours (12) and minutes (10), us-
sides until it stops.  ing the appropriate buttons.
3.   Tighten the cen-  7.  In order to verify that the correct time has
tral bolts holding the   been set, press the ALARM button (14).
body to the lamp,    The set time will be saved to the device’s
as shown in the dia-  memory and the radio will turn on every
gram.                day at the same time.
3
ENGLISH
WAKING UP TO A BUZZER ALARM          SPECIFICATIONS
1.  Follow the instructions in the section en-  Frequency Bands:
titled “Waking up to Music”.       FM1 - 64-88 MHz
2.  Set the VOLUME/BUZZER (7) knob to   FM2 - 88-108 MHz
the BUZZER position.               Battery: 9 V (not included)
3.  To turn off the buzzer, press the ALARM   Power Source: 230 V ~ 50 Hz
OFF button (14), or move the function
selector (1) to the ON position.   The manufacturer reserves the right to
make changes to the characteristics of the
SLEEP TIMER                          device without prior notice.
Make sure the selector (1) is not set to the
ON position, otherwise the unit fill not turn   Service life of  appliance -  3 years
off after the set time runs out.
1.  To set the radio to turn off after a set   Guarantee
amount of time (from 1 min. to 1 hr. 59   Details regarding guarantee conditions can
min.), press and hold the SLEEP button   be obtained from the dealer from whom the
(9) and set the desired time using the   appliance was purchased. The bill of sale or
HOUR (12) and MIN (10) buttons.    receipt must be produced when making any
2.  When the set time runs out, the radio will   claim under the terms of this guarantee.
turn off automatically. To turn off the ra-
dio before the time runs out, press the    This product conforms to the
SNOOZE button (8).                         EMC-Requirements as laid down
by the Council Directive 89/336/
SNOOZE MODE                                  EEC and to the Low Voltage Reg-
1.  The buzzer alarm or radio can be tempo-  ulation (23/73 EEC)
rarily silenced for 9 minutes by pressing
the SNOOZE button (8). You can lightly
sleep during this time.
The alarm will repeat itself in 9 minutes.
2.  Set the function selector (1) to the OFF
position to turn off the alarm.
CARE
Wipe the device body with a soft cloth, mois-
tening with water if necessary. Unplug the
device from the power outlet while clean-
ing. Do not use abrasive or other cleaning
substances as they can damage the device
body.
This product was not designed for use in lo-
cations with high levels of humidity. Do not
allow water to come into contact with the
device body or internal parts. Normal ven-
tilation of the product will extend its service
life.
4
РУССКИЙ
РАДИОЧАСЫ С ЛАМПОЙ-НОЧНИКОМ                             3. Закрутите цен-
тральные винты,
РАСПОЛОЖЕНИЕ ЭЛЕМЕНТОВ                                  удерживающие
УПРАВЛЕНИЯ                                              корпус с лампой,
1.   Функциональный  переключатель  ON/                 как показано на
OFF/AUTO                                             рисунке.
2.   Дисплей                                            4. Установите
3.   Отсек для батареек                                 переключатель
4.   Шкала настройки радио                              освещения (13) в
5.   Регулятор настройки радио                          положение ON.
6.   Переключатель диапазонов
7.   Регулятор громкости/звонка VOLUME/
BUZZER                            Примечание: Не забудьте установить пе-
8.   Кнопка короткого сна SNOOZE     реключатель освещения (13) в положе-
9.   Кнопка  автоматического  отключения   ние OFF перед тем, как сложить абажур.
SLEEP                             Перед заменой лампочки убедитесь,
10. Кнопка настройки минут MINUTE    что она остыла. Удалите старую лам-
11. Кнопка установки времени CLOCK   почку и поставьте на ее место новую
12. Кнопка настройки часов HOUR      (мощность лампочки 25 Вт).
13. Кнопка “Вкл./Выкл.” для лампы
14. Кнопка будильника ALARM          УСТАНОВКА ТЕКУЩЕГО ВРЕМЕНИ
Нажмите и удерживайте кнопку CLOCK
ПИТАНИЕ                              (11), при этом установите часы, нажимая
1.  Подключите сетевой шнур к сети. Убе-  на кнопку HOUR (12) и минуты, нажимая
дитесь, что напряжение, указанное на   на кнопку MINUTE (10). Текущее время бу-
приборе, соответствует напряжению в   дет показано на дисплее (2).
вашем доме.
2.  Вставьте одну батарейку 9 В (не входит   РАДИО
в комплект) в отсек для батареек (3).  1.  Установите функциональный переклю-
Батарейка поддерживает работу часов,   чатель (1) в позицию ON.
если происходят сбои в электросети.   2.  Установите  частотный  переключатель
В этих случаях дисплей не высвечива-  (6) в положение FM1 или FM2.
ет время, но оно поддерживается. При   3.  Осуществите настройку на нужную
длительном использовании батарейки    передающую станцию регулятором
могут испортиться и потечь. Если вы   TUNING (5).
будете пользоваться прибором без ба-  4.  Отрегулируйте громкость звучания ре-
тареек, то при каждом включении его   гулятором VOLUME (7).
в сеть необходимо устанавливать вре-  5.  Для лучшего приема передач в FM-
мя, как описано в разделе “Установка   диапазоне вытяните шнур антенны на
текущего времени”.                    полную длину.
ВКЛЮЧЕНИЕ ОСВЕЩЕНИЯ                  ПРОБУЖДЕНИЕ ПОД МУЗЫКУ
1.  Включите сетевой шнур в розетку.  1.  Установите функциональный переклю-
2.  Потяните вверх корпус часов с боковых   чатель в позицию ON (1).
сторон до упора.                   2.  Установите  частотный  переключатель
(6) в позицию FM1 или FM2.
3.  Настройтесь на нужную станцию регу-
лятором TUNING (5).
5