На сайте 123379 инструкций общим размером 499.27 Гб , которые состоят из 6234097 страниц
Фото
Руководство пользователя HYUNDAI H-1625. Основные функции, характеристики и условия эксплуатации изложены на 13 страницах документа в pdf формате.
Доступно к просмотру 12 страниц. Рекомендуем вам скачать файл инструкции, поскольку онлайн просмотр документа может сильно отличаться от оригинала.
H-1625
ПОРТАТИВНЫЙ
PORTABLE RADIO RECEIVER                          РАДИОПРИЕМНИК
Instruction manual          Руководство по эксплуатации
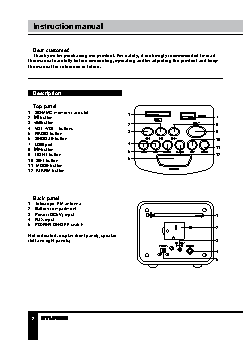
Instruction manual                                                                                                        Instruction manual
Dear customer!
Thank you for purchasing our product. For safety, it is strongly recommended to read
this manual carefully before connecting, operating and/or adjusting the product and keep
the manual for reference in future.
Description
Top panel
1.  SD/MMC memory card slot         1
2.    button                                                        7
3.     button                       2                               8
4.  VOL-/VOL+ buttons
5.  RADIO button                    3                               9
6.  SNOOZE button                                                   10
7.  USB port                        4
8.     button                       5                               11
9.  LIGHT button                                                    12
10. SET button                      6
11. MODE button
12. ALARM button
Back panel
1.  Telescopic FM-antenna
2.  Battery compartment
3.  Power (DC5V) input                                              1
4.  AUX input
5.  POWER ON/OFF switch
2
Not indicated: display (front panel), speaker
(left and right panels)                                             3
4
5
2                                                                                                                                                  3
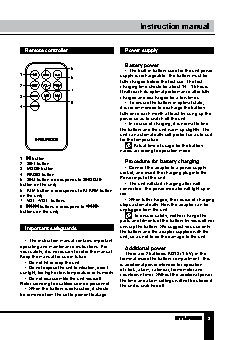
Instruction manual                                Instruction manual
Remote controller                   Power supply
Battery power
5                   •  The built-in battery used for the unit power
1                 6                 supply is rechargeable. The battery must be
fully charged before the first use. The first
2                                   charging time should be about 14…16 hours.
7                 It will reach its optimal performance after fully
3                                   charged and discharged for a few times.
8                   •  To ensure the battery in optimal state,
4                                   it is recommended to discharge the battery
fully once each month at least by using up the
power so as to switch off the unit.
•  In course of charging, it is normal to find
the battery and the unit warm up slightly. The
unit can automatically self-protect so as to suit
for the temperature.
Actual time of usage for the battery
varies according to operation mode.
1.    button
2.  SET button                        Procedure for battery charging
3.  MODE button                       •  Connect the adapter to a power supply
4.  RADIO button                    socket, and insert the charging plug into the
5.  SNZ button (corresponds to SNOOZE   Power input of the unit.
button on the unit)                   •  The unit will start charging after well
6.  ALM button (corresponds to ALARM button   connected. The power indicator will light up in
on the unit)                        red.
7.  VOL+/VOL- buttons                 •  When fully charged, the course of charging
8.    /   buttons (correspond to   /     stops automatically. Now the adaptor can be
buttons on the unit)                unplugged from the unit.
To ensure safety, neither change the
parts and fitments of the battery by yourself nor
Important safeguards              unwrap the battery. We suggest you use only
the battery and the adapter supplied with the
unit, so as not to do the damage to the unit.
•  The instruction manual contains important
operating and maintenance instructions. For   Additional power
your safety, it is necessary to refer the manual.   There are 2 batteries AG13 (1.5 V) in the
Keep the manual for use in future.  terminal inside the battery compartment. This
•  Do not hit or drop the unit.   is additional power intended for operation
•  Do not expose the unit to vibration, direct   of clock, alarm, calendar, termometer and
sunlight, too high or low temperature or humidity.  countdown timer. Without the additional power
•  Do not disassemble the unit yourself.   the time and alarm settings will not be stored if
Refer servicing to qualified service personnel.  the unit is switched off.
•  When the battery is exhausted, it should
be removed from the set to prevent leakage.
2                                                                          3