На сайте 123431 инструкция общим размером 499.45 Гб , которые состоят из 6236163 страниц
Фото
Руководство пользователя HYUNDAI H-1551. Основные функции, характеристики и условия эксплуатации изложены на 11 страницах документа в pdf формате.
Доступно к просмотру 10 страниц. Рекомендуем вам скачать файл инструкции, поскольку онлайн просмотр документа может сильно отличаться от оригинала.
H-1551
RADIO WITH ALARM                        РАДИОПРИЕМНИК
С БУДИЛЬНИКОМ
Instruction manual          Руководство по эксплуатации
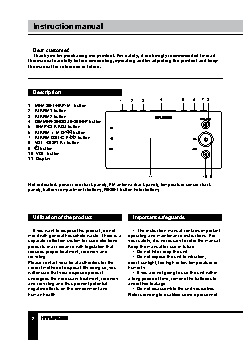
Instruction manual
Dear customer!
Thank you for purchasing our product. For safety, it is strongly recommended to read
this manual carefully before connecting, operating and/or adjusting the product and keep
the manual for reference in future.
Description
1  2  3     4       5  6   7 8
1.  MEM.SET/NAP/M+ button
2.  ALARM1 button
3.  ALARM2 button
4.  DIMMER/SNOOZE/SLEEP button
5.  TEMP/CLK.ADJ button
6.  ALARM Y-M-D/   button
7.  ALARM DST/C-F/   button
8.  VOL+/DISPLAY button
9.    button
10. VOL- button
11. Display
11                 10  9
Not indicated: power cord (back panel), FM antenna (back panel), temperature sensor (back
panel), battery compartment (bottom), RESET button hole (bottom).
Utilization of the product          Important safeguards
If you want to dispose this product, do not   •  The instruction manual contains important
mix it with general household waste. There is a   operating and maintenance instructions. For
separate collection system for used electronic   your safety, it is necessary to refer the manual.
products in accordance with legislation that   Keep the manual for use in future.
requires proper treatment, recovery and   •  Do not hit or drop the unit.
recycling.                            •  Do not expose the unit to vibration,
Please contact your local authorities for the   direct sunlight, too high or low temperature or
correct method of disposal. By doing so, you   humidity.
will ensure that your disposed product   •  If you are not going to use the unit within
undergoes the necessary treatment, recovery   a long period of time, remove the batteries to
and recycling and thus prevent potential   avoid their leakage.
negative effects on the environment and   •  Do not disassemble the unit yourselves.
human health.                       Refer servicing to qualified service personnel.
2
Instruction manual
Power supply                        •  Press repeatedly Y-M-D/   button or
press and hold it to decrease the setting; press
repeatedly DST/C-F/   button or press and
Battery operation                 hold it to increase the setting.
•  Insert 1 x 3 V lithium battery CR2032 (not   •  In normal mode, press repeatedly Y-M-D/
included) to the terminal inside the battery    button to switch the display between
compartment according to the polarity marks (+   current time, year and month and day. Each
and -). Your set will not work normally from the   indication will be on for 5 seconds, then the
battery supply, but there is now the advantage   display returns to initial mode.
that, in case there is a mains current failure,
your clock will continue to work. The clock   Dimmer function
display will not light up, the clock time and   To adjust the brightness of the display, press
alarm setting will be held in the clock memory   DIMMER button. You can switch between 3
by the battery back-up system.      positions: HIGH, NORMAL or LOW.
This enables you to move the set from place to
place without re-setting the clock every time. The   Reset
battery back-up system is only meant to be used   To reset all settings of the unit to default
from short temporary power failures. For longer   settings, press the RESET hole with a pointed
durations the battery may become exhausted or   object (e.g., a ballpoint pen). This measure is
there may be some deviation in accuracy.  needed when you changed the batteries in the
•  When the battery is exhausted, it should   unit or if the unit does not function correctly.
be removed from the set to prevent leakage.
If you do not wish to take advantage of the   Daylight saving time
battery back-up system, your set will work   Press and hold DST/C-F/   button to
normally without a battery. However, if
disconnected from the mains, the clock figures   switch on or off the DST (Daylight Saving
will flash when the mains are re-connected and   Time) mode. This enables to observe 1-hour
difference between summer and winter time.
you must re-set the clock.
AС operation                        Thermometer
•  The appliance is for household use only.  Press  TEMP/CLK.ADJ button to show
•  Before the first connecting of the appliance   the current temperature. The temerature
check that voltage indicated on the rating label   indicatoin will be on for 5 seconds, then the
corresponds the mains voltage in your home.  display returns to initial mode. Press DST/C-F/
button to switch between Celsius and
•  Insert the plug into the power supply.  Fahrenheit temperature modes.
•  The set is now working as electronic clock.
General operations                  Nap function
In normal mode press and hold MEM.SET/
NAP/M+ button to switch on or off. Press the
Setting the clock and calendar    button to select the time period (10-90min with
•  Press and hold CLK.ADJ button. Press it   a 10min step), after wich the alarm will ring.
repeatedly to cycle through time and calendar   The buzzer is used as the sound source.
settings in following order: Year => Month =>
Day => 12/24H mode => Current hours =>   Display functions
Current minutes. The selected setting will blink.  In clock mode press and hold VOL+/
3