На сайте 123408 инструкций общим размером 499.34 Гб , которые состоят из 6235299 страниц
Фото

Руководство пользователя ASSISTANT AH-1522. Основные функции, характеристики и условия эксплуатации изложены на 6 страницах документа в pdf формате.
Доступно к просмотру 6 страниц. Рекомендуем вам скачать файл инструкции, поскольку онлайн просмотр документа может сильно отличаться от оригинала.
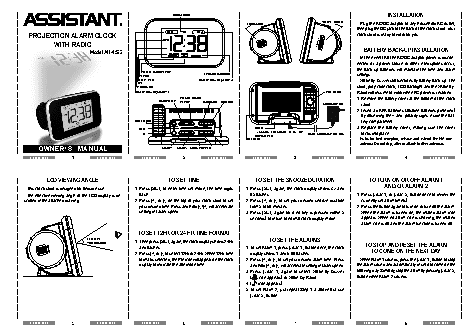
SNOOZE ICON                                                                   INSTALLATION
VOLUME TUNNER
FOCUS KNOB                               Plug the AC/DC adaptor to any household AC outlet,
then plug the DC jack to the back of the clock radio. Your
PROJECTION ALARM CLOCK                                                                                                clock radio is ready to work for you.
WITH RADIO
Model AH-1522                                                                                      BATTERY BACK-UP INSTALLATION
In the event that the AC/DC adaptor power is discon-
nected or a power failure or other interruptions occur,
the back-up batteries will maintain the time and alarm
PRESENT RADIO MEMORY
MEMORY                  FM RADIO BAND ICON                                    settings.
SLEEP TIMER           WAKE BY BUZZER (ALARM 2)                                  Wake-by-Buzzer still functions by battery back-up. The
TIME
PM INDICATOR                                                                   radio, projection clock, LCD backlight and the Wake-by-
WAKE BY BUZZER (ALARM 1)                                             PROJECTOR  Radio will resume to work when AC power is restored.
PRESENT READIO                                                 1. Remove the battery cover at the bottom of the clock
RADIO/SLEEP  MEMORY  BACKWARD  FORWARD
AC/DC ADAPTOR  radio.
2. Insert 3 x AAA batteries (alkaline batteries preferred)
by observing the + and–polarity signs inside the bat-
PROJECTION                                                                       tery compartment.
RESET                                     INSERT                              3. Replace the battery cover, making sure the cover
3 x AAA BATTERIES INSIDE THE BATTERY
SET                                                         INSERT AC/DC ADAPTOR JACK  locks into place.
COMPARTMENT
AUX LINE-IN                               Note: for best reception, release and extend the FM wire
antenna. Do not strip, alter or attach to other antennas.
OWNER’S  MANUAL                             ALARM 1    ALARM 2  SNOOZE/DIMMER  –           +
ENGLISH       – 1 –     ENGLISH         ENGLISH       – 2 –     ENGLISH         ENGLISH       – 3 –     ENGLISH         ENGLISH       – 4 –     ENGLISH
LCD VIEWING ANGLE                           TO SET TIME                    TO SET THE SNOOZE DURATION               TO TURN ON OR OFF ALARM 1
AND/OR ALARM 2
This clock radio is designed for bedside use.  1. Press [SET] to enter time set mode, the time digits   1. Press [SET] again, the clock display shows Zz and
The effective viewing angle of the LCD display is de-  ?ash.                    05 ?ashes.                            1. Press [ALM 1] or [ALM 2] button once to review the
scribed in the attached drawing.       2. Press [+] or [-] on the top of your clock radio to set   2. Press [+] or [-] to set your desired snooze duration   currently set alarm time(s).
your desired time. Press and hold [-]/[+] will accelerate   from 5 to 60 minutes.  2. Press the button again to turn on or turn off the alarm.
setting in faster speed.              3. Press [SET] again (or if no key is pressed within 5   When the alarm is turned on, the related alarm icon
seconds) to return to normal clock display mode.  appears. When no alarm icon is showing, the related
alarm icon is off and the alarm function is turned off.
TO SET 12HR OR 24 HR TIME FORMAT
EFFECTIVE                                                         TO SET THE ALARMS
VIEWING ANGLE    1. Then press [SET] again, the clock display shows 24Hr                            TO STOP AND RESET THE ALARM
and ?ashes.                           1. To set Alarm 1, press [ALM 1] button once, the clock
2. Press [+] or [-] to select 12Hr or 24Hr. When 12Hr time   display shows 1 and 6:00 ?ashes.  TO COME ON THE NEXT DAY
format is selected, the PM icon will appear on the clock   2. Press [+] or [-] to set your desired alarm time. Press   When Alarm 1 sounds, press the [ALM 1] button to stop
display to indicate the afternoon time.  and hold [+] or [-] will accelerate setting in faster speed.  the alarm sound and automatically reset it to come on the
3. Press  [ALM 1] again to select Wake-by-Buzzer   following day. Similarly, stop the alarm by pressing [ALM 2]
(     icon appears) or Wake-By-Radio  button when Alarm 2 sounds.
4. (     icon appears)
5. To set Alarm 2, just repeat Step 1–3 above but use
[ALM 2] button.
ENGLISH       – 5 –     ENGLISH         ENGLISH       – 6 –     ENGLISH         ENGLISH       – 7 –     ENGLISH         ENGLISH       – 8 –     ENGLISH
TO USE THE SNOOZE ALARM                  TO USE THE HI-LO DIMMER               TO TUNE AND PLAY THE RADIO                 TO USE THE MEMORY SET
(RADIO PRESET) FUNCTION
When alarm sounds, press the [SNOOZE/DIMMER]   This clock radio features an adjustable display backlight   1. Press [SLEEP/RADIO], the clock display will show
once, the alarm will be silenced and come on again ac-  with dim, medium and bright settings. To select a backlight   “ON” and ?ashes.  This clock radio features a total of 5 preset memory of
cording to the set snooze duration.     setting, press the [SNOOZE/DIMMER] button until the   2. Then press [      ] or [       ] to tune into a desired radio   FM radio .These allow you to preset your favorite stations
brightness is reached. This setting can only be selected   station. To scan the stations, press [      ] or [       ]   and access them quickly.
when the radio is not playing.           for a few seconds and release. The radio will search   1. Turn on the radio by press of [RADIO / SLEEP]. Press
Note: Please note the always-on backlight will not work while   and stop on the next strong station. Remark: keep your   [      ] or [       ] to select a radio station you like to
TO USE THE PROJECTION CLOCK            the clock is operating on battery power.  radio away from ?uorescent lamps, which may cause interfer-  preset memory.
ence to the radio.
Press [PROJECTION] button to turn on or off the projec-                                                               2. Then press and hold the MEMORY until “MEM” ap-
tion clock. Turn the focus knob on the projector to adjust                     3. You may also use the MEMORY function to select a   pears and “01” ?ashes below the time digits.
preset radio station. See the TO USE THE MEMORY
the image of the projected time onto the wall or ceiling.   TO SET UP THE FM ANTENNA  SET FUNCTION.                    3. Then press [MEMORY] again to store Memory 01.
Press and hold the [PROJECTION] button for 2 seconds                                                                   4. Press [      ] or [       ] to select another station you like
to ?ip the projected time 180 degree.    Extend the FM wire antenna fully and vary the direc-  4. Rotate the VOLUME dial to adjust the volume level.  to preset . Then press and hold [MEMORY] until “MEM”
tion for best FM reception. Do not strip, alter or attach to   5. Press [SNOOZE/DIMMER] button to turn off the radio.  appears and “01” ?ashes below the time digits. Press
other antennas.
[+] or [–] button to select “02” on the lower display,
then press [MEMORY] again to store.
5. Repeat Step 4 to preset up to ?ve FM stations.
6. To listen to a preset station at any time, simply press
the [MEMORY] to select a preset station while the
radio is on.
7. To edit a preset station, select another station and
then repeat Step 2-4. This overrides the original setting.
ENGLISH       – 9 –     ENGLISH         ENGLISH      – 10 –     ENGLISH         ENGLISH      – 11 –     ENGLISH         ENGLISH      – 12 –     ENGLISH
TO USE THE SLEEP TIMER                    TROUBLE SHOOTING               4. Do not mix old and new batteries. Do not mix alkaline,   Stamp   Печать магазина
standard (carbon-zinc), or rechargeable (nickel-
1. Press the [RADIO/SLEEP] button twice to enter the   If your clock displays irrelevant time or does not function   cadimium) batteries.
sleep mode. The clock display shows the SLEEP icon   properly, which maybe caused by electro-static discharge   5. If the unit is not to be used for a prolonged period, such
and “5” (5 minutes) and ?ashes, keep pressing the   or other interference, use a thin object to press the   as a month or longer, remove the batteries to prevent
[RADIO/SLEEP] to select a 10-,15-, 30-, 45-, 60-,   [RESET] button on top. The clock radio will be reset to   possible corrosion. Should the battery compartment
75-, 90-minute sleep timer. The sleep timer display   default settings and you need to set it again.  become corroded or dirty, clean the compartment
remains for few seconds and then returns to normal                              thoroughly and replace the batteries.    Date of sale         Дата продажи
clock display. The SLEEP icon will appear, showing
the radio timer is activated.
2. The radio will play for the programmed sleep time and
then shut off. To check how many sleep time is remain-  CARE OF YOUR PRODUCT
ing, press [RADIO/SLEEP] button once.  1. Place your clock radio on a stable surface, away from                          Model                Номер модели
3. To turn off the radio before the sleep time has elapsed,   sources of direct sunlight or excessive heat or moisture.
press [SNOOZE/DIMMER] once.            2. Protect your furniture when placing your units on a
natural wood and lacquered ?nish by using a cloth or
protective material between it and the furniture.
Warranty period   Гарантийный срок
3. Clean your unit with a soft cloth moistened only with
mild soap and water. Stronger agents such as benzine,
thinner or similar materials can damage the surface
of the unit. Make sure the unit is unplugged before
cleaning.
ENGLISH      – 13 –     ENGLISH         ENGLISH      – 14 –     ENGLISH         ENGLISH      – 15 –     ENGLISH         ENGLISH      – 16 –     ENGLISH
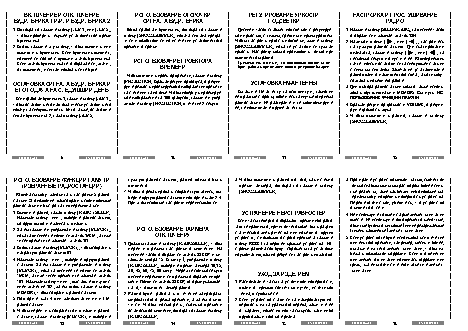
ЗНАЧОК ОТСРОЧКИ БУДИЛЬНИКА                                                         УСТАНОВКА
РЕГУЛЯТОР
РЕГУЛЯТОР ФОКУСА            ГРОМКОСТИ     Подключите адаптер переменного/постоянного тока
в сеть переменного тока, затем вставьте его разъем
ЧАСЫ С ПРОЕКЦИЕЙ ВРЕМЕНИ,                                                                                              в гнездо питания радиочасов. Радиочасы готовы к
работе.
БУДИЛЬНИКОМ И РАДИО
Модель AH-1522
УСТАНОВКА РЕЗЕРВНОЙ БАТАРЕИ
В случае отключения сетевого адаптера либо из-за
ТЕКУЩАЯ ПАМЯТЬ РАДИО
ПАМЯТЬ              ЗНАЧОК РАДИОДИАПАЗОНА FM                                  сбоя в сети питания, благодаря резервным батареям,
ТАЙМЕР ОТКЛЮЧЕНИЯ    ПОДАЧА ЗВУКОВОГО СИГНАЛА                                 сохранятся настройки времени и будильника.
ВРЕМЯ                  БУДИЛЬНИКА (БУДИЛЬНИК 2)
ИНДИКАТОР ВРЕМЕНИ СУТОК                                                          При питании от батарей, функция подачи звукового
ПОДАЧА ЗВУКОВОГО СИГНАЛА БУДИЛЬНИКА (БУДИЛЬНИК 1)                    ПРОЕКТОР   сигнала будильника продолжает работать. Радио,
АДАПТЕР
ТЕКУЩАЯ ПАМЯТЬ                                                 проектор времени, светодиодная подсветка и функ-
РАДИО/ОТКЛЮЧЕНИЕ  РАДИО  НАЗАД  ВПЕРЕД                        ПЕРЕМЕННОГО/
ПОСТОЯННОГО ТОКА  ция включения радио по будильнику заработают
после возобновления питания от сети переменного
тока.
ПРОЕКЦИЯ                                                                       1. Снимите крышку отделения для элементов питания
в нижней части радиочасов.
СБРОС                                   УСТАНОВИТЕ
3 ЭЛЕМЕНТА ААА В ОТДЕЛЕНИЕ ДЛЯ
НАСТРОЙКА                                 ЭЛЕМЕНТОВ ПИТАНИЯ    ПОДКЛЮЧИТЕ РАЗЪЕМ   2. Вставьте 3 элемента AAA (желательно, щелочного
ЛИНЕЙНЫЙ ВХОД          АДАПТЕРА ПЕРЕМЕННОГО/  типа), соблюдая при этом полярность, ориенти-
ПОСТОЯННОГО ТОКА
руйтесь по знакам + и – внутри отделения для
РУКОВОДСТВО ПО ЭКСПЛУАТАЦИИ                     БУДИЛЬНИК 1   БУДИЛЬНИК 2  ОТСРОЧКА/  –           +                      элементов питания.
ПОДСВЕТКА
RUSSIAN       – 1 –     РУССКИЙ         RUSSIAN       – 2 –     РУССКИЙ         RUSSIAN       – 3 –     РУССКИЙ         RUSSIAN       – 4 –     РУССКИЙ
3. Установите крышку отделения на место, убедитесь,   УСТАНОВКА ВРЕМЕНИ             НАСТРОЙКА ДЛИТЕЛЬНОСТИ                   НАСТРОЙКА БУДИЛЬНИКА
что она зафиксировалась.                                                                   ОТСРОЧКИ
Примечание:  для  улучшения  качества  приема,   1. Нажмите кнопку [SET], чтобы перейти в режим                       1. Чтобы установить сигнал будильника 1, однократно
вытащите штырьковую FM-антенну. Не разбирайте и   установки времени, числа времени начнут мигать.  1. Вновь нажмите кнопку [SET], на дисплее часов   нажмите кнопку [ALM 1], на дисплее часов отобра-
не модифицируйте ее, не подключайте другие антенны.  2. Нажимая кнопки [+] или [-], находящиеся на верх-  появятся мигающие значки Zz и 05.  зится цифра 1 и мигающее время 6:00.
ней крышке радиочасов, установите нужное время.   2. Нажимая кнопку [+] или [-], установите нужное   2. Нажимая кнопку [+] или [-], установите нужное
Если нажать и удерживать одну из кнопок [+] или   время отсрочки сигнала, от 5 до 60 минут.  время подачи сигнала. Если нажать и удерживать
УГОЛ ОБЗОРА ЖК-ДИСПЛЕЯ               [-], настройка будет происходить быстрее.  3. Вновь нажмите кнопку [SET] (либо не нажимайте   одну из кнопок [+] или [-], настройка будет проис-
Радиочасы предназначены для установки на тум-                                   кнопок в течение 5 секунд), часы перейдут в штат-  ходить быстрее.
бочку у кровати.                         УСТАНОВКА ФОРМАТА ВРЕМЕНИ 12            ный режим отображения времени.        3. Вновь нажмите кнопку [ALM 1], чтобы выбрать
Оптимальный угол обзора ЖК-дисплея показан на     ИЛИ 24 ЧАСА                                                           функцию подачи тонового сигнала (появляется
следующем рисунке:                                                                                                       значок     ) либо включения радио по будильнику
1. Вновь нажмите кнопку [SET], на часах отобража-                                 (появляется значок     )
ется мигающий значок 24Hr.                                                    4. Чтобы установить сигнал будильника 2, повторите
2. Нажимая кнопки [+] или [-], выберите формат вре-                               вышеописанные шаги 1 – 3, но нажимайте кнопку
мени 12Hr или 24Hr. Если выбран формат времени                                  [ALM 2].
12Hr, на дисплее часов отобразится значок PM,
ОПТИМАЛЬНЫЙ
УГОЛ ОБЗОРА        означающий вторую половину дня.
RUSSIAN       – 5 –     РУССКИЙ         RUSSIAN       – 6 –     РУССКИЙ         RUSSIAN       – 7 –     РУССКИЙ         RUSSIAN       – 8 –     РУССКИЙ