На сайте 123455 инструкций общим размером 499.52 Гб , которые состоят из 6237163 страниц
Фото
Руководство пользователя SONY VCL-ES20A. Основные функции, характеристики и условия эксплуатации изложены на 2 страницах документа в pdf формате.
Доступно к просмотру 2 страницы. Рекомендуем вам скачать файл инструкции, поскольку онлайн просмотр документа может сильно отличаться от оригинала.
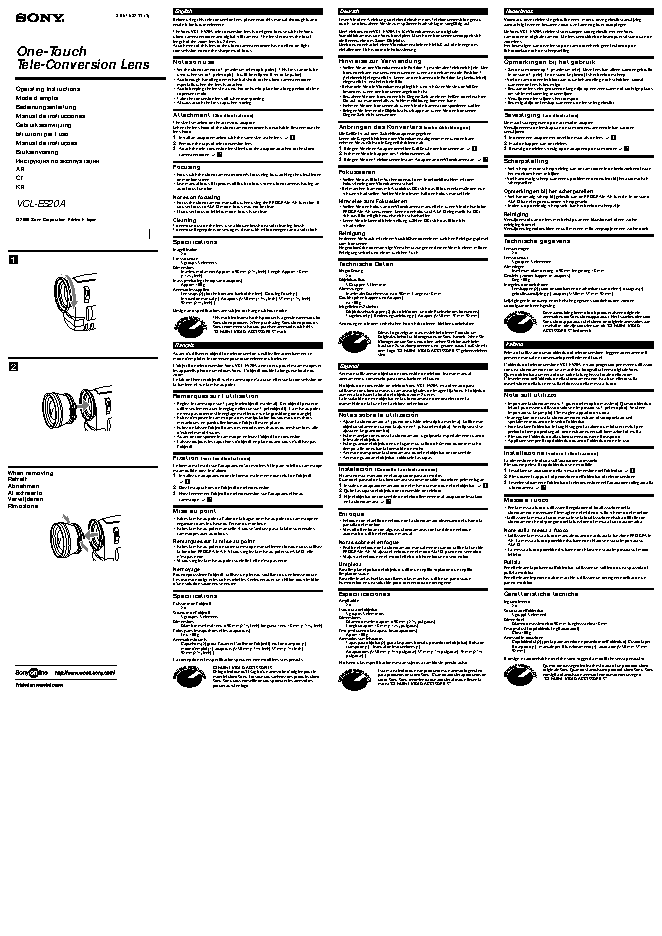
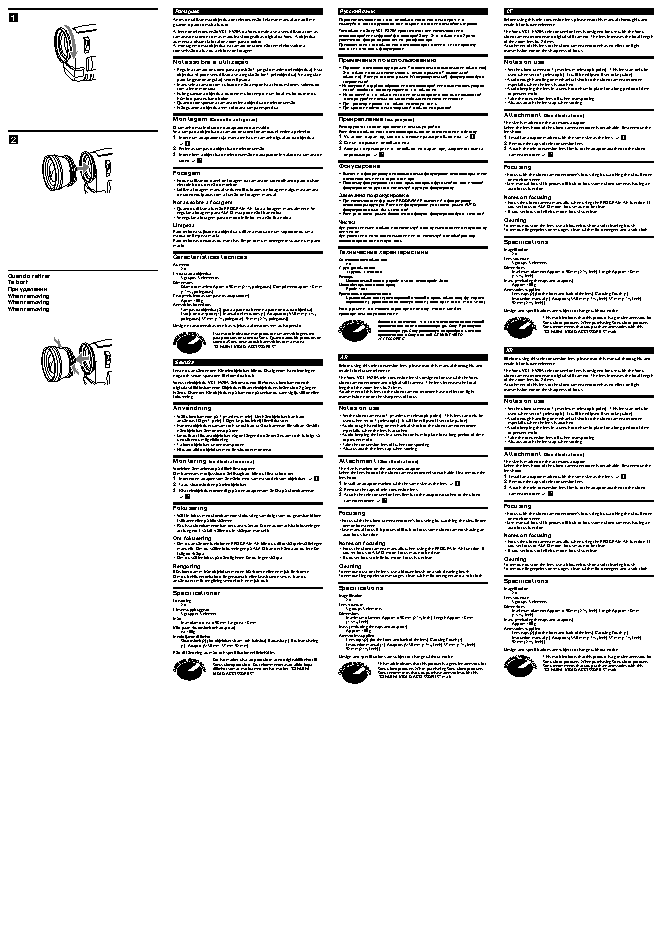
English Deutsch Nederlands 3-067-532-11 (1) Before using this tele-conversion lens, please read this manual thoroughly and Lesen Sie diese Anleitung vor Inbetriebnahme des Telekonverters bitte genau Voordat u deze telelens in gebruik neemt, moet u deze gebruiksaanwijzing retain it for future reference. durch, und bewahren Sie sie zum spateren Nachschlagen sorgfaltig auf. aandachtig lezen en bewaren zodat u ze later nog kunt raadplegen. The Sony VCL-ES20A tele-conversion lens is designed for use with the Sony Der Telekonverter VCL-ES20A ist fur Videokameras und digitale De Sony VCL-ES20A telelens is ontworpen voor gebruik met een Sony video camera recorder and digital still camera. The lens increases the focal Standbildkameras von Sony konzipiert. Durch den Konverter verdoppelt sich camcorder en digitale camera. De lens verdubbelt de brandpuntsafstand van de length of the zoom lens by 2 times. die Brennweite des Zoom-Objektivs. zoomlens. Der Konverter hat bei einer Videokamera keinen Einflu? auf die Menge des Het bevestigen van deze lens op de camcorder heeft geen invloed op de Attachment of this lens to the video camera recorder has no effect on light One-Touch transmission nor on the sharpness of focus. einfallenden Lichts oder die Fokussierung. lichtdoorlaat noch de scherpstelling. Tele-Conversion Lens Notes on use Hinweise zur Verwendung Opmerkingen bij het gebruik • Set the video camera to T (maximum telescopic point). This lens can only be • Stellen Sie an der Videokamera die Position T (maximaler Telebereich) ein. Der • Zet de camcorder op T (maximum tele). Deze lens kan alleen worden gebruikt Konverter kann nur verwendet werden, wenn an der Kamera die Position T used when set to T (telescopic). It will be eclipsed if set to W (wide). in de stand T (tele). In de stand W (breed) is het beeld onscherp. • Avoid rough handling or mechanical shock to the video camera recorder, (Telebereich) eingestellt ist. Wenn an der Kamera die Position W (Weitwinkel) • Stel de camcorder niet bloot aan ruwe behandeling noch schokken, vooral eingestellt ist, erscheint kein Bild. especially when the lens is attached. wanneer de lens is bevestigd. Operating Instructions • Avoid keeping the lens in a very hot or humid place for a long period of time • Behandeln Sie die Videokamera pfleglich, und schutzen Sie sie vor Sto?en, • Bewaar de lens niet gedurende lange tijd op een zeer warme of vochtige plaats besonders, wenn der Konverter angebracht ist. to prevent mold. om schimmelvorming te vermijden. Mode d’emploi • Take the conversion lens off when transporting. • Bewahren Sie den Konverter nicht langere Zeit an einem hei?en oder feuchten • Verwijder de lens tijdens het transport. Ort auf, da es andernfalls zu Schimmelbildung kommen kann. • Always attach the lens cap when storing. • Bevestig altijd de lenskap wanneer u de lens niet gebruikt. Bedienungsanleitung • Nehmen Sie den Konverter ab, wenn Sie die Kamera transportieren wollen. • Bringen Sie immer die Objektivschutzkappe an, wenn Sie den Konverter Manual de instrucciones Attachment (See illustrations) langere Zeit nicht verwenden. Bevestiging (zie illustraties) The size is marked on the accessory adaptor. De maat is aangegeven op de accessoire-adapter. Gebruiksaanwijzing When the lens hood of the video camera recorder is detachable, first remove the Anbringen des Konverters (siehe Abbildungen) Verwijder eerst de lenskap van de camcorder wanneer die kan worden Istruzioni per l’uso lens hood. Die Gro?e ist auf dem Zubehoradapter angegeben. verwijderd. 1 Install an adaptor marked with the same size as the lens. t 1 Wenn die Gegenlichtblende der Videokamera abgenommen werden kann, 1 Monteer een adapter met dezelfde maat als de lens. t 1 Manual de instrucoes 2 Remove the caps of tele-conversion lens. nehmen Sie zunachst die Gegenlichtblende ab. 2 Haal de kappen van de telelens. 3 Attach the tele-conversion lens firmly to the adaptor attached to the video 1 Bringen Sie einen Adapter derselben Gro?e wie der Konverter an. t 1 3 Bevestig de telelens stevig op de adapter op de camcorder. t 2 Bruksanvisning camera recorder. t 2 2 Nehmen Sie die Kappen des Telekonverters ab. Инcтpyкция по зкcплyaтaции 3 Bringen Sie den Telekonverter fest am Adapter an der Videokamera an. t 2 Scherpstelling Focusing AR Fokussieren • Stel scherp met de scherpstelring van de camcorder in de beeldzoeker of naar • Focus with the video camera recorder’s focus ring by watching the viewfinder het monitorscherm te kijken. CT or monitor screen. • Stellen Sie das Bild im Sucher oder auf dem Monitorbildschirm mit dem • Stel handmatig scherp wanneer u problemen ondervindt bij het automatisch • Use manual focus if it proves difficult to focus some video cameras having an Fokussierring der Videokamera scharf. scherpstellen. KR auto focus function. • Bei manchen Kameras mit Autofokus la?t sich das Bild unter Umstanden nur schwer scharfstellen. Stellen Sie in diesem Fall den Fokus manuell ein. Opmerkingen bij het scherpstellen Notes on focusing • Stel handmatig scherp bij gebruik van de PROGRAM AE functie. In de stand AUTO kan niet goed worden scherpgesteld. VCL-ES20A • Focus the video camera manually when using the PROGRAM AE function. If Hinweise zum Fokussieren • Indien u op oneindig scherpstelt, kan het beeld onscherp zijn. • Stellen Sie den Fokus an der Videokamera manuell ein, wenn Sie die Funktion you set focus to AUTO mode, focus may not be clear. • If you set focus to infinity mode, focus is unclear. PROGRAM AE verwenden. Wenn der Fokus auf AUTO eingestellt ist, la?t sich das Bild moglicherweise nicht scharfstellen. Reiniging © 2000 Sony Corporation Printed in Japan Cleaning • Wenn Sie die Unendlicheinstellung wahlen, la?t sich das Bild nicht Verwijder stof van de lens met behulp van een blaasborstel of een zachte To remove dust on the lens, use a blower brush or a soft cleaning brush. scharfstellen. reinigingsborstel. To remove fingerprints or smudges, clean with mild detergent and a soft cloth. Verwijder vingerafdrukken en vuil met een mild zeepsopje en een zachte doek. Reinigung Entfernen Sie Staub mit einem Staubblaser oder einem weichen Reinigungspinsel Specifications vom Konverter. Technische gegevens Magnification Fingerabdrucke oder sonstige Verschmutzungen entfernen Sie mit einem milden Lensvermogen 2 ? Reinigungsmittel und einem weichen Tuch. 2 ? 1 Lens structure Lensstructuur 3 groups, 3 elements Technische Daten 3 groepen, 3 elementen Dimensions Afmetingen Maximum diameter Approx. o 58 mm (2 3 / 8 inch), Length Approx. 48 mm Vergro?erung Maximum diameter ong. o 58 mm, lengte ong. 48 mm (1 15 / 16 inch) 2 ? Gewicht (zonder kappen en adapters) Mass (excluding the caps and adaptors) Objektivaufbau Ong. 100 g Approx. 100 g 3 Gruppen, 3 Elemente Meegeleverde toebehoren Accessories supplied Abmessungen Lenskappen (2) (voor de voorkant en de achterkant van de lens), draagtas (1), Lens caps (2) (for the front and back of the lens), Carrying Pouch (1), Maximaler Durchmesser ca. o 58 mm, Lange ca. 48 mm gebruiksaanwijzing (1), adapter (3: 30 mm, 37 mm, 52 mm) Instruction manual (1), Adaptors (3: 30 mm (1 9 / 16 inch), 37 mm (1 1 / 2 inch), Gewicht (ohne Kappen und Adapter) Wijzigingen in ontwerp en technische gegevens voorbehouden zonder 52 mm (2 1 / 8 inch) ) ca. 100 g Mitgeliefertes Zubehor voorafgaande kennisgeving. Design and specifications are subject to change without notice. Objektivschutzkappen (2) (fur die Vorder- und die Ruckseite des Konverters), Deze aanduiding kenmerkt dit product als een originele Tragebeutel (1), Bedienungsanleitung (1), Adapter (3: 30 mm, 37 mm, 52 mm) accessoire voor Sony videoapparatuur. Het is aanbevolen voor This mark indicates that this product is a genuine accessory for Sony video products. When purchasing Sony video products, Anderungen, die dem technischen Fortschritt dienen, bleiben vorbehalten. Sony videoapparatuur uitsluitend de originele accessoires aan Sony recommends that you purchase accessories with this te schaffen, die zijn voorzien van dit “GENUINE VIDEO “GENUINE VIDEO ACCESSORIES” mark. Dieses Logo zeigt an, dass es sich bei diesem Produkt um ACCESSORIES” beeldmerk. Originalzubehor fur Videogerate von Sony handelt. Wenn Sie Videogerate von Sony erwerben, achten Sie bitte auch beim Francais Kauf von Zusatzkomponenten und -geraten darauf, da? sie mit Italiano dem Logo “GENUINE VIDEO ACCESSORIES” gekennzeichnet Avant d’utiliser cet objectif de teleconversion, veuillez lire attentivement ce sind. Prima di utilizzare questo obiettivo di teleconversione, leggere attentamente il mode d’emploi et le conserver pour toute reference ulterieure. presente manuale e conservarlo per riferimenti futuri. 2 L’objectif de teleconversion Sony VCL-ES20A a ete concu pour les camescopes et Espanol L’obiettivo di teleconversione VCL-ES20A e stato progettato per essere utilizzato les appareils photo numeriques Sony. L’objectif double la longueur focale du con una videocamera e con una macchina fotografica ferma digitale Sony. zoom. Antes de utilizar este objetivo de conversion de telefoto, lea este manual Questo obiettivo aumenta di due volte la lunghezza focale dello zoom. Le fait de fixer cet objectif sur le camescope n’a aucun effet sur la transmission de atentamente y conservelo para consultarlo en el futuro. L’inserimento dell’obiettivo nella videocamera non ha alcun effetto sulla la lumiere, ni sur la mise au point. El objetivo de conversion de telefoto Sony VCL-ES20A esta disenado para trasmissione della luce ne sulla nitidezza della messa a fuoco. utilizarse con videocamaras y camaras digitales de imagen fija Sony. El objetivo Remarques sur l’utilisation aumenta la distancia focal del objetivo zoom 2 veces. Note sull’utilizzo La instalacion de este objetivo en la videocamara no tendra efecto en la • Reglez le camescope sur T (angle teleobjectif maximal). Cet objectif peut etre transmision de la luz ni en la nitidez del enfoque. • Impostare la videocamera su T (punto telescopico massimo). Questo obiettivo, utilise seulement avec le reglage effectue sur T (teleobjectif). La mise au point infatti, puo essere utilizzato solo se e impostato su T (telescopico). Se viene ne sera pas correcte si le reglage est effectue sur W (position grand angle). Notas sobre la utilizacion impostato su W (ampio), l’immagine apparira oscurata. • Evitez d’exposer le camescope a des manipulation brusques ou des chocs • Maneggiare con cura la videocamera ed evitare di sottoporla ad urti, mecaniques, en particulier lorsque l’objectif est en place. • Ajuste la videocamara a T (punto de vision telescopica maxima). Utilice este specialmente quando e inserito l’obiettivo. • Evitez de laisser l’objectif dans des endroits tres chauds ou tres humides, afin objetivo solamente cuando la ajuste en T (vista telescopica). Se eclipsara si se • Non lasciare l’obiettivo in luoghi soggetti a calore o umidita eccessivi per d’eviter les moisissures. ajusta en W (panoramico). periodi di tempo prolungati, onde evitare eventuali formazioni di muffa. • Avant de transporter le camescope, enlevez l’objectif de conversion. • Evite manejar con rudeza la videocamara, y golpearla, especialmente cuando • Rimuovere l’obiettivo dalla videocamera durante il trasporto. le instale el objetivo. • Laissez toujours les capuchons d’objectif en place quand vous n’utilisez pas • Evite guardar el objetivo en un lugar muy calido o humedo durante mucho • Applicare sempre il copriobiettivo quando l’obiettivo non e in uso. l’objectif. tiempo a fin de evitar la formacion de moho. • Antes de transportar la videocamara, quitele el objetivo de conversion. Installazione (vedere l’illustrazione) Fixation (voir les illustrations) • Antes de guardar el objetivo, coloquele las tapas. La dimensione e indicata sull’adattatore accessorio. Le format est inscrit sur l’adaptateur d’accessoires. Si le pare-soleil du camescope Rimuovere prima il copriobiettivo se e estraibile. When removing est amovible, otez-le d’abord. Instalacion (Consulte las ilustraciones) 1 Installare un adattatore della stessa dimensione dell’obiettivo. t 1 1 Installez un adaptateur dont le format est le meme que celui de l’objectif. El tamano esta marcado en el adaptador para accesorios. 2 Rimuovere i cappucci di protezione dell’obiettivo di teleconversione. Retrait Cuando el parasol de la videocamara sea desmontable, quitelo en primer lugar. t 1 3 Inserire saldamente l’obiettivo di teleconversione nell’adattatore collegato alla Abnehmen 2 Otez les capuchons de l’objectif de teleconversion. 1 Instale un adaptador marcado con el mismo tamano que el del objetivo. t 1 videocamera. t 2 Al extraerlo 3 Fixez fermement l’objectif de teleconversion sur l’adaptateur fixe au 2 Quite las tapas del objetivo de conversion de telefoto. 3 Fije el objetivo de conversion de telefoto firmemente al adaptador instalado Verwijderen camescope. t 2 Messa a fuoco en la videocamara. t 2 Rimozione • Per la messa a fuoco, utilizzare il regolatore di focalizzazione della Mise au point videocamera e osservare l’immagine nel mirino o sullo schermo del monitor. Enfoque • Faites la mise au point a l’aide de la bague de mise au point du camescope en • Enfoque con el anillo de enfoque de la videocamara observando el visor o la • Utilizzare la messa a fuoco manuale se la focalizzazione risulta difficile con regardant dans le viseur ou l’ecran du moniteur. pantalla del monitor. videocamere che dispongono della funzione di messa a fuoco automatica. • Faites la mise au point manuelle si vous n’arrivez pas a la faire sur certains • Si es dificil enfocar con algunas videocamaras con funcion de enfoque Note sulla messa a fuoco camescopes avec autofocus. automatico, utilice el enfoque manual. • Utilizzare la messa a fuoco manuale quando e attivata la funzione PROGRAM Remarques sur la mise au point Notas sobre el enfoque AE. La messa a fuoco potrebbe risultare non chiara se e stata impostata su • Faites la mise au point de votre camescope manuellement lorsque vous utilisez • Realice el enfoque de la videocamara manualmente cuando utilice la funcion AUTO. la fonction PROGRAM AE. Si vous reglez la mise au point sur AUTO, elle PROGRAM AE. Si ajusta el enfoque en el modo AUTO, puede no ser nitido. • La messa a fuoco potrebbe risultare non chiara se e stata impostata sul modo n’est pas nette. • Si ajusta el enfoque en el modo infinito, dicho enfoque no sera nitido. infinito. • Si vous reglez la mise au point sur infini, elle n’est pas nette. Limpieza Pulizia Nettoyage Para limpiar el polvo del objetivo, utilice un cepillo soplador o un cepillo Per eliminare la polvere dall’obiettivo, utilizzare un soffietto o una spazzola di Pour depoussierer l’objectif, utilisez un pinceau soufflant ou une brosse douce. limpiador suave. pulizia morbida. Les traces de doigt et les taches rebelles s’enlevent avec un chiffon doux imbibe Para eliminar las huellas dactilares o las manchas, utilice un pano suave Per eliminare impronte o altre macchie, utilizzare un detergente delicato e un d’une solution savonneuse neutre. humedecido en una solucion poco concentrada de detergente. panno morbido. Specifications Especificaciones Caratteristiche tecniche Ampliacion Ingrandimento Puissance de l’objectif 2 ? 2 ? 2 ? Estructura del objetivo Structure de l’objectif 3 grupos, 3 elementos Struttura dell’obiettivo 3 groupes, 3 elements Dimensiones 3 gruppi, 3 elementi Dimensions Diametro maximo aprox. o 58 mm (2 3 / 8 pulgadas), Dimensioni Diametre maximal : env. o 58 mm (2 3 / 8 inch), longueur : env. 48 mm (1 15 / 16 inch) Longitud aprox. 48 mm (1 15 / 16 pulgadas) Diametro massimo circa 58 mm, lunghezza circa 48 mm Poids (sans les capuchons ni les adaptateurs) Peso (excluyendo las tapas y los adaptadores) Peso (esclusi i copriobiettivi e gli adattatori) Env. 100 g Aprox. 100 g Circa 100 g Accessoires fournis Accesorios suministrados Accessori in dotazione Capuchons (2) (pour l’avant et l’arriere de l’objectif), etui de transport (1), Tapas para objetivo (2) (para las partes frontal y posterior del objetivo), Bolsa de Copriobiettivi (2) (per la parte anteriore e posteriore dell’obiettivo), Custodia per mode d’emploi (1), adapteurs (3: 30 mm(1 9 / 16 inch), 37 mm(1 1 / 2 inch), transporte (1) , Manual de instrucciones (1), il trasporto (1) , manuale per il funzionamento (1), adattatore (3: 30 mm, 37 mm, 52 mm(2 1 / 8 inch) ) Adaptadores (3: 30 mm (1 9 / 16 pulgadas), 37 mm (1 1 / 2 pulgadas), 52 mm (2 1 / 8 52 mm) pulgadas) ) La conception et les specifications peuvent etre modifiees sans preavis. Il design e caratteristiche tecniche sono soggetti a modifiche senza preavviso. El diseno y las especificaciones estan sujetos a cambio sin previo aviso. GENUINE VIDEO ACCESSORIES Questo contrassegno indica che si tratta di un prodotto video Ce logo indique qu’il s’agit d’un accessoire d’origine pour le Esta marca indica que este producto es un accesorio genuino originale Sony. Quando si acquistano prodotti video Sony, Sony materiel video Sony. Lorsque vous achetez des produits video para productos de video Sony. Cuando adquiera productos de consiglia di acquistare accessori con questo contrassegno Sony, Sony vous conseille de vous procurer les accessoires video Sony, Sony recomienda que adquiera los que lleven la “GENUINE VIDEO ACCESSORIES”. portant aussi ce logo. marca “GENUINE VIDEO ACCESORIES”.
Portugues                                                  Pyccкий яэык                                                CT
1                                                          Antes de utilizar esta objectiva de teleconversao, leia este manual ate ao fim e  Пepeд иcпользовaниeм этого тeлeобъeктивa внимaтeльно пpочтитe,  Before using this tele-conversion lens, please read this manual thoroughly and
guarde-o para consulta futura.                              пожaлyйcтa, дaнноe pyководcтво и cоxpaнитe eго для дaльнeйшиx cпpaвок.  retain it for future reference.
A lente de teleconversao VCL-ES20A da Sony destina-se a ser utilizada com as  Teлeобъeктив Sony VCL-ES20A пpeднaзнaчeн для иcпользовaния c  The Sony VCL-ES20A tele-conversion lens is designed for use with the Sony
camaras de video e com as maquinas fotograficas digital da Sony. A objectiva  видeокaмepой или цифpовой фотокaмepой Sony.  Этот объeктив в 2 paзa  video camera recorder and digital still camera. The lens increases the focal length
aumenta a distancia focal de zoom para o dobro.             yвeличивaeт фокycноe paccтояниe тpaнcфокaтоpa.             of the zoom lens by 2 times.
A montagem desta objectiva na camara de video nao tem efeitos sobre a  Пpиcоeдинeниe этого объeктивa к видeокaмepe нe влияeт ни нa пepeдaчy  Attachment of this lens to the video camera recorder has no effect on light
transmissao da luz ou a nitidez de focagem.                 cвeтa, ни нa чeткоcть фокycиpовки.                         transmission nor on the sharpness of focus.
Notas sobre a utilizacao                                    Пpимeчaния по иcпользовaнию                                Notes on use
• Пepeвeдитe видeокaмepy в peжим T (мaкcимaльного выдвижeния объeктивa).
• Regule a camara de video para a posicao T (angulo maximo teleobjectiva). Esta  Этот объeктив можно иcпользовaть только в peжимe T (выдвижной  • Set the video camera to T (maximum telescopic point).  This lens can only be
objectiva so pode ser utilizada se a regulacao for T (teleobjectiva). Se a regular  объeктив).  Ecли ycтaновлeн peжим W (шиpокоyгольный), фокycиpовкa бyдeт  used when set to T (telescopic).  It will be eclipsed if set to W (wide).
para W (grande angular) sera eclipsada.                    нeпpaвильной.                                             • Avoid rough handling or mechanical shock to the video camera recorder,
• Manuseie a camara com cuidado e nao a exponha a choques fortes, sobretudo  • He допycкaйтe гpyбого обpaщeния c видeокaмepой или мexaничecкиx yдapов  especially when the lens is attached.
com a lente montada.                                       по нeй, оcобeнно, когдa пpикpeплeн этот объeктив.         • Avoid keeping the lens in a very hot or humid place for a long period of time
• Evite guardar a objectiva, durante muito tempo, num local muito quente ou  • He оcтaвляйтe этот объeктив нa длитeльноe вpeмя в мecтax c повышeнной  to prevent mold.
humido  para evitar o bolor.                               тeмпepaтypой или влaжноcтью во избeжaниe появлeния плeceни.  • Take the conversion lens off when transporting.
• Quando transportar a camara retire a objectiva de teleconversao.  • Пpи тpaнcпоpтиpовкe этот объeктив cлeдyeт cнять.  • Always attach the lens cap when storing.
• Nao guarde a objectiva sem colocar a tampa respectiva.    • Пpи xpaнeнии обязaтeльно зaкpывaйтe объeктив кpышкой.
Attachment (See illustrations)
Montagem (Consulte as figuras)                              Пpикpeплeниe (cм. pиcyнки)
The size is marked on the accessory adaptor.
O tamanho esta indicado no adaptador do acessorio.          Paзмep yкaзaн нa aдaптepe дополнитeльныx ycтpойcтв.        When the lens hood of the video camera recorder is detachable, first remove the
Se a tampa da objectiva da camara de video for amovivel, retire-a primeiro.  Ecли блeндa объeктивa нa видeокaмepe cъeмнaя, cнaчaлa cнимитe блeндy.  lens hood.
2                                                          1 Monte um adaptador cuja marca tenha um tamanho igual ao da objectiva.  1 Уcтaновитe aдaптep, cоотвeтcтвyющий paзмepy объeктивa. t 1  1 Install an adaptor marked with the same size as the lens. t 1
2 Cнимитe кpышки тeлeобъeктивa.
t 1
2 Remove the caps of tele-conversion lens.
2 Retire as tampas da objectiva de teleconversao.           3 Aккypaтно пpиcоeдинитe тeлeобъeктив к aдaптepy, зaкpeплeнномy нa  3 Attach the tele-conversion lens firmly to the adaptor attached to the video
3 Monte bem a objectiva de teleconversao no adaptador instalado na camara de  видeокaмepe. t 2                           camera recorder. t 2
video. t 2
Фокycиpовкa                                                Focusing
Focagem                                                     • Bыполнитe фокycиpовкy c помощью кольцa фокycиpовки видeокaмepы, глядя  • Focus with the video camera recorder’s focus ring by watching the viewfinder
в видоиcкaтeль или нa экpaн монитоpa.                       or monitor screen.
• Foque utilizando o anel de focagem da camara de video olhando para o visor
electronico ou o ecra do monitor.                         • Поcколькy фокycиpовкa нa нeкотоpыx кaмepax c фyнкциeй aвтомaтичecкой  • Use manual focus if it proves difficult to focus some video cameras having an
• Utilize a focagem manual se tiver dificuldades de focagem nalgumas camara  фокycиpовки зaтpyднeнa, иcпользyйтe pyчнyю фокycиpовкy.  auto focus function.
de video equipadas com a funcao de focagem manual.        Зaмeчaния по фокycиpовкe                                   Notes on focusing
Notas sobre a focagem                                       • Пpи иcпользовaнии фyнкции PROGRAM AE выполняйтe фокycиpовкy  • Focus the video camera manually when using the PROGRAM AE function. If
видeокaмepы вpyчнyю. Ecли для фокycиpовки ycтaновлeн peжим AUTO,
• Quando utilizar a funcao PROGRAM AE, faca a focagem manualmente. Se  фокycиpовкa можeт быть нeчeткой.                  you set focus to AUTO mode, focus may not be clear.
regular a focagem para AUTO, esta pode nao ficar nitida.  • Ecли ycтaновлeн peжим бecконeчного фокyca, фокycиpовкa бyдeт нeчeткой.  • If you set focus to infinity mode, focus is unclear.
• Se regular a focagem para o modo infinito, esta nao fica nitida.
Чиcткa                                                     Cleaning
Limpeza                                                     Для yдaлeния пыли c объeктивa иcпользyйтe щeткy пылecоca или мягкyю щeткy  To remove dust on the lens, use a blower brush or a soft cleaning brush.
Para retirar a sujidade da objectiva, utilize a escova de um soprador ou uma  для чиcтки.                              To remove fingerprints or smudges, clean with mild detergent and a soft cloth.
escova de limpeza macia.                                    Для yдaлeния отпeчaтков пaльцeв или пятeн иcпользyйтe cлaбый pacтвоp
Para retirar as dedadas ou manchas, limpe com um detergente suave e um pano  моющeго cpeдcтвa и мягкyю ткaнь.          Specifications
macio.
Texничecкиe xapaктepиcтики                                 Magnification
2 ?
Caracteristicas tecnicas
Oптичecкaя cилa объeктивa                                  Lens structure
Aumento                                                        2 ?                                                        3 groups, 3 elements
2 ?                                                      Cтpyктypa объeктивa                                        Dimensions
Estrutura da objectiva                                         3 гpyппы, 3 элeмeнтa                                       Maximum diameter Approx. o 58 mm (2  3 / 8  inch), Length Approx. 48 mm
Quando retirar                                                                                                         Paзмepы                                                       (1  15 / 16  inch)
3 grupos, 3 elementos
Ta bort                                                    Dimensoes                                                      Maкcимaльный диaмeтp пpибл. o 58 мм, длинa пpибл. 48 мм  Mass  (excluding the caps and adaptors)
Diametro maximo Aprox. o 58 mm (2  3 / 8  polegadas), Comprimento aprox. 48 mm  Macca (бeз кpышeк и aдaптepов)         Approx. 100 g
Пpи yдaлeнии                                                                                                              Пpибл. 100 г                                            Accessories supplied
(1  15 / 16  polegadas)                                  Пpилaгaeмыe пpинaдлeжноcти
When removing                                              Peso (excluindo as tampas e os adaptadores)                    Кpышки объeктивa (2) (для пepeднeй и зaднeй cтоpоны объeктивa), фyтляp для  Lens caps (2) (for the front and back of the lens), Carrying Pouch (1),
Instruction manual (1), Adaptors (3: 30 mm (1  9 / 16  inch), 37 mm (1  1 / 2  inch),
When removing                                                 Aprox. 100 g                                                пepeноcки (1), pyководcтво по экcплyaтaции (1), aдaптep (3: 30 мм, 37 мм, 52 мм)  52 mm (2  1 / 8  inch) )
Acessorios fornecidos
When removing                                                 Tampas da objectiva (2) (para a parte da frente e a parte de tras da objectiva),  Конcтpyкция и тexничecкиe xapaктepиcтики могyт измeнятьcя бeз  Design and specifications are subject to change without notice.
пpeдвapитeльного yвeдомлeния.
Estojo de transporte (1), Manual de instrucoes (1), Adaptador (3: 30 mm (1  9 / 16
polegadas), 37 mm (1  1 / 2  polegadas), 52 mm (2  1 / 8  polegadas))                                                              This mark indicates that this product is a genuine accessory for
Дaннaя мeткa ознaчaeт, что это издeлиe являeтcя подлинной   Sony video products. When purchasing Sony video products,
Design e caracteristicas tecnicas sujeitas a alteracoes sem aviso previo.  пpинaдлeжноcтью для видeоaппapaтypы Sony. Пpи покyпкe      Sony recommends that you purchase accessories with this
видeоaппapaтypы Sony peкомeндyeтcя пpиобpeтaть для нee      “GENUINE VIDEO ACCESSORIES” mark.
Esta marca indica que este produto e um acessorio genuino  пpинaдлeжноcти Sony c мeткой “GENUINE VIDEO
para produtos de video da Sony. Quando adquirir produtos de  ACCESSORIES”.
video da Sony, deve adquirir acessorios com a marca
“GENUINE VIDEO ACCESSORIES”.
KR
AR                                                         BBefore using this tele-conversion lens, please read this manual thoroughly and
Svenska                                                                                                               retain it for future reference.
Before using this tele-conversion lens, please read this manual thoroughly and
Innan du anvander den har teleobjektivet bor du lasa igenom handledningen  retain it for future reference.             The Sony VCL-ES20A tele-conversion lens is designed for use with the Sony
noga och sedan spara den for framtida bruk.                                                                            video camera recorder and digital still camera. The lens increases the focal length
The Sony VCL-ES20A tele-conversion lens is designed for use with the Sony  of the zoom lens by 2 times.
Sonys teleobjektiv VCL-ES20A ar konstruerat for Sonys videokameror och  video camera recorder and digital still camera.  The lens increases the focal  Attachment of this lens to the video camera recorder has no effect on light
digitala stillbildskameror. Objektivet okar teleobjektivets brannvidd 2 ganger.  length of the zoom lens by 2 times.   transmission nor on the sharpness of focus.
Nar du faster det har objektivet pa kameran paverkar du vare sig ljusflode eller  Attachment of this lens to the video camera recorder has no effect on light
fokusering.                                                 transmission nor on the sharpness of focus.
Notes on use
Anvandning                                                  Notes on use                                               • Set the video camera to T (maximum telescopic point).  This lens can only be
used when set to T (telescopic).  It will be eclipsed if set to W (wide).
• Stall videokameran pa T (maximum tele). Det har objektivet kan bara  • Set the video camera to T (maximum telescopic point).  This lens can only be  • Avoid rough handling or mechanical shock to the video camera recorder,
anvandas i laget T (tele). I laget W (vidvinkel) formorkas det.  used when set to T (telescopic).  It will be eclipsed if set to W (wide).  especially when the lens is attached.
• Hantera objektivet varsamt och undvik att utsatta kameran for stotar, sarskilt  • Avoid rough handling or mechanical shock to the video camera recorder,  • Avoid keeping the lens in a very hot or humid place for a long period of time
nar objektivet ar monterat pa den.                         especially when the lens is attached.                       to prevent mold.
• Undvik att forvara objektivet nagon langre tid dar det ar varmt och fuktigt, sa  • Avoid keeping the lens in a very hot or humid place for a long period of time  • Take the conversion lens off when transporting.
undviker du mogelbildning.                                 to prevent mold.                                          • Always attach the lens cap when storing.
• Ta bort objektivet under transporter.                     • Take the conversion lens off when transporting.
• Forvara alltid objektivet med linsskyddet monterat.       • Always attach the lens cap when storing.
Attachment (See illustrations)
Montering (se illustrationerna)                             Attachment (See illustrations)                             The size is marked on the accessory adaptor.
When the lens hood of the video camera recorder is detachable, first remove the
Storleken ar markerad pa tillbehorsadaptern.                The size is marked on the accessory adaptor.               lens hood.
Om kamerans motljusskydd ar lostagbart, bor du forst ta bort det.  When the lens hood of the video camera recorder is detachable, first remove the  1 Install an adaptor marked with the same size as the lens. t 1
1 Montera en adapter som ar markt med samma storlek som objektivet. t 1  lens hood.
1 Install an adaptor marked with the same size as the lens. t 1  2 Remove the caps of tele-conversion lens.
2 Ta av skyddslocken pa teleobjektivet.
3 Fast teleobjektivet ordentligt pa den adapter som ar fast pa videokameran.  2 Remove the caps of tele-conversion lens.  3 Attach the tele-conversion lens firmly to the adaptor attached to the video
camera recorder. t 2
t 2                                                       3 Attach the tele-conversion lens firmly to the adaptor attached to the video
camera recorder. t 2
Focusing
Fokusering
Focusing                                                   • Focus with the video camera recorder’s focus ring by watching the viewfinder
• Stall in fokus med videokamerans fokusring samtidigt som du granskar bilden                                            or monitor screen.
i sokaren eller pa bildskarmen.                           • Focus with the video camera recorder’s focus ring by watching the viewfinder  • Use manual focus if it proves difficult to focus some video cameras having an
• Pa vissa videokameror kan det vara svart att fa den automatiska fokuseringen  or monitor screen.                       auto focus function.
att fungera. I sa fall staller du in skarpan manuellt.    • Use manual focus if it proves difficult to focus some video cameras having an
auto focus function.                                      Notes on focusing
Om fokusering                                                                                                          • Focus the video camera manually when using the PROGRAM AE function. If
• Om du anvander funktionen PROGRAM AE bor du utfora skarpeinstallningen  Notes on focusing                              you set focus to AUTO mode, focus may not be clear.
manuellt. Om du staller fokuseringen pa AUTO kan det handa att du inte far  • Focus the video camera manually when using the PROGRAM AE function. If  • If you set focus to infinity mode, focus is unclear.
fullgod skarpa.                                            you set focus to AUTO mode, focus may not be clear.
• Om du staller fokus pa oandligheten far du ingen skarpa.  • If you set focus to infinity mode, focus is unclear.     Cleaning
Rengoring                                                   Cleaning                                                   To remove dust on the lens, use a blower brush or a soft cleaning brush.
To remove fingerprints or smudges, clean with mild detergent and a soft cloth.
Blas bort damm fran objektivet med en blasborste eller en mjuk linsborste.  To remove dust on the lens, use a blower brush or a soft cleaning brush.
Om du behover torka bort fingeravtryck eller fastsittande smuts, kan du  To remove fingerprints or smudges, clean with mild detergent and a soft cloth.
anvanda ett milt rengoringsmedel och en mjuk duk.                                                                      Specifications
Specifications                                             Magnification
Specificationer                                                                                                           2 ?
Magnification                                              Lens structure
Forstoring                                                     2 ?                                                        3 groups, 3 elements
2 ?                                                      Lens structure                                             Dimensions
Linsens uppbyggnad                                             3 groups, 3 elements                                       Maximum diameter Approx. o 58 mm (2  3 / 8  inch), Length Approx. 48 mm
3 grupper, 3 element                                     Dimensions                                                    (1  15 / 16  inch)
Matt                                                           Maximum diameter Approx. o 58 mm (2  3 / 8  inch), Length Approx. 48 mm  Mass  (excluding the caps and adaptors)
Max diameter ca. o 58 mm, langd ca. 48 mm                   (1  15 / 16  inch)                                         Approx. 100 g
Vikt (utan skyddslock och adaptrar)                         Mass  (excluding the caps and adaptors)                    Accessories supplied
ca. 100 g                                                   Approx. 100 g                                              Lens caps (2) (for the front and back of the lens), Carrying Pouch (1),
Medfoljande tillbehor                                       Accessories supplied                                          Instruction manual (1), Adaptors (3: 30 mm (1  9 / 16  inch), 37 mm (1  1 / 2  inch),
Skyddslock (2) (for objektivets fram- och baksida), Barvaska (1), Bruksanvisning  Lens caps (2) (for the front and back of the lens), Carrying Pouch (1),  52 mm (2  1 / 8  inch) )
(1), Adapter (3: 30 mm, 37 mm, 52 mm)                       Instruction manual (1), Adaptors (3: 30 mm (1  9 / 16  inch), 37 mm (1  1 / 2  inch),
52 mm (2  1 / 8  inch) )                                Design and specifications are subject to change without notice.
Ratt till andring av matt och specifikationer forbehalles.
Design and specifications are subject to change without notice.           This mark indicates that this product is a genuine accessory for
Det har market visar att produkten ar ett originaltillbehor till                                                       Sony video products. When purchasing Sony video products,
Sonys videoprodukter. Du rekommenderas att alltid kopa     This mark indicates that this product is a genuine accessory for  Sony recommends that you purchase accessories with this
tillbehor som ar markta med det har market, “GENUINE       Sony video products. When purchasing Sony video products,   “GENUINE VIDEO ACCESSORIES” mark.
VIDEO ACCESSORIES”.                                        Sony recommends that you purchase accessories with this
“GENUINE VIDEO ACCESSORIES” mark.