На сайте 123381 инструкция общим размером 499.28 Гб , которые состоят из 6234181 страницы
Фото


Руководство пользователя SJCAM SJ4000. Основные функции, характеристики и условия эксплуатации изложены на 48 страницах документа в pdf формате.
Доступно к просмотру 15 страниц. Рекомендуем вам скачать файл инструкции, поскольку онлайн просмотр документа может сильно отличаться от оригинала.
Warning
1 It is a high-precision product, do not fall or crash.
2. Do not expose the unit to strong magnetic objects, such as magnet and electrical motor. Avoid strong radio waves. Strong magnetic fields may cause
the products breakdown or images and sounds damage.
3 Never leave the products exposed to high temperatures and direct sunlight.
4 Please choose branded Micro SD card. Neutral cards are not guaranteed to work normally.
5 Do not place Micro SD card near strong magnetic objects to avoid data loss.
6 In case of overheating, smoke, or unpleasant smell in the process of charging, unplug your device immediately to prevent fire hazard.
7 While it is charging, keep the product out of children’s reach. Power line may cause children accidental suffocation or electric shock.
8 Keep the device in cool, dry and dust-proof places.
Preface
This product  is a high-definition digital  motion  video recording  device tailored to  market demand. It has  a  variety of industry-leading features
including digital video recording, photo shooting, audio recording, video display and detachable battery, which makes it perfect for vehicle data
recording, photo-shooting, outdoor sports, home security, deep-water probing, etc., allowing you to film at anytime, anywhere. And it has a variety of
patents.
FPV
Product Features
>A water-resistant casing that allows you to film fascinating water sports; water-resistant up to 30 meters under water
>High definition screen that displays and replays fascinating videos recorded
>Detachable battery that is easy to replace and prolongs your camera’s service life
>Video recording while charging
>Video recording with battery
>12-megapixel HD wide-angle lens
>HDMI HD output
>Web camera
> Support storage cards up to 32GB maximum
> Multiple video recording formats: 1080P      720P      WVGA
> Recorded in MOV format
>Multiple photo shooting modes: Single shot, Snapper
> Video encryption enabled
> Mini appearance, diversified colors available
1
1. Insertinng Micro SD Card
Note: Pllease choosee branded Miicro SD cardd and format  it on compuuter before  uuse. Neutral  cards are noot guaranteedd to work
normallyy.
2. Installinng and remooving batteriees
A Presss on battery cap to open it.
B Corrrectly install battery into ccamera as inddicated by +/--  symbols aand direction
of arrrows markedd on battery uuntil it’s in pllace.
C Batttery Gauge: PPlease refer too diagram.
D Remmove Battery:: Open cap too take battery out.
3. Charginng
A Chaarging can bee done by  eeither conneccting SJ40000 to computeer or power
adapptor.
B Chaarge SJ4000 oon vehicle by connecting itt to car chargger.
C SJ40000 can recoord video whhile chargingg  (Switch intoo Vehicle-mounnted Mode in
“Menu”)
D Chaarging of SJ40000 can be doone even wheen it’s powereed off.
4. Switchinng camera oon and off
A Presss and hold poower switch ffor 3 to 5 seconds to turn iit on / off.
B Switch it on and off by turninng display screen on and offf.
5. Mode SSwitching
Switch bettween video rrecording / phhoto shootingg / playback / menu by pressing “Powerr On-Off” buttton.
recording mode, while    photto shooting mmode. Symbolls are displayyed on top off screen.     Refers to thhe function
of video playyback, and the last one is systtem settings.
6. How to record videos and configure recordiing setting
1. Video Recording
Switchh to recordingg mode and thhere’ll be an   iconn in the upperr left corner
of the screen. Presss OK to start recording andd the    icon in thee upper left
cornerr will start to flash. Press ““OK” again iff you want too stop and thee
icon wwill disappearr.
2. Photo shooting & SSettings
Switchh the camera on and press   “Mode” to select “Photo shooting Mo de”, there’ll
be an   icon iin the upper lleft corner of display screeen and the cammera is in
9
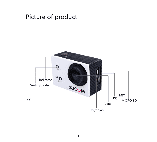
photo shooting mode. Press “OK” to take photos.
Shooting Pattern: Single shot / Self-timer (2s/5s/10s) / Continuous Shooting
3.    File Storage & Playing
After you are done recording, use a USB cable to export the videos onto a
computer to play. Or you can take the Micro SD card out and access the image
data with a card reader.
Liquid Crystal Display (LCD)   1.5LTPS
Lens       170°A+ HD wide-angle lens
Language Options   English / German / French / Spanish / Italian
Portuguese  / Chinese Traditional  / Chinese
Simplified / Japanese / Russian
Resolution  of  Videos  080P   (1920*1080 )   30FPS
Recorded   720P    (1280*720)    60FPS
VGA   ( 848*480)     60FPS
QVGA  (640*480)     60FPS
Video Format     MOV
Compressed Format of Videos   H.264
Resolution of Photos     12M / 8M / 5M
Storage    Micro SD
Shooting Mode   Single Shot / Self-timer (2s / 5s /  10s /
Continuous Shooting
Frequency of Optical Source   50Hz / 60Hz
USB Interface   USB2.0
Power Source Interface   5V1A
Battery Capacity   900MAH
Power Dissipation   400mA@4.2V
Recording Time   1080P/ About 70 minutes
Charging Time   About 3hours
Operating System (OS)   Windows XP/VistaorAbove/Win7/Mac os
Dimension  59.27*41.13*29.28
Note: Specifications could be subject to modification due to upgrading or updating. Please regard the actual product as the standard
form.
10