На сайте 123434 инструкции общим размером 499.46 Гб , которые состоят из 6236200 страниц
Фото
Руководство пользователя MIDLAND XTC-300 action camera. Основные функции, характеристики и условия эксплуатации изложены на 2 страницах документа в pdf формате.
Доступно к просмотру 2 страницы. Рекомендуем вам скачать файл инструкции, поскольку онлайн просмотр документа может сильно отличаться от оригинала.
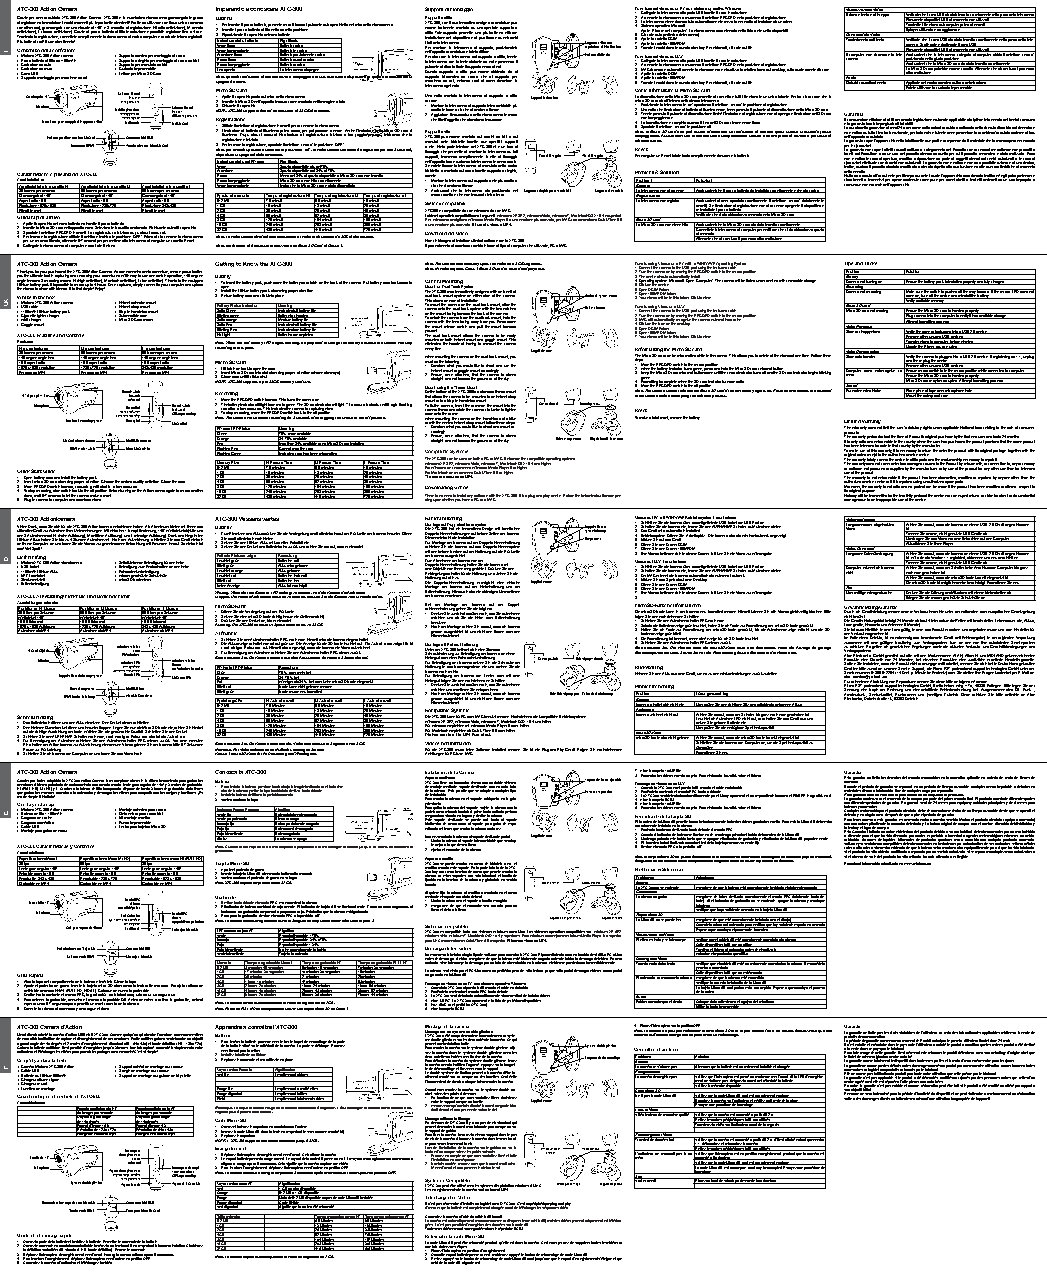
XTC-300 Action Camera Imparando a conoscere XTC-300 Supporti di montaggio Download dei video su un PC con sistema operativo Windows Visualizzazione Video 1. Collegate la telecamera alla porta USB tramite il cavo in dotazione. Il video e lento e si inceppa Verificate che il cavo USB sia stato inserito correttamente nella presa della telecamera Grazie per aver acquistato XTC-300 Action Camera. XTC-300 e la nuovissima videocamera grandangolo in grado Batteria Supporti a slitta 2. Accendete la videocamera muovendo il selettore RECORD nella posizione di registrazione. Rimuovete dispositivi USB al momento non utilizzati di registrare ed immortalare i vostri momenti piu importanti e divertenti! Facile da utilizzare con il suo unico comando 1. Per inserire il pacco batteria, premete verso il basso il pulsante sul coperchietto nel retro della videocamera. XTC-300, con il suo innovativo design a scanalature puo 3. La telecamera viene riconosciuta automaticamente senza la necessita di installare alcun driver. Trasferite i file video sul computer prima di vederli (on-off/record), grandangolo con una visuale di 140° e 3 modalita di registrazione: HI (alta definizione), M (media essere facilmente montata su uno speciale supporto a 4. Sistema operativo Microsoft: Aprite ‘Risorse del computer’. La videocamera sara elencata nella lista delle unita disponibili. definizione), L (bassa definizione). Grazie al pacco batteria al litio in dotazione e possibile registrare fino a 4 ore. 2. Inserite il pacco batteria al litio nella corretta posizione. slitta. Tale supporto permette una piu facile ed efficace 5. Cliccate sulla periferica (telecamera). Il player utilizzato e da aggiornare 3. Riposizionate il coperchio del vano batterie Terminata la registrazione, connettete semplicemente la videocamera al vostro computer e scaricate i video registrati. installazione del dispositivo e si puo fissare su entrambi 6. Aprite la cartella DCIM. Download del Video Piu facile di cosi! Buon divertimento! Indicatore stato batteria Significato i lati della telecamera. Supporto a slitta con 7. Aprite la cartella 100MEDIA. Trasferimento dati lento Verificate che il cavo USB sia stato inserito correttamente nella presa della tele- Verde fisso Batteria carica Per montare la telecamera al supporto, posizionatela regolazione dell’inclinazione camera. Scollegate e ricollegate il cavo USB Contenuto della confezione Verde lampeggiante Batteria in carica 8. Trovate i vostri video in questa directory. Per visionarli, cliccate sul file. Rimuovete dispositivi USB al momento non utilizzati I nell’apposita scanalatura e fatela slittare. › Midland XTC-300 Action camera › Supporto adesivo per montaggio al casco Arancione fisso Batteria parzialmente carica Per staccare la telecamera dal supporto a slitta, tenete Pulsante di rilascio Download dei video su MAC Il computer non riconosce la tele- Assicuratevi che la telecamera collegata al computer abbia il selettore “record” › Pacco batteria al litio da 1100mAh › Supporto a cinghia per montaggio al casco da bici Rosso fisso Batteria quasi scarica la telecamera con la lente distante da voi e premendo il 1. Collegate la telecamera alla porta USB tramite il cavo in dotazione. camera posizionato nella giusta posizione › Caricatore da auto › Supporto per manubrio da bici Rosso lampeggiante Batteria scarica pulsante di rilascio tirate il supporto verso di voi. 2. Accendete la videocamera muovendo il selettore RECORD nella posizione di registrazione. Assicuratevi che la Micro SD card sia stata inserita correttamente › Caricatore da muro › Custodia impermeabile Led spento La telecamera si spegne 3. MAC riconosce automaticamente la videocamera e visualizza la relativa icona sul desktop, sulla quale dovete cliccare. La Micro SD card potrebbe essere corrotta. Attendete che si concluda il processo › Cavo USB › Lettore per Micro SD Card Questo supporto a slitta puo essere abbinato sia al 4. Aprite la cartella DCIM. di formattazione › Supporto montaggio per maschere da sci Nota: quando l’indicatore di batteria inizia a lampeggiare rosso, ricaricate il dispositivo in quanto la telecamera si supporto bi-adesivo da casco che al supporto per 5. Aprite la cartella 100MEDIA. Audio spegnera a breve. maschera da sci, evitando cosi di dover rimontare la 6. Trovate i vostri video in questa directory. Per visionarli, cliccate sul file. Disturbi causati dal vento Applicate del nastro adesivo sul foro del microfono telecamera ogni volta. Micro SD Card Come riformattare la Micro SD card Potete utilizzare la custodia impermeabile Selettore Record Grandangolo 140° In avanti: 1. Aprite il coperchio posto sul retro della videocamera Una volta montata la telecamera al supporto a slitta Supporti in dotazione La riformattazione della Micro SD card permette di cancellare tutti i file video in un unico istante. Per far cio occorre che la on/registrazione 2. Inserite la Micro SD nell’apposita fessura come mostrato nell’immagine a lato. occorre: micro SD card sia all’interno della stessa telecamera. Microfono Selettore Record 3. Chiudete il coperchio. 1. Montare la telecamera al supporto intercambiabile piu 1. Posizionate la telecamera in “on” spostando il selettore “record” in posizione di registrazione. Led di registrazione NOTA: XTC-300 supporta fino ad un massimo di 32 GB di memoria. adatto in base a cio che si desidera filmare. 2. Una volta che l’indicatore di batteria si illumina verde, tener premuto il pulsante di riformattazione della Micro SD card. lampeggia rosso Indietro: 2. Aggiustare l’inquadratura della videocamera in modo 3. Tenete premuto il pulsante di riformattazione finche l’indicatore di registrazione non si spenga e l’indicatore dell’SD card Garanzia mentre registra Off/Stop registrazione Registrazione non lampeggi verde. Il consumatore e titolare di diritti secondo la legislazione nazionale applicabile disciplinante la vendita dei beni di consumo Scanalature per montaggio del supporto a slitta Led batteria Led SD Card che filmi l’oggetto che si desidera inquadrare. 4. La formattazione e completa quando il Led dell’SD card rimane verde fisso. e la garanzia lascia impregiudicati tali diritti. 1. Slittate il selettore di registrazione in avanti per accendere la videocamera. 5. Spostate il selettore “record” in posizione off. La durata della garanzia e di mesi 24 a decorrere dalla data di acquisto o dalla data della ricevuta rilasciata dal rivenditore 2. L’indicatore di batteria si illuminera prima rosso, per poi passare a verde. Anche l’indicatore della Micro SD card si Supporti a vite Nota: la Micro SD card non puo essere riformattata se l’indicatore di batteria quasi scarica si accende (rosso ed e valida su tutto il territorio nazionale; per farla valere l’utente deve presentare lo scontrino d’acquisto assieme al box illuminera. Dopo alcuni secondi l’indicatore di registrazione iniziera a lampeggiare rosso, indicando che la lampeggiante). Assicuratevi che le batterie siano completamente cariche o nuove prima di iniziare il processo di Pulsante per riformattazione SD Card Connettore Mini USB registrazione e iniziata. XTC-300 puo essere montata sui caschi da bici o sui riformattazione. dell’apparato acquistato. La garanzia copre l’apparecchio nella totalita delle sue parti e comprende sia il materiale che la manodopera necessaria Interruttore HI/M/L Vano inserimento Micro SD Card 3. Per fermare la registrazione, spostate il selettore “record” in posizione “OFF”. manubri delle biciclette tramite due specifici supporti per le riparazioni. a vite. Nella parte inferiore del XTC-300 vi e un foro di Nota: pur avendo spostato il selettore in posizione “off”, la videocamera continuera a registrare per altri 3 secondi; fissaggio che permette di montare la telecamera su tali Reset La garanzia non copre i difetti causati dall’uso o collegamento del Prodotto con accessori o/e software non prodotti o dopodiche si spegnera definitivamente. Foro di fissaggio Vite di fissaggio Per eseguire un Reset totale basta semplicemente rimuovere la batteria. forniti dal Produttore o da un uso del prodotto diverso da quello per cui il prodotto medesimo e stato realizzato. Essa supporti, inserendo semplicemente la vite di fissaggio non e valida in caso di apertura, modifica o riparazione da parte di soggetti diversi dai centri autorizzati o in caso di Indicatore stato del SD card Significato nell’apposito foro e ruotando la telecamera in senso orario. riparazioni effettuate con ricambi non autorizzati. La garanzia non e valida e non sara possibile azionare alcuna rivalsa, Verde Spazio disponibile piu del 75% Se volete fissare la telecamera al manubrio della vostra inoltre, qualora il prodotto sia stato modificato o alterato rispetto alla sua funzione ed alle sue caratteristiche al momento Arancione Spazio disponibile dal 34% al 75% bicicletta o montarla sul casco tramite supporto a cinghia, Problemi & Soluzioni della vendita. Caratteristiche e pulsanti del XTC-300 Rosso Meno del 34% di spazio disponibile o Micro SD card non inserita. dovete: Nulla sara dovuto all’acquirente per il tempo durante il quale l’apparecchio sara rimasto inattivo ne egli potra pretendere Caratteristiche: Rosso lampeggiante Micro SD card non letta correttamente 1. Montare la telecamera sul supporto a vite piu adatto a Problemi Soluzioni risarcimenti o indennizzi per spese sostenute come pure per danni diretti o indiretti derivanti da un uso improprio o Caratteristiche in modalita HI Caratteristiche in modalita M Caratteristiche in modalita L Verde lampeggiante Indica che la Micro SD card e stata riformattata cio che si desidera filmare. Batteria comunque non normale dell’apparecchio. 30 frames per secondo 60 frames per secondo 60 frames per secondo 2. Assicurarsi che la telecamera sia posizionata nel Supporto a cinghia per casco da bici Supporto al manubrio La telecamera non si accende Assicuratevi che il pacco batteria sia installato correttamente e che sia carico. Grandangolo di 140° Grandangolo di 140° Grandangolo di 140° Spazio di memoria Tempo di registrazione HI Tempo di registrazione M Tempo di registrazione L modo corretto e che non inquadri cielo o terra. Registrazione Aspect ratio 16:9 Aspect ratio 16:9 Aspect ratio 16:9 512 MB 7.5 minuti 6.5 minuti 10 minuti La telecamera non registra Assicuratevi di aver spostato correttamente il selettore “record” (totalmente in Risoluzione 1920x1080 Risoluzione 1280x720 Risoluzione 848x480 1 GB 15 minuti 13 minuti 20 minuti Sistemi compatibili avanti). Se l’indicatore di registrazione non si accende spegnete il dispositivo e Filmati in mp4 Filmati in mp4 Filmati in mp4 2 GB 30 minuti 26 minuti 40 minuti. XTC300 e compatibile sia con Windows sia con MAC. re-installate il pacco batteria. Guida rapida all’uso 4 GB 60 minuti 52 minuti 80 minuti I sistemi operativi compatibili sono i seguenti: Windows XP SP2, Windows Vista, Windows 7, Macintosh OSX 10.4 e superiori. Micro SD card Verificate che ci sia abbastanza memoria nella Micro SD card. 160 minuti Per Windows consigliamo Windows Media Player 9 o una versione piu avanzata; per MAC raccomandiamo Quick Time 6.5 8 GB 120 minuti 104 minuti 1. Aprite il coperchio del vano batteria ed inserite il pacco batteria. 16 GB 240 minuti 208 minuti 360 minuti o una versione piu avanzata. Il formato video e MP4. La Micro SD card non viene letta Assicuratevi che la Micro SD card sia stata inserita correttamente. 2. Inserite la Micro SD card nell’apposito vano. Selezionate la qualita desiderata. Richiudete quindi il coperchio. 32 GB 480 minuti 416 minuti 720 minuti Connettete la telecamera al computer per verificare che ci sia abbastanza spazio 3. Spostate il selettore RECORD in avanti. La registrazione iniziera dopo alcuni secondi. Download dei video di memoria 4. Per fermare la registrazione slittate il selettore indietro in posizione “OFF”. Prima di riaccendere la videocamera Nota: La videocamera dividera automaticamente i video in documenti da 2GB di dimensione. per un secondo filmato, attendete 5/7 secondi per permettere alla telecamera di eseguire un corretto Reset. Non c’e bisogno di installare ulteriori software con la XTC-300. Attendete che si concluda il processo di formattazione 5. Collegate la videocamera al computer e scaricate il video. Nota: nel formato HI e necessario utilizzare una Micro SD Card di Classe 4. Il procedimento di download cambia in base al tipo di computer che utilizzate, PC o MAC. XTC-300 Action Camera Getting to Know the XTC-300 Note: The camera automatically splits the video into 2 GB segments. Downloading Videos on a PC with a WINDOWS Operating System Tips and Tricks Note: HI video requires Class 4 Micro SD card to record and playback. 1. Connect the camera to the USB port using the included cable. Thank you for your purchase of the XTC-300 Action Camera. As someone who seeks adventure, we are proud to offer 2. Turn the camera on by moving the RECORD switch to the record position. Problem Solution you the ultimate tool in capturing and recording your adventures. With easy to use one switch operation, 140 degree Battery 3. The device should automatically install. Battery angle lens and 3 recording modes: HI (high definition), M (middle definition), L (low definition). Thanks to the equipped 1. To insert the battery pack, push down the battery door latch on the back of the camera. Pull battery door backwards to Camera Mounting 4. Operating system: Microsoft. Open ‘Computer’. The camera will be listed under devices with removable storage. Camera not turning on Ensure the battery pack is installed properly and fully charged. Lithium battery pack it is possible to record up to 4 hours. Once captured, simply connect to your computer and upload open. Mount on Dual Track System 5. Click on the device. Recording the videos to share with friends. It is that simple! Enjoy! 2. Install the Lithium battery pack observing proper direction. The XTC-300 was innovatively designed with an identical 6. Open DCIM Folder. Camera not recording Make sure the switch is pushed all the way forward. If the record LED does not What’s in the box 3. Return battery door and click into place. dual track mount system on either side of the camera. dual track system mount 7. Open 100MEDIA folder. come on, turn off the device and reinstall the battery. 8. Your videos will be in this folder. Click to view. UK › Midland XTC-300 Action camera › Helmet adhesive mount This allows an ease of installation. Verify available memory. To mount the camera on the dual track mount, slide the › USB cable › Helmet strap mount Battery Status Indicator Meaning camera onto the dual track system with the two notches Release button Downloading Video on a MAC Micro SD card › 1100mAh Lithium battery pack › Bicycle handlebar mount Solid Green Indicates full battery life on the mount facing towards the back of the camera. 1. Connect the camera to the USB port using the included cable. Micro SD card not reading Ensure the Micro SD card is inserted properly. › Cigarette lighter charger › Submersible case Blinking green Battery is charging To detach the camera from the dual track mount, hold the 2. Turn the camera on by moving the RECORD switch to the record position. Plug camera into the computer to verify it has available storage. › Wall charger › Micro SD Card reader Solid orange Medium battery life camera with the lens facing away from you. Press down 3. MAC will automatically recognize the camera external hard drive. Attempt formatting process. › Goggle mount Solid Red Indicates half battery life the mount release switch and pull the mount towards 4. Click on the icon on the desktop. Video Playback Blinking Red* Indicates low battery life yourself. 5. Open DCIM Folder. Slow or choppy video Verify the camera is plugged into a USB 2.0 device. XTC-300 Features and Controls No Light Batteries are depleted The dual track mount allows the camera to be easily 6. Open 100MEDIA folder. Remove other unused USB devices. 7. Your videos will be in this folder. Click to view. Features: Note: When the red battery LED begins blinking, be prepared to charge the battery because the camera will stop mounted on both helmet mount and goggle mount. This Transfer video to computer before viewing. elimi nates the hassle of having to remount the camera HI mode features M mode features L mode features recording at this point. every time. Reformatting the Micro SD card Update the Player you are using 30 frames per second 60 frames per second 60 frames per second Supplied mounts The Micro SD card can be reformatted while in the camera. This allows you to delete all the videos at one time. Follow these Video Downloading 140 degree angle lens 140 degree angle lens 140 degree angle lens When mounting the camera on the dual track mount, you steps: Slow data transfer Verify the camera is plugged into a USB 2.0 device. If registering as 1.1, unplug 16:9 aspect ratio 16:9 aspect ratio 16:9 aspect ratio Micro SD Card must do the following: 1. Move the RECORD switch to the record position. and the re-plug the device. 1920 x 1080 resolution 1280 x 720 resolution 848x480 resolution 1. Lift latch on back to open the door. 1. Consider what you would like to shoot and use the 2. When the battery indicator turns green, press and hold the Micro SD card reformat button. Remove other unused USB devices. helmet mount or goggle mount accordingly. Records as MP4 Records as MP4 Records as MP4 2. Insert Micro SD card into slot observing proper direction (shown sideways). 2. Ensure, once attached, that the camera is aimed 3. Keep the Micro SD card reformat button down until the record indicator turns off and the SD card indicator begins blinking Computer does notrecognize ca- Ensure record switch is in the record position while connected to computer. 3. Close door until it clicks shut. straight and not towards the ground or at the sky. green. mera Ensure the Micro SD card is inserted properly. NOTE: XTC-300 supports up to 32GB memory card size. 4. Formatting is complete when the SD card indicator turns on solid. Micro SD card may becorrupted. Attempt formatting process. Mount using the Thread Mount 5. Move the RECORD switch to the off position. Sound Record switch Recording On the bottom of the XTC-300 is a standard thread mount Note: The camera cannot reformat the Micro SD card if the low battery light is on. Ensure new batteries are installed Excessive Wind Noise Place piece of tape over microphone hole. 140° degree glass lens forward: that allows the camera to be mounted to an helmet strap in the camera before attempting the reformat process. Mount the waterproof case on/record 1. Move the RECORD switch forward. This turns the camera on. mount or to a bicycle handlebar mount. Microphone Record switch 2. The battery indicator will light from red to green. The SD card indicator will light. The record indicator will begin flashing To fix the camera, insert the screw on the mount into the Camera thread Mounting screw Record led red after a few seconds. This indicates the camera is capturing video. camera thread and rotate the camera clockwise to tighten flashes red when backward: 3. To stop recording, move the RECORD switch back to the off position. Reset camera is recording Off/Stop recording Note: The camera will continue recording for 3 seconds after toggling the switch to the off position. down onto the screw. To make a total reset, remove the battery Dual track mounting system Battery led When mounting the camera on the handlebars of a bike Limited Warranty SD Card led or with the vented helmet strap mount follow these steps: SD card LED Status Meaning 1. Consider what you would like to shoot and mount ac- The Warranty does not limit the user’s statutory rights under applicable National laws relating to the sale of consumer cordingly. Green 75% more avai lable 2. Ensure, once attached, that the camera is aimed products. Orange 34-75% available Helmet strap mount Bicycle handle bar mount The warranty period starts at the time of Product’s original purchase by the first end-user and lasts 24 months. SD Card reformat button Mini USB connector straight and not towards the ground or at the sky. It is only valid and enforceable in the country where the user has purchased the product provided that the same product Red less than 34% available or no MicroSD card installed. HI/M/L mode switch Micro SD Card slot Flashing Red Cannot read the card Compatible Systems has been intended for sale in that country by the manufacter. To make use of this warranty, it is necessary to return the defective product with its original package together with the Flashing Green Indicates card has been reformatted. original sales receipt to the authorized service centre. The XTC-300 can be used on both a PC or MAC. Below are the compatible operating systems: The warranty totally covers the device in all its parts and the workmanship necessary to repair it. Memory Size HI Record Time M Record Time L Record Time Windows XP SP2, Windows Vista, Windows 7, Macintosh OSX 10.4 and higher The warranty does not cover defects or damages caused to the Product by misuse with, or connection to, any accessory 512 MB 7.5 minutes 6.5 minutes 10 minutes For Windows we recommend Windows Media Player 9 or higher. or software not produced or supplied by the manufacturer or by use of the product for any other use than for intended Quick Start Guide 1 GB 15 minutes 13 minutes 20 minutes For Macintosh we recommend Quick Time 6.5 or higher. use of the product. 1. Open battery door and install the battery pack. 2 GB 30 minutes 26 minutes 40 minutes The camera records as MP4. The warranty is not enforceable if the product has been dismantled, modified or repaired by anyone other than the 2. Insert micro SD card observing proper direction. Choose the desired quality definition. Close the door. 4 GB 60 minutes 52 minutes 80 minutes authorized service centre or if it is repaired using unauthorized spare parts. 3. Move RECORD switch forward, recording will start in a few seconds. 8 GB 120 minutes 104 minutes 160 minutes Downloading videos Moreover, the warranty is not valid and no protest can be made if the product has been modified or altered respect to 4. To stop recording, slide switch back to the off position. Before turning on the Action camera again to record another 16 GB 240 minutes 208 minutes 360 minutes its original purpose. video, wait 5/7 seconds to let the camera make a reset. 32 GB 480 minutes 416 minutes 720 minutes There is no need to install any software with the XTC-300. It is a plug and play device. Follow the below instructions depen- Nobody will be indemnified for the inactivity period of the device nor can expect refund or claim for direct or circumstantial 5. Plug in camera to computer and download video. ding upon whether you have a PC or a MAC. damages due to an inappropriate use of the device. XTC-300 Actionkamera XTC-300 Wissenswertes Kamerahalterung Videos auf PC mit WINDOWS Betriebssystem herunterladen Videowiedergabe 1. Schlie?en Sie die Kamera uber das mitgelieferte USB-Kabel am USB-Port an. Vielen Dank, dass Sie sich fur die XTC-300 Action Kamera entschieden haben. Als Abenteurer bieten wir Ihnen das Batterie Montage auf Doppelschienensystem Doppelschienen- 2. Schalten Sie die Kamera ein, indem Sie den AUFNAHME-Schalter auf Aufnahme stellen. Langsames oder abgehacktes Achten Sie darauf, dass die Kamera an einem USB 2.0 Gerat angeschlossen ist. Video. Die XTC-300 hat ein innovatives Design mit identischen ultimative Gerat zur Aufnahme Ihrer Unternehmungen. Mit einfacher 1-Knopf-Bedienung, 140° Weitwinkelobjektiv und Doppelschienenhalterungen auf beiden Seiten der Kamera. systemhalterung 3. Das Gerat wird automatisch installiert. den 3 Aufnahmemodi HI (hohe Auflosung), M (mittlere Auflosung) und L (niedrige Auflosung). Dank des integrierten 1. Zum Einsetzen des Akkus drucken Sie die Verriegelung des Batteriefachs auf der Ruckseite der Kamera herunter. Offnen 4. Betriebssystem: Offnen Sie „Arbeitsplatz“. Die Kamera wird als Wechsellaufwerk angezeigt. Trennen Sie andere, nicht genutzte USB-Gerate ab. Lithium-Akkus haben Sie bis zu 4 Stunden Aufnahmezeit. Nach der Aufzeichnung schlie?en Sie das Gerat einfach Sie das Batteriefach nach hinten. Dies vereinfacht die Installation. Entsperrtaste 5. Klicken Sie auf das Gerat. Ubertragen Sie das Video vor dem Betrachten auf den Computer. an Ihrem Computer an und laden Sie die Videos zur gemeinsamen Betrachtung mit Freunden herauf. So einfach ist 2. Setzen Sie den Lithium-Akku mit korrekter Polaritat ein. Zur Montage der Kamera auf der Doppelschienenhalterung 6. Offnen Sie den Ordner DCIM. Aktualisieren Sie Ihren Player. das! Viel Spa?! 3. Setzen Sie den Deckel des Batteriefachs zuruck und achten Sie darauf, dass er einrastet. schieben Sie die Kamera auf das Doppelschienensystem 7. Offnen Sie den Ordner 100MEDIA. Video-Download mit den beiden Kerben auf der Halterung auf die Ruckseite 8. Ihre Videos befinden sich in diesem Ordner. Klicken Sie ein Video zur Wiedergabe. Langsame Datenubertragung. Achten Sie darauf, dass die Kamera an einem USB 2.0 Gerat angeschlossen D Lieferumfang Batterie-Statusanzeige Bedeutung der Kamera ausgerichtet. ist. Wird sie als Version 1.1 registriert, abtrennen und neu anschlie?en. Zum Abnehmen der Kamera von der Leuchtet grun Batterien voll › Midland XTC-300 Action Videokamera › Selbstklebende Befestigung fur den Helm Doppelschienenhalterung halten Sie die Kamera mit Videos auf MAC herunterladen Trennen Sie andere, nicht genutzte USB-Gerate ab. › USB-Kabel › Befestigung zum Festschnallen an den Helm Blinkt grun Akku wird geladen dem Objektiv von Ihnen weg gerichtet. Drucken Sie den 1. Schlie?en Sie die Kamera uber das mitgelieferte USB-Kabel am USB-Port an. Computer erkennt die Kamera Achten Sie darauf, dass der Schalter beim Anschluss am Computer bis ganz › 1100mAh Lithium Akku › Fahrradlenkerbefestigung Leuchtet orange Akku geladen 2. Schalten Sie die Kamera ein, indem Sie den AUFNAHME-Schalter auf Aufnahme stellen. nicht. nach vorn geschoben ist. › KFZ Ladekabel › Wassergeschutzte Schutzhulle Leuchtet rot Batterien halb voll Entriegelungsschalter fur die Halterung und ziehen Sie die 3. Der MAC erkennt die Kamera automatisch als externes Laufwerk. Achten Sie darauf, dass die microSD-Karte korrekt eingesetzt ist. › Steckernetzteil › microSD-Kartenleser Blinkt rot* Batterien leer Halterung auf sich zu. Supplied mounts 4. Klicken Sie das Symbol auf dem Desktop. › Brillenbefestigung Keine Anzeige Akku ist erschopft Die Doppelschienenhalterung ermoglicht eine einfache 5. Offnen Sie den Ordner DCIM. Ton Die microSD-Karte ist moglicherweise beschadigt. Formatieren Sie neu. Montage der Kamera auf der Helmhalterung und der 7. Ihre Videos befinden sich in diesem Ordner. Klicken Sie ein Video zur Wiedergabe. Wichtig: Wenn die rote Batterie LED anfangt zu blinken, wird die Kamera die Aufnahme Brillenhalterung. Hierdurch wird ein standiges Ummontieren 6. Offnen Sie den Ordner 100MEDIA. Uberma?ige Windgerausche. Decken Sie die Offnung des Mikrofons mit einem Klebestreifen ab. XTC-300 Ausstattungsmerkmale und Bedienelemente stoppen. Um weitere Aufnahmen machen zu konnen, mussen Sie die Batterie zuerst wieder laden. der Kamera vermieden. 8. Bringen Sie die wassergeschutzte Schutzhulle an. Ausstattungsmerkmale: microSD-Karte Bei der Montage der Kamera auf der Doppel- microSD-Karte neu formatieren Funktionen HI-Modus Funktionen M-Modus Funktionen L-Modus schienenhalterung gehen Sie wie folgt vor: Gewahrleistung/Garantie 30 Bilder pro Sekunde 60 Bilder pro Sekunde 60 Bilder pro Sekunde 1. Offnen Sie die Verriegelung auf der Ruckseite. 1. Denken Sie zunachst daruber nach, was Sie aufnehmen Die microSD-Karte kann in der Kamera neu formatiert werden. Hiermit konnen Sie alle Videos gleichzeitig loschen. Bitte Durch die Gewahrleistung werden andere Verbraucherrechte unter der nationalen oder europaischen Gesetzgebung Weitwinkel 140° Weitwinkel 140° Weitwinkel 140° 2. Setzen Sie eine microSD-Karte richtig herum ein (Seitenansicht). mochten und ob Sie die Helm- oder Brillenhalterung folgen Sie den nachstehenden Schritten: nicht beruhrt. 16:9 Bildformat 16:9 Bildformat 16:9 Bildformat 3. Drucken Sie den Deckel an, bis er einrastet. benutzen. 1. Schieben Sie den Aufnahmeschalter REC nach vorn. Die Gewahrleistungsfrist betragt 24 Monate ab Kauf-/Lieferdatum (bei Teilen mit beschrankter Lebensdauer wie, Akkus, 1920 x 1080 Auflosung 1280 x 720 Auflosung 848 x 480 Auflosung Achtung: Die XTC-300 unterstutzt Speicherkarten bis zu 32 GB. 2. Nach der Montage achten Sie darauf, dass die Kamera 2. Sobald die Batterieanzeige grun leuchtet, halten Sie die Taste zur Formatierung der microSD-Karte gedruckt. Ladegerate, Headsets und Antennen 6 Monate). Aufnahme als MP4 Aufnahme als MP4 Aufnahme als MP4 Aufnahme gerade ausgerichtet ist und nicht den Boden oder den 3. Halten Sie die Taste zur Formatierung der microSD-Karte gedruckt, bis die Aufnahmeanzeige erlischt und die SD- Sie ist ausschlie?lich in dem Land gultig, in dem das Produkt erworben und angeboten wurde und vom Hersteller fur den Verkauf vorgesehen ist. Kartenanzeige grun blinkt. 1. Schieben Sie den Aufnahmeschalter REC nach vorn. Hiermit wird die Kamera eingeschaltet. Himmel aufnimmt. 4. Die Formatierung ist beendet, wenn die Anzeige fur die SD-Karte leuchtet. Im Falle eines Defekts, ist es notwendig das beanstandete Gerat (mit Fehlerangabe) in der originalen Verpackung 2. Die Akkuanzeige schaltet von rot auf grun um. Die Anzeige fur die SD-Karte leuchtet auf. Die Aufnahmeanzeige blinkt Montage mit Schraubhalterung 5. Schieben Sie den Aufnahmeschalter REC wieder zuruck. zusammen mit dem gultigen Kaufbeleg zum Vertragspartner bzw. an den von ihm autorisierten Servicepartner Aufnahmeschalter nach einigen Sekunden rot. Hiermit wird angezeigt, dass die Kamera ein Video aufzeichnet. Bitte beachten Sie: Die Kamera kann die microSD-Karte nicht neu formatieren, wenn die Anzeige fur geringe zu schicken. Es gelten die gesetzlichen Regelungen sowie die aktuellen Verkaufs- und Geschaftsbedingungen des 140-Grad-Objektiv vorn: 3. Zur Beendigung der Aufnahme schieben Sie den Aufnahmeschalter REC wieder zuruck. Unter der XTC-300 befindet sich eine Standard- Batteriekapazitat leuchtet. Setzen Sie vor der Formatierung frische Batterien in die Kamera ein. Vertragspartners. Ein/Aufnahme Schraubhalterung zur Befestigung der Kamera an einem Alan Electronics GmbH gewahrt auf alle mit den Markennamen ALAN, Albrecht und MIDLAND gekennzeichneten Mikrofon Aufnahmeschalter Bitte beachten Sie: Die Kamera nimmt nach dem Ausschalten fur weitere 3 Sekunden auf. Helmgurt oder einer Fahrradlenkerhalterung. Kameragewinde Befestigungsschraube Produkte eine Garantie von 24 Monaten, bei einzelnen Produkten eine zusatzliche erweiterte Herstellergarantie. Aufnahme-LED hinten: Zur Befestigung der Kamera setzen Sie die Schraube der Sollten Sie feststellen, dass ein Produkt nicht ordnungsgema? arbeitet, wenden Sie sich bei in Deutschland gekauften blinkt grun bei Aus/Aufnahme beenden SD-Karte LED-Status Bedeutung Halterung in das Kameragewinde ein und drehen Sie die Ruckstellung Geraten bitte zuerst an unseren Service Support, die Firma PST professional support technologies GmbH unter der Aufnahme mit Kamera Grun 75 % oder mehr frei Kamera nach rechts. Servicenummer 01805-012204 (14 Cent p. Minute im Festnetz) oder Sie stellen Ihre Fragen kostenfrei per E-Mail an: Doppelschienenhalterungssystem Batterie-LED SD-Karten-LED Orange 34-75 % frei Zur Befestigung der Kamera am Lenker oder mit dem Nehmen Sie den Akku aus dem Gerat, um es zu den Werkseinstellungen zuruckzustellen. alan-service@ps-tech.de Rot Weniger als 34 % frei oder keine microSD-Karte eingesetzt. Helmgurt folgen Sie den nachstehenden Schritten: Zur schnelleren Abwicklung von Reparaturen senden Sie diese bitte an folgende Adresse: Blinkt rot Karte kann nicht gelesen werden 1. Denken Sie zunachst daruber nach, was Sie aufnehmen Problembehebung Firma PST professional support technologies GmbH, Breitscheider Weg 117a, 40885 Ratingen. Bitte legen Sie der Formatierungstaste Mini-USB-Port mochten und montieren Sie entsprechend. Sendung eine Kopie der Rechnung und eine detaillierte Fehlerbeschreibung bei. Ausgenommen sind CB- Funk- , Blinkt grun Karte wurde neu formatiert. 2. Nach der Montage achten Sie darauf, dass die Kamera Helm-Befestigungsgurt Fahrradlenkerhalterung HI/M/L Modus Schaltung microSD-Kartenleser gerade ausgerichtet ist und nicht den Boden oder den Problem Losungsvorschlag Amateurfunk-, Seefunkartikel, Funkscanner und jeweiliges Zubehor. Diese schicken Sie bitte weiterhin an Alan Electronics, Daimlerstra?e 1k, 63303 Dreieich. Speichergro?e HI Aufnahmezeit M Aufnahmezeit L Aufnahmezeit Himmel aufnimmt. Batterie 512 MB 7.5 Minuten 6.5 Minuten 10 Minuten Kamera schaltet sich nicht ein. Uberprufen Sie den richtigen Sitz des vollstandig geladenen Akkus. 1 GB 15 Minuten 13 Minuten 20 Minuten Kompatible Systeme Aufnahme Schnellanleitung 2 GB 30 Minuten 26 Minuten 40 Minuten Die XTC-300 kann fur PC oder MAC benutzt werden. Nachstehend die kompatiblen Betriebssysteme: Kamera zeichnet nicht auf. Achten Sie darauf, dass der Schalter bis ganz nach vorn geschoben ist. Leuchtet die Aufnahme-LED nicht auf, so schalten Sie das Gerat aus und 1. Das Batteriefach offnen und den Akku einsetzen. Den Deckel wieder schlie?en. 4 GB 60 Minuten 52 Minuten 80 Minuten Windows XP SP2, Windows Vista, Windows 7, Macintosh OSX 10.4 und hoher setzen Sie geladen Batterie ein. 160 Minuten 120 Minuten 8 GB 104 Minuten 2. Den hinteren Gummideckel offnen und herunterklappen. Legen Sie nun die Micro SD-Karte ein, achten Sie hierbei 16 GB 240 Minuten 208 Minuten 360 Minuten Fur Windows empfehlen wir Windows Media Player 9 oder hoher. Uberprufen Sie die verfugbare Speicherkapazitat. auf die richtige Ausrichtung der Karte. Wahlen Sie die gewunschte Qualitat. Schlie?en Sie den Deckel. Fur Macintosh empfehlen wir Quick Time 6.5 oder hoher. microSD-Karte 3. Schieben Sie den AUFNAHME-Schalter nach vorn, nach wenigen Sekunden startet die Aufnahme. 32 GB 480 Minuten 416 Minuten 720 Minuten Die Kamera nimmt im MP4-Format auf. microSD-Karte wird nicht gelesen. Achten Sie darauf, dass die microSD-Karte korrekt eingesetzt ist. 4. Zur Beendigung der Aufnahme schieben Sie den Aufnahmeschalter REC wieder zuruck. Vor dem erneuten Videos herunterladen Einschalten der Action Kamera zur Aufzeichnung eines neuen Videos gonnen Sie der Kamera bitte 5-7 Sekunden Bitte beachten Sie: Die Kamera unterteilt das Video automatisch in Segmente von 2 GB. Schlie?en Sie die Kamera am Computer an, um die Speicherkapazitat zu uberprufen. Pause zur Ruckstellung. Hinweise: Fur Videoaufnahmen im HI-Modus benotigen Sie eine Fur die XTC-300 muss keine Software installiert werden. Sie ist ein Plug-and-Play-Gerat. Folgen Sie nachstehenden 5. Schlie?en Sie die Kamera am Computer an und laden Sie das Video hoch. Klasse 4 microSD-Karte fur Aufzeichnung und Wiedergabe. Anleitungen fur PC bzw. MAC. Formatieren Sie neu. XTC-300 Action Camera Conozca la XTC-300 Instalacion de la Camara 7. Abre la carpeta 100MEDIA. Garantia 8. Encuentra tus videos en esta carpeta. Para visionarlo, haz click sobre el fichero. Soporte deslizante Esta garantia no limita los derechos del usuario reconocidos en la normativa aplicable en materia de venta de bienes de Gracias por haber adquirido la XTC-300 Action Camera. Nos complace ofrecerte la ultima herramienta para grabar tus Bateria XTC-300 tiene un innovador diseno con un doble sistema soporte deslizante ajustable consumo. aventuras. Sistema patentado de accionamiento con un solo mando, lente gran angular de 140? y 3 modos de grabacion: Descarga de videos en un MAC Durante el periodo de garantia se reparara, en un periodo de tiempo razonable, cualquier averia imputable a defectos en Hi (FULL HD), M (HD) y L. Gracias a la bateria de litio incorporada, dispone de hasta 3 horas de grabacion. Solo tienes 1. Para instalar la bateria, presione hacia abajo la lengueta situada en el lado dere- de montaje mediante soporte deslizante, uno en cada lado 1. Conecta la XTC-300 en el puerto USB usando el cable en dotacion. materiales, diseno o fabricacion, libre de cualquier cargo por reparacion. de la camara. Esto permite que se adapte a cualquier tipo que grabar tus escenas, conectar a tu ordenador y descargar los videos para compartir con tus amigos y familiares. ?Es cho de la camara y retire la tapa haciendola deslizar hacia delante. Pestana aseguradora 2. Enciendela moviendo el mando REC hacia a delante. Esta garantia solo es valida en el pais donde se ha adquirido el producto. asi de simple, Disfrutala! 2. Instale la bateria de litio en la posicion correcta. de instalacion. 3. La XTC-300 sera detectada automaticamente por el Mac y aparecera el correspondiente icono en el FINDER. Haga click en el. 3. Vuelva a colocar la tapa. Para montar la camara en el soporte, coloquela en la guia 4. Abre la carpeta DCIM. La garantia comienza en el momento de la compra por parte del primer usuario final. El producto consta de diferentes partes Que hay en la caja y deslicela. 5. Abre la carpeta 100MEDIA. con diferentes periodos de garantia. En general, sera de 24 meses para equipos y unidades principales y de 6 meses para baterias y accesorios. › Midland XTC-300 Action camera › Montaje adhesivo para casco Indicador Estado Baterias Significa Para quitar la camara del soporte, sujete la camara con la 6. Encuentra tus videos en esta carpeta. Para visionarlo, haz click sobre el fichero. Cualquier reclamacion por el producto afectado, debe de comunicarse dentro de un tiempo razonable desde que se aprecio el E › Bateria de litio 1.100mAh › Cinta velcro para casco bici Verde fijo Bateria totalmente cargada parte trasera mirando hacia Ud. pulse hacia arriba la pestana Formateado de la tarjeta SD defecto y, en ningun caso, despues de que expire el periodo de garantia. aseguradora situada en la guia y deslice la camara. › Cargador de coche › Kit montaje manillar Verde parpadeando Bteria en carga Este soporte deslizante se puede unir tanto al soporte Para tener acceso a esta garantia, es necesario enviar a nuestro servicio tecnico el producto afectado (equipo o accesorio) › Cargador domestico › Funda impermeable Naranja fijo Batria parcialmente cargada biadhesivo de casco como al soporte para gafas de esqui, El formateo de la Micro SD permite borrar instantaneamente todos los videos guardados en ella. Para esto la Micro SD debe estar con una nota explicativa de la anomalia detectada y La factura original de compra, con el nombre, direccion del distribuidor y › Cable USB › Lector para tarjetas Micro SD Rojo fijo Bateria casi descargada evitando asi tener que montar la camara cada vez. correctamente instalada en la camara. la fecha y el lugar de compra › Montaje para gafas de esqui 1. Encienda la camara deslizando hacia delante el mando REC. Esta Garantia Limitada no cubre el deterioro del producto debido a su uso habitual, defectos causados por un uso indebido Rojo intermitente* Bateria agotada Supplied mounts 2. Cuando el indicador de bateria se ilumine verde, mantenga pulsado el boton de formateo de la Micro SD. o diferente para el que ha sido disenado, por caidas, exposicion a humedad o agentes metereologicos extremos, corrosion, Sin luz La camara se apaga Una vez montada la camara al soporte deslizante podra: 3. Mantenga pulsado este boton hasta que se apague el indicador de grabacion y el indicador de la Micro SD parpadee verde. oxidacion, derrames de liquidos, influencias de productos quimicos, uso o conexion con cualquier producto, accesorio, 1. Montar la camara al soporte intercambiable que se adap- 4. EL formateo habra finalizado cuando el led de la tarjeta permanezca verde fijo te mejor a lo que desea filmar. XTC-300 Caracteristicas y Controles Nota: Cuando el led rojo de la bateria empiece a parpadear, debera recargar la bateria ya que, en breve, se detendra la 2. Ajustar el encuadre de la camara. 5. Deslice el mando REC a la posicion “off”. software y/o servicios no compatibles, defectos causados en las baterias por cortocircuitos de sus contactos, sellos o celulas rotos o alterados o si muestra evidencia de que la bateria se ha usado en otro equipo diferente para el que ha sido fabricada, Caracteristicas: grabacion. si el producto ha sido abierto, modificado o reparado por un servicio autorizado, si se repara usando piezas no autorizadas o Especificaciones Modo L Especificaciones Modo M (HD) Especificaciones modo Hi (FULL HD) Soporte a tornillo Nota: la tarjeta Micro SD no puede formatearse si el indicador de bateria casi descargada se enciende (rojo intermitente). si el numero de serie del producto ha sido retirado, borrado, alterado o es ilegible. Asegurese de las baterias esten completamente cargadas antes de iniziar el proceso de formateo. 30 fps 60 fps 30 fps Trajeta Micro SD XTC-300 se puede montar en casco de bicicleta o en el Encontrara informacion actualizada en www.midland.es Lente gran angular 140? Lente gran angular 140? Lente gran angular 140? 1. Aparte el protector de goma. manillar usando este soporte. En la parte inferior de la XTC- Problemas & Soluciones Relacion aspecto 16:9 Relacion aspecto 16:9 Relacion aspecto 16:9 2. Inserte la tarjeta Micro SD observando la direccion marcada. 300 hay una rosca hembra de acero que permite montar la camara en estos soportes, con solo introducir el tornillo de Resolucion 848 x 480 Resolucion 1280 x 720 Resolucion 1928 x 1080 3. Vuelva a colocar el protector de goma en su lugar. fijacion en la hembra de la camara y girandola en sentido Problemas Soluciones Grabacion en MP4 Grabacion en MP4 Grabacion en MP4 Nota: XTC-300 soporta tarjetas de hasta 32 GB. horario. Rosca camara Tornillo montaje Bateria La XTC-300 no se enciende Asegurese de que la bateria esta correctamente instalada y totalmente cargada. Si quiere fijar la camara al manillar o montarla en el casco Grabaciones Grabando mediante el soporte con cinta, debera: La camara no graba Asegurese de haber deslizado correctamente el mando REC (totalmente hacia de- Mando REC Lente vidrio140° delante: 1. Deslice hacia delante el mando REC. Asi encnedera la camara. 1. Montar la camara en el soporte a tornillo escogido. lante). Si el indicador de grabacion no se enciende, apague la camara y recoloque encendido/grabar 2. El indicador de bateria cambiara de rojo a verde. El indicador de trajeta SD se iluminara verde. Pasados unos segundos, el 2. Asegurarse de que el encuadre sea correcto para no la bateria. filmar el cielo o la tierra. Verifique que haya suficiente memoria en la tarjeta Micro SD. Microfono Mando REC indicador de grabacion empezara a parpadear rojo. Esto indica que la camara esta grabando. Led Grabacion detras: 3. Para parar la grabacion, deslice el mando REC a la posicion “off”. Tarjeta Micro SD rojo intermitente cuando la Nota: La camara continuara grabando durante 3 segundos despues de haber efectuado el paso 3. Soporte cinta para casco Soporte manillar La Micro SD no se puede leer Asegurese de que este correctamente instalada (vea el dibujo). camara graba Apagado/Paro grabacion Conecte la camara al ordenador para verificar que hay suficiente espacio en memoria Guia para soporte deslizante Led Bateria Led tarjeta Micro SD LED estatus tarjeta SD Significa Sistemas compatibles Espere a que concluya el proceso de formateo Verde Espacio disponible > 75% XTC-300 es compatible tanto con sistemas Windows como Mac. Los sistemas operaticos compatibles son: Windows XP SP2, Visualizacion del Video Windows Vista, Windows 7, Macintosh OSX 10.4 y superiores. Para Windows aconsejamos Windows Media Player 9 o superior; Naranja Espacio disponible: 34% a 75% para MAC recomendamos Quick Time 6.5 o superior. El formato video es MP4. El video es lento y se interrumpe Verifique que el cable USB este correctamente conectado a la camara Rojo Espacio disponible < 34% Quite dispositivos USB que no utilice Pulsador formateo Tarjeta SD Conector Mini USB Rojo intermitente No lee correctamente la tarjeta Descarga de los videos Trasfiera el fichero al ordenador antes de visualizarlo Verde intermitente Tarjeta formateada. No es necesario instalar ningun tipo de software para conectar la XTC-300. El procedimiento varia en funcion de si utiliza PC o Mac Actualice el reproductor que utiliza Selector modo Hi/M/L Slot tarjeta Micro SD Antes de descargar el video, asegurese de que la bateria este totalmente cargada antes de iniciar la descarga del video. En caso Descraga del Video Memoria Tiempo de grabacion Modo L Tiempo de grabacion HD Tiempo de grabacion FULL HD contrario, si se interrumpe la descarga por un fallo de alimentacion en la camara, el video se puede danar irremediablemente. Transferencia datos lenta Verifique que el cable USB este correctamente conectado a la camara. Desconectelo 512 MB 8 munutos, 45 segundos 5 minutos, 15 segundos 7 minutos, 30 segundos y vuelva a conectarlo 1 GB 17 minutos, 30 segundos 10 minutos, 30 segundos 15 minutos La camara sera vista por el PC/Mac como un periferico pero de solo lectura ya que solo podra descargar videos, nunca podra Quite dispositivos USB que no este usando Guia Rapida 2 GB 35 minutos 21 minutos 29 minutos cargar nada en la Micro SD. El ordenador no reconoce la camara Asegurese de que la camara este encnedida 1. Abra la tapa del compartimento de la bateria e insertela. Cierre la tapa. 4 GB 1 hora, 10 minutos 42 minutos 58 minutos Descarga de videos en un PC con sistema operativo Windows Verifique la correcta instalacion de la Micro SD 2. Aparte el protector de goma. Inserte la tarjeta micro SD observando la indicacion marcada. Escoja la calidad de 8 GB 2 horas, 20 minutos 1 hora, 24 minutos 1 hora, 56 minutos 1. Conecta la XTC-300 al puerto USB usando el cable en dotacion. La tarjeta Micro SD card podria estar corrompida. Espere a que concluya el proceso definicion deseada Hi/M/L (FULL HD, HD o L). Coloque de nuevo la proteccion. 16 GB 4 horas, 40 minutos 2 horas, 48 minutos 3 horas, 52 minutos 2. Enciendela moviendo el mando REC hacia delante. de formateo 3. Deslice hacia adelante el mando REC, la grabacion se iniciara despues de unos segundos. 32 GB 9 horas, 20 minutos 5 horas, 36 minutos 7 horas, 44 minutos 3. La XTC-300 sera detectada automaticamente sin necesidad de instalar drivers. Audio 4. Para detener la grabacion, devuelva el mando a la posicion Off. Antes de volver a activar la grabacion, debera 4. Abre “MI PC”. La XTC-300 aparecera e la lista de perifericos disponibles. Ruidos causados por el viento Coloque cinta adhesiva en el agujero del microfono esperar unos 5-7 segundos para permitir un reset correcto de la camara. Nota: La camara divide automaticamente el video en segmentos de 2 GB. 5. Haz “click” en el periferico (XTC-300). 5. Conecte la camara al ordenador y descargue el video. Nota: En modo FULL HD es indispensable utilizar una tarjeta Micro SD de Clase 4 6. Abre la carpeta DCIM. Utilice la funda impermeable XTC-300 Camera d’Action Apprendre a connaitre l’XTC-300 Montage de la camera 4. Placez l’interrupteur sur la position OFF. Garantie Montage sur un systeme double glissiere Note: La camera ne peut pas reformater la carte Micro SD si le voyant batterie faible est allume. Assurez-vous que des La garantie ne limite pas les droits statutaires de l’utilisateur en vertu des lois nationales applicables relatives a la vente de Merci d’avoir achete la camera d’action MIDLAND XTC-300. Comme quelqu’un qui cherche l’aventure, nous sommes fiers Batterie L’XTC-300 a ete concu de maniere innovante avec un syste- batteries suffisament charge soit en place avant un reformatage. produits de consommation. de vous offrir l’outil ultime de capture et d’enregistrement de vos aventures. Facile a utiliser grace a seule touche, un objectif me double glissieres sur les deux cotes de la camera. Ce qui La periode de garantie commence au moment de Produit achat par le premier utilisateur final et dure 24 mois. a grand angle de 140 degres et 2 modes d’enregistrement: Standard (SD : 640x480) et haute definition (HD : 1280x720). 1. Pour inserer la batterie, poussez vers le bas le loquet de verrouillage de la porte permet une installation facile. Il n’est valable et executoire dans le pays ou le l’utilisateur a achete le produit a condition que les memes produit a ete destine Grace a la batterie au lithium, il est possible d’enregistrer jusqu’a 3 heures. Une fois capture, connecte la simplement a votre de la batterie situe sur le cote droit de la camera. La porte se debloque. Poussez Pour monter la camera sur le systeme double glissiere, clip- Systeme double glissiere Conseilles et asstuces a la vente dans ce pays par le fabricant. ordinateur et telecharger les videos pour pouvoir les partager avec vos amis! C’est si simple! vers l’avant pour la retirer. sez la camera dans le systeme double glissiere avec les Pour faire usage de cette garantie, il est necessaire de retourner le produit defectueux avec son emballage d’origine ainsi que 2. Installez la batterie au lithium. deux molettes orientees vers l’arriere de la camera. Probleme Solution le ticket de caisse original au centre autorise. Ce qu’il y a dans la boite 3. Replacez le couvercle et verrouillez le en place. Pour detacher la camera du systeme double glissere, tenez Languette de deverrouillage Batterie La garantie couvre totalement le dispositif dans toutes ses parties et la main-d’?uvre necessaire pour le reparer. la camera avec la lentille a l’oppose. Appuyez sur la languet- La garantie ne couvre pas les defauts ou les dommages causes au produit par une mauvaise utilisation, connexion avec toutes F › Camera Midland XTC-300 Action › Support adhesif de montage sur casque te de deverrouillage et tirez vers vous le support. La camera ne s’allume pas S’assurer que la batterie est correctement installee et chargee. accessoires ou logiciel non produits ou fournis par le fabricant. › Cable USB › Sangle de montage sur casque Voyant d’etat Batterie Signification Le double systeme de fixation permet a la camera d’etre fa- Enregistrement Elle ne couvre pas l’utilisation du produit pour toute autre utilisation que celle prevue par le fabricant. › Batterie au Lithium 900mAh › Support de montage sur guidon de bicyclette Vert fixe Les piles sont pleines cilement monte sur un casque ou des lunettes. Ceci evite La camera n’enregistre pas Verifiez que l’interrupteur est posse au maximum vers l’avant. Si la LED d’enregistre- › Chargeur allume-cigare l’inconvenient de devoir a chaque fois remonter la camera. ment ne s’allume pas, eteignez la camera et reinstalle la batterie. La garantie n’est pas applicable si le produit a ete demontes, modifies ou repares par des personnes autres que celles d’un centre agree ou si elle est reparee a l’aide pieces non autorisees. › Chargeur mural Verifiez la memoire disponible. En outre, la garantie n’est pas valable et aucune reclamation peut etre fait si le produit a ete modifie ou altere par rapport a › Lunettes de montage Rouge fixe Les piles sont a moitie vides Quand vous montez la camera sur le systeme double cro- Carte Micro SD son objectif initial. Rouge clignotant* Les piles sont faibles chet, suivez les points ci-dessous : Personne ne sera indemnise pour la periode d’inactivite du dispositif et ne peut s’attendre a remboursement ou reclamation Caracteristiques et controls de l’XTC-300 Eteint Les piles sont totalements vides 1. En fonction de ce que vous souhaitez filmer choisissez Ne lit pas la carte Micro SD Verifiez que la carte Micro SD card est correctement en place. suite a des dommages directs ou indirectes en raison d’une utilisation inappropriee de l’appareil. Caracteristiques: entre le support casque ou lunette. Supplied mounts Branchez la camera sur l’ordianteur et verifiez qu’il reste de la place. Essayez une procedure de formatage. Fonctionnalites de la HD Fonctionnalites de la SD Remarque: Lorsque le temoin rouge de la batterie commence a clignoter, il faut recharger la batterie car la camera n’en- 2. Assurez vous qu’une fois attache la camera regarde bien Lecture Video droit devant et non pas vers le sol ou le ciel. 60 Images par seconde 60 Images par seconde registre plus a partir de cet instant. Video lente ou de mauvaise qualite Verifiez que la camera est connecte a port USB 2.0. Objectif a grand angle Objectif a grand angle Montage utilisant le filetage de 140 degres de 140 degres Carte Micro SD En dessous de l’XTC-300 il y a un pas de vis standard qui Retirez les autres peripheriques USB non utilises. Format d’image 16:9 Format d’image 4:3 1. Ouvrez et baissez le capuchon en caoutchouc a l’arriere. permet de monter la camera sur la bande pour casque ou sur Transferez la video sur l’ordinateur avant de la regarder. Resolution de 1280 x 720 Resolution de 640 x 480 2. Inserez la carte Micro SD dans la fente en respectant le sens (comme montre ici). le support de guidon. Enregistre en format mp4 Enregistre en format mp4 3. Replacez le capuchon. Pour fixer la camera, inserrez la vis sur support dans le pas Telechargement Video NOTE: L’ XTC-300 supporte des cartes memoires jusqu’a 32GB. de vis de la camera et tournez la camera dans le sens horai- Transfert de donnees lent Verifiez que la camera est connecte a port USB 2.0. S’il est affiche en tant que version re pour serrer fermement la vis. 1.1, debranchez et rebranchez la camera. Enregistrement Lors de l’installation de la camera sur le guidon ou sur la Pas de vis de la Vis de fixation Retirez les autres peripheriques USB non utilises. Interrupteur laniere d’un casque suivez les points suivants : d’enregistrement 1. Deplacez l’interrupteur d’enregistrement vers l’avant. Cela allume la camera. 1. Prennez en compte ce que vous souhaitez filme et faite camera L’ordinateur ne reconnait pas la ca- Verifiez que l’nterrupteur est en position enregistrement pendant que la camera est Lentille de 140° avant: 2. Le voyant batterie passe du rouge au vert. Le voyant de la carte SD passe au vert. Le voyant d’enregistrement commence a l’installation en consequence. mera connecte a l’ordinateur. on/record clignoter rouge apres 8 secondes. Cela signifie que la camera capture une video. 2. Une fois montee, assurez vous que la camera soit orien- Verifiez que la carte Micro SD card est correctement en place. Microphone Interrupteur d’enregi- 3. Pour terminer l’enregistrement, deplacez l’interrupteur vers l’arriere en position OFF. te vers l’avant et non pas vers le ciel ou le sol. La carte Micro SD est corrompue. card may becorrupted. Essayez une procedure de Voyant d’enregistrement strement arriere: Note: La camera continue d’enregistrer pendant 3 secondes apres avoir bascule l’interrupteur en position OFF. formatage. clignote rouge pendant Off/Stop recording Son l’enregistrement Systemes Compatibles Systeme double glissiere Voyant batterie Voyant de la Carte SD Voyant d’etat carte SD Signification Bande pour casque Support de guidon Vent excessif Placez un bout de sctoch par dessus le trou du micro Vert 1 GB ou plus disponible L’XTC-300 peut etre utilise avec les sytemes d’exploitation Windows et MAC. Les enregistrements de la camera sont au format MP4. Orange 512 MB a 1 GB disponible Rouge Moin de 512 MB disponible ou pas de carte MicroSD installee. Telecharger les Videos Bouton de reformatage de carte Micro SD Connecteur Mini USB Rouge clignotant Carte illisible Il n’est pas necessaire d’installer un logiciel avec l’XTC-300. C’est un peripherique plug and play. Vert clignotant Signifie que la carte a ete reformate. S’assurer que la batterie est completement chargee avant de telecharger les sequences video. Touche mode HI/M/L Fente pour Micro SD Card Taille memoire Temps d’enregistrement HD Temps d’enregistrement SD Connectez la camera a l’aide du cable USB fournit. 512 MB 6.5 Minutes 9.5 Minutes La camera est automatiquement reconnue comme un disque externe (clef USB) mais les videos peuvent uniquement est telechar- 1 GB 13 Minutes 19 Minutes gees. Il n’est pas possible d’enregistrer des donnees sur la carte SD. 2 GB 26 Minutes 38 Minutes Toutes vos videos seront sauvegardees dans le repertoire DCIM. Guide de demarrage rapide 4 GB 52 Minutes 76 Minutes Reformater la carte Micro SD 1. Ouvrez la porte de la batterie et installez la batterie. Remettez le couvercle de la batterie. 8 GB 104 Minutes 152 Minutes La carte Micro SD peut etre reformate pendant qu’elle est dans la camera. Ceci vous permez de supprimer toutes les videos en 208 Minutes 304 Minutes 16 GB 2. Ouvrez le couvercle en caoutchouc rabattable. Inserez la carte micro SD en respectant la bonne orientation. Choisissez une fois. Suivez ces etapes: la definition souhaitee (SD: standard ; HD: haute definition). Fermez le couvercle. 32 GB 416 Minutes 608 Minutes 1. Placez l’interrupteur en position d’enregistrement. 3. Deplacez l’interrupteur d’enregistrement vers l’avant, l’enregistrement debute apres 8 secondes. 2. Quand le voyant batterie passe au vert, maintenez appuye le bouton de reformatage de carte Micro SD. 4. Pour terminer l’enregistrement, deplacez l’interrupteur vers l’arriere en position OFF. Note: La camera separe automatiquement la video en segments de 2 GB. 3. Restez appuye sur le bouton de reformatage de carte Micro SD card jusqu’a ce que le voyant d’enregistrement s’eteigne et que 5. Connectez la camera a l’ordinateur et telechargez la video. celui de la carte SD clignote vert.
Camara XTC-300 Conhecer a XTC-300 Descarregar videos Sugestoes e Truques Nota: A camara divide automaticamente o video em segmentos de 2 GB Nao ha necessidade de instalar qualquer software com o XTC-300. E um dispositivo plug and play. Siga as instrucoes abaixo, Obrigado pela sua compra da Camara Acao XTC-300. Tal como quem procura aventura, estamos orgulhosos em Bateria Nota: O video HI requer um cartao Micro SD de Classe 4 para gravar e reproduzir. que dependem se voce usar PC ou MAC. Problema Solucao lhe oferecer a melhor ferramenta para capturar e gravar as suas aventuras. Com um comutador de operacao facil Bateria P de usar, lentes angulares de 140 graus e 3 modos de gravacao: HI (alta definicao), M (media definicao), L (baixa 1. Para inserir a da bateria, empurre para baixo o fecho da tampa da bateria na Montagem da Camara Descarregar Videos em PC usando um Sistema Operativo da WINDOWS Camara nao liga Assegurar que o conjunto das baterias esta correctamente instalado e completamente definicao). Gracas ao equipamento que inclui uma caixa da bateria de Litio, e possivel gravar ate 4 horas. Uma vez parte traseira da camara. Puxe a tampa da bateria para tras para abrir. carregado. captada a imagem, basta ligar ao seu computador e descarregar os videos para partilhar com os amigos. E tao 2. Instale a bateria de Litio na direcao correta. Montagem no Sistema de Estrutura Dual 1. Ligue a camara a porta USB usando o cabo incluido. A gravar simples quanto isso! Aproveite! 3. Coloque a porta da bateria de novo no lugar. A XTC-300 foi desenhada duma forma inovadora, com Sistema de montagem 2. Ligue a camara movendo o interruptor RECORD para a posicao de gravar. um sistema de estrutura dual em ambos os lados da estrutura dual 3. O dispositivo deve instalar automaticamente. Camara nao esta a gravar Verifique se o interruptor esta todo empurrado para a frente. Se o LED de gravacao nao acender, desligue o dispositivo e reinstale a bateria. Indicador do estado da Bateria Significado camara. Isto permite uma facil instalacao. 4. Sistema operacional: Microsoft. Abrir ‘Computador’ A camara vai aparecer na lista de Dispositivos com armazenamento O conteudo da embalagem Verde Solido Indica bateria carregada na totalidade Para montar a camara na estrutura dual de montagem, removivel. Verificar memoria disponivel. › Camara Midland XTC-300 › Instalacao adesiva do capacete A piscar verde A bateria esta a carregar faca deslizar a camara no sistema de estrutura dual com Botao de libertacao 5. Clique no dispositivo. Cartao Micro SD 6. Abra a Pasta DCIM. › Cabo USB › Instalacao da cinta do capacete Laranja Vida media da bateria os dois encaixes na montagem de frente para a parte de 7. Abra a pasta 100MEDIA. Cartao Micro SD nao esta Verifique se o cartao Micro SD esta introduzido correctamente › Conjunto de baterias de Litio 1100mAh › Instalacao do guiador de bicicleta Vermelho Solido Indica bateria com meia carga tras da camara. 8. Os seus videos estarao nesta pasta. Clique para ver. a ler Ligue a camara ao computador para verificar o espaco disponivel. › Carregador de isqueiro › Caixa submersivel Para desmontar a camara da estrutura de montagem Tente o processo de formatacao. › Carregador de parede › Leitor de Cartao Micro SD A piscar Indica bateria fraca dual, segure na camara com as lentes de costas para Leitura do video › Instalacao de oculos de proteccao Sem luz As baterias estao esgotadas si. Pressione para baixo o interruptor de libertacao de Descarregar Videos em MAC Video lento ou Verificar se a camara esta ligada a um dispositivo USB 2.0. Nota: Quando o LED vermelho da bateria comecar a piscar, deve estar preparado para carregar a bateria porque a montagem e puxe a estrutura de montagem para si. 1. Ligue a camara a porta USB usando o cabo incluido. intermitente Retire outros dispositivos USB que nao estiverem a ser utilizados A estrutura de montagem dual permite que a camara Controlos e Caracteristicas da XTC-300 camara parara de gravar neste momento. seja facilmente montada tanto na estrutura do capacete Supplied mounts 2. Ligue a camara movendo o comutador RECORD para a posicao de gravar. Transferir o video para o computador antes de o visualizar. Caracteristicas como na estrutura dos oculos de proteccao. Isto elimina 3. O MAC ira reconhecer automaticamente o disco rigido externo da camara. Descarregar Video Atualize o Leitor que esta a usar. o inconveniente de ter que remontar a camara todas as 4. Clique no icone no ambiente de trabalho. Caracteristicas em modo HI Caracteristicas em modo M Caracteristicas em modo L Cartao Micro SD vezes. 5. Abra a Pasta DCIM. Transferencia de dados Verificar se a camara esta ligada a um dispositivo USB 2.0. Se registar 1.1.desligue e 30 imagens por segundo 60 imagens por segundo 60 imagens por segundo 1. Empurre para baixo o fecho da tampa na parte traseira da camara. Puxe a 6. Abra a pasta 100MEDIA. lenta volte a ligar o dispositivo. Lentes com angulo 140 graus Lentes com angulo 140 graus Lentes com angulo 140 graus tampa para tras para abrir. Quando for para montar a camara na estrutura de 7. Os seus videos estarao nesta pasta. Clique para ver. Retire outros dispositivos USB nao utilizados.. Formato 16:9 Formato 16:9 Formato 16:9 2. Introduza o cartao Micro SD na ranhura na posicao correcta (com os lados visiveis) montagem dual, deve fazer o seguinte: Resolucao 1920 x 1080 Resolucao 1280 x 720 Resolucao 848 x 480 3. Volte a colocar no lugar a porta. 1. Ter em consideracao o que gostaria de filmar e utilizar Computador nao Verifique se o interruptor de gravacao esta na posicao de gravar enquanto esta ligado ao Grava como mp4 Grava como mp4 Grava como mp4 NOTA: XTC-300 suporta cartao de memoria com capacidade ate 32GB a estrutura de montagem do capacete ou dos oculos Reformatar o cartao Micro SD reconhece a camara computador. de proteccao em conformidade com isso. O cartao Micro SD pode ser reformatado enquanto estiver na camara. Isto permite-lhe apagar todos os videos duma so vez. Assegure-se que o cartao Micro SD esta correctamente introduzido 2. Assegure-se, uma vez ligada, que a camara esta Siga estes passos: O cartao Micro SD pode estar corrompido. Tente o processo de formatacao. Interruptor de gravacao Gravar colocada direita e nao voltada para o chao ou para 1. Coloque o interruptor RECORD(Gravar) na posicao gravar. Som avancar: Lentes de vidro de 140? Ligado/gravar 1. Movimente o interruptor RECORD (Gravar) para a frente. Isto liga a camara. o ceu. 2. Quando o indicador da bateria ficar verde, pressione e mantenha pressionado o botao de reformatar cartao Micro SD. Ruido excessivo do Vento Coloque um pedaco de fita cola no orificio do microfone. graus Interruptor de gravacao 2. O indicador da bateria acendera de vermelho para verde. O indicador de cartao SD acendera. O indicador de gravacao 3. Mantenha o botao de reformatar do cartao Micro SD, ate que o indicador de gravacao se desligar e o indicador de cartao Monte a caixa a prova de agua. Microfone Led gravacao retroceder comecara a piscar de vermelho apos alguns segundos. Isto indica que a camara esta a capturar video. Montagem utilizando a Estrutura com Encaixes SD comeca a piscar verde. Na base da XTC-300 esta um encaixe de montagem Vermelho a piscar quando Desligado/Parar 3. Para parar a gravacao, movimente o interruptor RECORD (Gravar) de novo para a posicao off (desligado). 4. Movimente o interruptor RECORD(Gravar) para a posicao off (desligado). Camara esta a gravar gravacao Nota: A camara continuara a gravar durante 3 segundos apos ter colocado o interruptor na posicao off (desligado). standard que permite que a camara seja montada numa Nota: A camara nao pode reformatar o cartao Micro-SD se estiver acesa a luz indicadora de bateria fraca. Assegure Garantia Led bateria faixa do capacete ou num punho de bicicleta. que sao instaladas novas barreiras antes de tentar o processo de reformatacao. Sistema de montagem dual Led Cartao SD Para fixar a camara, introduza o parafuso na estrutura Encaixe da camara Parafuso de montagem A garantia nao limita os direitos legais em conformidade com as leis Nacionais aplicaveis relativas a venda de produtos de consumo. Estado do LED do cartao SD Significado do encaixe da camara e rode a camara no sentido dos O periodo de garantia tem inicio no momento da compra do Produto original pelo primeiro utilizador final e termina apos Verde disponivel mais de 75% ponteiros do relogio para apertar bem o parafuso. Reset Botao reformatar Cartao SD Mini USB Conector Quando da montagem da camara no punho da bicicleta 24 meses. Laranja disponivel 34-75% ou com a faixa de ventilacao do capacete siga estes Para fazer um reset total, remova a bateria. E somente valida e obrigatoria no pais onde o utilizador adquiriu o produto desde que o mesmo produto tenha sido Interruptor modo HI/M/L Ranhura Micro Cartao SD Vermelho menos de 34% disponivel, ou nenhum cartao Micro SD instalado. passos: destinado pelo fabricante para venda nesse pais. Vermelho a piscar Nao pode ler o cartao 1. Classifique o que pretende filmar e monte em Para fazer uso desta garantia, e necessario devolver para um centro de assistencia autorizado, o produto defeituoso, Verde a piscar Indica que o cartao foi reformatado. conformidade com isso. com a embalagem original em conjunto com o original do recibo da venda. 2. Assegure, uma vez ligado, que a camara esta direita Estrutura faixa do capacete Montagem Punho da Bicicleta A garantia cobre totalmente o aparelho em todas as suas partes e a mao-de-obra necessaria para o reparar. Manual de Inicio Rapido Tamanho da Memoria Tempo de Gravacao HI Tempo de Gravacao M Tempo de Gravacao L e nao voltada para o chao ou para o ceu. A garantia nao cobre defeitos ou danos causados ao Produto devidas a uso incorrecto, ou a ligacao a qualquer acessorio 512 MB 7.5 minutos 6.5 minutos 10 minutos ou software nao produzido ou fornecido pelo fabricante ou pelo uso do produto para qualquer outro fim que nao aquele 1. Abrir a porta da bateria e instalar o conjunto de baterias. 1 GB 15 minutos 13 minutos 20 minutos a que e destinado. 2. Introduzir o micro cartao SD tendo em atencao o sentido correcto de insercao. Escolher a qualidade de definicao Sistemas Compativeis A garantia nao e obrigatoria se o produto tiver sido desmontado, modificado ou reparado por qualquer outra pessoa que pretendida. Coloque a porta de novo no lugar. 2 GB 30 minutos 26 minutos 40 minutos O XTC-300 pode ser usado tanto em PC como em MAC. Abaixo estao os sistemas operacionais compativeis: nao o centro de assistencia autorizado ou se for reparado usando pecas de substituicao nao autorizadas. 3. Mova o comutador RECORD para a frente, a gravacao comecara em poucos segundos. 4 GB 60 minutos 52 minutos 80 minutos Windows XP SP2, Windows Vista, Windows 7, Macintosh OSX 10.4 e superior. Alem disso, a garantia nao e valida e nao pode ser feita reclamacao se o produto tiver sido modificado ou alterado no 4. Para parar a gravacao, corra o interruptor para a posicao Off(desligado). Antes de ligar novamente a camara de 8 GB 120 minutos 104 minutos 160 minutos Para o Windows recomendamos o Windows Media Player 9 ou superior. que se relaciona com a sua finalidade original. Acao para gravar outro video, espere 5/7 segundos ate a camara fazer um reset. 16 GB 240 minutos 208 minutos 360 minutos Para Macintosh recomendamos Quick Time 6.5 ou superior. Nao sera devida qualquer indemnizacao para o periodo de inactividade do dispositivo nem pode ser esperado reembolso 5. Ligue a camara ao computador e descarregue o video. 32 GB 480 minutos 416 minutos 720 minutos A camara grava como MP4. ou reivindicacao por danos directos ou circunstanciais devido ao uso inadequado do dispositivo. XTC-300 Action Camera ??????????? ??? XTC-300 ?????????? ??? ????????????? ???????????? ?????? ??? ?????????? ?? ??????????? ??????? Windows ???????? ???? 2. ????????????? ??? ?????? ???????????? ?? ???????? Record ??? ???? ??? ???????. ???????????? ??? ????????? ??? ???????????? XTC-300. ??????? ????????? ??? ???????? ?? ???????????, ?? ????????? ?????????? ?? ??????? ?????? ????? ???????? 1. ???????? ??? ???????????? ??? ???? USB ??????????????? ?? ?????????? ???????. ????????? ? XTC-300 ????????????? ?? ????????? ????????? ???? ????? ????????? ??? ??????????, ?? ??????? ???????? ??? ??? ??????????? ??? ????????? ??? ?????????????? ???. 1. ??? ?? ???????????? ?? ??? ?????????, ??????? ???? ?? ???? ?? ????? 3. ? ??????? ????????????? ????????. ??? ??????? ? ???????????? ??????????? ??? ?? ??? ????????? ???? ??????????? ????? ??? ??? ????? ?????? GR ?? ?????? ???????? ?? ??? ???? ???????, ????? 140 ?????? ?????? ??? 3 ???? ????????: HI (????? ???????) , ??? ?????????? ??? ????????? ??? ????? ?????? ??? ???????. ?? ??????? ?? ???????????? ??? ??????? ?????? ????? ???????? ?? 4. ??????? ???????????: Microsoft. ??????? ?? ?????? “O ??????????? ???”. ? ?????? ?????????? ??? ????? ??? ?????????? ??????????. ??????????? ?????? ??? ?????????????. ???? ????????? ? (???? ???????), L (?????? ???????). ???? ??? ??? ????????? Li-Ion ??? ?????????? ??? ?????????? ????? ?????? ?? ???????. ?????? ???? ?? ?????? ??? ?? ?? ??????????. ??? ??????? ??? ????????????. ??????. ??????? ? ??????? ??? ??? 4 ????. ????? ???????????? ??? ?????????, ???? ???????? ??? ?????? ???? ?????????? ??? 2. ??????????? ?? Li-Ion ??? ????????? ?????????? ??? ?? ??????????? ??? 5. ?????? ???? ??? ????????? ??? ????????. ? ???????????? ??? ????? ??????????? ??? ? ????????? ???? ????? ??????? ???? ?? ??????. ?? ? ??????? ???????? ??? “????????” ?? ?????? ??? ?? ?? ??????????? ?? ??????. ????? ???? ????! ??????????? ??! ??? ?? ????????????? ??? ?????? ??? ????? ???? ??????? ?????? ????? 6. ??????? ?? ?????? DCIM. ??????? ????? ??? ??????, ??????? ??? ??????? ??? ??????????? ???? ??? ?????????. ?? ????? ??????. ????????, ?????? ??? ?????? ??? ??????? ?????? ????? ???????? 7. ??????? ?? ?????? 100MEDIA. ??????? ?? ????????? ?????. ??????????? ??????????? 3. ??????? ?? ??????? ??? ????????? ??? ??????? ?? ???? ???? ???. ?? ??? ??? ??????? ????????? ?? ???? ????? ??? ??????? . 8. ?? ?????? ??? ?? ????????????? ?? ???? ?? ??????. ??????? ???? ??? ?? ?? ?????. ????? Micro SD ??? ?? ?????????? ??? ???????????? ??? ?? ????? ???? › ?????? Midland XTC-300 Action › ??????????? ???? ???????? ??????? ??????? ???????? ????????? ??????? ????????, ???????? ??? ?????? ?? ??? ?????? ??? ????? ??????? ????????????? ??? ???????? ??? ????? Micro SD ??????????? ??? ? ????? Micro SD ???? ??????????? ?????????. › ??????? USB › ???? ???????? ??????? ?? ?????? ?????? ??????? ??????????? ?????? ?????????? ???????? ???? ?? ????? ???. ?????? ???? ?? ???? ?? ???????? ??? ???????????? ?????? ??? ?????????? MAC ???????? ??? ???????????? ?? ??? ?????????? ??? ?? ??????????? ??? ???? ???????? › ??? ????????? Li-Ion 1100mAh › ???? ???????? ??? ???????? ??????????? ??????? ? ???????? ???????? ????? ??? ???????? ?? ???? ???? ?? ????? ???. 1. ???????? ??? ???????????? ??? ???? USB ??????????????? ?? ?????????? ???????. ????????????. › ????????? ??????????? › ????????? ???? ?????? ????????? ?????? ????????? ????????? ? ????? ???? ???????? ????????? ???? ???????????? ?? 2. ????????????? ??? ?????? ???????????? ?? ???????? Record ??? ???? ??? ???????. ?????? ??? ??????????? ?????????????. › ????????? ???????? › Micro SD card reader ?????? ??????? ??????????? ???? ????????? ????????? ??????????? ???? ?????? ??? ???? ???????? ??????? 3. O MAC ??????????? ???????? ?? ??????? ?? ????????? ?????. ??????????? ?????? › ???? ???????? ??? ????? (goggle mount) ??????????? ???????* ??????????? ?????? ???????? ??? ??? ???? ??? ????? (goggle mount). ???? ??????? ??? 4. ????? ???? ??? ????????? ???? ???? ????????? ????????. ???? ? ??????? ?????? ??????????? ??? ? ???????????? ????? ??????????? ?? ??????? USB 2.0. ?????????????? ??? ??????????? ??? XTC-300 ????? ??????? ?? ????????? ????? ??????? ??????????? ?????????? ??? ???????????? ??? ??????? ???? ????. 5.??????? ?? ?????? DCIM. ????????? ??? ????????? ???????? USB ??? ??? ????????????????. 6. ??????? ?? ?????? 100MEDIA. ??????????????: ????????: ???? ? ??????? ?????? ??? ????????? ??????? ?? ???????????, ???????????? ???? ??????????? ??? ???????????? ??? ????? ???? 7. ?? ?????? ??? ?? ????????????? ?? ???? ?? ??????. ??????? ???? ??? ?? ?? ?????. ?????????? ?? ?????? ???? ?????????? ???? ?? ???????????. ?? ????????? ??? ???????? ????? ? ?????? ?????? ?? ???????? ??? ???????. ?????????????? ?????? ?????????????? ????? ?????????????? ??????? ????????, ?? ?????? ?? ?????? ?? ????????: ??????????? ?????? Video Downloading ???????? (HI) ???????? (?) ???????? (L) ????? Micro SD 1. ????????????? ?? ?????? ?? ????????????? ??? ????????????? (Reformat) ??? ?????? Micro SD ???? ???????? ????????? ??????????? ??? ? ?????? ????? ??????????? ?? ??????? USB 2.0. ?? ?????????? ?? 30 ??????? ?? ???????????? (fps) 60 ??????? ?? ???????????? (fps) 60 ??????? ?? ???????????? (fps) ?????????????? ??????? ?? ???? ???????? ??? ?? ? ????? Micro SD ?????? ?? ????????????? ??? ????????? ???? ???? ????????????. ?? ???? ??? ????? ???????? ?? ??????? 1.1, ??????????? ??? ???????? ???? ?? ???????. ?????? ? ?? ???? ???????? ?? ?????. ????? 140 ?????? ????? 140 ?????? ????? 140 ?????? 1. ??????? ??? ?????? ???? ?? ???? ?? ?????????? ???????. 2. ???????????, ????? ??? ????????????, ??? ? ?????? ???????? ??? ??? ?? ??????. ??????????? ???? ?? ??????: ????????? ??? ????????? ???????? USB ??? ??? ????????????????. 16:9 aspect ratio 16:9 aspect ratio 4:3 aspect ratio 2. ???????? ??? ????? Micro SD ???? ??????? ??????????? ??? ??? ??????????? ?? ?? ???????? ?????? ??? ??? ???? ?? ?????? ? ??? ??????. 1. ???????????? ??? ???????? RECORD ??? ???? ????????. ? ??????????? ??? ??????????? ??????????? ??? ? ????????? record ????? ??? ???? ???????? ???? ?? ??????? ?? ????? ?????????? (???? ???????? ??? ????). ??????? 1920 x 1080 ??????? 1280 x 720 ??????? 848 x 480 3. ??????????? ?? ??????? ??? ???? ???. 2. ???? ? ??????? ??? ????????? ????? ???????, ?????? ??? ???????? ???????? ?? ?????? ????????????? ??? ?????? Micro ??? ???????????? ??? ??????????. ????????? ?? mp4 ????????? ?? mp4 ????????? ?? mp4 ????????: ? XTC-300 ??????????? ????? ?????? ??? 32GB. ?????????? ??????????????? ?? ???? Thread SD. ??????????? ??? ? ????? Micro SD ???? ??????????? ?????????. ??? ???? ????? ??? XTC-300 ??????? ??? ??????? ???? 3. ???????? ?? ?????? ????????????? ??? ?????? Micro SD ????? ? ??????? ???????? ?? ?????? ??? ? ??????? ??? ?????? ? ????? Micro SD ?????? ?? ?????????? ????????????. ????????? ?? ?????????? ??????? ???????? (thread) ??? ????????? ??? ???????????? ?? SD ??????? ?? ??????????? ???????. ?????????????. ????????? Record ??????????? ???? ??????????? ???? ???????? ??? ?????? 4. ? ????????????? ????????????? ???? ? ??????? ??? ?????? SD ?????? ?????? ???????. ???? forward: 1. ??????????? ??? ???????? RECORD ???? ?? ??????. ???? ??????????? ??? ????????????. 5. ???????????? ??? ???????? RECORD ??? ???? off. ????? 140° ?????? 2. ? ??????? ????????? ?? ?????? ??? ??????? ?? ???????. ? ??????? ??? ?????? SD ?? ?????? ???????. ? ??????? ? ??? ???? ??? ?? ????????. ??????? ??????? ?????? ???????????? ??????? ??????? ???? ??? ??? ??????????. on/??????? ??? ?? ????????? ??? ????????????, ????? ?? ???? ????????: ? ???????????? ??? ?????? ?? ???????????? ??? ????? Micro SD ?? ????? ???????? ? ?????? ??????? ????????? Record ???????? ?? ??????? ?? ??????????? ??????? ???? ??? ?????? ????????????. ???? ???????? ??? ? ?????? ???? ??? ???? ???? ??????? ??? ????????????? ??? ?????????. ??????????? ??? ????? ??????????? ?????????? ????????? ?????? ???????????? ??? ?????????? ??????????? ??? ????????? ???? ????????? ??????? Record backward: ?????????? ??????. ??????????? ??? ??????????? ??? ?? ?? ??????? ???? ??? ?????????????. ???????????? ??????? ?????? ??????? ???? Off/??????? ???????? 3. ??? ?? ??????????? ??? ???????, ??????????? ??? ???????? RECORD ???? ??? ???? off. ???????? ??????? ???? ???????? ? ?????? ????? ??????? ????????: ? ???????????? ?? ????????? ??? ??????? ??? 3 ???????????? ???? ?????? ?? ???????? ??? ???? off. ????. ? ??????? ??? ?????????? ?? ?????????? ??? ?????? ??? ???? ???????????? ???????? ?????? ??? ??????? ??? ??????? ????????? ???? ????????? ??? ???????????? ???? ????? ??? ????????? ????????????? ????????? (Reset) ?????? ????????????? ?????????. ????? ??????? ???????? ??????? ?????? SD ??????? ???????? ?????? SD ??????? ????????? ? ?? ??? ??????????? ???? ??? ?? ?????? ? ???????? ??? ???????? ?????? ??? ??? ????? ????? ??? ????????? ??? ??? ?????? ?????? ??? ??????? 24 ?????. ??????? ????????? 75% ??????????? ??????????? ???? ?? ??????: ??? ?? ???????????????? ????? ????????? ????????????? ????????? (reset), ????????? ??? ????????. ???? ???? ??? ?????? ?? ?????????? ???? ??? ???? ???? ???????????????? ? ????? ??? ????????? ????????? ??? ?? 1. ????????????? ?? ?????? ?? ????????????? ??? ????????? ????????? 34-75% ??????????? ??? ???????????? ?????????. ???????????? ?????? ???? ?????????????? ?? ???????? ???? ?? ???? ???? ??? ??? ????????????. ??????? ????????????? (Reformat) ??? ?????? SD ?????????? Mini USB ??????? ???? ??? 34% ????????? ? ??? ??????? ????? MicroSD. 2. ???????????, ????? ??? ????????????, ??? ? ?????? ??? ?? ?????? ????? ??? ???????? ?????, ????? ?????????? ? ????????? ??? ????????????? ????????? ?? ?? ?????????? ??????????? ??????? ??? ?????? ?? ???????? ??? ????? ???????? ?????? ??? ??? ???? ?? ?????? ? ??? ??????. ??? ???? ?? ??? ???????? ?????? ??? ??? ??????????????? ?????? ?????????. ????????? ???????? HI/M/L ???? ?????? Micro SD ??????????? ??????? ??????????? ??? ? ????? ???? ?????????????. ??????????? ?????? ???????? ??? ?? ?????? ???? ???????? ??? ???? ? ??????? ???????? ??’ ????????? ?? ??????? ?? ??? ??? ?? ???? ????? ??? ??? ??????? ??? ?????????? ??? ??? ???????? ??????? ????????? ????????? ???. ? ??????? ??? ???????? ?????? ? ?????? ??? ??????????? ??? ???? ????? ??? ????????? ???? ??, ? ??????? ???????????? ?????? H? ?????? ???????? ? ?????? ???????? L ?????? ???????? ?? ??????????? ???????? ? ????????? ??? ??? ????????? ? ????????? ??? ??? ???????????? ? ??? ??????????? ???? 512 MB 7.5 ????? 6.5 ????? 10 ????? ? XTC-300 ?????? ?? ?????????????? ??? ??? Windows PC ??? ?? MAC. ???????? ??????????? ?? ??????? ??????????? ????? ??? ????????? ????? ??? ????????????. 1 GB 15 ????? 13 ????? 20 ????? ?????????: Windows XP SP2, Windows Vista, Windows 7, Macintosh OSX 10.4 ??? ????????? ? ??????? ??? ???? ???? ?? ????????? ??? ?? ?????? ???? ?????????????????, ???? ??????? ????????? ? ???????? ??? ?????? ???????? ????????? 2 GB 30 ????? 26 ????? 40 ????? ??? Windows ?????????? ?? Windows Media Player 9 ? ??? ???????? ?????? ??? ???????????. ???????????? ???? ????? ??? ???????????????? ??????? ????????? ? ??? ???? ???????????? ?? ??-??????????????? 1. ??????? ?? ??????? ??? ????????? ??? ??????????? ?? ??? ?????????. ??????? ?? ???????. 4 GB 60 ????? 52 ????? 80 ????? ??? Macintosh ?????????? ?? Quick Time 6.5 ? ??? ???????? ?????? ??? ???????????. ????????????. ????????, ? ??????? ??? ?????? ??? ??? ?????? ?? ??????????????? ??????????? ???? ????????? ??? ?? ? ???????????? ?????????? ?? ????? MP4. 2. ??????? ??? ?????? ???? ?? ???? ?? ?????????? ???????. ???????? ??? ????? micro SD ???????????? ??? ??? 8 GB 120 ????? 104 ????? 160 ????? ?????? ???? ???????????? ? ?????????? ?? ????? ???????? ???? ?? ????? ?????? ???. ??????????? ??? ??? ????? ??????. ???????? ??? ????????? ???????? ????????. ??????? ?? ???????. 16 GB 240 ????? 208 ????? 360 ????? “????????????” ?????? ??????? ??? ????????? ?? ??????????? ??? ??? ??????? ????????? ??? ???????? ? ??? ?????? ?? ????????? ????????? 3. ???????????? ??? ???????? RECORD ???? ?? ??????, ? ??????? ?? ????????? ?? ?????? ????????????. 32 GB 480 ????? 416 ????? 720 ????? ??? ???????? ? ?? ?????????? ?????? ? ??????? ?????? ??? ?????????? ???? ???? ?????? ??? ????????. 4. ??? ?? ??????????? ??? ???????, ?????? ??? ???????? ???? ??? ???? off.???? ?????????????? ???? ??? ?????? ??? ?????????? ?? ????????????? ?????? ????????? ??? ??? XTC-300. ????? ??? ??????? ??? ?? ???????? ??? ?????????? ????????? ??? ????? ??????????? ?? ????????? ???? ??????, ?????????? 5-7 ???????????? ???? ?? ????? ???????????? ? ??????. ????????: ? ???????????? ??????? ???????? ?? ?????? ?? ??????? ??? 2 GB. ??????. ??????????? ??? ???????? ??????? ??????? ?? ?? ?? ????????? Windows PC ? MAC. 5. ???????? ??? ?????? ???? ?????????? ??? “?????????” ?? ??????. ????????: ? ????????? ??? ??????????? ?????? ?? ????? ??????? HI ??????? ????? ?icro SD Class 4. XTC-300 Action Camera Alles over de XTC-300 Opmerking: De camera splitst de video automatisch op in segmenten van 2 GB. Het downloaden van video’s op een PC met een Windows-besturingssysteem Tips en Truukjes Opmerking: HI-video heeft een klasse 4 Micro SD-kaart nodig om te kunnen opnemen en afspelen. 1. Sluit de camera aan op de USB-poort middels de meegeleverde kabel. Hartelijk bedankt voor het aanschaffen van de XTC-300 Action Camera. U kunt nu als een echte avonturier al uw Batterij 2. Zet de camera aan door de RECORD-schakelaar te verplaatsen naar de opnamepositie. Probleem Oplossing spannende momenten met deze ultieme camera vastleggen. Met een eenvoudig te gebruiken 1-schakelbediening, 3. Het toestel zou automatisch moeten installeren. Batterij NL een 140 graden lens en 3 opnamemodi: HI (hoge definitie), M (middelmatige definitie), L (lage definitie). Met de 1. Voor het plaatsen van de batterijen, duwt u de vergrendeling van de batterijklep, op de achterzijde van de camera, naar Cameramontage Dual Track montagesysteem 4. Besturingssysteem: Microsoft. Open ‘Deze computer’. De camera zal vermeld staan onder apparaten met verwisselbare Camera schakelt niet in Controleer of het batterijblok correct geinstalleerd en volledig opgeladen is. uitgeruste lithiumbatterij is het mogelijk om dit toestel tot maximaal 4 uur te gebruiken. U hoeft de camera slechts op beneden. Trek de batterijklep naar achteren om te openen. Montage op Dual Track Systeem opslag. Opname uw computer aan te sluiten om de genomen video’s te uploaden en vervolgens met vrienden te delen. Dat is alles! 2. Plaats de lithiumbatterij en let hierbij op de juiste richting. De XTC-300 is zeer innovatief ontwikkeld met een 5. Klik op het apparaat. Camera neemt niet op Controleer of de schakelaar geheel naar voren is geschoven. Indien de opname Geniet ervan! 3. Plaats het batterijklepje weer terug en klik het vast. Ontgrendeltoets 6. Open DCIM-map. identiek dual track montagesysteem op beide zijden van LED niet inschakelt, kunt u proberen het apparaat uit te schakelen en de batterijen de camera. Dit maakt installatie zeer eenvoudig. 7. Open 100MEDIA-map. opnieuw te installeren. Batterijstatus Indicator Betekenis 8. Uw video’s zijn in deze map. Klik om te bekijken. Wat zit er in de box? Constant Groen Volledige batterijcapaciteit Monteer de camera op de dual track montage door de Controleer de beschikbare geheugencapaciteit. › Midland XTC-300 Action camera › Kleefmontage voor helm Knippert groen Batterij is aan het opladen camera op het dual track systeem te schuiven met de Downloaden van video op een MAC Micro SD kaart twee inkepingen op de montage gericht op de achterzijde › USB kabel › Riemmontage voor helm Solide oranje Middellange levensduur van de batterij 1. Sluit de camera aan op de USB-poort middels de meegeleverde kabel. Micro SD kaart niet leesbaar Controleer of de Micro SD kaart correct is aangesloten. › 1100mAh Lithium batterijblok › Fietsstuurmontage van de camera. 2. Zet de camera aan door de RECORD-schakelaar te verplaatsen naar de opnamepositie. Sluit de camera aan op de computer om de beschikbare geheugencapaciteit ervan › Sigarettenaanstekerlader › Drijvende omhulsel Constant Rood Halve batterijcapaciteit Koppel de camera weer los van de dual track montage 3. MAC zal automatisch de externe harde schijf van de camera herkennen. te controleren. › Muurlader › Micro SD-kaartlezer Knipperend Rood* Vrijwel Uitgeputte Batterijen door de camera vast te houden met de lens naar uw 4. Klik op het icoontje op het bureaublad. Probeer het formatteerproces. lichaam gericht. Druk de ontkoppelschakelaar van de › Brilmontage Geen Licht Batterijen zijn leeg montage omlaag en trek de montagesteun naar u toe. 5. Open DCIM-map. Video Afspelen Opmerking: Wanneer de rode batterij-LED begint te knipperen, dient u de batterij op te laden, anders zal de camera Dankzij de dual track montage kan de camera eenvoudig Meegeleverde bevestigingen 6. Open 100MEDIA-map. Trage of schokkerige video Controleer of de camera is aangesloten op een USB 2.0 apparaat. XTC-300 Eigenschappen en Bedieningen op dat punt de opname stoppen. op beide de helmmontage en veiligheidsbrilmontage 7. Uw video’s zijn in deze map. Klik om te bekijken. Verwijder andere ongebruikte USB apparaten. Eigenschappen: Micro SD Kaart worden geinstalleerd. Hierdoor hoeft u de camera niet Kopieer de video naar de computer voordat u het afspeelt. telkens opnieuw te monteren. HI-modus functie M-modus functie L-modus functie 1. Til vergrendeling op de achterzijde van de klep om te openen De Micro SD Kaart Herformatteren Update de speler die u gebruikt 30 frames per seconde 60 frames per seconde 60 frames per seconde 2. Steek de micro SD kaart in de gleuf volgens de juiste polariteit (zijdelings aangegeven) Wanneer u de camera op de dual track montage U kunt de Micro SD kaart herformatteren terwijl het in de camera zit. U kunt met deze functie alle video’s gelijktijdig wissen. Video Downloaden 140 graden hoeklens 140 graden hoeklens 140 graden hoeklens 3. Sluit de klep tot het dichtklikt installeert, dient u het volgende te overwegen: Ga als volgt te werk: Trage gegevensoverdracht Controleer of de camera is aangesloten op een USB 2.0 apparaat. Indien het 1.1 16:9 aspectverhouding 16:9 aspectverhouding 16:9 aspectverhouding OPMERKING: XTC-300 ondersteunt geheugenkaarten van tot op 32GB. 1. Bepaal wat u wilt gaan opnemen en gebruik de 1. Schuif de RECORD schakelaar naar de opnamepositie. is, koppel het apparaat los en sluit weer aan. 1920 X 1080 resolutie 1280 X 720 resolutie 848 x 480 resolutie veiligheidsbril –of helmmontage dienovereenkomstig. 2. Wanneer de batterijindicator op groen springt, kunt u de Micro SD kaart formatteertoets ingedrukt houden. Verwijder andere ongebruikte USB apparaten. Neemt op als MP4 Neemt op als MP4 Neemt op als MP4 2. Zorg ervoor dat de camera na installatie recht vooruit 3. Houd de Micro SD kaart formatteertoets ingedrukt totdat de recorderindicator uitschakelt en de SD kaartindicator groen Computer herkent de camera niet Controleer of de RECORD schakelaar ingesteld is op de opnamepositie wanneer Opnemen is gericht en niet naar de grond of lucht. begint te knipperen. aangesloten op de computer. 1. Beweeg de RECORD schakelaar naar voren om de camera in te schakelen. 4. Formatteren is voltooid wanneer de SD-kaartindicator solide wordt. Controleer of de Micro SD kaart correct is aangesloten. Montage m.b.v. Draadmontage 5. Schuif de RECORD schakelaar naar de stand “uit”. RECORD schakelaar 2. De batterij-indicator licht op van rood naar groen. De SD-kaart indicator gaat branden. Onderop de XTC-300 zit een standaard draadmontage Cameradraad Montageschroef Opmerking: De camera kan de Micro SD kaart niet herformatteren wanneer de LED een lage batterijcapaciteit De Micro SD kaart is eventueel corrupt. Probeer het formatteerproces. vooruit: Glazen lens met 140° aan/opnemen De opname-indicator begint na een paar seconden rood te knipperen. Dit geeft aan dat de camera een video aan waarmee de camera op een helmriem of fietsstuur aangeeft. Zorg ervoor nieuwe batterijen in de camera te installeren voordat u het formattteerproces probeert uit te Audio het vastleggen is. hoek gemonteerd kan worden. voeren. Extreem windlawaai Plak een stukje tap over de microfoonopening. RECORD schakelaar 3. Stop de opname door de RECORD schakelaar terug naar de stand “uit” te schuiven. Bevestig de waterdichte behuizing Micorfoon terug: Opmerking: Nadat u de schakelaar naar de stand “uit” schuift, zal de camera nog 3 seconden blijven opnemen. Bevestig de camera door de schroef op de montage in Opname LED Uit/Opname stoppen de cameradraad te steken en de camera rechtsom te Knippert rood wanneer draaien om het vast te zetten op de schroef. Terugstellen Garantie camera opneemt SD kaart LED Status Betekenis Wanneer u de camera op de handvatten van een Deze Garantie heeft geen effect op de wettelijke rechten van de gebruiker volgens Nationale wetgeving van kracht m.b.t. Dual Track Montagesysteem Batterij LED SD Kaart LED Groen 75% meer beschikbare fietsstuur of met de geventileerde helmriemmontage Montage voor helmriem Montage voor fietsstuur Verwijder de batterijen voor het algeheel terugstellen de verkoop van consumentenproducten. Oranje 34-75% beschikbaar installeert, dient u het volgende te overwegen: De garantieperiode begint op de originele aankoopdatum van de Product door de eerste eindgebruiker en is geldig voor Rood minder dan 34% beschikbaar of niet geplaatste MicroSD-kaart. 1. Bepaal wat u wilt gaan opnemen en monteer 24 maanden. SD Kaart formatteertoets Mini USB aansluiting Knipperend Rood Kaart niet leesbaar dienovereenkomstig. Het is uitsluitend geldig en ten uitvoer legbaar in het land waar de gebruiker het product heeft aangeschaft, vooropgesteld HI/M/L modusschakelaar Knipperend Groen Geeft aan dat de kaart opnieuw geformatteerd is. 2. Zorg ervoor dat de camera na installatie recht vooruit dat de fabrikant hetzelfde product bestemd had voor verkoop in dat land. SD Kaart formatteertoets is gericht en niet naar de grond of lucht. Om gebruik te kunnen maken van deze garantie, moet het defecte product in de originele verpakking samen met het originele aankoopbewijs worden ingeleverd bij het geautoriseerde servicecentrum. Geheugencapaciteit HI opnametijd M opnametijd L opnametijd Compatibele Systemen De garantie dekt alle onderdelen van het apparaat en de arbeidskosten vereist voor reparatie ervan. 512 MB 7.5 Minuten 6.5 Minuten 10 Minuten De XTC-300 kan zowel op een PC als een MAC gebruikt worden. Hieronder vindt u de compatibele besturingssystemen: De garantie dekt geen defecten of beschadiging van het Product veroorzaakt door misbruik van, of met betrekking tot, Korte Starthandleiding 1 GB 15 Minuten 13 Minuten 20 Minuten Windows XP SP2, Windows Vista, Windows 7, Macintosh OSX 10.4 en hoger accessoires of software niet geproduceerd of geleverd door de fabrikant of door gebruik van het Product voor enig ander 2 GB 30 Minuten 26 Minuten 40 Minuten Voor Windows raden we aan Windows Media Player 9 of hoger. doeleinde dan het beoogde gebruiksdoeleinde van het Product. 1. Open het batterijklepje en installeer het batterijblok. Sluit het batterijklepje weer. De garantie is niet ten uitvoer legbaar na ontmanteling, modificatie of reparatie van het Product uitgevoerd door iemand 2. Open en vouw de rubberen achterafdekking omlaag. Sluit de micro SD kaart aan en let daarbij op de juiste 4 GB 60 Minuten 52 Minuten 80 Minuten Voor Macintosh raden we aan Quick Time 6,5 of hoger. anders dan het geautoriseerde servicecentrum of na reparatie met gebruik van ongeautoriseerde reserveonderdelen. richting. Selecteer de gewenste definitiekwaliteit. Sluit de afdekking. 8 GB 120 Minuten 104 Minuten 160 Minuten De camera neemt op in MP4 formaat. De garantie is bovendien niet geldig, en hier kan niet tegen geprotesteerd worden, nadat het product gemodificeerd of 3. Beweeg de RECORD schakelaar naar voren, Opname zal binnen een paar seconden starten. 16 GB 240 Minuten 208 Minuten 360 Minuten Video’s Downloaden gewijzigd is m.b.t. het originele gebruiksdoeleinde ervan. 4. Schuif de schakelaar terug naar stand “uit” om de opname te stoppen. Voordat u de Action camera weer aanzet 32 GB 480 Minuten 416 Minuten 720 Minuten Niemand wordt schadeloosgesteld voor de periode van inactiviteit van het apparaat noch kan een terugbetaling worden om een andere video op te nemen, wacht u 5/7 seconden om de camera zich te laten terugstellen. Het is niet nodig om elke software met de XTC-300 te installeren. Het is een plug-and-play apparaat. Volg de onderstaande verwacht of claim worden ingediend voor directe of indirecte beschadigingen wegens ongepast gebruik van het Product. 5. Sluit de camera aan op de computer en download de video. instructies hangt het af van het gebruik van een PC of een MAC. XTC-300 Action Camera Установка аккумулятора Установка видеокамеры Просмотр записи Благодарим вас за приобретение видеокамеры XTC-300, которая позволит любителям острых ощущений 1. Батарейный отсек расположен в задней части камеры. Сдвиньте вниз В комплекте вы найдете следующие варианты крепежей бороздки держателя Загрузка видео на компьютер с операционной системой Windows Медленное или прерывистое Удостоверьтесь, что камера подключена к устройству, поддерживающему USB 1. Подключите видеокамеру к персональному компьютеру через разъем USB посредством кабеля, поставляемого в комплекте. 2.0. воспроизведение видео файла видеокамеры, характеризующиеся различным назначением защелку крышки батарейного отсека и оттяните крышку, чтобы ее открыть. делать видеозаписи своих приключений. Простота в использовании, широкий угол обзора и 3 режима записи: 2. Вставьте аккумулятор, соблюдая правильное его положение. и вариантами соединения с видеокамерой: 2. Включите камеру, переместив ползунок (Rec) в позицию запись. Отсоедините другие USB устройства от ПК. RU Hi-высокое качество, М-среднее качество, L -низкое качество (стандартный режим), 4 часа в режиме записи 3. Закройте крышку батарейного отсека (при правильном выполнении, › 2 крепежа на шлем: 3. Устройство (камера) автоматически определится компьютером. Перед просмотром записи сохраните её на ПК. гарантируют то, что вы не пропустите ни одной секунды, наполненной адреналином. 4.Операционная система: Microsoft. Открыть раздел “Мой компьютер”. Камера будет отображаться в разделе устройств со Сделав запись, подключите камеру к компьютеру, загрузите видеоролик в интернет и разделите свои эмоции вы услышите щелчок). На липучке – соединение с камерой осуществляется рычажок съемными носителями. Обновите Player, который вы используете. (см. следующий посредством держателя раздел), с друзьями! Индикация уровня разряда аккумулятора на ремешке – винтовая система соединения с камерой; 5.Кликните на устройство. Загрузка видео файла на ПК Комплектация: › Крепеж на очки – соединение с камерой осуществляется 6.Откройте папку под названием DCIM. Медленная передача данных Удостоверьтесь, что камера подключена к устройству, поддерживающему USB Индикатор разряда аккумулятора Соответствующее значение посредством держателя (см. следующий раздел); 7.Затем кликните на папку100MEDIA. Ваше видео будет в этой папке. 2.0. Если камера регистрируется как устройство USB 1.1, то отсоедините камеру и видеокамера XTC-300 Action camera › крепеж на шлем - ремешок Постоянно горит зеленым светом Полный заряд аккумулятора › Крепеж на руль мотоцикла / велосипеда – винтовая система 8.Нажмите, чтобы посмотреть Ваше видео. снова подключите к ПК. › кабель USB › крепеж на шлем - липучка Мигает зеленым светом Аккумулятор заряжается соединения с камерой. Отсоедините другие USB устройства от ПК. › Li-Ion аккумулятор 1100 мА/ч › крепеж на руль Постоянно горит оранжевым светом Аккумулятор разряжен наполовину Загрузка видео на Mac Персональный компьютер Удостоверьтесь, что ползунок записи видеокамеры расположен в верхней 1. Подключите видеокамеру к персональному компьютеру через разъем USB посредством кабеля, поставляемого в комплекте. › зарядное устройство от прикуривателя › водонепроницаемый чехол не распознает камеру как внешнее позиции (позиция записи). › сетевое зарядное устройство › Micro SD Card reader Постоянно горит красным светом Аккумулятор разряжен до низкого уровня 2. Включите камеру, затем переместите ползунок (Rec) в позицию запись. USB устройство Удостоверьтесь, что карта памяти установлена должным образом. 3. Mаc автоматически распознает камеру как внешний жесткий диск. › крепеж на очки Мигает красным светом* Недостаточный уровень заряда аккумулятора для работы Держатель для установки видеокамеры Supplied mounts Отформатируйте карту памяти. Не горит Аккумулятор разряжен полностью на шлем или очки 4. Кликните на иконку этого диска. Звук 5. Откройте папку под названием DCIM. Характеристики видеокамеры и элементы управления Внимание! Когда красный индикатор начинает мигать, будьте готовы зарядить аккумулятор, так как в этот момент Данный держатель предназначен для фиксации видеокамеры на крепеже шлема или очков, позволяет быстро и просто 6. Затем кликните на папку100MEDIA. Ваше видео будет в этой папке. Чрезмерный шум, задувание ветра Прикройте отверстие микрофона. сменить положение видеокамеры (шлем-очки) в зависимости от цели / объекта съемки. Режим- Hi Режим- M Режим- L камера прекращает запись ролика. Для установки видеокамеры на держателе вставьте направляющие выступы видеокамеры в соответствующие 7. Кликните, чтобы посмотреть Ваше видео. Оденьте водонепроницаемый чехол 30 кадров в секунду 60 кадров в секунду 60 кадров в секунду Установка Micro SD карты памяти бороздки держателя и плавно двигайте камеру вдоль бороздок. угол обзора 140° угол обзора 140° угол обзора 140° Теперь достаточно зафиксировать держатель с камерой на крепеже шлема (на липучке) или очков в необходимой позиции Форматирование Micro SD карты памяти Правила эксплуатации и ухода. разрешение 1920х1080 разрешение 1280х720 разрешение 848x480 1. Откройте заднюю резиновую крышку. (направлении), учитывая объект предстоящей съемки, и удостовериться, что объектив видеокамеры направлен строго вперед, Форматируя Micro SD карту памяти, вы можете просто и быстро удалить все видеозаписи. ! Не пользуйтесь содержащими алкоголь жидкостями и чистящими средствами для очистки видеокамеры. а не на землю или небо. Камера готова к использованию! размер кадра 16:9 размер кадра 16:9 размер кадра 16:9 2. Установите карту памяти, соблюдая правильное ее положение. Для этого: ! Не погружайте видеокамеру в воду. запись в формате MP4 запись в формате MP4 запись в формате MP4 3. Закройте крышку отсека до характерного щелчка. Для отсоединения видеокамеры от крепежа, зафиксируйте видеокамеру в руке (объектив направлен от вас), нажмите на рычажок 4. Внимание! XTC-300 поддерживает карты памяти емкостью до 32ГБ. (см. рисунок в верхней части страницы) и тяните держатель на себя. 1. Переместите ползунок записи (Rec) в верхнюю позицию (позиция записи). ! Протирайте видеокамеру мягким влажным кусочком ткани. 2. Когда индикатор батареи загорится зеленым светом, нажмите и удерживайте кнопку форматирования карты памяти. ! На время длительного хранения выключите видеокамеру и удалите из нее аккумулятор. Запись ролика Винтовая система соединения камеры с крепежом 3. Удерживайте кнопку до тех пор, пока индикатор записи (Rec) погаснет, а индикатор карты памяти начнет мигать зеленым Внимание! Не вскрывайте корпус видеокамеры самостоятельно! светом. Крепеж на шлем (на ремешке) и рулевой крепеж имеют винтовую 4. Форматирование завершено когда индикатор SD-карты постоянно горит. Несанкционированное вскрытие изделия лишит вас гарантии на устройство! Гарантия ползунок записи (Rec) Для включения видеокамеры переместите ползунок записи (Rec) вперед (в позицию запись). систему соединения видеокамеры с крепежом. 5. Переместите ползунок записи в нижнюю позицию (off). На данный товар гарантия выдается сроком на один год, считая со дня приобретения товара. Гарантийное обслуживание Для фиксации видеокамеры на данном крепеже вставьте винт в верхней позиции – 5. Индикатор батареи загорится зеленым светом (красный потухнет). Внимание: В случае, если горит индикатор низкого уровня заряда аккумулятора, невозможно осуществить форматирование осуществляется только при условии строгого соблюдения правил эксплуатации и требований безопасности, указанных в угол обзора 140° включение камеры/ 6. Через несколько секунд индикатор записи (Rec) начнет мигать красным светом – осуществляется запись ролика. крепежа в резьбовое соединение видеокамеры, расположенное резьбовое винт крепежа карты памяти. Таким образом, перед началом форматирования удостоверьтесь, что аккумулятор видеокамеры руководстве пользователя. запись ролика ползунок записи (Rec) 7. Для остановки записи переместите ползунок (Rec) обратно в позицию Off. на нижней поверхности ее корпуса, и вращайте видеокамеру соединение полностью заряжен. микрофон индикатор записи (Rec) в нижней позиции Внимание: камера остановит запись через 3 секунды. по часовой стрелке. Произведено или импортировано: – мигает красным Установите видеокамеру в необходимом направлении, учитывая СТЕ Интернешнл с.р.л. Ул. Р. Севарди 7- 42010 светом во время записи – остановка записи/ объект предстоящей съемки, и удостоверьтесь, что объектив Манкасаль, Реджио Эмилия, Италия ролика выключение камеры Индикатор состояния Micro SD карты Соответствующее значение видеокамеры направлен строго вперед, а не на землю или небо. Общий сброс индикатор батареи индикатор карты Камера готова к использованию! Импортер в России: ЗАО «Алан-Связь» направляющие крепления камеры на держателе памяти Горит зеленым светом Свыше 75 % свободной памяти Чтобы сделать общий сброс, удалите аккумулятор из батарейного отсека камеры. Интернет-сайт: www.midland.ru Горит оранжевым светом От 34% до 75 % свободной памяти 105187, г. Москва, Фортунатовская, 31А, стр. 2 Горит красным светом Мешьше, чем 34 % доступно или карта не установлена крепеж на шлем (на ремешке) крепеж на руль Установка режима HI/M/L Mini USB разъем Мигает красным светом Карта не читается кнопка форматирования Мигает зеленым светом Карта была отформатирована Проблемы и неполадки карты памяти отсек Micro SD карты памяти Объм памяти Доступное время записи в минутах Проблема Решение Режим-Hi Режим-M Режим-L Совместимость видеокамеры с операционными системами персонального компьютера Аккумулятор 512 Мб 7,5 6,5 10 Видеокамера совместима с операционной системой Windows и MAC. Ниже приведены операционные системы совместимые Камера не включается Удостоверьтесь, что аккумулятор полностью заряжен 1 Гб 15 13 20 с камерой: Запись Краткое руководство по использованию видеокамеры 2 Гб 30 26 40 Windows XP SP2, Windows Vista, Windows 7, Macintosh OSX 10.4 или выше. Камера не осуществляет запись Удостоверьтесь, что ползунок записи расположен в верхней позиции (до щелчка). Для Windows мы рекомендуем Windows Media Player 9 или выше. 60 80 52 Если индикатор записи не загорается, то выключите камеру и переустановите 4 Гб 1. Откройте крышку батарейного отсека и установите аккумулятор. Закройте крышку батарейного отсека. 8 Гб 120 104 160 Для Macintosh мы рекомендуем Quick Time 6.5 или выше. аккумулятор. 2. Откройте резиновую крышку отсека карты памяти и установите карту памяти, затем установите желаемое 16 Гб 240 208 360 Видеозаписи сохраняются в формате MP4. Проверьте объем доступной памяти. разрешение (Hi/M/L).Закройте крышку отсека карты памяти. 32 Гб 480 416 720 Карта памяти Micro SD 3. Сдвиньте ползунок записи (Rec) вперед, в позицию “Запись”- запись начнется через несколько секунд. Загрузка видеозаписей на персональный компьютер Карта памяти не читается Удостоверьтесь, что карта памяти установлена должным образом. 4. Для остановки записи переместите ползунок (Rec) назад в позицию (off). Перед тем, как вновь включить камеру на Внимание: видеокамера автоматически разделяет запись на фрагменты размером 2 Гб. Для загрузки видеоролика на персональный компьютер (ПК) установка какой-либо программы не требуется. Перед началом запись нового видеоролика, подождите 5-7 секунд, пока камера осуществит сброс. загрузки удостоверьтесь, что аккумулятор видеокамеры полностью заряжен.Ниже приведены инструкции для загрузки Посредством ПК проверьте доступный объем памяти. 5. Подключите камеру к персональному компьютеру и скопируйте видеоролик. Внимание: Режим Hi требует 4 класс карты Micro SD для записи и воспроизведения. видеозаписей для PC или MAC. Отформатируйте карту памяти. Compliant • INFORMAZIONE AGLI UTENTI manual de instrucciones del mismo, no deben Ai sensi dell’art. 13 del decreto legislativo 25 ser desechados junto a los residuos urbanos luglio 2005, n.151 “Attuazione delle Direttive normales sino que deben ser depositados en 2002/95/CE, 2002/96/CE e 2003/108/CE, relative los centros de recogida especializados. En estos Prodotto o importato da: alla riduzione dell’uso di sostanze pericolose centros, los materiales se dividiran en base CTE INTERNATIONAL s.r.l. nelle apparecchiature elettriche ed elettroniche, a sus caracteristicas y seran reciclados, para Via. R.Sevardi 7- 42124 Reggio Emilia Italia nonche allo smaltimento dei rifiuti”. asi poder contribuir de manera importante a la • Il simbolo del cassonetto barrato riportato proteccion y conservacion del medio ambiente. www.cte.it - www.midlandradio.eu sull’apparecchiatura indica che il prodotto Prima dell’uso leggere attentamente le istruzioni. Se il prodotto contiene batterie: non gettare nel fuoco, non alla fine della propria vita utile deve essere • Tous les articles presentant ce symbole sur le disperdere nell’ambiente dopo l’uso, usare gli appositi contenitori per la raccolta. raccolto separatamente dagli altri rifiuti. L’utente corps, l'emballage ou le manuel d'utilisation dovra, pertanto, conferire l’apparecchiatura de celui-ci ne doivent pas etre jetes dans des Produced or imported by: giunta a fine vita agli idonei centri di raccolta poubelles normales mais etre amenes dans differenziata dei rifiuti elettronici ed elettrotecnici, des centres de traitement specialises. La, CTE INTERNATIONAL s.r.l. Via. R.Sevardi 7 42124 Mancasale Reggio Emilia Italy oppure riconsegnarla al rivenditore al momento les differents materiaux seront separes par dell’acquisto di una nuova apparecchiatura di tipo caracteristiques et recycles, permettant ainsi de equivalente, in ragione di uno a uno. L’adeguata contribuer a la protection de l'environnement. Imported by: raccolta differenziata per l’avvio successivo • Todos os artigos que apresentem este simbolo no ALAN UK dell’apparecchiatura dismessa al riciclaggio, al seu corpo, embalagem ou manual de instrucoes, Unit 2, Callenders, Paddington Drive, Churchward Park, Swindon, Wiltshire, SN5 7YW - UK trattamento e allo smaltimento ambientalmente nao devem ser eliminados juntamente com o lixo www.alan-uk.com compatibile contribuisce ad evitare possibili normal mas sim conduzidos para contentores effetti negativi sull’ambiente e sulla salute e de eliminacao de residuos especializados. Read the instructions carefully before installation and use. if the product contains batteries: do not throw the favorisce il riciclo dei materiali di cui e composta Aqui, os diversos materiais serao divididos por battery into fire. To disperse after use, throw into the appropriate containers. l’apparecchiatura. Lo smaltimento abusivo caracteristicas e reciclados, realizando assim del prodotto da parte dell’utente comporta Importado por: l’applicazione delle sanzioni amministrative di uma importante contribuicao para a proteccao ALAN COMMUNICATIONS, SA cui al dlgs. n.22/1997 (articolo 50 e seguenti del ambiental. C/Cobalt, 48 - 08940 Cornella de Llobregat - Espana dlgs. n.22/1997). • ??? ?? ???????? ??? ????? ??????????? ?? ???????? Tel: +34 902 384878 Fax: +34 933 779155 • All articles displaying this symbol on the body, ??????? ??? ????, ?? ?????????? ? ?? ?????????? www.midland.es packaging or instruction manual of same, must ?????? ????, ??? ?????? ?? ????????????? not be thrown away into normal disposal bins but ????? ??????? ?????? ??????????? ???? ?? Lea atentamente las instrucciones antes de usar el equipo. si el producto contiene pilas o baterias no las brought to specialised waste disposal centres. ?????????????? ??? ?????? ?????? ??????????. tire al fuego ni las disperse en el ambiente despues de su uso, utilice los contenedores apropiados para su Here, the various materials will be divided ????, ?? ??????? ????? ?? ?????? ?? ????????????? reciclaje. by characteristics and recycles, thus making ??????? ?? ?? ?????????????? ??? ?? ????????????? an important contribution to environmental ??????, ????????????? ???? ?????????? ???? Vertrieb durch: protection. ????????? ??? ?????????????. • Alle Artikel, die auf der Verpackung oder der • Alle artikels die dit symbool weergeven op de ALAN ELECTRONICS GmbH Gebrauchanweisung dieses Symbol tragen, Daimlerstra?e 1K - D-63303 Dreieich Deutschland durfen nicht in den normalen Mulltonnen behuizing, verpakking of instructiehandleiding www.alan-electronics.de entsorgt werden, sondern mussen an ervan, mogen niet weggegooid worden in Vor Benutzung Bedienungsanleitung beachten. Bei Verwendung von Batterien beachten Sie bitte gesonderten Sammelstellen abgegeben werden. normale vuilnisemmers maar moeten naar die Umweltbestimmungen. Batterien niemals ins offene Feuer werfen, und nur in dafur vorgesehene Dort werden die Materialien entsprechend ihrer speciale afvalverwerkingscentra gebracht Sammelbehalter entsorgen. Eigenschaften getrennt und, um einen Beitrag worden. Hier worden de verschillende materialen zum Umweltschutz zu liefern, wiederverwertet. verdeeld volgens eigenschappen en recyclage • Todos los articulos que exhiban este simbolo en waardoor een belangrijke bijdrage aan de el cuerpo del producto, en el embalaje o en el milieubescherming wordt geleverd.