На сайте 123418 инструкций общим размером 499.4 Гб , которые состоят из 6235582 страниц
Фото
Руководство пользователя MANFROTTO Mkcompactadv-WH Compact Advanced. Основные функции, характеристики и условия эксплуатации изложены на 2 страницах документа в pdf формате.
Доступно к просмотру 2 страницы. Рекомендуем вам скачать файл инструкции, поскольку онлайн просмотр документа может сильно отличаться от оригинала.
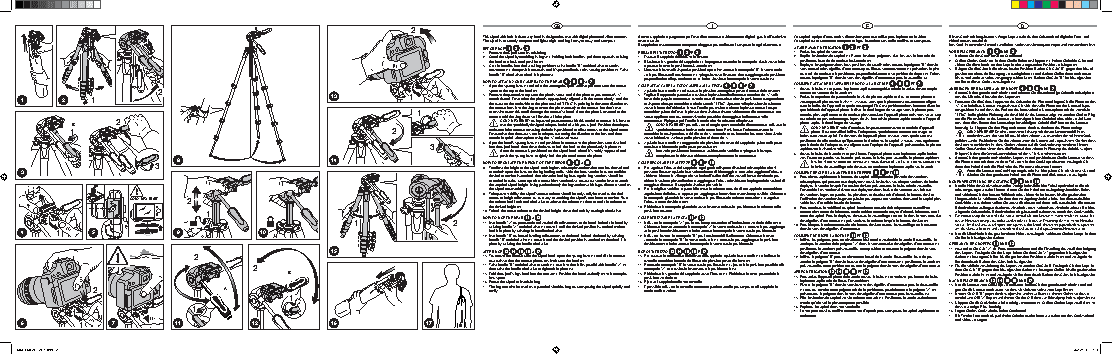
E                                                      RU                                                       J                                                      KO                                                      CN
Este tripode dispone de una rotula de tres vias y esta disenado para usarse con camaras   Этот штатив со встроенной 3-D головкой создан для использования с цифровыми фото и видео   3????????????????????????????????????????????  ? ??? 3way ??? ??? ?????? ?????? ? ??? ???? ?? ??? ?   ????????????,?????????????
fotograficas y de video.                                камерами. Штатив чрезвычайно компактен и отличается небольшим весом, благодаря чему его   ??????????????????????????  ????.                                            ???????????,?????
Este tripode es extremadamente compacto y ligero lo cual lo hace facil de cargar y de transportar.  легко переносить и перевозить на транспорте.                       ?? ???? ??? ?????? ?? ?? ? ??? ?????.
ANTES DE USARSE  1    2   Y  3                          ПЕРЕД ИСПОЛЬЗОВАНИЕМ  1    2   &  3                    ?????  1    2   &  3                                                                                            ???  1    2   &  3
1.  Saque el tripode de su estuche de tela.             1.  Достаньте штатив из матерчатой сумки.               1.  ???????????????                                    ?? ?  1    2   &  3                                     1.  ???????????
2.  Pare el tripode desdoblando sus patas (1). Sujetando ambas manijas, jalelas hacia arriba   2.  Раскройте ножки штатива и установите его (1). Держа обеими руками, потяните их вверх так,   2.  (1)??????????????(2)????????????????????????????  1.  ???? ?????? ????.  2.  ????????(1)????????????????,?????????(2)?
hasta poner la rotula en posicion horizontal (2).       чтобы головка заняла горизонтальное положение (2).    3.  ????????????????:(1)????B??????????????????(2)?    2.  ??? ? ?????? ????(1). ?? ??? ?? ?? ???? ??? ?? ???   3.  ???????????:???????B,???????(1),???????,?
3.  Ponga las manijas en sus posiciones de uso: gire la manija "B" en sentido contrario a las   3.  Установите ручки в рабочее положение: поверните ручку "B" против часовой стрелки для   ?????????????????????????(3)????B????????????  ???(2).  ??????????(2)????????B,??????(3)?
agujas del reloj para liberar su movimiento (1), luego muevala hacia fuera hasta que quede   свободного движения (1), затем поднимите ее вверх так, чтобы она находилась перпендику-  ????  3.  ??? ?? ??? ??: ?? B? ?? ?????? ?? ???? ???? ??? ?  ???????????  4    5    6   &  7
perpendicular a su posicion inicial (2). Por ultimo gire la manija "B" en sentido de las agujas   лярно по отношению к своему исходному положению (2). Поверните ручку "B" по часовой   (1), ??????? ??? ?? ??? ?? ???? ?? ???(2). ??B ? ?? ?
del reloj para fijarla en su posicion (3).              стрелке для фиксации (3).                             ??????????  4    5    6   &  7                            ????? ?? ?????(3).                                   4.  ????(1),??????????(2)??????????
INSTALACION DE LA CAMARA EN LA ROTULA  4    5    6   Y  7     КАК УСТАНОВИТЬ КАМЕРУ НА ГОЛОВКУ  4    5    6   &  7     4.  (1)???????????(2)??????????????????????????????  ???? ??? ???? ?  4    5    6   &  7                5.  ???????????,???????????1/4“??????????????
?????,?????????“LENS”?????????????????????
?????
4.  Abra la palanca (1) y quite la placa rapida de liberacion (placa rectangular) del espacio   4.  Раскройте пружинный рычаг (1) и выньте прямоугольную быстросъемную площадку из   5.  ???????????????????????1/4”????????????????????     ????????????,???????,???????????????????
central que esta arriba de la rotula (2).               центра верхней части головки (2).                      ??????????????????????????????????LENS????????        4.  ??? ??(1) ???? ? ??? ????? ?? ??? ???? ?????(2).       ?,??????,???????????
5.  Retire la capucha protectora del tornillo de la placa y atornille la placa en el agujero roscado   5.  Снимите защитный колпачок винта площадки и соедините площадку с внутренней резьбой ?“   ????????????????????????????????????????????  5.  ???? ??? ?? ?? ?? ??? ? ???? ?“ ? ??? ????? ?????.   SONY NEX 5R/5T: ???????????????????,????????
?" de su camara. Asegurese que la placa se encuentre alineada correctamente respecto al   вашей камеры. Убедитесь, что площадка выровнена по отношению к корпусу камеры и что   ????????????????????????????????????????????  ????? ??? ??? ??? ??? ????? ?? ? ???? ??? “LENS”??   ???????????????????????????????,?????
cuerpo de la camara y que la flecha marcada “LENS” situada en la parte de abajo de la   стрелочка на нижней стороне площадки, обозначенная словом "LENS" указывает в том же   ???????????????????????????????????????    ??? ??? ???? ??? ??? ?? ??? ????? ?????. ?? ????   ?????????????????????????????????,????
placa apunte en la misma direccion que el lente de la camara. Use el anillo para apretar la   направлении, что и объектив камеры. При помощи кольца надежно закрепите площадку на   ???NEX 5R/5T: ???????????????????????????????  ????? ???? ???? ?????. ? ?? ??? ???? ?? ?? ? ????   1/4”????????.
placa firmemente en la camara pero sin forzar, ya que podria danar la rosca de la camara.   камере , но не перетягивайте; это может повредить резьбу камеры. Как только камера будет   ????????????????????????????????????????  ?? ?? ?? ???? ??? ???. ????? ???? ??? ?? ?? ??? ??   6.  ???????(1)??????,??????????????????????,?
Una vez que la placa este sujeta a la camara, pliegue el anillo de tal forma que quede   установлена на площадку, сложите кольцо таким образом, чтобы оно лежало на площадке.   ????????????????????????????????????????????  ????? ??? ?? ???.   ?????,????????????(2)?
aplanado en la placa.                                       SONY NEX 5R/5T: для улучшения качества работы с этой моделью камеры, лучше   ??????????????????????????????1/4”?????????????  SONY NEX 5R/5T: ? ???? ??? ??? ??? ???? ?????? ??  7.  ??!?????????????,?????????????,??????,??
SONY NEX 5R/5T: Para un funcionamiento mas eficaz con este modelo de camara,   всего использовать специально разработанный адаптер, входящий в комплектацию   6.  (1) ???????????(2)??????????????????????????????  ? ?? ???? ?? ????? ????. ??? ?? ???? ?? ?????   ????????????
lo ideal es usar el adaptador de diseno especial que viene incluido con su tripode.   вашего штатива. Установите адаптер под камерой, удостоверьтесь, что отверстие   ??????????????????????????  ??? ?? ?? ??? ??? ??? ??? ???. ???? ???? ??? ??? ?
Coloque el adaptador bajo la camara, asegurese que el agujero quede en tal posicion que   расположено так, что имеется доступ к креплению штатива. Проверьте также, чтобы стрелки   7.   ????????????????????????????????????????  ??? ?? ? ?” ??? ???? ? ??? ????? ?? ???.  ??????????  8    9   &  10
permita el acceso a la montura del tripode. Asegurese tambien que las flechas dibujadas en   на адаптере указывали направление к объективу, а затем присоедините быстросъемную   ???????????????????????????????  6.  ??? ??(1) ????? ??? ????? ??? ?? ????? ???? ??? ?   8.  ?????????,????????????????:??????????,??
el adaptador apunten en la direccion del lente y enseguida instale la placa de liberacion   площадку с помощью универсального болта ?” .                                ??? ?? ????? ? ??? ????? ?? ? ? ??? ???(2).             ???????????,????????,???????????????????
mediante el tornillo universal de ?”.                 6.  Раскройте пружинный рычаг головки (1) и установите камеру таким образом, чтобы площадка   ???????  8    9   &  10    7.   ???? ??? ?? ?? ?, ????? ???? ??? ??? ??? ?? ??
6.  Abra la palanca de la rotula (1) y acomode la camara de tal forma que la placa se inserte   была зафиксирована сначала в головке штатива, затем закройте рычаг и плотно зафиксируйте   8.  ????????????????????????????????????????????  ?? ????? ????.  ?????????(????????,????????)????????????
???????????????????????????
nuevamente en la rotula haciendo entrar primero su parte anterior, cierre enseguida la   площадку на месте (2).  ???????:????????????????????????????????????                                                                9.  ??????,?????????????????????????????????
palanca para sujetar la parte posterior de la placa firmemente en su posicion (2).  7.   Когда камера установлена на головку штатива, проверьте её устойчивость и при   ????? ?? ???? ?  8    9   &  10                         ???????????(1),?????????????(2)?
7.    Una vez que la camara quede instalada en la rotula del tripode, verifique su estabilidad   помощи рычага зафиксируйте на месте площадку и камеру.   ??????????????????????(???????????????????)  8.  ?????? ??? ???? ????, ? ?? ?? ??? ??? ??? ??? ???  10.  ???????????,????????????
????????????????????????????????????????????
y oprima la palanca para bloquear firmemente en posicion la placa y la camara.  КАК РЕГУЛИРОВАТЬ ВЫСОТУ ШТАТИВА  8    9   &  10     ????????                        ??: ? ? ??? ??? ??? ?? ??? ?? ??? ??? ?? ??? ??? ??
COMO AJUSTAR LA ALTURA DEL TRIPODE  8    9   Y  10      8.  Для регулировки высоты штатива каждая ножка оснащена телескопическими секциями, кото-  9.  ???????????????????????????????????????????  ? ? ? ??? ?? ????. ??? ??? ?????? ?? ? ??? ?? ?? ??  ??????  11  &  12
8.  Para ajustar la altura del tripode, cada pata tiene secciones telescopicas que pueden aflo-  рые могут быть разблокированы и выдвинуты: откройте рычаг на хомуте блокировки ножки,   ????????????????????????????????(1)??????????  ?? ?? ???? ?? ??? ?? ???(?? ??? ?? ?? ???? ?? ?? ?  11.  ????A??????????????????????A(1)?????,????
jarse y extenderse: abra la palanca en el collarin de bloqueo de la pata, deslice la seccion   задвиньте внутреннюю секцию полностью или пока желаемая высота не будет достигнута,   ?????????(2)?????????????????????????  ?? ?????). ? ?? ?? ?? ???? ???? ?????? ???? ?? ? ?  ?????????(2),?????????????????
interior hacia adentro o hacia fuera hasta alcanzar la extension deseada, enseguida cierre   затем снова закройте рычаг блокировки. Секции ножки должны выдвигаться по порядку,   10. ??????????????????????????????????????  ? ???.  12.  ????B???????????????????B(1)?????,???????
la palanca de bloqueo nuevamente. Conviene ir extendiendo las secciones siguiendo un   сверху вниз (самая широкая секция в первую очередь, самая узкая секция - в последнюю),   9.  ??? ??? ??, ?????? ?? ??? ?? ?? ?? ?? ?????? ?? ??  ??????(2),?????????????????
orden de arriba hacia abajo (primero la seccion mas gruesa, y al final la mas delgada) hasta   чтобы достигнуть необходимой высоты штатива. Предпочтительное использование секции   ?????  11  &  12    ? ?? ?? ???? ?? ??? ????? ?????. ?? ??? ?? ?? ?? ?
? ?????? ?? ?(1), ??? ???? ??? ?? ????(2).
alcanzar la altura del tripode requerida. Cuando se usan predominantemente las secciones   ножек с большим диаметром делает штатив более устойчивым.  11. ????A??????????????????????????(1)????A???????                     ???  13 14 15 16  &  17
de diametro mayor el tripode es mas estable.          9.  Чтобы улучшить устойчивость, центральная колонна штатива должна использоваться дей-  ????????????(2)??????????????????????????????   10. ?? ?? ??? ??? ?? ?? ????? ??? ?? ???? ??? ???   13.  ?????????????,????(1)???????,???????????
9.  Para mejorar la estabilidad, conviene usar la columna central del tripode unicamente como   ствительно только в качестве последнего средства регулировки высоты, или как способ до-  12. ????B????????????????????????(1)????B????????  ??(2)?
ultimo recurso para ajustar la altura o bien para obtener la extension maxima del tripode.   стигнуть максимального выдвижения штатива. Чтобы выдвинуть ее, разблокируйте рукоятку,   ???????????(2)??????????????????????????????   ?? ???  11   &  12     14.  ???????B,????(1),??????????A????(2),?????
Para extenderlo, desbloquee el boton, girelo en sentido contrario a las agujas del reloj para   поверните ее против часовой стрелки, чтобы разблокировать колонну (1), затем поднимите   11. ?? A? ???? ??? ???? ? ?? ?? ???? ?????. ?? A? ?? ??  ????,??????(3)?
liberar la columna (1), enseguida jale la columna hacia arriba hasta la altura deseada (2).  колонну на желаемую высоту (2).  ???  13 14 15 16  &  17                   ???? ?? ??? ???? (1), ??? ??? ?? ?(2) ?? ??? ??????   15.  ???????????(1)????????????(2),??????
10. Para bloquear la columna central a la altura deseada, cierre el boton girandolo en el sentido   10.  Для блокировки центральной колонны на желаемой высоте, закройте рукоятку, повернув ее   13. ??????????????????(1) ???????????(2)????????????  ?? ??? ?????.  16.  ???????????
de las manecillas del reloj.                            по часовой стрелке.                                    ????????????????                                      12. ?? B? ???? ??? ?? ???? ?????. ?? B? ?? ?????? ?? ?  17.  ????????????????????????
USO DE LA ROTULA  11   Y  12                            КАК ИСПОЛЬЗОВАТЬ ГОЛОВКУ  11  &  12                     14. (1)????B?????????????????(2)???????A????????????      ?? ????(1), ??? ??? ?? ?(2) ?? ??? ?????? ?? ??? ??
???.
11. Utilice la manija "A" para ajustes panoramicos o de inclinacion vertical. Desbloquee la rotula   11.  Используйте рукоятку "A" для панорамных движений и регулировки вертикального наклона   ????????????????????(3)?
girando la manija "A" en sentido contrario a las agujas del reloj (1), enseguida muevala hasta   головки. Снимите блокировку головки, повернув рукоятку "A" против часовой стрелки (1),   15. (1)????????????(2)??????????????????????  ?? ?  13 14 15 16   &  17
alcanzar la posicion deseada (2), luego fijela en posicion girando la manija en sentido de las   поворачивайте до необходимого положения (2) затем зафиксируйте на месте, повернув   16. ?????????????
agujas del reloj.                                       рукоятку по часовой стрелке.                         17. ????????????????????????????????????????????        13. ???? ??? ?????, ??? ??(1) ???? ??? ??? ??? ????? ?
12.  Utilice la manija "B" para ajustes de nivelacion lateral de la rotula. Afloje la rotula girando la mani-  12.  Используйте рукоятку "B" для регулировки горизонтального движения головки. Снимите бло-  ???? ????? ???(2).
ja "B" en sentido contrario a las agujas del reloj (1), enseguida muevala hasta alcanzar la posicion   кировку головки, повернув рукоятку "B" против часовой стрелки (1), поворачивайте до необхо-  14. ?? B? ?? ?????? ?? ??? ?(1), ?? A? ??? ??? ???(2), ??
deseada (2), luego fijela en posicion girando la manija en sentido de las agujas del reloj.  димого положения (2) затем зафиксируйте на месте, повернув рукоятку по часовой стрелке.  ?????? ??? ?? ?????(3).
DESPUES DE USARSE  13 14 15 16  Y  17                   ПОСЛЕ ИСПОЛЬЗОВАНИЯ  13 14 15 16  &  17                                                                        15. ?????? ??? ?? ???? ???? (1). ??? ???? ??(2) ????? ?
?? ???.
13. Para retirar la camara de la rotula del tripode, abra la palanca (1) e incline la camara hacia el   13.  Для того чтобы снять камеру с головки штатива , раскройте рычаг (1) и наклоните камеру   16. ?????? ?? ?? ????.
frente de tal forma que la placa de la camara se suelte de la rotula (2).  вперед так, чтобы площадка камеры отошла от головки (2).                                  17. ??? ?? ???? ??? ????, ?? ??? ?????? ?? ??? ??? ? ?                                                                                                                                  INSTRUCTIONS
14. Gire la manija "B" en sentido contrario a las agujas del reloj para liberarla (1), enseguida   14.  Поверните рукоятку "B" против часовой стрелки для свободного движения (1), поверните ее в   ???.
rotela hasta que quede paralela a la manija "A" (2), luego gire la manija en sentido de las   положение параллельное рукоятке "A" (2), затем поверните рукоятку по часовой стрелке для
agujas del reloj para apretarla en posicion (3).        фиксации в нужном положении (3).                                                                                                                                                                                                                                                                    MKCOMPACTADV-BK
15. Doble las patas del tripode a su posicion en el centro (1). Coloque enseguida la rotula   15.  Сложите ножки штатива обратно в центр (1). Установите головку вертикально, чтобы она                                                                                                                                                                       MKCOMPACTADV-WH
verticalmente (2) de modo que ocupe menos espacio.      занимала меньше места (2).
16. Regrese el tripode a su estuche de tela.            16.  Положите штатив обратно в матерчатую сумку.
17. El estuche tambien puede usarse como una practica bolsa que se lleva al hombro para   17.  Сумку также можно использовать в качестве удобной наплечной сумки для быстрой и удоб-
transportar el tripode de manera rapida y facil.        ной транспортировки штатива.                                                                                                                                                                                                                                                                          165 cm  1,92 kg   3 kg
Cod. 106693 - 12/13    Copyright © 2013 Manfrotto Bassano Italy          64.96”  4.23 lbs  6.61 lbs
MKCOMPACTADV.indd   1                                                                                                                                                                                                                                                                                                                                                                        06/12/13   17:49
2                                                  GB                                                       I                                                       F                                                       D
This tripod with built-in three-way head is designed for use with digital photo and video cameras.  Questo treppiede e progettato per l’uso di fotocamere e videocamere digitali, grazie all’esclusiva   Ce trepied, equipe d’une rotule 3 dimensions peut etre utilise pour la photo ou la video.  Dieses Stativ mit integriertem 3-Wege-Kopf wurde fur den Gebrauch mit digitalen Foto- und
The tripod is extremely compact and lightweight, making it easy to carry and transport.  testa a tre vie.       Ce trepied est extremement compact et leger, le rendant tres facile a utiliser et transporter.  Videokameras entwickelt.
Il treppiede e estremamente compatto e leggero per facilitarne il trasporto in ogni circostanza.                Das Stativ ist besonders kompakt und leicht, so dass es sich bequem tragen und transportieren lasst.
BEFORE USE  1    2   &  3                                                                                       A FAIRE AVANT UTILISATION  1    2   ET  3
1.  Remove the tripod from its fabric bag.              PRIMA DELL’UTILIZZO  1    2   E  3                      1.  Retirer le trepied de son sac.                      VOR DEM GEBRAUCH  1    2   UND  3
2.  Stand the tripod by unfolding its legs (1). Holding both handles, pull them upwards to bring   1.  Estrarre il treppiede dalla borsa in tessuto.  2.  Depliez les jambes du trepied (1). Prenez les deux poignees, tirez-les vers le haut afin de   1.  Nehmen Sie das Stativ aus dem Stoffbeutel.
the head to a horizontal position (2).                2.  Divaricare le 3 gambe del treppiede (1). Impugnare entrambe le manopole, tirarle verso l’alto   positionner la rotule de maniere horizontale (2).  2.  Stellen Sie das Stativ auf, in dem Sie die Beine ausklappen (1). Halten Sie beide Griffe und
ziehen Sie diese hoch, um den Kopf in eine waagerechte Position zu bringen (2).
3.  Get the handles into their working positions: twist handle "B" anticlockwise to free its   e portare la testa in posizione orizzontale (2).   3.  Deployez les poignees dans leurs positions de travail: faites tourner la poignee "B" dans le   3.  Bringen Sie die Griffe in die einsatzbereite Position: Drehen Sie Griff "B" gegen den Uhrzei-
sens contraire des aiguilles d’une montre pour liberer son mouvement (1) puis faites-la pivo-
2                                                                                                                         movement (1), then push it outwards until it’s perpendicular to its starting position (2). Twist   3.  Muovere le leve sulle rispettive posizioni operative: ruotare la manopola "B" in senso antio-  ter a 90° de maniere a la positionner perpendiculairement a sa position de depart (2). Faites   gersinn, um eine freie Bewegung zu ermoglichen (1) und drehen Sie ihn dann nach au?en,
handle "B" clockwise to lock it in place (3).
rario per liberarne il movimento (1), spingerla verso l’esterno, fino a raggiungere la posizione
perpendicolare alla precedente (2), e, infine, riavvitare la manopola in senso orario (3).   tourner la poignee "B" dans le sens des aiguilles d’une montre pour la verrouiller (3).  bis er senkrecht zu seiner Ausgangsposition ist (2). Drehen Sie Griff "B" im Uhrzeigersinn,
HOW TO ATTACH YOUR CAMERA TO THE HEAD  4    5    6   &  7                                                       COMMENT ATTACHER L’APPAREIL PHOTO A LA ROTULE  4    5    6   ET  7  um ihn an dieser Stelle zu verriegeln (3).
4.  Open the sprung lever (1) and take the rectangular quick release plate out from the centre   COME ATTACCARE LA FOTOCAMERA ALLA TESTA  4    5    6   E  7     4.  Ouvrez le levier (1) et prenez le plateau rapide rectangulaire afin de le retirer de son empla-  ANBRINGEN DER KAMERA AN DEN KOPF  4    5    6   UND  7
2                                                                                                                    5.  Remove the protective cap from the plate’s screw and fit the plate to your camera’s ?"   4.  Aprire la leva a molla (1) ed estrarre la piastrina rettangolare posta al centro della testa (2).  cement au sommet de la rotule (2).  4.  Offnen Sie den gefederten Hebel (1) und nehmen Sie die rechteckige Schnellwechselplatte
space at the top of the head (2).
5.  Togliere il cappuccio protettivo e avvitare la piastrina alla filettatura femmina da ?’’ sulla
aus der Mitte der Oberseite des Kopfes (2).
1              2          1                                                                                     13                          1                            female thread. Ensure that the plate is appropriately aligned with the camera body, and that   base della propria fotocamera, avendo cura di controllare che sia posizionata ortogonalmen-  5.  Retirez le capuchon de protection de la vis du plateau rapide et fixez ce meme plateau a   5.  Entfernen Sie die Schutzkappe von der Schraube der Platte und legen Sie die Platte auf das
votre appareil photo avec la vis 1/4. Assurez-vous que le plateau est correctement aligne
te rispetto al corpo macchina e che la freccia “LENS” riportata sulla piastrina sia orientata
the arrow on the underside of the plate marked “LENS” is pointing in the same direction as
the camera lens. Use the ring to fasten the plate securely to the camera, but don’t use   verso la lente dell’obiettivo. Usare l’anello per assicurare bene la piastra contro il corpo   avec le boitier de l’appareil et que le marquage LENS est positionne dans la meme direction   ?"-Gewinde Ihrer Kamera. Vergewissern Sie sich, dass die Platte auf den Kamerakorper
que l’objectif de l’appareil photo. Utilisez la demi-bague de serrage sous le plateau pour
ausgerichtet ist und dass der Pfeil auf der Unterseite der Kameraplatte mit der Aufschrift
1                         excessive force; this could damage the camera’s thread. Once the plate is fastened to the   macchina; prima dell’uso, la piastra deve risultare fissata saldamente alla fotocamera, ma   attacher plus rapidement et de maniere plus securisee l’appareil photo mais sans serrer trop   “LENS” in die gleiche Richtung wie das Objektiv der Kamera zeigt. Verwenden Sie den Ring,
camera, fold the ring down so it lies flat with the plate.
senza applicare una forza eccessiva che potrebbe danneggiare la filettatura sulla
2                                                                                                                                         SONY NEX 5R/5T: for improved performance with this model of camera, it is best to   fotocamera. Ripiegare poi l’anello in modo che sia aderente alla piastra.   fort afin de ne pas endommager le pas de vis. Une fois le plateau rapide attache a l’appareil   um die Platte sicher an der Kamera zu befestigen. Uben Sie dabei aber nicht zu viel Kraft
B                                                                                                                                                         use the specifically designed adaptor included with your tripod. Position the adaptor   SONY NEX 5R/5T: per utilizzare al meglio questo modello di fotocamera, utilizzare lo   photo, repliez le demi bague de serrage.   aus, denn dies konnte den Kamerakopf beschadigen. Sobald die Platte an der Kamera
1                                                                                                                   2                                  underneath the camera, ensuring the hole is positioned to allow access to the tripod mount.   macchina in corrispondenza del filetto da ?, facendo attenzione che le frecce siano rivolte   SONY NEX 5R/5T: afin d’ameliorer les performances avec ce modele d’appareil   befestigt ist, klappen Sie den Ring nach unten, damit er flach auf der Platte aufliegt.
speciale adattatore incluso nella confezione. Posizionare l’adattatore sotto la
SONY NEX 5R/5T: fur eine verbesserte Leistung mit diesem Kameramodell ist es
photo, il est conseille d’utiliser l’adaptateur specialement concu a cet usage, et
Ensure also that the arrows on the adaptor are facing the direction of the lens and then
empfehlenswert, den speziell entwickelten Adapter zu verwenden, der mit Ihrem Stativ
attach the quick release plate using the ?” universal screw.  verso l’obiettivo. Avvitare poi la piastrina al filetto da ?.  inclus avec votre trepied. En dessous de l’appareil photo, assurez-vous que le trou est   geliefert wurde. Positionieren Sie den Adapter unter der Kamera und vergewissern Sie sich, dass
positionne de telle maniere qu’il permette la fixation sur le trepied. Assurez-vous egalement
3                  6.  Open the head’s sprung lever (1) and position the camera so the plate slots front-first back   6.  Aprire la leva a molla (1) e agganciare la piastrina alla testa del treppiede, prima nella parte   que la fleche de l’adaptateur est alignee avec l’optique de l’appareil, puis attachez le plateau   das Loch so positioniert ist, dass Sie den Adapter auf die Stativhalterung montieren konnen.
into the tripod head, then close the lever to lock the back of the plate firmly in place (2).
anteriore e bloccando poi la parte posteriore (2).
rapide avec la vis universelle ?”.
Stellen Sie au?erdem sicher, dass die Pfeile auf dem Adapter in Richtung des Objektivs zeigen.
7.    Once the camera is positioned on the tripod head, check it’s stably supported and   7.   Una volta posizionata la camera, verificarne la stabilita e spingere la leva per   6.  Ouvrez le levier de la rotule (1) et positionnez l’appareil photo avec le plateau rapide incline   Bringen Sie dann die Schnellwechselplatte mit der ?”-Universalschraube an.
push the sprung lever to tightly lock the plate and camera in place.  completarne la chiusura e bloccare completamente la fotocamera.
8                                                      14                                                     HOW TO REGULATE THE HEIGHT OF THE TRIPOD  8    9   &  10  COME REGOLARE LE ALTEZZE  8    9   E  10              7.   vers l’avant en premier sur la rotule, puis fermez le levier pour verrouiller le plateau rapide (2).  6.  Offnen Sie den gefederten Hebel des Kopfes (1) und positionieren Sie die Kamera so, dass
Une fois l’appareil photo positionne sur la rotule du trepied, verifiez sa stabilite et poussant
die Platte erneut mit dem vorderen Teil zuerst in den Stativkopf einrastet. Verriegeln Sie
3                                                                                                                     8.  To adjust the height of the tripod, each leg has telescopic sections that can be released and   8.  Per regolare l’altezza del treppiede, ogni gamba dispone di sezioni telescopiche che si   le levier de verrouillage afin de serrer au maximum le plateau rapide sur la rotule.  dann den Hebel, damit die Ruckseite der Platte fest einrasten kann (2).
3                                                                                                                                                                        extended: open the lever on the leg locking collar, slide the inner section in or out until the   possono liberare: aprire la leva sul manicotto di bloccaggio e, una volta raggiunta l’altezza   COMMENT REGLER LA HAUTEUR DU TREPIED  8    9   ET  10    7.   Wenn die Kamera am Stativkopf angebracht ist, uberprufen Sie, ob sie fest sitzt und
desired extension is reached, then close the locking lever again. Leg sections should be   richiesta, bloccarla. Allungare le sezioni nell’ordine dall’alto verso il basso (lasciando per   8.  Pour ajuster rapidement la hauteur du trepied, chaque jambe possede des sections   drucken Sie den gefederten Hebel, um die Platte und die Kamera zu verriegeln.
extended in order, from top to bottom (widest section first, narrowest section last), to reach   ultima la sezione piu sottile) fino a raggiungere l’altezza desiderata. Impiegando le sezioni di   telescopiques qui peuvent etre deployees : ouvrir les leviers sur chaque sections de jambe,   HOHENVERSTELLUNG DES STATIVS  8    9   UND  10
maggiore diametro, il treppiede risultera piu stabile.
the required tripod height. Using predominantly the leg sections with larger diameters makes
2                                                                                                                                                                9.  To improve stability, the tripod’s centre column should be only really be used as the final   9.  Per la migliore stabilita, e preferibile usare la colonna centrale di un treppiede come ultima   deployez la section jusqu’a l’extension desiree puis refermez le levier afin de verrouiller   8.  Um die Hohe des Stativs einzustellen, verfugt jedes Bein uber Teleskopabschnitte, die ein-
the tripod more stable.
oder ausgezogen werden konnen. Offnen Sie den Hebel am Verriegelungsbund des Beins
l’ensemble. Les sections doivent etre deployees dans l’ordre, du sommet vers la base
regolazione dell’altezza, oppure per raggiungere la massima estensione possibile. Sbloccare
(les sections larges en premier, les plus fines en dernier) afin d’obtenir la hauteur desiree.
und schieben Sie den inneren Teil hinein oder ziehen sie ihn heraus, bis die gewunschte
SONY NEX 5R/5T      2                                                                                                            means of height adjustment, or as a way of reaching the tripod’s maximum extension. Turn   la manopola, girandola in senso antiorario, per liberare la colonna centrale (1), e regolare   L’utilisation des sections larges en priorite par rapport aux sections fines rend le trepied plus   Lange erreicht ist, schlie?en Sie dann den Verriegelungshebel wieder. Um die erforderliche
l’altezza come desiderato (2).
the column lock knob anti-clockwise to release the column (1), then extend the column to
stable lors d’un faible besoin de hauteur.
LENS
the desired height (2).                               10. Richiudere la manopola, girandola verso in senso antiorario, per bloccare la colonna nella   9.  Pour ameliorer la stabilite du trepied, la colonne centrale doit uniquement etre utilisee   Stativhohe zu erreichen, sollten Sie zuerst die oberen und dann -falls erforderlich- die unteren
Beinabschnitte verlangern (breitester Abschnitt zuerst, schmalster Abschnitt zuletzt). Der uber-
posizione corretta.
1                                                                                                   10. To lock the centre column at the desired height, close the knob by turning it clockwise.  COME UTILIZZARE LA TESTA  11   E  12    comme ajustement de la hauteur totale ou bien comme le moyen d’obtenir la hauteur maxi-  9.  Zur Verbesserung der Stabilitat des Stativs sollte die Mittelsaule nur im Ausnahmefall als letztes Mit-
wiegende Gebrauch der Beinabschnitte mit gro?erem Durchmesser macht das Stativ stabiler.
mum du trepied. Pour la deployer, desserrez le verrouillage, tournez le dans le sens contraire
&  12
HOW TO USE THE HEAD  11
des aiguilles d’une montre (1) puis soulevez la colonne jusqu’a la hauteur desiree (2).
1                                   2          11. Use handle "A" for panoramic and vertical tilt adjustments of the head. Unlock the head by   11. Utilizzare la manopola "A" per la funzione panoramica e l’inclinazione verticale della testa.   10. Pour bloquer la colonne centrale a la hauteur desiree, fermez le verrouillage en le tournant   tel zur Hohenverstellung verwendet werden oder als Mittel zur Erreichung der maximalen Hohe des
Stativs. Um die Saule zu verlangern, entriegeln Sie den Knopf, drehen ihn gegen den Uhrzeigersinn,
twisting handle "A" anticlockwise (1), move it until the desired position is reached (2) then
Sbloccare la testa ruotando la manopola "A" in senso antiorario (1), muoverla per raggiunge-
um die Saule zu losen (1), und ziehen dann die Saule bis auf die gewunschte Hohe heraus (2).
dans le sens des aiguilles d’une montre.
lock it in place by twisting the handle clockwise.
re la posizione desiderata (2) e infine ruotare la manopola in senso orario per bloccarla.
4            1            5                              9                             10                                                                              12. Use handle "B" for lateral levelling adjustments of the head. Unlock the head by twisting   12. Utilizzare, invece, la manopola "B" per i movimenti di livellamento. Sbloccare la testa   COMMENT UTILISER LA ROTULE  11  ET  12     10. Um die Mittelsaule in der gewunschten Hohe zu verriegeln, schlie?en Sie den Knopf, in dem
handle "B" anticlockwise (1), move it until the desired position is reached (2) then lock it in   ruotando la manopola "B" in senso antiorario (1), muoverla per raggiungere la posizione   11. Utilisez les poignees pour un ajustement horizontal et vertical de la rotule. Deverrouillez la   Sie ihn im Uhrzeigersinn drehen.
place by twisting the handle clockwise.                 desiderata (2) e infine ruotare la manopola in senso orario per bloccarla.  rotule par la rotation de la poignee "A" dans le sens contraire des aiguilles d’une montre (1),   GEBRAUCH DES KOPFES  11  UND  12
15                                                     AFTER USE  13 14 15 16  &  17                           DOPO L’UTILIZZO  13 14 15 16   E  17                      positionnez la rotule (2) puis verrouillez cette position en tournant la poignee dans le sens   11. Verwenden Sie Griff "A" fur Panoramaaufnahmen und die Einstellung der vertikalen Neigung
des aiguilles d’une montre.
des Kopfes. Entriegeln Sie den Kopf, indem Sie den Griff "A" gegen den Uhrzeigersinn
2                                                                                                       13. To remove the camera from the tripod head, open the sprung lever (1) and tilt the camera   13. Per estrarre la fotocamera dalla testa del treppiede, aprire la leva a molla (1) e inclinare in   12. Utilisez la poignee "B" pour un ajustement lateral de la rotule. Deverrouillez la rotule par   drehen (1), bewegen Sie ihn, bis die gewunschte Position erreicht ist (2) und verriegeln sie
forwards so that the camera plate frees itself from the head (2).  avanti la macchina in modo da liberare la piastrina posta alla base (2).  rotation la poignee "B" dans le inverse des aiguilles d’une montre (1), positionnez la rotule (2)   ihn dann durch Drehen des Griffs im Uhrzeigersinn.
2                                                                                  14. Twist handle "B" anticlockwise to free it (1), turn it so that it lies parallel with handle "A" (2),   14. Ruotare la manopola "B" in senso orario per liberarla (1), riportarla in posizione parallela alla   puis verrouillez cette position en tournant la poignee dans le sens des aiguilles d’une montre.  12. Fur die seitliche Ausrichtung des Kopfes verwenden Sie Griff B. Entriegeln Sie den Kopf, in-
then twist the handle clockwise to tighten it in place (3).
manopola "A" (2) e avvitarla in senso orario per bloccarla (3).
B                                                                     15. Fold the tripod’s legs back into the centre (1). Position the head vertically (2) so it occupies   15. Richiudere le 3 gambe del treppiede verso l’interno (1). Richiudere la testa, portandola in   APRES UTILISATION  13 14 15 16  ET  17    dem Sie Griff "B" gegen den Uhrzeigersinn drehen (1), bewegen Sie ihn, bis die gewunschte
Position erreicht ist (2) und verriegeln sie ihn dann durch Drehen des Griffs im Uhrzeigersinn.
less space.                                             posizione verticale (2).                              13. Pour retirer l’appareil photo de la rotule, ouvrez le levier (1) et soulevez par le cote du levier
le plateau rapide afin de liberer l’ensemble (2).
16. Return the tripod to its fabric bag.                16. Riporre il treppiede nella sua custodia.            14. Pivotez la poignee "B" dans le sens inverse des aiguilles d’une montre pour la deverrouiller   NACH DEM GEBRAUCH  13 14 15 16   UND  17
13. Um die Kamera vom Stativkopf zu entfernen, offnen Sie den gefederten Hebel (1) und nei-
2                                               A                                                                                            17. The bag can also be used as a practical shoulder bag for transporting the tripod quickly and   17. E possibile utilizzare la custodia come una pratica tracolla per trasportare il treppiede in   (1), tournez ensuite cette poignee afin de la positionner parallelement a la poignee "A" (2),   gen Sie die Kamera nach vorne, so dass sie sich von selbst vom Kopf lost (2).
easily.
modo facile e veloce.
puis tournez la poignee dans le sens des aiguilles d’une montre pour la verrouiller (3).
1                                                                                                                                                                                     15. Pliez les jambes du trepied vers la colonne centrale (1). Positionnez la rotule verticalement   14.  Drehen Sie Griff "B" gegen den Uhrzeigersinn, um ihn zu losen (1), drehen Sie ihn, so dass er
parallel zum Griff "A" liegt (2) und drehen Sie den Griff dann zur Befestigung im Uhrzeigersinn (3).
(2) afin qu’elle soit la plus compacte possible.
15. Klappen Sie die Stativbeine wieder mittig zusammen (1). Stellen Sie den Kopf vertikal (2), so
1                                                                                                                                                                                                                        16. Replacez le trepied dans son sac dedie              16. Legen Sie das Stativ wieder in den Stoffbeutel.
dass er weniger Platz benotigt.
17. Le sac peut aussi etre utilise comme sac d’epaule pour transporter le trepied rapidement et
facilement.                                           17. Die Tasche kann auch als praktische Schultertasche benutzt werden, um das Stativ schnell
6                    1           7                      11                          12                          16                                17                                                                                                                                                                                             und sicher zu tragen.
MKCOMPACTADV.indd   2                                                                                                                                                                                                                                                                                                                                                                        06/12/13   17:49