На сайте 126990 инструкций общим размером 514.19 Гб , которые состоят из 6426803 страниц
Фото
Руководство пользователя CANON XL 5.4-86.4mm. Основные функции, характеристики и условия эксплуатации изложены на 2 страницах документа в pdf формате.
Доступно к просмотру 2 страницы. Рекомендуем вам скачать файл инструкции, поскольку онлайн просмотр документа может сильно отличаться от оригинала.
J ????? ????????? ? E Canon Manual 16? Zoom Video Lens F Objectif Video Zoom 16? manuel Canon D Canon Manuelles Video-Objektiv mit 16-fach-Zoom
????? INSTRUCTIONS MODE D’EMPLOI BEDIENUNGSANLEITUNG
9- NN XL 5.4-86.4 mm XL-5,4-86,4 mm XL 5,4-86,4 mm
1 23 4 5 6 78 9 !0 !1
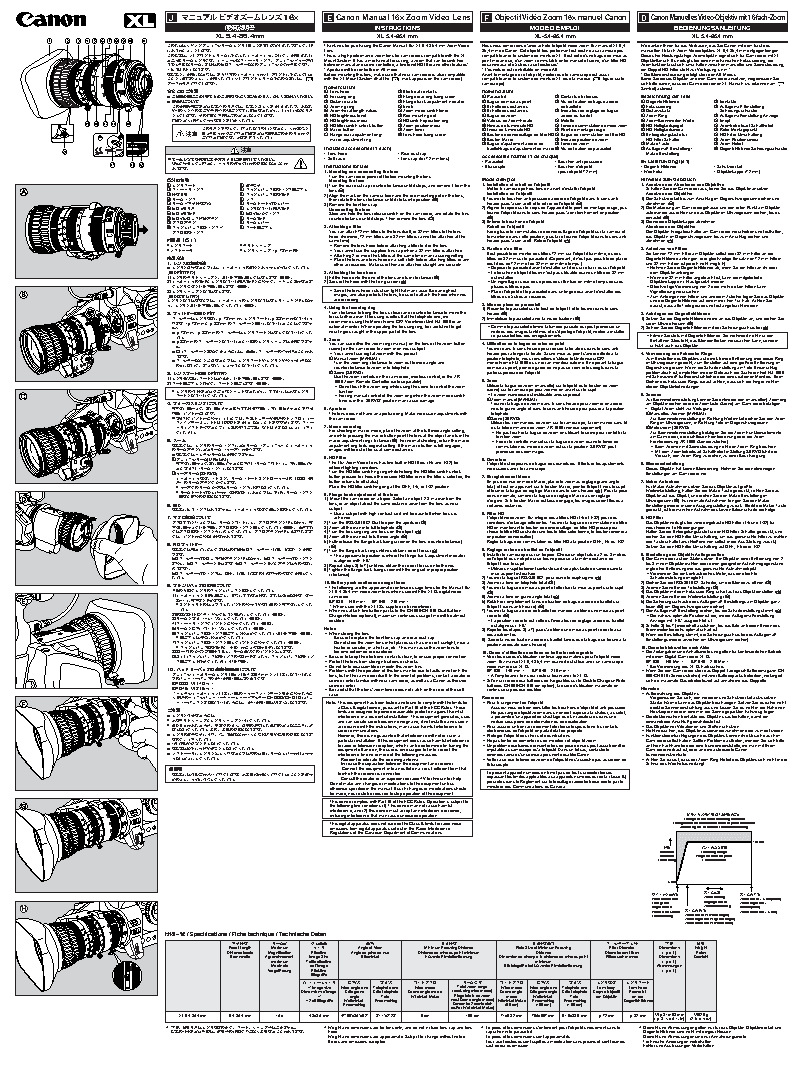
???????????????????? ???????????????? Thank you for purchasing the Canon Manual 16? XL 5.4-86.4 mm Zoom Video Nous vous remercions d’avoir achete l’objectif video zoom 16? manuel XL 5,4- Wir danken Ihnen fur das Vertrauen, das Sie Canon mit dem Kauf des
???????????? Lens. 86,4 mm de Canon. Cet objectif tres performant est destine aux camescopes manuellen 16-fach-Zoom-Videoobjektivs XL 5,4-86,4 mm entgegenbringen.
??????9- ?????????????????????????????? This is a high-performance zoom lens for camcorders compatible with the XL compatible avec le systeme de monture XL. Il est dote d’une bague de mise au Dieses hochleistungsfahige Zoomobjektiv eignet sich fur Camcorder mit XL-
?????????????????????????????????????? Mount System. It has a mechanical focus ring, a zoom that can be switched point mecanique, d’un zoom commutable entre manuel et servo, d’un filtre ND Objektivflansch. Es verfugt uber einen mechanischen Fokussierring, die
?????????? ??? /% ???????????????????? ? ? between manual and servo-controlled, a two-level ND filter and other features*. deux niveaux et d’autres caracteristiques*. Zoomfunktion lasst sich umschalten zwischen manueller und Servosteuerung,
???? "& ?????? * Aperture will be controlled in AE mode. * L’ouverture est controlable en mode AE. ein Doppel-ND-Filter steht zur Verfugung u.v.m.*
????????????????????????? 9- ??????????? Before mounting this lens, make sure that your camcorder is also compatible Avant le montage de cet objectif, verifier que le camescope est aussi * Die Blendensteuerung erfolgt uber den AE-Modus.
??????????????????9- ???????????????? with the XL Mount System (that the mark appears on the camcorder). compatible avec le systeme de monture XL (que la marque figure sur le Bevor Sie dieses Objektiv an einen Camcorder ansetzen, vergewissern Sie
?????????????? camescope). sich bitte davon, dass der Camcorder einen XL-Flansch (zu erkennen am -
Nomenclature Symbol) aufweist
??????? 1 Lens hood !1 Electrical contacts Nomenclature
? ?????????????????????????????????????? 2 Focusing ring !2 Flange rear ring fixing screw 1 Parasoleil !1 Contacts electriques Bezeichnung der Teile
? ??????? 3 Distance scale !3 Flange back adjustment indicator 2 Bague de mise au point !2 Vis de fixation de bague arriere 1 Gegenlichtblende !1 Kontakte
???????????????????????????????????? 4 Zooming ring !4 Knob 3 Echelle des distances de barillete 2 Fokussierring !2 Auflagema?-Einstellring-
???????????????????????????????????? 5 Zoom/Focal length values !5 Zoom mode switch lever 3 Echelle des distances !3 Indicateur de reglage de bague 3 Distanzskala Sicherungsschraube
??????????????????????????? 6 ND brightness level !6 Red mounting dot 4 Bague de zoom arriere du barillet 4 Zoom-Ring !3 Auflagema?einstellung-Anzeige
?????????????????????? 7 ND brightness index !7 ND switch operation ring 5 Valeurs de Zoom/Focale !4 Molette 5 Zoom/Brennweiten-Werte !4 Knopf
!9 !8 !7 !6 !4 8 ND filter switch unlock button !8 Zoom position index 6 Niveau de luminosite ND !5 Levier de commutation de mode zoom 6 ND-Helligkeitspegel !5 Zoombetriebsart-Schalthebel
??????????????????????????? 9 Macro button !9 Zoom lever 7 Index de luminosite ND !6 Point de montage rouge 7 ND-Helligkeitsindex !6 Roter Montagepunkt
?? ??????????????????????????? !0 Flange rear adjustment ring/ @0 Lens hood fixing screw 8 Bouton de deverrouillage de filtre ND !7 Bague de commutation de filtre ND 8 Entriegelungstaste fur !7 ND-Filter-Umschaltring
??????????????????? macro adjustment ring 9 Bouton Macro !8 Index de position de zoom ND-Filter-Schalter !8 Zoom-Positionsindex
!0 Bague d’ajustement arriere de !9 Levier de zoom 9 Makro-Taste !9 Zoom-Hebel
@0 ?? Included accessories (1 each) • Rear dust cap barillet/bague d’ajustement de macro @0 Vis de fixation de parasoleil !0 Auflagema?-Einstellring/ @0 Gegenlichtblende-Sicherungsschraube
• Lens hood
Makro-Einstellring
???????????????????????????? • Soft case • Lens cap (for 72 mm lens) Accessoires fournis (1 de chaque)
!5 !3 !2 ?????????????????????????????? • Parasoleil • Bouchon anti-poussiere Im Lieferumfang (je 1) • Schutzdeckel
• Bouchon d’objectif
•Etui souple
• Gegenlichtblende
????? Instructions for Use
1. Mounting and unmounting the lens (pour objectif 72 mm) • Weichetui • Objektivkappe (72 mm)
Turn the camcorder power off before mounting the lens.
????? Mounting the lens Mode d’emploi Hinweise zum Gebrauch
1 ?????? !1 ???? 1) Turn the rear dust cap counterclockwise until it stops, and remove it from the 1. Installation et retrait de l’objectif 1. Ansetzen und Abnehmen des Objektivs
2 ???????? !2 ???????????????? lens (A). Mettre le camescope hors tension avant d’installer l’objectif. Schalten Sie den Camcorder aus, bevor Sie das Objektiv ansetzen.
3 ???? !3 ??????????? 2) Align the mark on the camera body and the red mounting dot on the lens, Installation de l’objectif Ansetzen des Objektivs
4 ?????? !4 ?? then rotate the lens clockwise until it clicks into position (B). 1) Tourner le bouchon anti-poussiere arriere de l’objectif dans le sens anti- 1) Den Schutzdeckel bis zum Anschlag im Gegenuhrzeigersinn drehen und
5 ?????????? !5 ??????????? 3) Remove the front lens cap. horaire jusqu’a son arret et le retirer de l’objectif (A). abnehmen. (A).
6 /% ???? !6 ??????????? Unmounting the lens 2) Aligner le repere sur le corps de l’appareil et le point de montage rouge, puis 2) Die Markierung am Camcordergehause und den roten Punkt am Objektiv
7 /% ???? !7 /% ??????? Slide and hold the lens release switch on the camcorder, and rotate the lens tourner l’objectif dans le sens horaire jusqu’a enclenchement en position aufeinander ausrichten und das Objektiv im Uhrzeigersinn drehen, bis es
8 /% ?????????? !8 ????? counterclockwise until it stops. Then remove the lens (C). (B). einrastet (B).
9 ?????? !9 ?????? 3) Enlever le bouchon de l’objectif. 3) Die vordere Objektivkappe abnehmen.
!0 ????????????? @0 ??????? 2. Attaching a filter Retrait de l’objectif Abnehmen des Objektivs
???????? You can attach 72mm filters to the lens itself, or 82mm filters to the lens Faire glisser le commutateur de deverrouillage de l’objectif sur la camera et Den Objektiv-Freigabeschalter am Camcorder verschieben und festhalten,
hood. (however, 72 mm filters and 82 mm filters cannot be attached at the le maintenir dans cette position, puis faire tourner l’objectif dans le sens anti- das Objektiv im Gegenuhrzeigersinn bis zum Anschlag drehen und
??????? same time). horaire jusqu’a son arret. Retirer l’objectif (C). abnehmen (C).
? ?????? ? ??????? ?Remove the lens hood before attaching a filter to it or the lens.
? ?????? ? ????????П NN ?? ?You cannot use the supplied lens cap when a 82 mm filter is attached. 2. Fixation d’un filtre 2. Aufsetzen von Filtern
Il est possible de monter des filtres 72 mm sur l’objectif lui-meme, ou des Sie konnen 72-mm-Filter am Objektiv selbst oder 82-mm-Filter an der
?Attaching 2 or more thick filters at the same time may cause vignetting.
???? ?Place the lens and lens hood on a soft cloth before attaching filters or any filtres de 82 mm sur le parasoleil. (Cependant, il n’est pas possible de placer Gegenlichtblende anbringen. (der gleichzeitige Einsatz von 72-mm-Filtern
???????? des filtres de 72 mm et de 82 mm en meme temps.) und 82-mm-Filtern ist jedoch nicht moglich).
other accessories. Make sure they are attached straight and securely.
? ???????????????????????????????????? ?Deposer le paresoleil avant d’installer un filtre sur celui-ci ou sur l’objectif. ?Nehmen Sie die Gegenlichtblende ab, wenn Sie ein Filter an ihr oder
3. Attaching the lens hood ?Le bouchon d’objectif fourni n’est pas utilisable quand un filtre de 82 mm dem Objektiv anbringen.
????????????????????????????? A?? 1) Fit the hood onto the end of the lens and turn clockwise (D). est installee. ?Wenn ein 82-mm-Filter angebracht ist, kann die mitgelieferte
???????????????????????????????????? 2) Secure the hood with the fixing screw (E). ?Un vignettage risque de se produire si l’on fixe en meme temps deux ou Objektivdkappe nicht aufgesetzt werden.
?????????????????? B?? plusieurs filtres epais. ?Gleichzeitige Verwendung von 2 oder mehr dicken Filtern kann
???????????????? ?Since the lens hood cuts stray light that may cause flare and ghost ?Placer l’objectif et le paresoleil dans un linge doux avant d’installer des Vignettierung verursachen.
images, and also protects the lens, be sure to attach the hood when you filtres ou d’autres accessoires. ?Zum Anbringen von Filtern und anderem Zubehor legen Sie das Objektiv
????????????????????????????????????? are recording. und die Gegenlichtblende auf einem weichen Tuch ab. Achten Sie
3. Mise en place du parasoleil
????????????????????? C?? darauf, dass alle Teile gerade und fest angebracht werden.
4. Using the focusing ring
1) Presenter le parasoleil sur le bout de l’objectif et le tourner dans le sens
?????????? Turn clockwise to bring the focus closer and counterclockwise to move the horaire (D). 3. Anbringen der Gegenlichtblende
focus farther away. If focusing is difficult at the telephoto end, we
????????????П NN ?????????П NN ?????? 2) Immobiliser le parasoleil avec la vis de fixation (E). 1) Setzen Sie die Gegenlichtblende vorne an das Objektiv an, und drehen Sie
????П NN ?П NN ?????????????????????? recommend using the Monochrome CRT Viewfinder Unit FU-1000 or an sie im Uhrzeichersinn (D).
external monitor. When operating the focusing ring, be careful not to get ?Comme le parasoleil elimine la lumiere parasite qui peut provoquer un
??? 2) Sichern Sie die Gegenlichtblende mit der Sicherungsschraube (E).
? П NN?П NN ????????????????????????? your fingers caught in the upper part of the lens. voile ou des images fantomes et qu’il protege l’objectif, verifier a installer
ce parasoleil lors des enregistrements. ?Filmen Sie stets mit Gegenlichtblende. Sie verhindert nicht nur den
??? 5. Zoom
? П NN ?????????????????????????????? Einfall von Streulicht, das Blendenflecken verursachen kann, sondern
You can use either the zoom ring (manual) on the lens or the zoom button 4. Utilisation de la bague de mise au point schutzt auch das Objektiv.
?? (servo) on the camcorder to zoom in on your subject. Tourner dans le sens horaire pour reduire la focale ou dans le sens anti-
? ???????????????????????????????????
?You cannot use digital zoom with this product. horaire pour allonger la focale. Si une mise au point s’avere difficile a la 4. Verwendung des Fokussier-Rings
???? 1Manual zoom [MANUAL] position telephoto, nous conseillons d’utiliser le Unite viseur CRT Zum Einstellen des Objektivs auf eine kleinere Entfernung wird dieser Ring
? ???????????????????????????????????
Turn the zoom ring clockwise to zoom out to wide angle and monochrome FU-1000 ou un ecran moniteur externe. En operant la bague im Uhrzeigersinn gedreht, zum Einstellen auf eine gro?ere Entfernung im
???????????????????????????
counterclockwise to zoom in to telephoto. de mise au point, prendre garde de ne pas se coincer les doigts dans la Gegenuhrzeigersinn. Wenn die Scharfeinstellung am Tele-Endanschlag
????????????? 2Servo [SERVO] partie superieure de l’objectif. problematisch ist, empfehlen wir den Gebrauch der Suchereinheit FU-1000
Use the zoom controls on the camcorder, wireless control, or the ZR- mit Schwarzwei?-Kathodenstrahlrohre oder eines externen Monitors. Beim
??????????????????????????? D?? 5. Zoom
??????????????????????? E?? 1000 Zoom Remote Controller (sold separately). Drehen des Fokussier-Rings darauf achten, dass sich die Finger nicht im
?Do not touch the zoom ring while using the servo to control the zoom Utiliser la bague de zoom (manuelle) sur l’objectif ou le bouton de zoom oberen Objektivteil verfangen.
(servo) sur le camescope pour zoomer en avant sur le sujet.
? ????????????????????????????????? function.
?????????????? ?Forcing manual control of the zoom ring when the zoom mode switch ?Le zoom numerique est inutilisable avec ce produit. 5. Zoomen
1Zoom manuel [MANUAL] Zur Brennweitenverstellung konnen Sie entweder den (manuellen) Zoomring
lever is in the “SERVO” position may cause damage.
???????????? Tourner la bague de zoom dans le sens horaire pour zoomer en arriere am Objektiv drehen oder die Zoomtaste (Servo) am Camcorder betatigen.
????????????????????????????????????? 6. Aperture vers le grand angle et dans le sens anti-horaire pour passer a la position ? Digital-Zoom steht zur Verfugung.
???????????? The lens does not have an aperture ring. Make necessary adjustments with telephoto. 1Manuelles Zoomen [MANUAL]
? ??????????????????????????????????? the camcorder. 2Servo [SERVO] Zur Brennweitenverstellung in Richtung Weitwinkel drehen Sie den Zoom-
??????????'6 ????????????????????? Utiliser les commandes de zoom sur le camescope, la commande sans fil Ring im Uhrzeigersinn; in Richtung Tele im Gegenuhrzeigersinn.
??????????????????????????????????? 7. Macro recording ou la telecommande de zoom ZR-1000 (vendue seprement). 2Motorzoom [SERVO]
For shooting in macro mode, place the zoom at the full wide angle setting,
?????? ?Ne pas toucher la bague de zoom en utilisant le servo pour controler la Zur Brennweitenverstellung betatigen Sie die Zoom-Funktionselemente
and while pressing the macro button point the lens at the object and turn the fonction zoom. am Camcorder, der drahtlosen Fernbedienung oder der Zoom-
??? macro adjustment ring clockwise (F). For normal shooting, return the macro
?Forcer le controle manuel sur la bague de zoom quand le levier de Fernbedienung ZR-1000 (Sonderzubehor).
???????????????????????????????????? adjustment ring to its original setting. If the macro button is left engaged, commutation du mode de zoom est sur la position “SERVO” peut ?Beim Zoomen mit Servosteuerung nicht den Zoom-Ring beruhren.
???????????????????????? images will be out of focus at some distances.
provoquer des dommages. ?Mit dem Zoombetriebsart-Schalthebel in Stellung SERVO fuhrt der
? ????????????????????? Versuch, den Zoom-Ring zu drehen, zu einer Beschadigung.
1????????<."/6"-> 8. ND Filter 6. Ouverture
The 16? Zoom Video Lens has two built-in ND filters (1/6 and 1/32) for
???????????????????????????????????? L’objectif est depourvu de bague des ouvertures. Effectuer les ajustements 6. Blendeneinstellung
?????????????????? different lighting conditions. necessaires avec le camescope. Dieses Objektiv hat keinen Blendenring. Nehmen Sie die notwendigen
Turn the ND filter switching ring while holding the ND filter switch unlock
2??????<4&370> Einstellungen am Camcorder vor.
???????????????????????????? ;3 ?? button pressed to choose the desired ND filter (once the filter is selected, the 7. Enregistrement Macro
button returns to off status). En prise de vue en mode Macro, placer le zoom au reglage grand angle 7. Makro-Aufnahme
????????????????
? ????????????????????????????? Place the ND filter switching ring at the OFF, 1/6, or 1/32 position. total, et tout en appuyant sur le bouton Macro, pointer l’objectif vers le sujet Fur Makro-Aufnahmen setzen Sie das Objektiv auf gro?te
et tourner la bague de reglage Macro dans le sens horaire (F). Pour la prise Weitwinkelstellung, halten Sie die Makro-Taste gedruckt, richten Sie das
? ?????????????4&370??????????????????
9. Flange back adjustment of the lens
?????????????? de vue normale, ramener la bague de reglage Macro a son reglage Objektiv auf das Objekt, und drehen Sie den Makro-Einstellring im
1) Mount the camcorder on a tripod. Select an object 2-3 m away from the d’origine. Si le bouton Macro est laisse engage, les images seront floues a Uhrzeigersinn (F). Fur normale Aufnahmen bringen Sie den Makro-
?? lens, or an object about the same distance away from the lens as your certaines distances. Einstellring wieder in seine Ausgangsstellung zuruck. Bleibt die Makro-Taste
????????????????????????????????????? subject. gedruckt, ist bei manchen Aufnahmedistanzen Bildunscharfe die Folge.
?Use a subject with high contrast so it will be easy tell when focus is 8. Filtre ND
????????? achieved. L’objectif video zoom 16? integre deux filtres ND (1/6 et 1/32) pour des 8. ND-Filter
???????????????????????????????????? 2) Turn the IRIS/SELECT Dial to open the aperture (G). conditions d’eclairage differentes. Tourner la bague de commutation de filtre Das Objektiv verfugt uber zwei eingebaute ND-Filter (1/6 und 1/32) fur
?????????????????????????????? F?????? 3) Zoom all the way in to full telephoto (G). ND en maintenant le bouton de deverrouillage de filtre ND presse pour verschiedene Lichtbedingungen.
???????????????????????????????????? 4) Turn the focusing ring and focus on the object (G). choisir le filtre ND souhaite (une fois le filtre selectionne, le bouton reviendra Halten Sie die Entriegelungstaste fur den ND-Filter-Schalter gedruckt, und
??????????????????? 5) Zoom all the way out to full wide angle (H). en position deverrouillee). drehen Sie den ND-Filter-Umschaltring, um das gewunschte Filter zu wahlen
6) Fully release the flange back fixing screw on the lens (counterclockwise) Regler la bague de commutation du filtre ND a la position OFF, 1/6 ou 1/32. (die Taste schaltet anschlie?end von selbst in die Aus-Stellung zuruck).
/% ?????
(H). Setzen Sie den ND-Filter-Umschaltring auf OFF, 1/6 oder 1/32.
???????????? ????? /%?????? ? ????? 7) Turn the flange back ring until you obtain correct focus (H). 9. Reglage arriere de barillet de l’objectif
???? 1) Installer le camescope sur un trepied. Choisir un objet situe a 2 ou 3 metres 9. Einstellung des Objektiv-Auflagema?es
?The approximate position is where the flange back adjustment indicator
/%??????????????????????/%??????????? is aligned with “F.B”. de l’objectif ou un objet qui se trouve presque a la meme distance de 1) Den Camcorder auf ein Stativ setzen. Ein Objekt in einer Entfernung von 2
????/% ???????????/% ???????????????Ґ?? l’objectif que le sujet. bis 3 m vom Objektiv wahlen oder einen geeigneten Aufnahmegegenstand
8) Repeat steps 3) to 7) until you obtain the correct focus on both ends.
?????? 9) Tighten the flange back fixing screw with the ring set in proper position ?Utiliser un sujet fortement contraste car il sera plus facile de savoir quand la in gleicher Entfernung wie das gewunschte Aufnahmeobjekt.
/%????????????0''? ? ??????Ґ??????? mise au point est realisee. ?Verwenden Sie ein kontrastreiches Motiv, das eine leichte
(clockwise).
???? 2) Tourner la bague IRIS/SELECT pour ouvrir le diaphragme (G). Scharfeinstellung ermoglicht.
10. Battery pack continuous usage times 3) Zoomer a fond en telephoto total (G). 2) Drehen Sie die IRIS/SELECT-Scheibe, um die Blende zu offnen (G).
?????????????? 4) Tourner la bague de mise au point et effectuer la mise au point sur le sujet 3) Zoomen Sie voll in die Telestellung (G).
?The following are the approximate continued usage times for the Manual 16?
??????????????????????????? XL 5.4-86.4 mm video zoom lens when used with the XL1S digital video (G). 4) Das Objektiv mit dem Fokussier-Ring scharf auf das Objekt einstellen (G).
????????????????????????????????? ?
camcorder. 5) Zoomer a fond en grand angle total (H). 5) Zoomen Sie voll in die Weitwinkelstellung (H).
N??????????? BP-930: 140 min 1) BP-945: 215 min 1) 6) Relacher completement la vis de fixation de bague arriere de barillet sur 6) Die Sicherungsschraube des Auflagema?-Einstellrings am Objektiv ganz
? ??????????????????????????????????
When used with the XL1S’s supplied color viewfinder. l’objectif (sens anti-horaire) (H). losen (H) (im Gegenuhrzeigersinn drehen).
1)
??? ?When you attach two battery packs to the CH-900/CH-910 Dual Battery 7) Tourner la bague arriere de barillet de maniere a obtenir une mise au point 7) Den Auflagema?-Einstellring drehen, bis die Scharfeinstellung stimmt (H).
*3*4 4&-&$5 ??????????????????? G??
Charger/Holder (optional), maximum continuous usage time will be almost correcte (H). ?Die nahezu optimale Position ist die, wo die Auflagema?einstellung-
???????????????????? G?? doubled. ?La position correcte est celle ou l’indicateur de reglage arriere du barillet Anzeige mit “F.B” ausgerichtet ist.
??????????????????????? G??
est aligne sur “F.B”. 8) Schritte 3) bis 7) wiederholt ausfuhren, bis das Bild an beiden Enden des
????????????????????? H?? Notes 8) Repeter les etapes 3) a 7) jusqu’a obtenir une mise au point correcte aux Brennweitenbereichs optimal scharf ist.
??????????????????????????????????H?? ?When storing the lens:
deux extremites. 9) Wenn die Einstellung stimmt, die Sicherungsschraube des Auflagema?-
? ????????????????? – Be sure to replace the front lens cap and rear dust cap. 9) Serrer la vis de fixation arriere du barillet tandis que la bague se trouve a la Einstellrings wieder anziehen (im Uhrzeigersinn drehen).
?????????????????????????????? H?? – Do not store the zoom lens in hot places such as in direct sunlight, near a
position adequate (sens horaire).
? ?????????????' #????Ґ?????????? heater or radiator, in a hot car, etc. This may cause the zoom lens to 10. Dauerbetriebszeiten nach Akku
? ??????????????????????????? become deformed or discolored. 10. Duree d’utilisation continue de batterie rechargeable ?Die Zeitangaben sind Anhaltswerte und gelten fur kontinuierlichen Betrieb
????????????????Ґ??????????????????? ?Be sure to keep the electronic contacts clean, to ensure proper connection. ?Voici les durees d’utilisation continue approximatives pour l’objectif video mit einem Digital-Camcorder XL1S.
???????????????????? ?Protect the lens from strong vibrations or shocks. zoom 16? manuel XL 5,4-86,4 mm quand il est utilise avec un camescope BP-930: 140 Min. 1) BP-945: 215 Min. 1)
?Do not try to disassemble or modify this zoom lens. video numerique XL1S. 1) Bei Verwendung des XL1S-Farbsuchers.
??????????????????? ?Problems with the operation of this lens may be due to faults in not only the BP-930: 140 min. 1) BP-945: 215 min. 1) ?Wenn Sie den Camcorder uber das Doppel-Ladegerat/Batteriemagazin CH-
????? ????????? ? 9- NN ? 9- 4 ???????
lens, but in the camcorder itself. In the event of problems, contact a dealer or 1) A l’emploi avec le viseur couleur fourni avec le XL1S. 900/CH-910 (Sonderzubehor) mit zwei Batteriepacks betreiben, verlangert
???????????????????????? service center familiar with your camcorder, as well as a Canon authorized ?Si l’on raccorde deux batteries rechargeables sur le Double Chargeur/Porte- sich die maximale Dauerbetriebszeit auf annahernd das Doppelte.
#1 ?? ? ??
service center. batteries CH-900/CH-910 (en option), la duree d’utilisation maximale en
#1 ?? ? ?? ?Be careful that the lens’ zoom lever does not catch on the cord of the soft continu sera presque doublee. Hinweise
?? ?????????? 9- 4 ?????????????????????? ?Aufbewahrung des Objektivs:
case.
? ???????????????????????$) $) ??? Remarques – Vergewissern Sie sich, den vorderen und Schutzdeckel aufzusetzen.
??????? ?????????????????? ??????? Note: This equipment has been tested and found to comply with the limits for ?Pour le rangement de l’objectif: – Starke Warme kann das Objektiv beschadigen. Setzen Sie es daher nicht
a Class B digital device, pursuant to Part 15 of the FCC Rules. These – Assurez-vous de bien reinstaller les bouchons d’objectif et anti-poussiere. direkter Sonneneinstrahlung aus und lassen Sie es nicht in der Nahe von
??? limits are designed to provide reasonable protection against harmful – Ne pas ranger objectif zoom dans un endroit expose a la chaleur, au soleil, Heizkorpern oder in einem in der Sonne geparkten Fahrzeug liegen.
? ???????????
interference in a residential installation. This equipment generates, uses a proximite d’un appareil de chauffage ou d’un radiateur ou dans une ?Die elektronischen Kontakte des Objektivs sauberhalten, damit ein
? ??????????????????????????
and can radiate radio frequency energy and, if not installed and used in voiture sous peine de deformation ou de decoloration. einwandfreier Anschlu? gewahrleistet ist.
? ????????????????????????????????????
accordance with the instructions, may cause harmful interference to ?Pour assurer un bon raccordement electrique toujours tenir les contacts ?Das Objektiv vor Vibrationen und Sto?en schutzen.
???????????????????????? radio communications. electroniques de l’objectif en parfait etat de proprete. ?Nicht versuchen, das Objektiv auseinanderzunehmen oder zu modifizieren.
? ????????????????????????????????????
However, there is no guarantee that interference will not occur in a ?Proteger l’objectif des chocs et des vibrations. ?Funktionsbeeintrachtigungen des Objektivs konnen ihre Ursache auch im
??????????? particular installation. If this equipment does cause harmful interference ?Ne pas tenter de demonter ou de modifier cet objectif zoom. Camcorder selbst haben. Sollten Probleme auftreten, wenden Sie sich bitte
? ??????????????????
to radio or television reception, which can be determined by turning the ?Un probleme quelconque rencontre lors de prise de vues peut aussi bien etre an Ihren Fachhandler oder eine Kundendienststelle, wo man mit Ihrem
? ?????????????????????? equipment off and on, the user is encouraged to try to correct the imputable au camescope qu’a l’objectif. Dans un tel cas, contacter le Camcorder vertraut ist, oder an eine autorisierte Canon-
? ????????????????????????????????????
interference by one or more of the following measures: revendeur ainsi qu’un service apres-vente qualifie Canon. Kundendienstzentrale.
????????????? – Reorient or relocate the receiving antenna. ?Veiller a ce que le levier de zoom de l’objectif ne s’accroche pas au cordon de ?Achten Sie darauf, dass der Zoom-Ring-Hebel des Objektivs sich nicht in der
– Increase the separation between the equipment and receiver. l’etui souple. Schnur des Weichetuis verfangt.
??? – Connect the equipment into an outlet on a circuit different from that
???????????????????????????????????? to which the receiver is connected. Le present appareil numerique n’emet pas de bruits radioelectriques
depassant les limites applicables aux appareils numeriques (de la classe B)
????????????????? – Consult the dealer or an experienced radio/TV technician for help.
Do not make any changes or modifications to the equipment unless prescrites dans le Reglement sur le brouillage radioelectrique edicte par le
otherwise specified in the manual. If such changes or modifications should ministere des Communications du Canada.
be made, you could be required to stop operation of the equipment.
This device complies with Part 15 of the FCC Rules. Operation is subject to
the following two conditions:(1) This device may not cause harmful
interference, and (2) this device must accept any interference recieved,
including interference that may cause undesired operation. ????????????????
Change in minimum focusing distance
This digital apparatus does not exceed the Class B limits for radio noise Changement en distance de mise au point minimum
emissions from digital apparatus set out in the Radio Interference Anderung der kurzesten Einstellentfernung
Regulations of the Canadian Department of Communications.
100 cm
?? ????????
Distance Focusing Range
Distance Plage de mise au point
Entfernung Einstellbereich
5 cm
???Ґ?
???????? ???? 5 ?
Wide-macro end Zoom Setting Zoom set to T (Telephoto)
Cote grand Reglage zoom Zoom regle sur T
angle-macro Zoomeinstellung (teleobjectif)
Weitwinkel-Makro- ???? 8 ? Zoom steht auf T (Tele)
Endanschlag Zoom set to W (Wide-angle)
Zoom regle sur W (grand angle)
Zoom steht auf W (Weitwinkel)
???? / Specifications / Fiche technique / Technische Daten
???? ???? ???? ?? ???? ?????? ???????? ?? ??
Focal Length Maximum ??? Angle of View Minimum Focusing Distance Field Size at Minimum Focusing Filter Diameter Dimensions Weight
Distance focale Magnification Effective Angle de prise de vue Distance de mise au point minimum Distance Diametre des filtres ( П ? L) Poids
Brennweite Agrandissement Image Size Bildwinkel Kurzeste Einstellentfernung Dimension de champ a la distance de mise au point Filterdurch-messer Dimensions Gewicht
maximum Taille effective minimum ( П ? L)
Maximale de l’image Bildfeldgro?e bei kurzester Einstellentfernung Abmessungen
Vergro?erung Effektive ( П ? L)
Bildgro?e
1
??????? ??? ??? ?????? ????? ?????? ??? ??? ????? ??????
1 /3” Image size Wide-angle end Telephoto end Wide-macro Total zoom range Wide-macro Wide-angle end Telephoto end Lens body Lens hood
Dimensions d'image Cote grand Cote telephoto Grand angle-macro (excluding wide-macro) Grand angle- Cote grand angle Cote telephoto Corps d’objectif Parasoleil
1 /3” angle Tele- Witwinkel-Makro Plage totale de zoom macro Weitwinkel- Tele- am Objektiv an der
1 /3-Zoll Bildgro?e Weitwinkel- Endanschlag (sauf Grand angle-macro) Witwinkel-Makro Endanschlag Endanschlag Gegenlichtblende
Endanschlag Gesamter Zoombreich (50 cm) (100 cm) (100 cm)
(au?er Weitwinkel-Makro)
XL 5.4-86.4 mm 5.4-86.4 mm 4.8?3.6 mm 5 cm 100 cm 71?53.2 mm 796?597 mm 51.9?38.9 mm П 72 mm П 82 mm ?П 81?158 mm ? 920 g
1
3°11??2°23?
1
16?
( П 3 /4 ? 6 /4 in) (2 lb x /2 oz)
1
47°55??36°?52?
? ????????????????????????????????? ? Weight and dimensions are for lens only, and do not include lens cap and lens ? Le poids et les dimensions s’entendent pour l’objectif uniquement sans le ? Gewicht und Abmessungen gelten nur fur das Objektiv. Objektivdeckel und
??????????????????????????????????? hood. capuchon ni le parasoleil. Gegenlichtblende sind nicht mit eingeschlossen.
Weight and dimensions are approximate. Subject to change without notice. Le poids et les dimensions sont approximatifs. Gewicht und Abmessungen sind nur Annaherungswerte.
Errors and omissions excepted. Les caracteristiques sont sujettes a modification sans preavis et sont fournies Technische Anderungen vorbehalten.
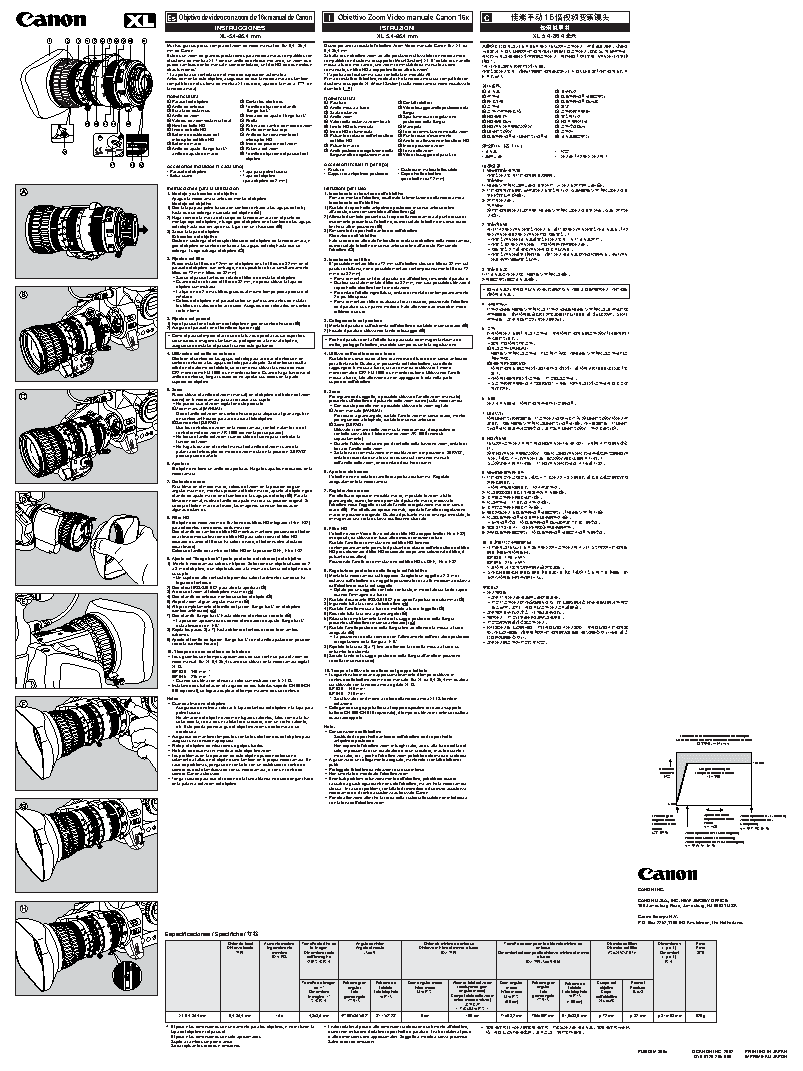
sauf erreur ou omission. Fehler und Auslassungen Vorbehalten.Es Objetivo de video con zoom de 16? manual de Canon I Obiettivo Zoom Video manuale Canon 16? C ???? П??э??? INSTRUCCIONES ISTRUZIONI ????? XL-5,4-86,4 mm XL 5,4-86,4 mm 9- ?? 1 23 4 5 6 78 9 !0 !1 Muchas gracias por su compra del zoom de video manual de 16? 5,4 - 86,4 Grazie per aver acquistato l’obiettivo Zoom Video manuale Canon 16? XL da ???????? 9- ?? П??э???d???і??b??? mm de Canon. 5,4-86,4 mm. ???9-?????????????????э???b?Ї???????a Este es un zoom de grandes prestaciones para videocamaras compatibles con Si tratta di un obiettivo zoom ad alte prestazioni utilizzabile con videocamere ??????????????э???a??/%c????D??????? el sistema de montura XL. Tiene un anillo de enfoque mecanico, un zoom que compatibili con il sistema di supporto (Mount System) XL. E’ dotato di un anello ?? b puede cambiarse entre manual y servocontrolado, un filtro ND de dos niveles y messa a fuoco meccanico, uno zoom commutabile da manuale a servo- ??????????????b otras funciones*. comandato, un filtro ND a doppio livello ed altre funzioni*. ???Ч????d???????????9-??????c?????ѓ? * La apertura se controlara en el modo de exposicion automatica. * L’apertura del diaframma sara controllata in modalita AE. ѓ?Db Antes de montar este objetivo, asegurese de que la videocamara es tambien Prima di installare l’obiettivo, verificate che la videocamera sia compatibile con compatible con el sistema de montura XL (es decir, aparece la marca en il sistema di supporto XL (Mount System) (sulla videocamera viene visualizzato ???? la videocamara). il simbolo ). 1 ??? !1 ???? Nomenclatura Nomenclatura 2 ??? !2 ??????????? 1 Parasol del objetivo !1 Contactos electricos 3 ???? !3 ????????? 1 Paraluce !1 Contatti elettrici 2 Anillo de enfoque !2 Tornillo de fijacion del anillo 2 Anello messa a fuoco !2 Vite di fissaggio anello posteriore della 4 э?? !4 ?? 3 Escala de distancias “flange-back” 5 э?E????? !5 э?????? 3 Scala distanze flangia 4 Anillo de zoom !3 Indicador de ajuste “flange back” 4 Anello zoom !3 Spia luminosa di regolazione 6 /% ??? !6 ????? 5 Valores de zoom/distancia focal !4 Perilla 5 Valori della distanza zoom/focale posteriore della flangia 7 /% ???? !7 /% ????? !9 !8 !7 !6 !4 6 Nivel de brillo ND !5 Palanca de cambio de modo de zoom 6 Livello ND di luminosita !4 Manopola 8 /% ????????? !8 э????? 7 Indice de brillo ND !6 Punto de montura rojo 7 Indice ND di luminosita !5 Leva di commutazione modalita zoom 9 ?????? !8 э?? 8 Boton de desbloqueo del !7 Anillo de funcionamiento del 8 Pulsante di rilascio dell’interruttore !6 Punto rosso d’inserimento !0 ??????? ??????? @0 ??????? interruptor del filtro ND interruptor ND del filtro ND !7 Anello di attivazione interruttore ND 9 Boton de macro !8 Indice de posicion del zoom 9 Pulsante macro !8 Indice posizione zoom ????c? ?D !0 Anillo de ajuste “flange-back”/ !9 Palanca del zoom @0 anillo de ajuste de macro @0 Tornillo de fijacion del parasol del !0 Anello posteriore di regolazione della !9 Leva dello zoom • ??? • ?? flangia/anello di regolazione macro @0 Vite di fissaggio del paraluce objetivo • ???? • ???c ?????D !5 !3 !2 Accesorios incluidos (1 cada uno) Accessori inclusi (1 per tipo) ???? • Paraluce • Custodia in materiale flessibile • Parasol del objetivo • Tapa para polvo trasera ???????? • Bolsa suave • Tapa del objetivo • Cappuccio antipolvere posteriore • Coperchietto obiettivo ????????????????b (per obiettivi da 72 mm) (para objetivo de 2 mm) ???? ????????????????d????????? A b Instrucciones para la utilizacion Istruzioni per l’uso ????????ѓ???????????d?????????????? 1. Montaje y extraccion del objetivo 1. Inserimento e rimozione dell’obiettivo ??????? B b Apague la videocamara antes de montar el objetivo. Prima di montare l’obiettivo, disattivate l’alimentazione della videocamera. ??????b Montaje del objetivo Inserimento dell’obiettivo 1) Gire la tapa para polvo trasera en sentido contrario a las agujas del reloj 1) Ruotate il coperchietto antipolvere posteriore in senso antiorario fino ???? ????????????d???????????????b??d??? hasta que se detenga y saquela del objetivo (A). all’arresto, quindi rimuovetelo dall’obiettivo (A). 2) Haga coincidir la marca del cuerpo de la videocamara con el punto de 2) Allineate il simbolo presente sul corpo della videocamera al punto rosso di ? C b montaje rojo del objetivo, y luego gire el objetivo en el sentido de las agujas inserimento presente sull’obiettivo, quindi ruotate l’obiettivo in senso orario del reloj hasta que encaje en su lugar con un chasquido (B). finche scatti in posizione (B). ????? 3) Saque la tapa del objetivo. 3) Rimuovete il coperchietto anteriore dell’obiettivo. ??? ???????????d?? ????????????bc Extraccion del objetivo Rimozione dell’obiettivo ?????? ???????????bD Deslice y sostenga el interruptor liberador del objetivo de la videocamara, y Fate scorrere ed afferrate l’interruttore di rilascio obiettivo della videocamera, ???????????????????d???????b gire el objetivo en sentido contrario a las agujas del reloj hasta que se quindi ruotate l’obiettivo in senso antiorario fino all’arresto. Rimuovete ???? ??????d???????????b detenga. Luego extraiga el objetivo (C). l’obiettivo (C). ????? ??????????????b ?????????????d???????????????b???? 2. Fijacion del filtro 2. Inserimento del filtro ???????????b Puede instalar filtros de 72mm en el objetivo en si o filtros de 82 mm en el E’ possibile montare filtri da 72 mm sull’obiettivo stesso o filtri da 82 mm sul parasol del objetivo. (sin embargo, no es posible colocar simultaneamente paraluce (tuttavia, non e possibile montare contemporaneamente filtri da 72 ????? filtros de 72 mm y filtros de 82 mm). mm e da 82 mm). ?????????d???????? D b ?Saque el parasol antes de colarle el filtro o de instalar el objetivo. ?Prima di montare un filtro al paraluce o all’obiettivo, rimuovete il paraluce. ?????????? E b ?Cuando este colocado el filtro de 82 mm, no podra utilizar la tapa de ?Qualora sia stato montato il filtro da 82 mm, non sara possibile utilizzare il objetivo suministrada. coperchietto obiettivo fornito in dotazione. ?La fijacion de 2 o mas filtros gruesos al mismo tiempo podra producir el ?Per evitare l’effetto vignettatura, evitare di montate contemporaneamente ?????????????????????d?????Ќ???d???? vinetado. 2 o piu filtri spessi. ??????b ?Coloque el objetivo y el parasol sobre un pano suave antes de instalar ?Prima di montare i filtri o qualsiasi altro accessorio, posizionate l’obiettivo los filtros o cualquier otro accesorio. Asegurese de colocarlos en sentido ed il paraluce su un panno morbido. Fate attenzione ad inserirli in modo ????? recto y firme. rettilineo e sicuro. ??????????????d??????????????b????? ?????d??????$35?????'6 d??????b??? 3. Fijacion del parasol 3. Collegamento del paraluce ????d?????????????b 1) Fije el parasol en el extremo del objetivo y gire en sentido horario (D). 1) Montate il paraluce sull’estremita dell’obiettivo e ruotatelo in senso orario (D). 2) Asegure el parasol con el tornillo de fijacion (E). э? 2) Fissate il paraluce utilizzando la vite di fissaggio (E). ????????c??Dэ??d?????????э???c????D ?Como el parasol impide el acceso de la luz que podria causar espectros secundarios e imagenes fantasmas. protegiendo a la vez al objetivo, ?Poiche il paraluce evita l’effetto luce parassita ed immagini fantasma ed ??????ѓb asegurese de instalar el parasol cuando este grabando. inoltre, protegge l’obiettivo, inseritelo sempre durante la registrazione. ?Ч???????э?b 1??э? ."/6"- 4. Utilizacion del anillo de enfoque 4. Utilizzo dell’anello messa a fuoco ????????э??d?э????d?????????э???э Girelo en el sentido de las agujas del reloj para acercar el enfoque y en Ruotatelo in senso orario al fine di avvicinare il fuoco ed in senso antiorario ????b sentido contrario a las agujas del reloj para alejarlo. Si el enfoque resulta per allontanarlo. Qualora, in prossimita del teleobiettivo, sia difficile 2???? 4&370 dificil en el extremo de telefoto, se recomienda utilizar la unidad de visor raggiungere la messa a fuoco, si raccomanda di utilizzare il mirino ???????э???????????d??? ;3 ???c? CRT monocromo FU-1000 o un monitor externo. Cuando haga funcionar el monocromatico CRT FU-1000 o un monitor esterno. Utilizzando l’anello ?Db anillo de enfoque, tenga cuidado de no apretar sus dedos en la parte messa a fuoco, fate attenzione a non appoggiare le dita nella parte ??????????э??d????э??b superior de objetivo. superiore dell’obiettivo. ??э????????o4&370p???d??????э??????? 5. Zoom ????b 5. Zoom Puede utilizar el anillo del zoom (manual) en el objetivo o el boton del zoom Per ingrandire il soggetto, e possibile utilizzare l’anello zoom (manuale) (servo) en la videocamara para acercarse a su sujeto. ?? presente sull’obiettivo o il pulsante dello zoom (servo) sulla videocamera. ?No puede usar el zoom digital en este producto. ?Con questo prodotto non e possibile utilizzare lo zoom digitale. ???????d????????с????b 1Zoom manual [MANUAL] 1Zoom manuale [MANUAL] Gire el anillo del zoom en sentido horario para alejarse al gran angular y Per ridurre a grandangolo, ruotate l’anello zoom in senso orario, mentre ???? en sentido antihorario para acercarse al teleobjetivo. ???????????d?э?????????d??????????? per ingrandire a telephoto, ruotatelo in senso antiorario. 2Servocontrol [SERVO] 2Servo [SERVO] ??ѓd????????????????? F b??????d???? Use los controles de zoom en la videocamara, control inalambrico o el Utilizzate i comandi dello zoom sulla videocamera, il dispositivo di ?????????????b??????????d??????b control remoto de zoom ZR-1000 (de venta por separado). controllo senza fili o il telecomando zoom ZR-1000 (venduti ?No toque el anillo del zoom cuando utilice el servo para controlar la separatamente). /% ??? funcion del zoom. ?Durante l’utilizzo del servo per il controllo della funzione zoom, evitate di П??э????????/%??? ? d?љ???????? ?No haga fuerza en el control manual del anillo del zoom cuando la toccare l’anello dello zoom. ?b palanca del interruptor de modo de zoom esta en la posicion “SERVO” ?Se la leva di commutazione in modalita zoom e in posizione “SERVO”, ??/%?????????d????/%????????????/%? porque puede danarlo. evitate di esercitare una forza eccessiva sul comando manuale ??bc??????????d????????????bD dell’anello dello zoom, onde evitare il rischio di danni. ???????????d? /% ???????? ? b 6. Apertura El objetivo no tiene un anillo de aperturas. Haga los ajustes necesarios en la 6. Apertura diaframma videocamara. ????????? L’obiettivo non e dotato di anello di apertura diaframma. Regolate ??????????b??????? j ???ѓ?????????? 7. Grabacion macro adeguatamente la videocamera. ?????ѓb Para filmar en el modo macro, coloque el zoom en la posicion de gran ????б????ѓdь?????b angular maximo y, mientras presiona el boton macro, apunte al objeto y gire 7. Registrazione macro ?? *3*4 4&-&$5 ???????? G b el anillo de ajuste macro en el sentido de las agujas del reloj (F). Para la Per effettuare riprese in modalita macro, impostate lo zoom a tutto ???э??????? G b filmacion normal, vuelva el anillo de ajuste macro a su posicion original. Si grandangolo, quindi, tenendo premuto il pulsante macro, indirizzate se deja el boton macro activado, las imagenes se veran borrosas en l’obiettivo verso l’oggetto e ruotate l’anello di regolazione macro in senso ?????d??ѓ???? G b algunas distancias. orario (F). Per effettuare riprese normali, riportate l’anello di regolazione ???э??????? H b macro in posizione originale. Qualora il pulsante macro rimanga innestato, le ??????????????????bc??????D H 8. Filtro ND immagini ad una certa distanza risulteranno sfuocate. ?????????????????? H b El objetivo de video zoom de 16? tiene dos filtros ND integrado (1/6 y 1/32) ???????d????????????o' #p???b para diferentes condiciones de iluminacion. 8. Filtro ND ???? ? d????????????b Gire el anillo de cambio de filtro ND mientras mantiene presionado el boton L’obiettivo zoom Video 16? e dotato di filtri ND a doppio livello (1/6 e 1/32) ??????????d?????????????????b de activacion/desactivacion de filtro ND para seleccionar el filtro ND incorporati, da utilizzare in base alle diverse condizioni di luce. deseado (cuando el filtro se ha seleccionado, el boton vuelve al estado Ruotate l’anello di commutazione del filtro ND tenendo ?????????? desactivado). contemporaneamente premuto il pulsante di rilascio dell’interruttore del filtro ?????? П9- ????э?????9- ????????? Coloque el anillo de cambio del filtro ND en la posicion OFF, 1/6 o 1/32. ND per selezionare il filtro ND desiderato (dopo aver selezionato il filtro, il ??????????b pulsante si disattiva). #1 ? ?? 9. Ajuste del “flange-back” (parte posterior del reborde) del objetivo Posizionate l’anello di commutazione del filtro ND su OFF, 1/6 o 1/32. 1) Monte la videocamara sobre un tripode. Seleccione un objeto situado de 2 #1 ? ?? ??? 9- 4 ?????ґ?????b a 3 m del objetivo, o un objeto situado a la misma distancia del objetivo que 9. Regolazione posteriore della flangia dell’obiettivo su sujeto. ???$) $) ??????? ???c??D????????d? 1) Montate la videocamera sul treppiede. Scegliete un oggetto a 2-3 m di ?Un sujeto de alto contraste le permitira saber facilmente cuando se ha distanza dall’obiettivo o un oggetto posizionato circa alla medesima distanza ????????????Пb logrado el enfoque. dall’obiettivo di quella del soggetto. 2) Gire el dial IRIS/SELECT para abrir la apertura (G). ?Optate per un soggetto con forte contrasto, in modo tale sia facile capire ???? 3) Acerque el zoom al teleobjetivo maximo (G). ???Ќ?? quando l’immagine e a fuoco. 4) Gire el anillo de enfoque y enfoque sobre el objeto (G). 2) Ruotate il quadrante IRIS/SELECT per aprire l’apertura di diaframma (G). E????????????????b 5) Aleje el zoom al gran angular maximo (H). E???э???????????a??????С?????????? 3) Ingrandite tutta la scena a teleobiettivo (G). 6) Afloje completamente el tornillo de fijacion “flange-back” en el objetivo 4) Ruotate l’anello messa a fuoco e mettete a fuoco l’oggetto (G). ????b??d????э???э????b (sentido antihorario) (H). 5) Riducete tutta la scena a grandangolo (H). ???Ќ???????d?Ќ?????b 7) Gire el anillo “flange-back” hasta obtener el enfoque correcto (H). 6) Rilasciate completamente la vite di fissaggio posteriore della flangia ?Ќ???d?????????????b ?La posicion aproximada es donde el indicador de ajuste “flange back” presente sull’obiettivo (in senso antiorario) (H). ??????????Чэ???b esta alineado con “F.B”. 8) Repita los pasos 3) a 7) hasta obtener el enfoque correcto en ambos 7) Ruotate l’anello posteriore della flangia fino ad ottenere la messa a fuoco ???Ч????????d?????????Ч?d?????????Ч adeguata (H). ?b??????d???????????????????????d?? extremos. 9) Apriete el tornillo de fijacion “flange-back” con el anillo ajustado en posicion ?La posizione corretta coincide con l’allineamento dell’indicatore posteriore ?????????b di regolazione della flangia a “F.B”. ??????э????????b correcta (sentido horario). 8) Ripetete le fasi da 3) a 7) fino ad ottenere la corretta messa a fuoco su 10. Tiempos de uso continuo de la bateria entrambe le estremita. ?Los siguientes son tiempos aproximados de uso continuo para el zoom de 9) Serrate la vite di fissaggio posteriore della flangia all’anello in posizione video manual 16? XL 5,4-86,4 cuando se utiliza con la videocamara digital corretta (in senso orario). XL1S. BP-930: 140 min. 1) 10. Tempo di utilizzo in continuo del gruppo batteria BP-945: 215 min. 1) ?I seguenti valori indicano approssimativamente il tempo di utilizzo in 1) Cuando se utiliza con el visor a color suministrado con la XL1S. continuo dell’obiettivo zoom video manuale 16x XL da 5,4-86,4 mm qualora sia utilizzato con la videocamera digitale XL1S. ?Instalando dos baterias en el cargador de dos baterias/soporte CH-900/CH- 910 (opcional), se lograra duplicar el tiempo maximo de uso continuo. BP-930: 140 min 1) BP-945: 215 min 1) Notas 1) Se utilizzato con il mirino a colori della videocamera XL1S fornito in ?Cuando almacene el objetivo: dotazione. – Asegurese de volver a colocar la tapa delantera del objetivo y la tapa para ?Collegando due gruppi batteria al doppio dispositivo di ricarica/supporto polvo trasera. batterie CH-900/CH-910 (opzionale), il tempo di utilizzo in continuo risultera – No almacene el objectivo zoom en lugares calientes, tales como a la luz quasi raddoppiato. solar directa, cerca de un calefactor o radiador, o en un coche caliente, etc. Esto podria provocar gue el objectivo zoom se deformara o se Note: decolorara. ?Conservazione dell’obiettivo: ?Asegurese de mantener limpios los contactos electronicos del objetivo para –Sostituite il coperchietto anteriore dell’obiettivo ed il coperchietto Cambios en la distancia minima de enfoque asegurar una conexion apropiada. antipolvere posteriore. Modifica della distanza minima di messa a fuoco ????????э? ?Proteja el objetivo de vibraciones o golpes fuertes. – Non deponete l’obiettivo zoom in luoghi caldi, ad es. alla luce diretta del ?No trate de desarmar ni modificar este objectivo zoom. sole, in prossimita di un riscaldatore o di un radiatore, in auto durante i ?Los problemas en la operacion de este objetivo pueden deberse no mesi caldi, ecc., poiche l’obiettivo zoom potrebbe deformarsi o scolorirsi. solamente a fallas en el objetivo sino tambien en la propia videocamara. En ?A garanzia di un collegamento adeguato, mantenete i contatti elettronici caso de problemas, pongase en contacto con un distribuidor o centro de puliti. 100 cm servicio que este familiarizado con su videocamara, o con un centro de ?Proteggete l’obiettivo da vibrazioni o scosse intense. Distancia Margen de enfoque servicio Canon autorizado. ?Non smontate o modificate l’obiettivo zoom. Distanza Campo di messa a fuoco ?Tenga cuidado para que el cordon de la funda blanda no quede enganchado ?Eventuali problemi di funzionamento dell’obiettivo, potrebbero essere ?? ???? en la palanca del zoom del objetivo. causati da guasti riguardanti non solo l’obiettivo, ma anche la videocamera stessa. In caso di problemi, contattate il rivenditore o il servizio assistenza videocamere o il centro assistenza autorizzato Canon. ?Ponete attenzione affinche la corda della custodia flessibile non interferisca con la leva dell’obiettivo zoom. 5 cm Ajuste del zoom Extremo gran Zoom ajustado a T (Telefoto) angular-macro Impostazione dello Zoom impostato su T Estremita wide- zoom (Telephoto) macro э??? э?? 5c??D? ????? Zoom ajustado a W (Gran angular) Weitwinkel-Makro-Endanschlag Zoom impostato su W (Grandangolo) э?? 8c??D? CANON INC. CANON U.S.A., INC. NEW JERSEY OFFICE 100 Jamesburg Road, Jamesburg, NJ 08831 USA Canon Europa N.V. P.O. Box 2262,1180 EG Amstelveen, the Netherlands Especificaciones / Specifiche / ?? Distancia focal Aumento maximo Tamano efectivo de Angulo de vision Distancia minima de enfoque Tamano de campo en la distancia minima de Diametrode filtros Dimensiones Peso Distanza focale Ingrandimento la imagen Angolo di veduta Distanza minima di messa a fuoco enfoque Diametro del filtro ( П ? L) Peso ?? massimo Dimensione reale ??? ???? Dimensioni del campo alla distanza minima di messa ??????? Dimensioni ?? ??П? dell’immagine a fuoco ( П ? L) ?????? ????????? ?? Tamano de imagen Extremo gran Extremo de Gran angular-macro Alcance total del zoom Gran angular- Extremo gran Extremo de Cuerpo del Parasol de /3” angular telefoto Wide-macro (excluyendo gran macro angular telefoto objetivo Paraluce 1 Dimensione Lato Lato telephoto ???? angular-macro) Wide-macro Lato Lato telephoto Corpo ??? immagine /3” grandangolo ??? Campo totale dello zoom ???? grandangolo ??? dell’obiettivo 1 ???? ??? (wide-macro esclusa) (50 cm) ??? (100 cm) ??Ч? э??? c?Ї?????D XL 5.4-86.4 mm 5,4-86,4 mm 16? 4,8?3,6 mm 47°55??36°?52? 3°11??2°23? 5 cm 100 cm 71?53,2 mm 796?597 mm 51,9?38,9 mm П 72 mm П 82 mm П 81?158 mm 920 g ? El peso y las dimensiones son unicamente para los objetivos, y no incluyen la ? I valori relativi al peso e alle dimensioni si riferiscono solamente all’obiettivo, ? ???????????????d?Ї????????b???????? tapa del objetivo ni el parasol. quindi non includono il relativo coperchietto e paraluce. I valori relativi al peso ?d?????????b??э?d??????b El peso y las dimensiones son solo aproximados. e alle dimensioni sono approssimativi. Soggetto a modifica senza preavviso. Sujeto a cambios sin previo aviso. Salvo errori ed omissioni. Se exceptuan los errores y omisiones. PUB.DIM-399ic © CANON INC. 2002 PRINTED IN JAPAN DY8-9120-296-000 IMPRIME AU JAPON