На сайте 123377 инструкций общим размером 499.27 Гб , которые состоят из 6233966 страниц
Фото
Руководство пользователя TRIPP LITE SNMPWEBCARD. Основные функции, характеристики и условия эксплуатации изложены на 100 страницах документа в pdf формате.
Доступно к просмотру 100 страниц. Рекомендуем вам скачать файл инструкции, поскольку онлайн просмотр документа может сильно отличаться от оригинала.
WARRANTY                     User’s Guide
REGISTRATION:
chance to win a FREE Tripp Lite
register online today for a
product—www.tripplite.com/warranty
SNMPWEBCARD
Firmware Version 12.06.0062 through 12.06.0065
Revision A
Table of Contents
1.  Introduction                 2    4.  Telnet/SSH Console           26       4.3   Network Configuration  69
1.1   System Requirements      2      4.1   Device Menu             27          4.3.1    IP Configuration      69
4.1.1    Status           28
2.  Installation and Configuration  2         4.1.2    Identification      29        4.3.1.1   Host Name      70
2.1   Saving Configuration Changes     2         4.1.3    Controls      30        4.3.1.2   Domain Data Entry Menu     70
2.2   Default UPS System                   4.1.3.1   Control Data      31        4.3.1.3   IPV4 Settings      70
Shutdown Settings          2           4.1.4    Events           32          4.3.1.4   IPV6 Settings      71
2.3   Other Default Settings  3                                                 4.3.1.5   DNS Settings      72
2.4   SNMP Configuration      3           4.1.5    Loads            35
4.1.5.1   Load Configuration      35        4.3.2    Remote Services      73
3.  Web Console                  4           4.1.5.2   Load Groups      36         4.3.2.1   Email Settings      73
3.1   Opening the Web Console  4                                                4.3.2.2   Remote Syslog      75
3.1.1     Alternate to Web Launch     4        4.1.5.3   Ramp/Shed Settings      37        4.3.2.3   Watchdog Settings      78
3.2   Web Console Interface   5           4.1.6    Preferences and Thresholds   38        4.3.3    User Interfaces      79
3.3   Device Summary          5           4.1.7    Device Alarms      39
3.4   Status Menu             5           4.1.8    Logs             39          4.3.3.1   Telnet/SSH      79
3.4.1    Status > Overview      5     4.2   System Configuration  39         4.3.3.2   Web Console      79
3.4.2    Status > Details      6       4.2.1    Address Book      39         4.3.3.3   SNMP Settings      80
3.4.3    Status > Alarms      7        4.2.1.1   Email Contacts      40        4.3.3.4   FTP           80
3.5   Device Menu             7           4.2.1.2   SNMP Contacts      41        4.3.3.5   Remote View Access Port     80
3.5.1    Device > Controls      7        4.2.1.3   HTTP Contacts      42     4.4   Alarms and Logging  81
3.5.2    Device > Loads      8                                               4.4.1    Alarms           81
3.5.3    Device > Load Groups      8        4.2.2    Global Actions      43        4.4.1.1   Alarm Details      82
3.5.4    Device > Events      9         4.2.2.1   Action Profiles      43
3.5.5     Device > Device Discovery    9        4.2.2.2   Schedules      55        4.4.2    View Logs      82
3.6   Actions Menu            10          4.2.3    Security         59          4.4.2.1   Data Log        83
3.6.1    Actions           10          4.2.3.1   Authentication Method      59        4.4.2.2   Event Log      85
3.6.1.1   Actions > Event Actions >          4.2.3.2   Local Users      60        4.4.3    Logging Settings      88
Device Actions      10          4.2.3.3   RADIUS Servers      63        4.4.3.1   Accounting Log Settings      88
3.6.1.2   Actions > Event Actions >          4.2.3.4   Change Password      64        4.4.3.2   Application Log Settings      88
General Actions      13
3.6.2     Actions > Scheduling      14        4.2.4    Date/Time      64        4.4.3.3   Data Log Settings      89
3.6.3    Actions > Address Book      15        4.2.4.1   Time Source Data         4.4.3.4   Event Log Settings      90
3.7  Logs                     15                 Entry Menu         64          4.4.3.5   Format Settings      91
3.7.1    Logs > Event Logs      15        4.2.4.2   Time Settings      65     4.5  About               92
3.7.2    Logs > Data       15          4.2.4.3   SNTP Settings      66  5.  Command Line Interface     93
3.8  Preferences              16          4.2.4.4   RTC Settings      66     5.1   Syntax Conventions     93
3.8.1    Preferences > Network      16        4.2.5    Local Device Discovery      67     5.2   Manual Pages  94
3.8.2    Preferences > DNS      18                                        5.3   Output Conventions     94
3.8.3    Preferences > Security      18        4.2.6    Restart PowerAlert  68  5.4   Getting Started with the PowerAlert CLI   94
3.8.4    Preferences > System      22
3.8.5     Preferences > Restart      24                                6.  Troubleshooting             96
3.9   RSS Support             24                                          7.  Technical Support           96
3.10  Help                    25
8.  Appendix                    97
Documentation Notice: This User’s Guide is a supplement to the printed manual that came with your SNMPWEBCARD or network-enabled Tripp Lite device. Refer to
the printed manual for instructions on hardware installation and basic configuration, including IP address assignment. If you have misplaced your printed manual, refer
to the electronic version included on the bundled CD-ROM or download it at www.tripplite.com/support/manuals/.
1111 W. 35th Street, Chicago, IL 60609 USA • www.tripplite.com/support
Copyright © 2013 Tripp Lite. All trademarks are the sole property of their respective owners.
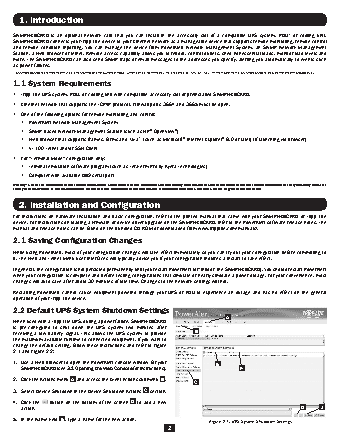
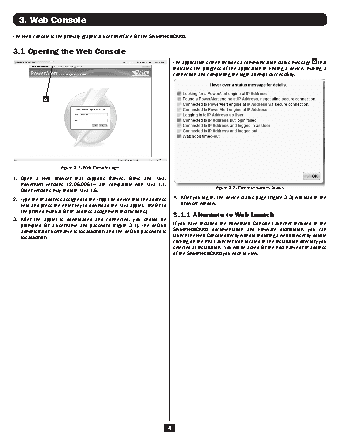
1. Introduction
SNMPWEBCARD is an optional network card that you can install in the accessory slot of a compatible UPS system, PDU* or cooling unit.
SNMPWEBCARD connects your Tripp Lite device to your Ethernet network as a manageable device that supports remote monitoring, remote control
and remote condition reporting. You can manage the device from PowerAlert Network Management System, an SNMP Network Management
Station, a Web browser or telnet. Remote access capability allows you to reboot, control outlets, shed nonessential loads, monitor load levels and
more. The SNMPWEBCARD can also send SNMP traps or email messages to the addresses you specify, alerting you automatically to events such
as power failures.
* SNMPWEBCARD is preinstalled in Tripp Lite Monitored and Switched PDUs, which can be identified by the presence of “MN” or “NET” in the model name. SNMPWECARD is also preinstalled in SRCOOLNET.
1.1 System Requirements
•  Tripp Lite UPS system, PDU, or cooling unit with compatible accessory slot or preinstalled SNMPWEBCARD.
•  Ethernet network that supports the TCP/IP protocol. Firewall ports 3664 and 3665 must be open.
•  One of the following options for remote monitoring and control:
•  PowerAlert Network Management System
®
®
•  SNMP-based Network Management Station (such as HP  OpenView )
•  Web browser that supports frames, forms and Java™ (such as Microsoft  Internet Explorer  8.0 or later) (if launching vid browser)
®
®
•  VT-100 Telnet and/or SSH Client
•  For “Terminal Mode” configuration only:
•  Terminal emulation software program (such as TeraTerm Pro by Ayera Technologies)
•  Computer with available DB9 serial port
Warning: Use of this equipment in life support applications where failure of this equipment can reasonably be expected to cause the failure of the life support equipment or to significantly affect its
safety or effectiveness is not recommended. Do not use this equipment in the presence of a flammable anesthetic mixture with air, oxygen or nitrous oxide.
2. Installation and Configuration
For instructions on hardware installation and basic configuration, refer to the printed manual that came with your SNMPWEBCARD or Tripp Lite
device. For instructions on loading a firmware or device driver upgrade on the SNMPWEBCARD, refer to the PowerAlert software release notes. The
manual and release notes can be found on the bundled CD-ROM or downloaded from www.tripplite.com/manuals/.
2.1 Saving Configuration Changes
While using PowerAlert, most of your configuration changes will take effect immediately so you can try out your configuration before committing to
it. The Web and Telnet Menu user interfaces will typically advise you if your configuration requires a restart to take effect.
In general, the configuration is not persisted permanently until you restart PowerAlert (or ‘reboot’ the SNMPWEBCARD). You should restart PowerAlert
when your configuration is complete and before testing configurations that simulate or nearly simulate a power outage. For your convenience, most
changes will auto-save after about 30 minutes of idle time. Changes to the network settings will not.
Restarting PowerAlert cannot cause equipment powered through your UPS or PDU to experience an outage and has no effect on the general
operation of your Tripp Lite device.
2.2 Default UPS System Shutdown Settings
A
When used with a Tripp Lite UPS, during a power failure, SNMPWEBCARD
is pre-configured to shut down the UPS system two minutes after
receiving a low battery signal. This allows the UPS system to provide   B
the maximum available runtime to connected equipment. If you want to
change the default setting, follow these instructions and refer to Figure
2-1 and Figure 2-2:
1.  Use a Web browser to open the PowerAlert console window for your     E
SNMPWEBCARD (see 3.1 Opening the Web Console for instructions).                F
2.  Click the Actions menu  A  and access the Event Actions submenu  B .
C
3.  Select Device Shutdown in the Device Shutdown Actions  C  section.
4.  Click the    button on the bottom of the screen  D  to add a new
action.                                                                                             D       J
5.  In the Name field  E , type a name for the new action.            Figure 2-1: UPS System Shutdown Settings
2
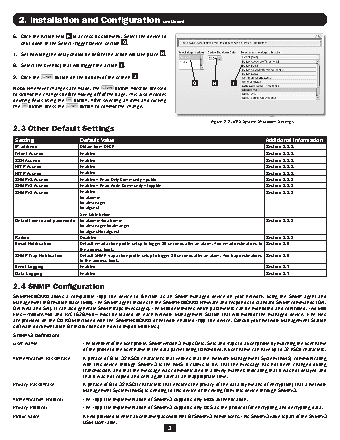
2. Installation and Configuration continued
6.  Click the Action field  F  to access its submenu. Select the device to
shut down in the Select Trigger Device section  G .
7.  Set how long the delay should be before the action will take place  H .
8.  Select the Event(s) that will trigger the action  I .
9.  Click the    button on the bottom of the screen  J .
G      H      I
Note: Whenever changes are made, the    button must be pressed
to submit the changes before moving off of the page. This also includes
deleting fields using the    button. After selecting an item and clicking
the    button press the    button to commit the change.
Figure 2-2: UPS System Shutdown Settings
2.3 Other Default Settings
Setting                 Default Value                                                      Additional Information
IP address              Obtain from DHCP                                                   Section 3.8.1
Telnet Access           Enabled                                                            Section 3.8.1
SSH Access              Enabled                                                            Section 3.8.1
HTTP Access             Enabled                                                            Section 3.8.1
HTTP Access             Enabled                                                            Section 3.8.1
SNMPv1 Access           Enabled—Read-Only Community—public                                 Section 3.8.2
SNMPv2 Access           Enabled—Read-Write Community—tripplite                             Section 3.8.2
SNMPv3 Access           Enabled                                                            Section 3.8.2
localadmin
localmanager
localguest
See table below
Default users and passwords  localadmin/localadmin                                         Section 3.8.2
localmanager/localmanger
localguest/localguest
Radius                  Disabled                                                           Section 3.8.2
Email Notification      Default email action profile setup to trigger 30 seconds after an alarm. Add email destinations to  Section 3.6
the address book.
SNMP Trap Notification  Default SNMP Trap action profile setup to trigger 30 seconds after an alarm. Add trap destinations  Section 3.6
to the address book.
Event Logging           Enabled                                                            Section 3.7
Data Logging            Enabled                                                            Section 3.7
2.4 SNMP Configuration
SNMPWEBCARD allows a compatible Tripp Lite device to function as an SNMP-managed device on your network, using the SNMP agent and
Management Information Base (MIB). The SNMP agent resides in the SNMPWEBCARD firmware and responds to standard SNMP commands (Get,
Get Next and Set). It can also generate SNMP traps (messages). The MIB determines which parameters can be monitored and controlled. Two MIB
files—Tripplite.mib and RFC1628.mib—must be loaded on each Network Management Station that will monitor the managed device. (The files
are provided on the CD-ROM included with the SNMPWEBCARD or network-enabled Tripp Lite device. Consult your Network Management Station
software documentation for instructions on how to import MIB files.)
SNMPv3 Definitions
User Name                The identifier of the user profile. SNMP version 3 maps Gets, Sets and Traps to a user profile by matching the user name
of the profile to the user name in the data packet being transmitted. A user name can have up to 32 ASCII characters.
Authentication Passphrase   A phrase of 8 to 32 ASCII characters that verifies that the Network Management System (NMS) communicating
with this device through SNMPv3 is the NMS it claims to be, that the message has not been changed during
transmission, and that the message was communicated in a timely manner, indicating that it was not delayed and
that it was not copied and sent again later at an inappropriate time.
Privacy Passphrase       A phrase of 8 to 32 ASCII characters that ensures the privacy of the data (by means of encryption) that a Network
Management System (NMS) is sending to this device or receiving from this device through SNMPv3.
Authentication Protocol   The Tripp Lite implementation of SNMPv3 supports only MD5 authentication.
Privacy Protocol         The Tripp Lite implementation of SNMPv3 supports only DES as the protocol for encrypting and decrypting data.
Public Value             A field provided to enter a username/password hint for SNMPv3 Admin users. This SNMPv3 value is part of the SNMPv3
USM User Table.
3