На сайте 123418 инструкций общим размером 499.4 Гб , которые состоят из 6235582 страниц
Фото
Руководство пользователя ZYXEL GN680-T. Основные функции, характеристики и условия эксплуатации изложены на 3 страницах документа в pdf формате.
Доступно к просмотру 3 страницы. Рекомендуем вам скачать файл инструкции, поскольку онлайн просмотр документа может сильно отличаться от оригинала.
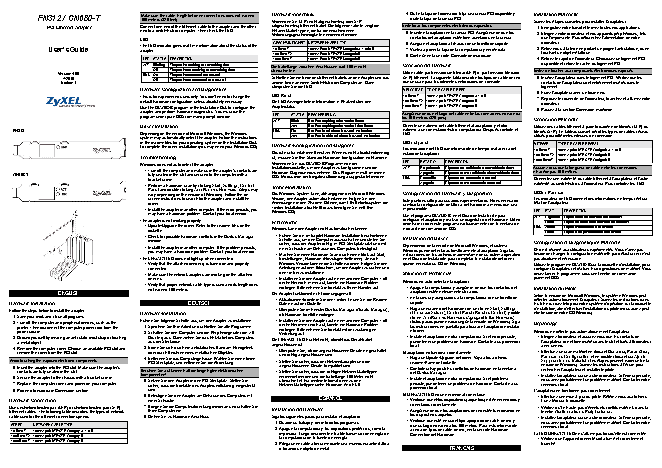
FN312 / GN680-T                      Make sure the cable length between connections does not exceed   Hardware-Anschlu?             4 Quite la tapa del ordenador. Elija una ranura PCI disponible y   Installation Materielle
quite la tapa de la ranura PCI.
100 meters (328 feet).
Verwenden Sie UTP (nicht abgeschirmtes) oder STP
Suivez les etapes suivantes pour installer l’adaptateur.
PCI Ethernet Adapter              Connect one end of the Ethernet cable to the adapter and the other   (abgeschirmtes) Ethernet-Kabel. Die folgende Tabelle zeigt die   Evite tocar los componentes electronicos expuestos.  1 Enregistrez votre travail et fermez toutes vos applications.
end to a switch/hub or computer. Then check the LED.   Netzwerkkabel-Typen, die fur die verschiedenen
Verbindungsgeschwindigkeiten verwendet werden.    5 Inserte el adaptador en la ranura PCI. Asegurese de que los   2 Eteignez votre ordinateur et vos appareils peripheriques, tels
LED                                                                                              contactos del adaptador esten bien asentados en la ranura.  que l’imprimante. Puis debranchez l’alimentation de votre
GESCHWINDIGKEIT NETZWERKKABEL-TYP               6 Asegure el adaptador al chasis con un tornillo de soporte.   ordinateur.
The LED indicator gives real-time information about the status of the
User’s Guide                      adapter.                                       10 Base-T    100? 2-Paar UTP/STP Kategorie 3, 4 oder 5  7 Vuelva a poner la tapa de la computadora y enciendala.  3 Reliez vous a la terre en portant un poignet anti-statique, ou en
100 Base-TX  100? 2-Paar UTP/STP Kategorie 5    8 Continue en la seccion Conexion del Hardware.   touchant un objet metallique.
LED  STATUS DESCRIPTION                        1000 Base-T  100? 4-Paar UTP/STP Kategorie 5                                                   4 Retirez le capot de l’ordinateur. Choisissez un logement PCI
ACT  Blinking  The port is receiving or transmitting data.  Die Kabellange zwischen Anschlussen darf 100 m nicht   Conexion del Hardware        disponible et retirez le cache du logement PCI.
Off   The port is not receiving or transmitting data.  uberschreiten.                                                                    Evitez de toucher aux composants electroniques exposes
Version 4.00                  LINK On   The port is connected to a network.                                                 Utilice cable par trenzado sin blindar (UTP) o  par trenzado blindado
7/2010                          Off   The port is not connected to a network.   Schlie?en Sie ein Ende des Ethernet-Kabels an den Adapter und das   (STP) Ethernet. La siguiente tabla describe los tipos de cable de red   5 Inserez l’adaptateur dans le logement PCI. Verifiez que les
Edition 1                                                                   andere Ende an einen Switch/Hub oder Computer an. Dann   que se usan para las diferentes velocidades de conexion.    contacts de l’adaptateur sont entierement inseres dans le
uberprufen Sie die LED.                                                                          logement.
Hardware Configuration and Diagnostics                                                        VELOCIDAD  TIPO DE CABLE DE RED                 6 Fixez l’adaptateur avec un tourne-vis.
This is for experienced users only. You don’t need to change the   LED-Panel                  10 Base-T  100? 2-par UTP/STP Categoria 3, 4 o 5  7 Reposez le couvercle de l’ordinateur, branchez et allumez votre
default hardware configuration unless absolutely necessary.   Die LED-Anzeigen liefern Information in Realzeit uber den   100 Base-TX  100? 2-par UTP/STP Categoria 5  ordinateur.
Use the DIAG.EXE program in the Installation Disk to configure the   Adapterstatus.           1000 Base-T  100? 4-par UTP/STP Categoria 5     8 Passez a la section Connexion materielle.
adapter and perform hardware diagnostics. You must run the                                    Asegurese de que el largo del cable entre las conexiones no exceda
program under pure DOS command prompt window.   LED   STATUS  BESCHREIBUNG                    los 100 metros (328 pies).
ACT    Blinkt  Der Port empfangt oder sendet Daten.                                           Connexion Materielle
Driver Installation                                   Aus   Der Port empfangt oder sendet keine Daten.  Conecte un extremo del cable Ethernet al adaptador y el otro   Utilisez des cables Ethernet a paire torsadee non blindes (UTP) ou
FN312                                                                                         LINK   Ein   Der Port ist mit einem Netzwerk verbunden.  extremo a un conmutador/hub o computadora. Despues controle el   blindes (STP). Le tableau suivant decrit les types de cables reseau
Depending on the version of Microsoft Windows, the Windows   Aus  Der Port ist nicht mit einem Netzwerk verbunden.   LED.                    utilises pour differentes vitesses de connexion.
system may automatically detect the adapter. Follow the instructions
in the readme files for your operating system on the Installation Disk                        LED del panel                                  VITESSE  TYPE DE CABLE RESEAU
to complete the driver installation (you may need your Windows CD).  Hardware-Konfiguration und -Diagnose
Los indicadore del LED dan informacion de tiempo real acerca del   10 Base-T  100? 2-paire UTP/STP Categorie 3, 4 ou 5
Das ist nur fur erfahrene Benutzer. Wenn es nicht absolut notwendig   estado del adaptador.
Troubleshooting                                ist, mussen Sie Ihre Standard-Hardware-Konfiguration nicht andern.                            100 Base-TX  100? 2-paire UTP/STP Categorie 5
100? 4-paire UTP/STP Categorie 5
1000 Base-T
Windows does not auto-detect the adapter.      Verwenden Sie das DIAG.EXE Programm von der    LED   ESTA-DO  DESCRIPCION                     Assurez vous que la longueur de cable entre les connexions
Parpadeando
Installationsdiskette, um den Adapter zu konfigurieren und die
El puerto est· recibiendo o transmitiendo datos.
ACT
• Turn off the computer and make sure the adapter’s contacts are   Hardware-Diagnose vorzunehmen. Das Programm mu? im reinen                n’excede pas 100 metres.
GN680-T                                         fully seated in the slot and secured to the computer with a   DOS-Modus (von der Eingabeaufforderung aus) gestartet werden.   Apagado  El puerto no est· recibiendo ni transmitiendo datos.
bracket screw.                                                                              LINK  Encendido  El puerto est· conectado a una red.  Connectez une extremite du cable Ethernet a l’adaptateur et l’autre
Apagado  El puerto no est· conectado a una red.   extremite au switch/hub ou a l’ordinateur. Puis controlez les LED.
• Perform a hardware scan by clicking Start, Settings, Control   Treiber-Installation
Panel and double-clicking Add/Remove Hardware. (Steps may                                                                                  LED du Panneau
vary depending on the version of Windows). Follow the on-  Das Windows-System kann, abhangig von der Microsoft Windows-  Configuracion del Hardware y Diagnostico
screen instructions to search for the adapter and install the   Version, den Adapter automatisch erkennen. Folgen Sie den   Este punto es solo para usuarios experimentados. No es necesario   Les indicateur de LED donnent des informations en temps reel sur
driver.                                      Anweisungen in den Readme-Dateien, damit Ihr Betriebssystem die   cambiar la configuracion de fabrica del hardware a menos que sea   l’etat de l’adatpateur.
Treiber-Installation abschlie?t (dazu benotigen Sie evtl. Ihre
• Install the adapter in another computer. If the error persists, you   Windows-CD).         imprescindible.                                LED  ETAT  DESCRIPTION
may have a hardware problem. Contact your local vendor.                                     Use el programa DIAG.EXE  en el Disco de Instalacion para
The adapter is not working properly.           Fehlersuche                                    configurar el adaptador y realizar un diagnostico del hardware. Usted   ACT  Clignotant  Le port reaoit ou transmet des donnees.
Le port ne reaoit ni ne transmet de donnees.
Eteint
• Update/Upgrade the driver. Refer to the readme files on the                                debe hacer correr este programa exclusivamente con la ventana de   LINK  Allume  Le port est connecte a un reseau.
indicacion de comando de DOS.
diskette.                                    Windows kann den Adapter nicht automatisch erkennen.                                              Eteint  Le port n'est pas connecte a un reseau.
• Check for possible hardware conflicts in the Device Manager   • Fuhren Sie die im Kapitel Hardware-Installation beschriebenen   Instalacion del Driver
window.                                         Schritte aus, um den Computer auszuschalten und stellen Sie
sicher, dass der Adapter richtig im PCI-Steckplatz sitzt und mit                           Configuration et Diagnostiques Materiels
• Install the adapter in another computer. If the problem persists,   einer Schraube am Gehause des Computers befestigt ist.  Dependiendo de la version de Microsoft Windows, el sistema   Ceci est reserve aux utilisateurs experimentes. Vous n’avez pas
you may have a hardware problem. Contact your local vendor.                                 Windows puede detectar automaticamente al adaptador. Siga las
• Machen Sie einen Hardware-Scan durch einen Klick auf Start,   instrucciones de los archivos readme/leame de su sistema operativo   besoin de changer la configuration materielle par defaut si ceci n’est
The LNK/ACT LED does not light up when connected.   Einstellungen, Hardware (Hinzufugen/Entfernen). Je nach   en el Disco de Instalacion para completar la instalacion del driver   pas absolument necessaire.
• Verify that the attached device(s) is turned on and properly   Windows Version konnen die Schritte variieren. Folgen Sie den   (puede necesitar su CD de Windows).  Utilisez le programme DIAG.EXE sur la disquette d’installation, pour
connected.                                      Anleitungen auf dem Bildschirm, um den Adapter zu suchen und                               configurer l’adaptateur et realiser les diagnostiques de materiel. Vous
den Treiber zu installieren.
• Make sure the network adapters are working on the attached                                 Solucion de Problemas                          devez lancer le programme sous une fenetre de commande
devices.                                      • Installieren Sie den Adapter auf einem anderen Computer. Tritt                             purement DOS.
der Fehler noch immer auf, konnte ein Hardware Problem   Windows no auto-detecta el adaptador.
• Verify that proper network cable type is used and its length does   vorliegen. Bitte nehmen Sie Kontakt zu Ihrem Handler auf.  • Apague la computadora y asegurese de que los contactos del
not exceed 100 meters.                                                                                                                     Installation du Pilote
ENGLISH                                                                      Der Adapter funktioniert nicht ordnungsgema?.     adaptador esten enteramente ubicados        Selon la version de Microsoft Windows, le systeme Windows peut
• Aktualisieren/Erweitern Sie den Treiber. Lesen Sie die Readme-  • en la ranura y asegurados a la computadora con un tornillo de   detecter automatiquement l’adapateur. Suivez les instructions dans
Hardware Installation                                            DEUTSCH                          Dateien auf der Diskette.                      soporte.                                    les fichiers Lisez Moi pour votre systeme d’operation sur la disquette
Follow the steps below to install the adapter.                                                  • Uberprufen Sie im Fenster Device Manager (Gerate-Manager),   • Haga un escaneo del hardware con un clic en Start, Settings   d’installation, afin d’effectuer l’installation du pilote (vous aurez peut-
Hardware-Installation                             ob Hardware-Konflikte vorliegen.               (Comenzar Seteos), Control Panel (Panel de Control) y doble   etre besoin de votre CD Windows).
1 Save your work and close all programs.                                                                                                       clic en Add/Remove Hardware (Agregar/Quitar Hardware).
Fuhren Sie folgende Schritte aus, um den Adapter zu installieren.  • Installieren Sie den Adapter auf einem anderen Computer. Tritt
2 Turn off the computer and peripheral devices, such as the                                     der Fehler immer noch auf, konnte ein Hardware-Problem   (Estos pasos pueden variar segun la version de Windows). Siga   Depannage
printer. Then disconnect the computer power cord from the   1 Speichern Sie Ihre Arbeit und schlie?en Sie alle Programme.  vorliegen. Bitte nehmen Sie Kontakt mit der zustandigen   las instrucciones en pantalla para buscar el adaptador e instalar
power source.                                 2 Schalten Sie den Computer und die Peripheriegerate (wie z.B.   Vertretung auf.                el driver.                                  Windows ne detecte pas automatique-ment l’adaptateur.
3 Ground yourself by wearing an anti-static wrist strap or touching   Drucker) aus. Dann ziehen Sie das Netzkabel des Computers   Die LINK/ACT LED leuchtet nicht, obwohl das Gerat/Kabel   • Instale el adaptador en otra computadora. Si el error persiste,   • Eteignez l’ordinateur et assurez vous que les contacts de
a metal object.                                aus der Steckdose.                           angeschlossen ist.                                puede tener un problema de hardware. Contacte a su proveedor   l’adaptateur soient bien inseres dans le slot et fixes a l’ordinateur
4 Remove the computer cover. Choose an available PCI slot and   3 Erden Sie sich durch ein antistatisches Band am Handgelenk   • Uberprufen Sie, ob die angeschlossenen Gerate eingeschaltet   local.  avec une vis.
remove the cover from the PCI slot.            oder durch Beruhren eines metallischen Objektes.  und richtig angeschlossen sind.           El adaptador no funciona correctamente.          • Effectuez un scan materiel en cliquant Demarrer, Parametres,
Panneau de Configuration et en double-cliquant sur Ajout/
Avoid touching the exposed electronic components.  4 Entfernen Sie das Computergehause. Wahlen Sie einen freien   • Stellen Sie sicher, dass der Netzwerkadapter und die   • Haga un Update/Upgrade del driver. Vaya a los archivos   Suppression de Materiel. (Les etapes peuvent varier selon la
PCI-Steckplatz, und entfernen Sie die Abdeckung.                                               readme/leame del diskette.
5 Insert the adapter into the PCI slot. Make sure the adapter’s                                 angeschlossenen Gerate kompatibel sind.       • Controle si hay posibles conflictos de hardware en la ventana   version de Windows). Suiviez les instructions a l’ecran pour
rechercher l’adaptateur et installer le pilote.
contacts are fully seated in the slot.       Beruhren Sie auf keinen Fall die freigelegten elektronischen   • Stellen Sie sicher, dass die richtigen Netzwerkkabeltypen   del Device Manager.
Komponenten!
6 Secure the adapter to the chassis with a bracket screw.                                       verwendet werden und die Kabellange 100 Meter nicht   • Instale el adaptador en otra computadora. Si el problema   • Installez l’adaptateur sur un autre ordinateur. Si l’erreur persiste,
5 Setzen Sie den Adapter in den PCI-Steckplatz. Stellen Sie   uberschreitet. Fur weitere Informationen zu den                                  vous avez probablement un probleme materiel. Contacter votre
7 Replace the computer cover and power on your computer.  sicher, dass die Kontakte des Adapters vollstandig eingesteckt   Netzwerkkabeltypen siehe Hardware-Anschlu?.  persiste, puede tener un problema de hardware. Contacte a su   revendeur local.
8 Proceed to Hardware Connection section.       sind.                                                                                          proveedor local.                            L’adaptateur ne fonctionne pas correctement.
6 Befestigen Sie den Adapter am Gehause des Computers mit                                    El LINK/ACT LED no se enciende al conectarse.    • Effectuez une mise a jour du pilote. Referez vous aux fichiers
Hardware Connection                               einer Schraube.                                               ESPANOL                         • Verifique que el/los dispositivo(s) adjunto(s) esten encendidos y   Lisez-Moi sur la disquette.
Use unshielded twisted pair (UTP) or shielded twisted-pair (STP)   7 Bringen Sie die Computerabdeckung wieder an und schalten Sie   Instalacion del Hardware  conectados correctamente.        • Verifiez qu’il n’existe pas d’eventuels conflits materiels dans la
Ethernet cables. The following table describes the types of network   Ihren Computer ein.                                                       • Asegurese de que los adaptadores de red esten funcionando en   fenetre Gestionnaire de Peripheriques.
cable used for the different connection speeds.     8 Gehen Sie zu Hardware-Anschluss.         Siga los siguientes pasos para instalar el adaptador.  los dispositivos adjuntos.               • Installez l’adaptateur sur un autre ordinateur. Si l’erreur persiste,
1 Guarde su trabajo y cierre todo los programas.  • Verifique que este en uso el tipo apropiado de cable de red y   vous avez probablement un probleme materiel. Contacter votre
SPEED   NETWORK CABLE TYPE                                                                                                                      que su largo no exceda los 100 metros. Para mas informacion   revendeur local.
2 Apague la computadora y los dispositivos perifericos, como la
10 Base-T  100? 2-pair UTP/STP Category 3, 4 or 5                                                                                               acerca de tipos de cable de red, ver la seccion Hardware
100 Base-TX 100? 2-pair UTP/STP Category 5                                                       impresora. Luego desconecte el cable transmisor de energia de   Connection del Hardware.   La LED LINK/ACT LED ne s’allume pas lorsqu’elle est connectee.
la computadora de la fuente de energia.
1000 Base-T 100? 4-pair UTP/STP Category 5                                                                                                                                                    • Verifiez que l’appareil connecte soit allume et correctement
3 Pongase en cable a tierra mediante una munequera antiestatica                                 branche.
o tocando un objeto de metal.                                FRANCAIS
• Assurez vous que les adaptateurs de reseau fonctionnent sur les   • Verifichi che la periferica sia fissata, accesa e correttamente   • Kontrollera att ansluten enhet(enheter) ar paslagna och ratt   • Установите адаптер в другой компьютер. Если проблема не   • ??????????????????????
appareils connectes.                           collegata. Si assicuri che gli adattatori della rete stiano agendo   anslutna.                 устранена, возможно, имеет место аппаратная   • ?????????????
• Verifiez que le bon type de cable reseau est utilise et que sa   sulle periferiche installate. Verifichi che il tipo di cavo di rete   • Kontrollera att natverksadaptrarna fungerar pa anslutna enheter.  неисправность. Свяжитесь с местным поставщиком
longueur ne depasse pas 100 metres. Pour plus d’informations   usato sia adeguato e che la sua lunghezza non superi i 100   Kontrollera att ratt typ av natverkssladd anvands och att dess langd   оборудования.  • ????????????????????? 100 ?,???
sur les types de cables reseau, referez vous a la section   metri. Per ulteriori informazioni sui tipi di cavi di rete, veda il   inte overstiger 100 m.  Адаптер работает неправильно.      ???????? 7 ????????
Hardware Connectionxion Materielle             punto B Hardware Connection.                                                                  • Обновите драйвер. См. файл readme на дискете.
• Проверьте наличие конфликтов оборудования в окне Device   Warnings and Warranty
ITALIANO                                       SVENSKA                                         Русский                         Manager (Диспетчер устройств).
• Установите адаптер в другой компьютер. Если проблема не   Interference Statement
Hardware Installation                           Maskinvaruinstallation                         Установка оборудования                            устранена, возможно, имеет место аппаратная   This device complies with Part 15 of the FCC rules. Operation is
неисправность. Свяжитесь с местным поставщиком
Seguire i seguenti punti per installare l'adattatore.   Folj stegen nedan for att installera adaptern.  Для установки адаптера выполните следующие действия.  оборудования.                  subject to the following two conditions:
1 Salvare il lavoro e chiudere tutti i programmi.  1 Spara ditt arbete och stang alla program.  1 Сохраните данные и закройте все программы.  Светодиод LINK/ACT LED при подключении не загорается.   • This device may not cause harmful interference.
2 Spegnere il computer e le periferiche collegate, come la   2 Stang av datorn och kringutrustning som t ex skrivare. Koppla   2 Выключите компьютер и периферийные устройства, такие   • Проверьте, что подключенное устройство(-а) включено и   • This device must accept any interference received, including
как принтер. Затем отсоедините кабель электропитания
stampante. Poi staccare il cavo della corrente dalla presa.  darefter bort datorns stromsladd fran stromkallan.  компьютера от источника питания.  правильно подсоединено.                   interference that may cause undesired operations.
3 Isolatevi dalla corrente indossando una fascetta anti-statica o   3 Jorda dig sjalv genom att ta pa ett anti-statiskt armband eller   3 Снимите статическое электричество при помощи   • Убедитесь, что сетевые адаптеры на подключенных   FCC Warning
toccando un oggetto di metallo.                vidrora ett metallforemal.                      антистатического браслета, надев его на запястье, или   устройствах работают .
4 Rimuovere il coperchio del computer. Scegliere uno slot PCI   4 Ta av datorholjet. Valj en ledig PCI-plats och ta av skyddet fran   прикоснитесь к металлическому предмету.  Убедитесь, что используется сетевой кабель соответствующего   This equipment has been tested and found to comply with the limits
for a Class B digital device, pursuant to Part 15 of the FCC Rules.
libero e rimuovere il coperchio dallo slot PCI.   PCI-platsen.                               4 Снимите крышку процессорного блока. Найдите свободный   типа, и его длина не превышает 100.  These limits are designed to provide reasonable protection against
Evitare di toccare i componenti elettrici esposti.  Undvik att rora vid de frilagda elektroniska komponenterna.  PCI слот и снимите с него крышку.                                           harmful interference in a commercial environment. This equipment
generates, uses, and can radiate radio frequency energy and, if not
5 Inserire l'adattatore nello slot PCI. Verificare che i contatti   5 For in adaptern i PCI-platsen. Kontrollera att adapterns kontakter   Старайтесь не касаться открытых электронных компонентов.  ??  installed and used in accordance with the instruction manual, may
dell'adattatore siano completamente alloggiati nello slot.  ar helt inforda i platsen.       5 Вставьте адаптер в PCI слот. Убедитесь, что контакты                                       cause harmful interference to radio communications. Operation of
6 Fissare l’adattatore allo chassis con una vite.   6 Fast adaptern vid chassit med en fastskruv.   адаптера полностью вошли в разъем.      ????                                           this equipment in a residential area is likely to cause harmful
7 Riposizionare la copertura del computer ed accenderlo.  7 Satt tillbaka datorholjet och sla pa datorn.  6 Закрепите адаптер в корпусе компьютера при помощи винта.   ?????????????       interference in which case the user will be required to correct the
interference at his own expense.
8 Procedere come descritto nella sezione Hardware connection.   8 Fortsatt till avsnittet Maskinvaruanslutning.   7 Установите на место крышку компьютера и включите   1 ??????????????
питание.                                     2 ?????????,?????????????                     CE Mark Warning
Hardware Connection                             Maskinvaruanslutning                            8 Перейдите к разделу Подключение оборудования.   3 ?????????????????????                    This is a class B product. In a domestic environment this product may
Usare il twisted pair non schermato (UTP) o i cavi Ethernet a coppia   Anvand oskarmade partvinnade (UTP) eller skarmade partvinnade           4 ?????????????? PCI ?,??????                 cause radio interference in which case the user may be required to
take adequate measures.
attorcigliata schermati (STP). La seguente tabella descrive i tipi di   (STP) Ethernet-sladdar. Foljande tabell beskriver vilka typer av   Подключение оборудования
cavi di rete usati per le diverse velocita di collegamento.     natverkssladdar som anvands for de olika anslutningshastigheterna.     Используйте кабели Ethernet типа неэкранированная витая пара   ??????????????  Certifications
HASTIGHET  TYP AV NATVERKSSLADD                (UTP) или экранированная витая пара (STP). В следующей
VELOCITA  TIPO DI CAVO DI RETE                                                                                                                5 ?????? PCI ???,?????? PCI ???????           Refer to the product page at www.zyxel.com.
10 Base-T  100? 2-par UTP/STP kategori 3, 4 eller 5  таблице описываются типы сетевых кабелей, используемые при
10 Base-T  100? 2-pair UTP/STP Categoria 3, 4 or 5                                            различных скоростях.                            6 ?????????????
100 Base-TX  100? 2-par UTP/STP kategori 5
100 Base-TX 100? 2-pair UTP/STP Categoria 5                                                                                                   7 ????????????????                            ZyXEL Limited Warranty
1000 Base-T  100? 4-par UTP/STP kategori 5     СКОРОСТЬ  ТИП СЕТЕВОГО КАБЕЛџ
1000 Base-T  100? 4-pair UTP/STP Categoria 5
8 ?????????                                   ZyXEL warrants to the original end user (purchaser) that this product
Assicurarsi che la lunghezza del cavo fra i collegamenti non superi i   Se till att sladdlangden mellan anslutningarna inte overstiger 100 m.  10 Base-T  2-парный кабель UTP/STP 100 ? категории 3, 4 или 5  is free from any defects in material or workmanship for a specific
100 Base-TX 2-парный кабель UTP/STP 100 ? категории 5
100 metri.                                     Anslut ena anden av Ethernet-sladden till adaptern och den andra   1000Base-T  4-парный кабель UTP/STP 100 ? категории 5   ????              period (the Warranty Period) from the date of purchase. The
Warranty Period varies by region. Check with your vendor and/or the
Collegare un'estremita del cavo Ethernet all'adattatore e l'altra   anden till en switch/hubb eller dator. Kontrollera darefter               ????????????????????????                       authorized ZyXEL local distributor for details about the Warranty
estremita ad uno switch/hub o computer. Controllare quindi i LED.   indikatorlampan.           Убедитесь, что длина кабеля между точками подключения не                                      Period of this product. During the warranty period, and upon proof of
превышает 100 метров.                          ????     ?????                                 purchase, should the product have indications of failure due to faulty
Pannelo LED                                     Indikatorlampa                                 Подключите один конец кабеля Ethernet к адаптеру, а другой - к   10 Base-T  100W 2-pair UTP/STP Category 3, 4 or 5  workmanship and/or materials, ZyXEL will, at its discretion, repair or
Gli indicatori del LED forniscono le informazioni in tempo reale sulla   Indikatorlampan ger realtidsinformation om adapterns status.   коммутатору/концентратору или компьютеру. Затем проверьте   100 Base-TX  100W 2-pair UTP/STP Category 5  replace the defective products or components without charge for
condizione dell'adattatore.                                                                    состояние светодиода.                          1000 Base-T  100W 4-pair UTP/STP Category 5    either parts or labor, and to whatever extent it shall deem necessary
INDIKATORLAMPA STATUS  BESKRIVNING                                                                                                           to restore the product  or components to proper operating condition.
ACT         Blinkar  Porten tar emot eller overfor data.  Светодиод                           ??????????????? 100 ? (328 ? )?                Any replacement will consist of a new or re-manufactured functionally
LED  STATO   DESCRIZIONE                                                                                                                                                                    equivalent product of equal or higher value, and will be solely at the
Av     Porten tar inte emot eller overfor data.                                   ?????????????,???????????????,
ACT  Lampeggiante  La porta sta ricevendo o trasmettendo dati.  LINK  Pa  Porten ar ansluten till ett natverk.   Светодиодный индикатор предоставляет информацию о   ???? LED ????          discretion of ZyXEL. This warranty shall not apply if the product has
Spenta   La porta non sta ricevendo o trasmettendo dati.  Av  Porten ar inte ansluten till ett natverk.   состоянии адаптера в режиме реального времени.                                been modified, misused, tampered with, damaged by an act of God,
LINK Accesa  La porta E collegata alla rete.                                                  СВЕ                                                                                           or subjected to abnormal working conditions.
Spenta   La porta non E collegata alla rete.  Maskinvarukonfiguration och diagnostik      ТОД  СТАТУС ОПИСАНИЕ                           ?? LEDs                                        Note
ИОД
LED ???????????????????
Hardware Configuration and Diagnostics          Detta ar endast avsett for erfarna anvandare. Du behover inte andra   ACT  Мигает  Порт принимает или передает данные.                       Repair or replacement, as provided under this warranty, is the
standardmaskinvarukonfiguration savida det inte ar absolut   Не горит Порт не принимает и не передает данные.  LED  ??  ??                   exclusive remedy of the purchaser. This warranty is in lieu of all other
Questo e unicamente per gli utenti esperti. Non bisogna cambiare la   nodvandigt.              LINK Горит  Порт подключен к сети Ethernet.    ACK       ??????????                           warranties, express or implied, including any implied warranty of
configurazione hardware di default se non assolutamente   Anvand det medfoljande programmet DIAG.EXE for att konfigurera   Не горит Порт не подключен к сети Ethernet.   ??                  merchantability or fitness for a particular use or purpose. ZyXEL shall
necessario. Usare il programma di DIAG.EXE nel dischetto di   adaptern och utfora maskinvarudiagnostik- Du maste kora                             ??    ??????????                           in no event be held liable for indirect or consequential damages of
installazione per configurare l'adattatore e per effettuare la   programmet i rent DOS-kommandopromptfonster.                                 LNK  ??   ???????                              any kind to the purchaser.
diagnostica hardware. Lanciare il programma direttamente dal                                   Конфигурация и диагностика оборудования            ??    ????????                             To obtain the services of this warranty, contact your vendor. You may
prompt di  DOS.                                                                                                                                                                              also refer to the warranty policy for the region in which you bought the
Installation av drivrutin                      Эта информация только для опытных пользователей. Не следует
изменять конфигурацию оборудования по умолчанию без   ???????                                 device at http://www.zyxel.com/web/support_warranty_info.php.
Driver Installation                             Beroende pa version av Microsoft Windows, kan Windows-systemet   крайней необходимости.
eventuellt detektera adaptern automatiskt. Folj instruktionerna i de                          ??????????????????????                         Registration
A seconda della versione di Windows, il system di Windows puo   medfoljande filerna readme for ditt operativsystem for att slutfora   Для конфигурирования адаптера и выполнения диагностики   ??????????????????,??????????
rilevare automaticamente l'adattatore. Seguire le istruzioni del file   drivrutinsinstallationen (eventuellt behover du din Windows-CD).  используется программа DIAG.EXE, поставляемая на   ?? DIAG.exe ??,????????? DOS ?????  Register your product online to receive e-mail notices of firmware
readme per il vostro sistema operativo sul dischetto di installazione                          установочном диске. Необходимо запускать программу из окна                                    upgrades and information at www.zyxel.com for global products, or at
per completare l'installazione del driver (potreste avere bisogno del                          командной строки DOS.                                                                         www.us.zyxel.com for North American products.
vostro CD di Windows).                          Felsokning                                                                                    ??????
Windows detekterar inte adaptern automatiskt.  Установка драйвера                             Microsoft Windows XP ?????????,??????????      "INFORMAZIONI AGLI UTENTI"
Analisi dei Guasti                               • Stang av datorn och kontrollera att adapterns kontakter ar helt   В зависимости от версии, операционная система Microsoft   ???????????????????,??????????  Ai sensi dell'art. 13 del Decreto Legislativo 25 luglio 2005,
Windows non rileva automaticamente l’adattatore.  infora i platsen och fasta vid datorn med en fastskruv.  Windows может обнаружить адаптер автоматически. Для   ????????????????            n.151"Attuazione delle Direttive 2002/95/CE, 2002/96/CE e 2003/
• Spenga il coputer e si assicuri che i contatti dell’ adattatore siano   • Utfor en maskinvarukontroll genom att klicka pa Start, Settings   завершения установки драйвера следуйте указаниям в файле   108/CE, relative alla riduzione dell'uso di sostanze pericolose
nelle apparecchiature elettriche ed elettroniche, nonche allo
inseriti completamente nello slot e che siano assicurati al   (installningar), Control Panel  (kontrollpanelen) och   readme на установочном диске для вашей операционной   ????          smaltimento dei rifiuti"
computer con una vite. Effettui un controllo dell'hardware   dubbelklicka pa Add/Remove Hardware (lagg till/ta bort   системы (потребуется компакт-диск Windows).  Windows ?????????
cliccando start, impostazioni, pannello di controllo, installazione   maskinvara). (Stegen kan variera beroende pa din Windows-                                                           Il simbolo del cassonetto barrato riportato sull'apparecchiatura o sulla
applicazioni, selezionare l’adattatore e doppio-ckick su aggiungi/  version). Folj instruktionerna pa skarmen for att soka efter   Поиск и устранение неисправностей  • ??,?????????????? PCI ???,?????  sua confezione indica che il prodotto alla fine della propria vita utile
rimuovi. (i punti possono variare secondo la versione di   adaptern och installera drivrutinen.                                               ????????                                    deve essere raccolto separatamente dagli altri rifiuti.
Windows). Segua le istruzioni sullo schermo per cercare   • Installera adaptern i en annan dator. Om felet kvarstar, kan det   Windows автоматически не определяет новый адаптер.  • ?????????????????????????, ( ?  La raccolta differenziata della presente apparecchiatura giunta a fine
l'adattatore e per installare il driver. Installi l'adattatore in altro   bero pa ett maskinvaruproblem. Kontakta din lokala   • Выключите компьютер и убедитесь, что контакты адаптера   ??? Windows ????,???????? ) ?????  vita e organizzata e gestita dal produttore. L'utente che vorra disfarsi
computer. Se l'errore persiste, potrebbe essere un problema   aterforsaljare.                  полностью вставлены в слот и адаптер надежно закреплен в   ?????????????                   della presente apparecchiatura dovra quindi contattare il produttore e
hardware. Mettersi in contatto con il vostro fornitore locale.                                 компьютере с помощью винта.                                                                seguire il sistema che questo ha adottato per consentire la raccolta
Adaptern fungerar inte som den ska.                                                             • ????????????????,????????,?
L’adattatore non funziona correttamente.                                                        • Выполните поиск устройств, щелкнув Start (Пуск), Settings                                  separata dell'apparecchiatura giunta a fine vita.
• Uppdatera/uppgradera drivrutinen. Se readme-filerna pa                                        ????????,????????????
• Update/Upgrade del driver. Fare riferimento al file readme sul   disketten.                   (Настройки), Control Panel (Панель управления) и дважды   ?????????                        L'adeguata raccolta differenziata per l'avvio successivo
dischetto. Controlli se ci sono conflitti hardware nella finestra                              щелкнув Add/Remove Hardware (Установка                                                     dell'apparecchiatura dismessa al riciclaggio, al trattamento e allo
gestione periferiche di windows. Installi l'adattatore in altro   • Sok efter mojliga maskinvarukonflikter i fonstret Device   оборудования). (Порядок действий может быть разным в   • ???????,?????????? (readme)   smaltimento ambientalmente compatibile  contribuisce ad evitare
computer. Se il problema persiste, potrebbe essere un problema   Manager (enhetshanteraren).   зависимости от версии Windows). Следуйте инструкциям на   • ?????????????????????          possibili effetti negativi sull'ambiente e sulla salute e favorisce il
hardware. Mettersi in contatto con il vostro fornitore locale.   • Installera adaptern i en annan dator. Om problemet kvarstar, kan   экране для обнаружения                              reimpiego e/o riciclo dei materiali di cui e composta l'apparecchiatura.
det bero pa ett maskinvaruproblem. Kontakta din lokala   адаптера и установки драйвера.       ? t ????????????????,????????,
Il LED LINK/ACT  non si accende quando e connesso.
aterforsaljare.                                                                                ?????????,????????????
Indikatorlampan LINK/ACT tands inte vid anslutning.                                           ??? LINK/ACT ???
Lo smaltimento abusivo del prodotto da parte del
detentore comporta l'applicazione delle sanzioni       ENGLISH              DEUTSCH
amministrative previste dalla normativa vigente."  Viewing a Product’s Certifications  Vorgehensweise zum Aufrufen einer
•  Go to www.zyxel.com.  Produktzertifizierung
•  Select your product from the drop-down list  •  Gehen Sie auf www.zyxel.com.
box on the ZyXEL home page to go to that   •  Wahlen Sie Ihr Produkt aus der Auswahlliste
product's page.      auf der ZyXEL Homepage aus, um die Seite des
•  Select the certification you wish to view from  entsprechenden Produkts aufzurufen.
this page.           •  Wahlen Sie die Zertifizierung, die Sie von
www.zyxel.com                                                  dieser Seite aus aufrufen mochten.
ESPANOL              FRANCAIS
Declaration of Conformity             Procedimiento para ver las   Procedure permettant de consulter
certificaciones de un producto  une(les) Certification(s) du Produit
We, ZyXEL Communications Corp., located at No.6, Innovation Rd II, Science-Park, Hsin-Chu,   •  Vaya a www.zyxel.com.  •  Connectez vous sur www.zyxel.com.
300, Taiwan, declare under our sole responsibility that the product:
•  Seleccione el producto que desea en el   •  Selectionnez votre produit dans la liste
Product information                      cuadro de lista desplegable que se encuentra  deroulante se trouvant sur la page d'accueil
en la pagina principal de ZyXEL para obtener  ZyXEL pour acceder a la page du produit
Product Name    :  Fast Ethernet PCI Adapter
Model Number   :  FN312                  acceso a la pagina de dicho producto.  concerne.
Produced by                              •  Seleccione la certificacion que desea ver en  •  Selectionnez sur cette page la certification
esta pagina.         que vous voulez consulter.
Company Name   :  ZyXEL Communications Corporation
Company Add.   :  No. 6, Innovation Road II, Science-Park, Hsin-Chu, 300, Taiwan   ITALIANO  SVENSKA
to which this declaration relates, is in conformity with the following standards or other
normative documents:                         Procedura per visualizzare le   Procedur for att visa en produkts
certificazioni di un prodotto  certifikat
EN 55022: 2006+A1: 2007
EN 55024:1998+A1: 2001+A2: 2003           •  Andare alla pagina www.zyxel.com  •  Ga till www.zyxel.com
EN 61000-3-2: 2006                        •  Nel sito ZyXEL, selezionare il proprio   •  Valj din produkt fran rullgardinslistrutan pa
EN 61000-3-3: 1995+A1: 2001+A2: 2005      prodotto dall’elenco a discesa per andare alla  ZyXEL:s hemsida for att ga till denna produkts
pagina di quel prodotto.  sida.
•  Da questa pagina selezionare la   •  Valj det certifikat du vill titta pa fran denna
Following the provisions of 2004/108/EC; 92/31/EEC Directive; 93/68/EEC, 99/5/EEC ,   certificazione che si vuole vedere.  sida.
and LVD 2006/95/EC.
In accordance with Annex III of the Directive 1999/5/EC.  РУССКИЙ       ????
The TCF-File is located at:
Просмотр сертификата(ов)   ???????
Company Name   : ZyXEL Communications Czech s.r.o.   продукта(ов)
Company Address : Modranska 621, 143 01 Praha 4, Czech Republic   • ?? www.zyxel.com?
•  Посетите сайт  www.zyxel.com.  • ?ZyXEL?????????????????
Person is responsible for marking this declaration:  •  Выберите ваш продукт из выпадающего   ??????????????
списка на домашней странице ZyXEL и   • ??????????????
Milan Baran      VP Operations      перейдите на его страницу.
Name (Full Name)      Position/ Title
•  Выберите сертификат, который вы хотите
2010-07-15                         просмотреть.
Date      Legal Signature
ENGLISH              DEUTSCH
1/1            Green Product Declaration  Green Product Declaration
RoHS Directive       RoHS Directive
2002/95/EC           2002/95/EC
www.zyxel.com
WEEE Directive 2002/96/EC  WEEE Directive 2002/96/EC
(WEEE: Waste Electrical and   (WEEE: Waste Electrical and
Electronic Equipment)  Electronic Equipment)
Declaration of Conformity           2003/108/EC          2003/108/EC
We, ZyXEL Communications Corp., located at No.6, Innovation Rd II, Science-Park, Hsin-Chu,
300, Taiwan, declare under our sole responsibility that the product:
Product information                       Declaration          Unterschrift des
Signature:           Erklarenden:
Product Name    :  Gigabit Ethernet PCI Adapter   Name/Title: Martin   Name/Titel: Martin
Model Number   :  GN680-T
Chao / Quality Assurance Director  Chao / Quality Assurance Director
Produced by
Date (yyyy/mm/dd): 2008/06/05  Datum (JJJJ/MM/TT): 2008/06/05
Company Name   :  ZyXEL Communications Corporation
Company Add.   :  No. 6, Innovation Road II, Science-Park, Hsin-Chu, 300, Taiwan   ITALIANO  ESPANOL
to which this declaration relates, is in conformity with the following standards or other
normative documents:                         Dichiarazione Green Product  Declaracion de Producto Ecologico
Direttiva RoHS       Directiva RoHS
EN 55022: 2006
EN 55024:1998+A1: 2001+A2: 2003           2002/95/CE           2002/95/EC
EN 61000-3-2: 2000+A2: 2005
EN 61000-3-3: 1995+A1: 2001+A2: 2005
Following the provisions of 2004/108/EC; 92/31/EEC Directive; 93/68/EEC, 99/5/EEC ,
and LVD 2006/95/EC.
In accordance with Annex III of the Directive 1999/5/EC.
The TCF-File is located at:                 Direttiva RAEE 2002/96/CE   Directiva REEE 2002/96/EC
Company Name   : ZyXEL Communications Czech s.r.o.   (RAEE: Rifiuti di   (REEE : Residuos de Equipos
Apparecchiature Elettriche ed   Electricos y Electronicos)
Company Address : Modranska 621, 143 01 Praha 4, Czech Republic
Elettroniche)        2003/108/EC
Person is responsible for marking this declaration:
2003/108/CE
Milan Baran      VP Operations
Name (Full Name)      Position/ Title      Firma         Firma de
dichiarazione:       declaracion:
2010-07-15                         Nome/titolo: Martin   Nombre/Titulo:
Date       Legal Signature
Chao / Quality Assurance Director  Martin Chao / Quality Assurance Director
Data (aaaa/mm/gg):  2008/06/05  Fecha (aaaa/mm/dd): 2008/06/05
FRANCAIS             SVENSKA
1/1           Declaration de Produit Green  Miljodeklaration
Directive RoHS       RoHS Direktiv
2002/95/EC           2002/95/EC
Directive DEEE 2002/96/EC  WEEE Direktiv 2002/96/EC
(DEEE : Dechets des   (WEEE: hantering av elektriskt
Equipements Electriques et   och elektroniskt avfall)
Electroniques)       2003/108/EC
2003/108/EC
Signature de la      Deklaration
declaration :        undertecknad av:
Nom/Titre : Martin   Namn/Titel: Martin
Chao / Quality Assurance Director  Chao / Quality Assurance Director
Date (aaaa/mm/jj) : 2008/06/05  Datum (aaaa/mm/dd):  2008/06/05