На сайте 126957 инструкций общим размером 514.09 Гб , которые состоят из 6425490 страниц
Фото
Руководство пользователя TP-LINK TL-WA801ND V2. Основные функции, характеристики и условия эксплуатации изложены на 100 страницах документа в pdf формате.
Доступно к просмотру 100 страниц. Рекомендуем вам скачать файл инструкции, поскольку онлайн просмотр документа может сильно отличаться от оригинала.
CONTENTS
English ··············································································1
Az?rbaycan dili ······························································15
???????··········································································29
?аза?ша··········································································43
Русский язык·····································································57
Українська мова·······························································71
???????···········································································85
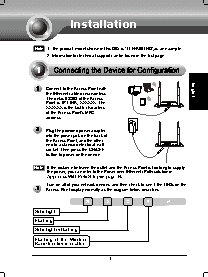
Installation
Note  1. The product model shown in this QIG is “TL-WA801ND”,as an example.
2. Information for technical support can be found in the last page.
Connect to the Access Point with
English
the Ethernet cable or via wireless.
The default SSID of the Access
Point is TP-LINK_ XXXXXX. The
XXXXXX is the last 6 characters
of the Access Point’s MAC
address.
Plug the provided power adapter
into the power jack on the back of
the Access Point, and the other
end to a standard electrical wall
socket. Then press the ON/OFF
button to power on the device.
Note  If the distance between the outlet and the Access Point is too long to supply
the power, you can refer to the Power over Ethernet (PoE) solution in
Appendix: With PoE Setup on page 14.
Turn on all of your network devices and then check to see if the LEDs on the
Access Point display normally as the diagram below describes.
Solid light
Flashing
Solid light or flashing
Flashing if the Wireless
Radio function is enabled
1
Note  If the LEDs  display abnormally, please check  to  see if  all  the  cable
connectors (power adapter and Ethernet cable) are well connected to your
device.
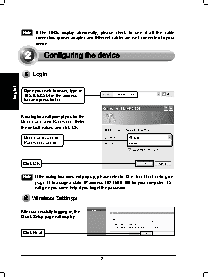
Login
English   Open your web browser, type in
192.168.0.254 in the address
bar and press Enter.
A dialog box will prompt you for the
User name and Password.Enter
the default values and click OK.
User name: admin
Password: admin
Click OK
Note  If the dialog box does not pop up, please refer to T3 in Troubleshooting on
page 11 to assign a static IP address 192.168.0.100 for your computer. T2
will give you some help if you forget the password.
Wireless Settings
After successfully logging in, the
Quick Setup page will display.
Click Next
2