На сайте 123408 инструкций общим размером 499.34 Гб , которые состоят из 6235299 страниц
Фото
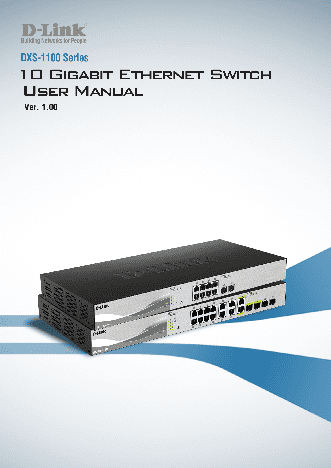
Руководство пользователя D-LINK DXS-1100-16TC. Основные функции, характеристики и условия эксплуатации изложены на 121 странице документа в pdf формате.
Доступно к просмотру 119 страниц. Рекомендуем вам скачать файл инструкции, поскольку онлайн просмотр документа может сильно отличаться от оригинала.
Copyright and Trademarks
Information in this document is subjected to change without notice.
© 2015 D-Link Corporation. All rights reserved.
Reproduction  in any manner  whatsoever  without the  written permission  of D-Link Corporation  is strictly
forbidden.
Trademarks used in this text: D-Link and the D-LINK logo are trademarks of D-Link Corporation; Microsoft
and Windows are registered trademarks of Microsoft Corporation.
Other trademarks and trade names may be used in this document to refer to either the entities claiming the
marks and names or their products. D-Link Corporation disclaims any proprietary interest in trademarks and
trade names other than its own.
FCC Warning
This equipment has been tested and found to comply with the limits for a Class A digital device, pursuant to
Part 15 of the FCC Rules. These limits are designed to provide reasonable  protection against harmful
interference when the equipment is operated in a commercial environment. This equipment generates, uses,
and can radiate radio frequency energy and, if not installed and used in accordance with this manual, may
cause harmful interference to radio communications.  Operation  of this equipment  in a residential area is
likely to cause harmful interference in which case the user will be required to correct the interference at his
expense.
Warning:  Changes  or  modifications  to  this  unit  not  expressly  approved  by  the  party  responsible  for
compliance could void the user authority to operate the equipment.
CE Mark Warning
This is a Class A product. In a domestic environment, this product may cause radio interference in which
case the user may be required to take adequate measures.
Warnung!
Dies ist ein Produkt der Klasse A. Im Wohnbereich kann dieses Produkt Funkstoerungen verursachen. In
diesem Fall kann vom Benutzer verlangt werden, angemessene Massnahmen zu ergreifen.
Precaucion!
Este es un producto de Clase A. En un entorno domestico, puede causar interferencias de radio, en cuyo
case, puede requerirse al usuario para que adopte las medidas adecuadas.
Attention!
Ceci est  un produit de classe A. Dans un environnement domestique, ce produit pourrait causer des
interferences radio, auquel cas l`utilisateur devrait prendre les mesures adequates.
Attenzione!
Il presente prodotto appartiene alla classe A. Se utilizzato in ambiente domestico il prodotto puo causare
interferenze radio, nel cui caso e possibile che l`utente debba assumere provvedimenti adeguati.
VCCI Warning
????????? A ??????????????????????????????????????
??????????????????????????????????????                                          VCCI-A
BSMI Notice
??????????,?????????,?????????,??????,??????????
???????
Safety Compliance
Warning: Class 1 Laser Product.
•   EN: When using a fiber optic media expansion module, never look at the transmit laser while it is
powered on.  Also,  never look directly at the fiber TX port and fiber cable ends when they  are
powered on.
•   FR: Ne regardez jamais le laser tant qu’il est sous tension. Ne regardez jamais directement le port
TX (Tramsmission) a fibres optiques et les embouts de cables a fibres optiques tant qu’ils sont sous
tension.
SFP (Mini-GBIC), XENPAK, and XFP Regulatory Compliance
Networks pluggable optical modules meet the following regulatory requirements:
•   Class 1.
•   IEC/EN60825-1:2007 2nd Edition or later, European Standard
•   FCC 21 CFR Chapter 1, Subchapter J in accordance with FDA and CDRH requirements.
•   Application of CE Mark in accordance with 2004/108/EEC EMC Directive and the 2006/95/EC Low
Voltage Directives.
•   UL and/or CSA registered component for North America.
•   47 CFR Part 15, Class A when installed into products.
Table of Contents                                         D-Link 10 Gigabit Ethernet Switch User Manual
Table of Contents
DXS-1100 Series 10 Gigabit Ethernet Switch ............................................................... ??! ???????
User Manual ..................................................................................................................... ??! ???????
Table of Contents .............................................................................................................................................. i
Intended Readers.............................................................................................................................................. 1
Terms/Usage .................................................................................................................................................. 1
Safety Instructions ......................................................................................................................................... 1
General Precautions for Rack-Mountable Products ...................................................................................... 2
Protecting Against Electrostatic Discharge .................................................................................................... 3
1   Product Introduction ................................................................................................................................. 4
DXS-1100-10TS ............................................................................................................................................. 5
Front Panel ................................................................................................................................................. 5
Rear Panel.................................................................................................................................................. 5
Side Panels ................................................................................................................................................ 5
DXS-1100-16TC............................................................................................................................................. 6
Front Panel ................................................................................................................................................. 6
Rear Panel.................................................................................................................................................. 6
Side Panels ................................................................................................................................................ 6
2   Hardware Installation ................................................................................................................................ 8
Step 1: Unpacking .......................................................................................................................................... 8
Step 2: Switch Installation .............................................................................................................................. 8
Desktop or Shelf Installation ....................................................................................................................... 8
Rack Installation ......................................................................................................................................... 8
Step 3: Plugging in the AC Power Cord with Power Cord Retainer ............................................................ 10
Power Failure ........................................................................................................................................... 12
3   Getting Started ........................................................................................................................................13
Management Options ................................................................................................................................... 13
Using Web-based Management .................................................................................................................. 13
Supported Web Browsers ........................................................................................................................ 13
Connecting to the Switch .......................................................................................................................... 13
Login Web-based Management ............................................................................................................... 13
Smart Wizard ............................................................................................................................................... 14
Web-based Management ............................................................................................................................. 14
D-Link Network Assistant (DNA) .................................................................................................................. 14
4   Configuration ...........................................................................................................................................16
Smart Wizard Configuration ......................................................................................................................... 16
System IP Information .............................................................................................................................. 16
User Accounts Settings ............................................................................................................................ 17
SNMP ....................................................................................................................................................... 18
Web-based Management ............................................................................................................................. 19
Tool Bar > Save Menu ................................................................................................................................. 20
Save Configuration ................................................................................................................................... 20
Tool Bar > Tools Menu ................................................................................................................................. 20
Firmware Upgrade and Backup................................................................................................................ 20
Configuration Restore and Backup .......................................................................................................... 22
Log Backup............................................................................................................................................... 24
Ping .......................................................................................................................................................... 25
Reset ........................................................................................................................................................ 26
i