На сайте 123401 инструкция общим размером 499.33 Гб , которые состоят из 6234961 страницы
Фото

Руководство пользователя D-LINK DES-1008FR/PRO. Основные функции, характеристики и условия эксплуатации изложены на 11 страницах документа в pdf формате.
Доступно к просмотру 11 страниц. Рекомендуем вам скачать файл инструкции, поскольку онлайн просмотр документа может сильно отличаться от оригинала.
DES-1008F
DES-1008FL/PRO
DES-1008FR/PRO
10/100M Fast Ethernet Switch
Before Your Begin
This Quick Installation Guide gives step-by-step instructions for setting up the D-Link
DES-1008F, DES-1008FL/PRO and DES-1008FR/PRO 10/100M Fast Ethernet
Switches. The model you have purchased may appear slightly different from those
shown in the illustrations.
Check Your Package Contents
These are the items included with your DES-1008F, DES-1008FL/PRO,
DES-1008FR/PRO purchase:
• DES-1008F, DES-1008FL/PRO,
DES-1008FR/PRO
10/100M Fast Ethernet Switch
• Quick Installation Guide
Using a power
supply with a
different voltage rating
• 7.5V DC, 1A Power Adapter                  will damage and void
the warranty for this
product.
If any of the above items are missing, please contact your reseller.
©2003 D-Link Systems, Inc. All rights reserved. Trademarks or registered trademarks are the property of their respective
holders. Software and specifications subject to change without notice.
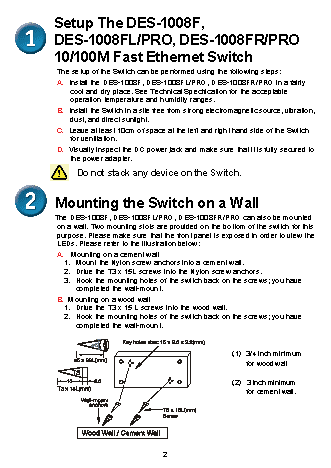
Setup The DES-1008F,
DES-1008FL/PRO, DES-1008FR/PRO
10/100M Fast Ethernet Switch
The setup of the Switch can be performed using the following steps:
A.  Install the DES-1008F, DES-1008FL/PRO, DES-1008FR/PRO in a fairly
cool and dry place. See Technical Specification for the acceptable
operation temperature and humidity ranges.
B.  Install the Switch in a site free from strong electromagnetic source, vibration,
dust, and direct sunlight.
C.  Leave at least 10cm of space at the left and right hand side of the Switch
for ventilation.
D.  Visually inspect the DC power jack and make sure that it is fully secured to
the power adapter.
Do not stack any device on the Switch.
Mounting the Switch on a Wall
The DES-1008F, DES-1008FL/PRO, DES-1008FR/PRO can also be mounted
on a wall. Two mounting slots are provided on the bottom of the switch for this
purpose. Please make sure that the front panel is exposed in order to view the
LEDs. Please refer to the illustration below:
A.   Mounting on a cement wall
1.  Mount the Nylon screw anchors into a cement wall.
2.  Drive the T3 x 15L screws into the Nylon screw anchors.
3.  Hook the mounting holes of the switch back on the screws; you have
completed the wall-mount.
B.  Mounting on a wood wall
1.  Drive the T3 x 15 L screws into the wood wall.
2.  Hook the mounting holes of the switch back on the screws; you have
completed the wall-mount.
(1)  3/4 inch minimum
for wood wall
(2)   3 inch minimum
for cement wall.
2
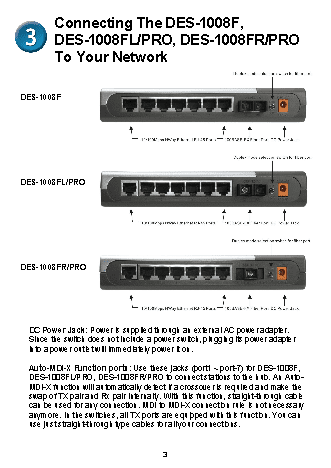
Connecting The DES-1008F,
DES-1008FL/PRO, DES-1008FR/PRO
To Your Network
DES-1008F
DES-1008FL/PRO
DES-1008FR/PRO
DC Power Jack: Power is supplied through an external AC power adapter.
Since the switch does not include a power switch, plugging its power adapter
into a power outlet will immediately power it on.
Auto-MDI-X Function ports: Use these jacks (port1 ~ port-7) for DES-1008F,
DES-1008FL/PRO, DES-1008FR/PRO to connect stations to the hub. An Auto-
MDI-X function will automatically detect if a crossover is required and make the
swap of TX pair and Rx pair internally. With this function, straight-through cable
can be used for any connection. MDI to MDI-X connection rule is not necessary
anymore. In the switches, all TX ports are equipped with this function. You can
use just straight-through type cables for all your connections.
3