На сайте 123373 инструкции общим размером 499.26 Гб , которые состоят из 6233729 страниц
Фото
Руководство пользователя D-LINK DAP-3310/RU/A1A. Основные функции, характеристики и условия эксплуатации изложены на 24 страницах документа в pdf формате.
Доступно к просмотру 21 страница. Рекомендуем вам скачать файл инструкции, поскольку онлайн просмотр документа может сильно отличаться от оригинала.
Building Networks for People
Quick Installation Guide
Wireless N Exterior Access Point
This document will guide you through the
basic installation process for your new
D-Link Unified Wireless Access Point.
DAP-3310/DAP-3410
Quick Installation Guide
Краткое руководство по установке
Guia de Instalacion Rapida
Guia de Instalacao Rapida
??????
Petunjuk Pemasangan Cepat
Documentation also available
via the D-Link Website
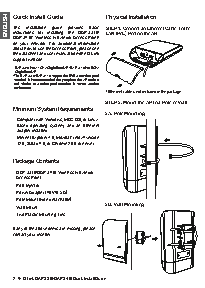
ENGLISH  Quick Install Guide  provides   basic   Physical Installation  3
guide
installation
This
STEP 1: Connect an Ethernet Cable  to the
instructions  for  installing  the  DAP-3310/
DAP-3410  Wireless N Exterior Access Point    LAN (PoE) Port on the AP.
2
1
on  your  network.  For  additional  information
about how to use the Access Point, please see
the datasheet and user manual from the D-Link
support website.
1   DAP-3310 is a 2.4GHz Single Band AP; DAP-3410 is a 5GHz
Single Band AP.
2  The DAP-3310/DAP-3410 support the IP65 water/dust-proof
standard. It is recommended that you place the AP under a
roof,  shelter,  or  weather-proof  container  in  severe  weather
environment.
3  Ethernet cable is not included in the package
STEP 2: Mount the AP to a Pole or Wall
Minimum System Requirements
2A: Pole Mounting
- Computer with Windows, MAC OS, or Linux-
based  operating  system,  and  an  Ethernet
adapter installed
- Internet Explorer 7.0, Mozilla Firefox  version
®
12.0, Safari 4.0, or Chrome 20.0 or newer
Package Contents
- DAP-3310/DAP-3410 Wireless N Exterior
Access Point
- PoE Injector
- Power Adapter (48 V/0.5 A)
- Pole Mount (Non-detachable)
- Wall Mount                   2B: Wall Mounting
- Two Plastic Mounting Ties
If any of the above items are missing, please
contact your reseller.
2  ?  D-Link DAP-3310/DAP-3410 Quick Install Guide
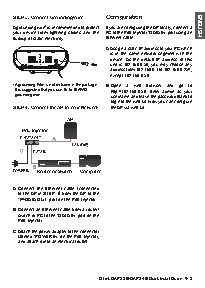
STEP 3: Connect Grounding Wire   Configuration
A grounding wire  is recommended to protect   If you are configuring the AP locally, connect a   ENGLISH
4
your  device  from  lightning  strikes  and  the   PC to the PoE Injector “DATA IN” port using an
buildup of static electricity.   Ethernet cable.
A.  Assign a static IP address to your PC which
is  in  the  same  network  segment  with  the
device.  As  the  default  IP  address  of  this
unit is 192.168.0.50, you may choose any
address from 192.168.0.1 to 192.168.0.254,
except 192.168.0.50.
4  A grounding Wire is not included in the package.    B.  Open  a  web  browser  and  go  to
It is suggested that you use 16 to 18 AWG   http://192.168.0.50.  Enter  admin  as  your
grounding wire.
username and leave the password blank to
log into the web UI. Now you can configure
STEP 4: Connect the AP to Your Network  the AP via web UI.
AP
PoE Injector
P+DATA OUT  A
LAN (PoE)
C    DATA IN
B
POWER IN  Router or Switch  Computer
A.  Connect  the  Ethernet  cable  (connected
to the AP in STEP 1) from the AP to the
“P+DATA OUT” port on the PoE Injector.
B.  Connect an Ethernet cable from a router/
switch or PC to the “DATA IN” port on the
PoE Injector.
C.  Attach the power adapter to the connector
labeled “POWER IN” on the PoE Injector,
and attach it into an electrical outlet.
D-Link DAP-3310/DAP-3410 Quick Install Guide  ?  3