На сайте 123469 инструкций общим размером 499.55 Гб , которые состоят из 6237525 страниц
Фото

Руководство пользователя GIGASET A400A. Основные функции, характеристики и условия эксплуатации изложены на 24 страницах документа в pdf формате.
Доступно к просмотру 24 страницы. Рекомендуем вам скачать файл инструкции, поскольку онлайн просмотр документа может сильно отличаться от оригинала.
RTC-965
SURROUND SOUND
TUNER PREAMPLIFIER
SURROUND SOUND TUNER PREAMPLIFIER  RTC-965
MASTER VOLUME
POWER
1  2  3
REMOTE SENSOR                 4 BACK  5  6 ENTER
VIDEO1REC  RBPS RDS RT EON TP TA PTY  TAPE2M  ST  TUNED  AUTO MEMORY  PRESET  OSD
VIDEO2          OPTICAL
VIDEO 3         COAXIAL  7  8  9
STANDBY
VID4AUX         1  2
STANDBY  SOURCE  MPEG  dts  Digital  Pro Logic  3 Stereo  DSP MODE  5.1 CH D. RANGE  SLEEP  3  4  0
TAPE 2         AUX/      FREQUENCY
PHONO  TUNER  CD  TAPE 1  MONITOR  VIDEO 1  VIDEO 2  VIDEO 3  VIDEO 4  VIDEO 5  MEMORY  DIRECT  MONO  BAND  <     TUNING     >
DYNAMIC  SPEAKER  5.1 CH  VIDEO  VIDEO 1
PRO-LOGIC  3  STEREO  DSP  STEREO  RANGE  MENU  MODE  INPUT  LABELS  REC
BASS  TREBLE  BALANCE
SUBWOOFER  REAR  CENTER
–  +  –  +  –  +
Owner’s Manual
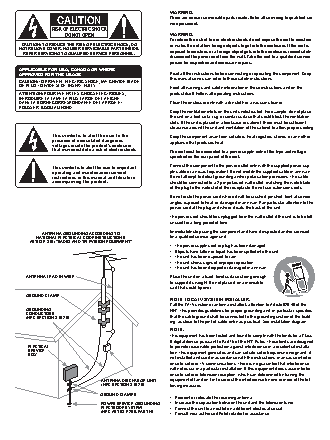
WARNING:
CAUTION                                 There are no user serviceable parts inside. Refer all servicing to qualified ser-
vice personnel.
RISK OF ELECTRIC SHOCK
DO NOT OPEN                           WARNING:
To reduce the risk of fire or electric shock, do not expose the unit to moisture
CAUTION: TO REDUCE THE RISK OF ELECTRIC SHOCK, DO    or water. Do not allow foreign objects to get into the enclosure. If the unit is
NOT REMOVE COVER. NO USER-SERVICEABLE PARTS INSIDE.   exposed to moisture, or a foreign object gets into the enclosure, immediately
REFER SERVICING TO QUALIFIED SERVICE PERSONNEL.
disconnect the power cord from the wall. Take the unit to a qualified service
person for inspection and necessary repairs.
APPLICABLE FOR USA, CANADA OR WHERE
APPROVED FOR THE USAGE                                Read all the instructions before connecting or operating the component. Keep
this manual so you can refer to these safety instructions.
CAUTION: TO PREVENT ELECTRIC SHOCK, MATCH WIDE BLADE
OF PLUG TO WIDE SLOT. INSERT FULLY.
Heed all warnings and safety information in these instructions and on the
ATTENTION: POUR EVITER LES CHOCS ELECTRIQUES,         product itself. Follow all operating instructions.
INTRODUIRE LA LAME LA PLUS LARGE DE LA FICHE
DANS LA BORNE CORRESPONDANTE DE LA PRISE ET           Clean the enclosure only with a dry cloth or a vacuum cleaner.
POUSSER JUSQU AU FOND.
Keep the ventilation inlets on the unit unobstructed. For example, do not place
the unit on a bed, sofa, rug, or similar surface that could block the ventilation
slots. If the unit is placed in a bookcase or cabinet, there must be sufficient
clearance around the unit and ventilation of the cabinet to allow proper cooling.
This symbol is to alert the user to the   Keep the component away from radiators, heat registers, stoves, or any other
presence of uninsulated dangerous         appliance that produces heat.
voltages inside the product's enclosure
that may constitute a risk of electric shock.  The unit must be connected to a power supply only of the type and voltage
specified on the rear panel of the unit.
Connect the component to the power outlet only with the supplied power sup-
This symbol is to alert the user to important
operating and maintenance (service)       ply cable or an exact equivalent. Do not modify the supplied cable in any way.
instructions in this manual and literature  Do not attempt to defeat grounding and/or polarization provisions. The cable
accompanying the product.                 should be connected to a 2-pin polarized wall outlet, matching the wide blade
of the plug to the wide slot of the receptacle. Do not use extension cords.
Do not route the power cord where it will be crushed, pinched, bent at severe
angles, exposed to heat, or damaged in any way. Pay particular attention to the
power cord at the plug and where it exits the back of the unit.
The power cord should be unplugged from the wall outlet if the unit is to be left
unused for a long period of time.
Immediately stop using the component and have it inspected and/or serviced
ANTENNA GROUNDING ACCORDING TO
NATIONAL ELECTRICAL CODE INSTRUCTIONS           by a qualified service agency if:
ARTICLE 810: "RADIO AND TELEVISION EQUIPMENT"
• The power supply cord or plug has been damaged.
• Objects have fallen or liquid has been spilled into the unit.
• The unit has been exposed to rain.
• The unit shows signs of improper operation
• The unit has been dropped or damaged in any way
ANTENNA LEAD IN WIRE                                Place the unit on a fixed, level surface strong enough
to support its weight. Do not place it on a moveable
cart that could tip over.
GROUND CLAMP
NOTE TO CATV SYSTEM INSTALLER:
Call the CATV system or antenna installer’s attention to Article 820-40 of the
GROUNDING                                           NEC. This provides guidelines for proper grounding and, in particular, specifies
CONDUCTORS
(NEC SECTION 810-20)                                that the cable ground shall be connected to the grounding system of the build-
ing, as close to the pint of cable entry as practical. See installation diagram.
NOTE:
This equipment has been tested and found to comply with the limits for a Class
B digital device, pursuant to Part 15 of the FCC Rules. These limits are designed
ELECTICAL                                          to provide reasonable protection against interference in a residential installa-
SERVICE                                            tion. This equipment generates and can radiate radio frequency energy and, if
BOX
not installed and used in accordance with the instructions, may cause interfer-
ence to radio or TV communications. There is no guarantee that interference
will not occur in a particular installation. If this equipment does cause interfer-
ence to radio or television reception, which can determined by turning the
ANTENNA DISCHARGE UNIT   equipment off and on, try to correct the interference by one or more of the fol-
(NEC SECTION 810-20)     lowing measures:
GROUND CLAMPS
• Reorient or relocate the receiving antenna.
POWER SERVICE GROUNDING  • Increase the separation between the unit and the television tuner.
ELECTRODE SYSTEM         • Connect the unit to an outlet on a different electrical circuit.
(NEC ARTICLE 250, PART H)
• Consult your authorized Rotel retailer for assistance.
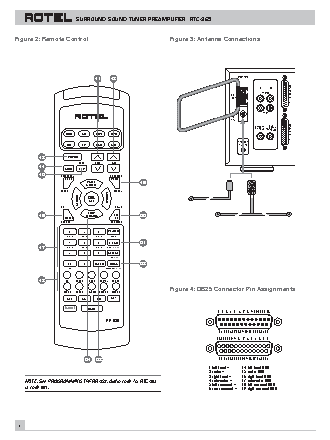
RTC-965
Figure 1: Controls and Connections
1         2   3                           4                            5                               6
SURROUND SOUND TUNER PREAMPLIFIER  RTC-965
MASTER VOLUME
POWER
1   2    3
REMOTE SENSOR                                     4 BACK  5  6 ENTER
VIDEO1REC  RBPS RDS RT EON TP TA PTY  TAPE2M  ST  TUNED  AUTO MEMORY  PRESET  OSD
VIDEO2                    OPTICAL
VIDEO 3                    COAXIAL      7   8    9
STANDBY
VID4AUX                    1  2
STANDBY    SOURCE  MPEG  dts  Digital  Pro Logic  3 Stereo  DSP MODE  5.1 CH D. RANGE  SLEEP  3  4  0
TAPE 2                  AUX/             FREQUENCY
PHONO  TUNER  CD  TAPE 1  MONITOR  VIDEO 1  VIDEO 2  VIDEO 3  VIDEO 4  VIDEO 5  MEMORY  DIRECT  MONO  BAND  <     TUNING     >
DYNAMIC   SPEAKER  5.1 CH  VIDEO  VIDEO 1
PRO-LOGIC  3  STEREO  DSP  STEREO  RANGE  MENU  MODE  INPUT  LABELS  REC
8    9    10  11   12   13   14   15  16   17
BASS   TREBLE  BALANCE
SUBWOOFER  REAR     CENTER
–    +   –    +    –    +
7                                  18                19 20      21         22  23  24  25
26   27     28     29      30  31         32                                           33
AC
L  R    COMPOSITE  S-VIDEO                  INPUT
ANTENNA                       PHONO
GND   L  R
L   R                               VIDEO 4           SURROUND SOUND
FRONT      5.1 CH OUTPUT                            TUNER PREAMPLIFIER
AM                      AC-3/PCM                                MODEL NO. RTC-965
LOOP                    DIGITAL IN  L  R      VIDEO 3           RTC-965                     100W MAX
SWITCHED
VIDEO
2        CD       VIDEO 2
FM         REAR
75W
3        IN       VIDEO 1        WARNING:TO REDUCE THE RISK OF FIRE
PLAY          OR ELECTRICAL SHOCK, DO NOT EXPOSE
TAPE1                    THIS EQUIPMENT TO RAIN OR MOISTURE.
5.1 CH INPUT  AUX        AUX/
SUB                             VIDEO 1
CENTER  WOOFER     4        OUT       REC
PREOUT
PREOUT
CAUTION
IN
5
TAPE 2    VIDEO 5                                  RISK OF ELECTRIC SHOCK
DO NOT OPEN
REMOTE                            MON                                            AVIS: RISQUE DE CHOC ELECTRIQUE–NE PAS OUVRIR
EXT IN                            OUT   TV MONITOR
WARNING:TO REDUCE THE RISK OF FIRE
OR ELECTRICAL SHOCK, DO NOT EXPOSE
THIS EQUIPMENT TO RAIN OR MOISTURE.
34     35         36     37      38                  39                          40
3