На сайте 123408 инструкций общим размером 499.34 Гб , которые состоят из 6235299 страниц
Фото
Руководство пользователя DELL 1110. Основные функции, характеристики и условия эксплуатации изложены на 47 страницах документа в pdf формате.
Доступно к просмотру 46 страниц. Рекомендуем вам скачать файл инструкции, поскольку онлайн просмотр документа может сильно отличаться от оригинала.
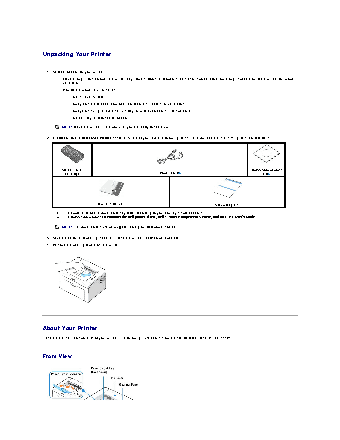
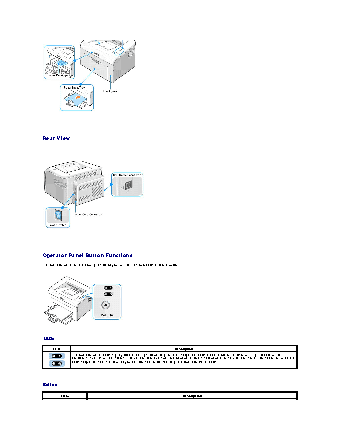
Unpacking Your Printer
1.  Select a location for your printer.
l Leave enough room to open the printer tray, covers, doors, and options. It is also important to allow enough space around the printer for proper
ventilation.
l Provide the proper environment:
l A firm, level surface
l Away from the direct airflow of air conditioners, heaters, or ventilators
l Away from sunlight, extreme humidity, or wide fluctuations in temperature
l A clean, dry, and dust-free location
NOTE: Leave the printer in the box until you are ready to set it up.
2.  In addition to the Dell Laser Printer 1110, ensure that you have the following items in the box. If there is a missing item, contact Dell:
Starter Toner                                                        Drivers and Utilities
a
b
Cartridge                          Power Cord                           CD
Owner's Manual                             Setup Diagram
a.   The appearance of the power cord may differ according to your country's specifications.
b.   The Drivers and Utilities CD contains the Dell printer driver, Dell™ Toner Management System, and an HTML User's Guide.
NOTE: The power cord must be plugged into a grounded power socket.
3.  Save the carton and packing material in case the printer needs to be repacked.
4.  Remove the packing tape from the printer.
About Your Printer
These are the main components of your printer. The following illustrations show the standard Dell Laser Printer 1110:
Front View
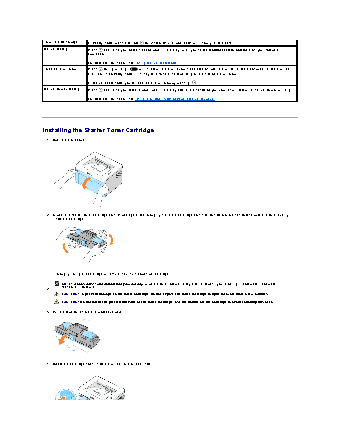
Rear View
Operator Panel Button Functions
The operator panel on the top right side of your printer has two LEDs and one button.
LEDs
LED                                         Description
The operator panel LEDs signify different things, depending on their sequence. LEDs that are off, on, and/or blinking indicate printer
conditions, such as printer status, intervention (for example, out of paper and jammed paper), or service. For more information on what the
LEDs sequence means and what you can do, see "Understanding the Operator Panel LEDs".
Button
Item                                        Description
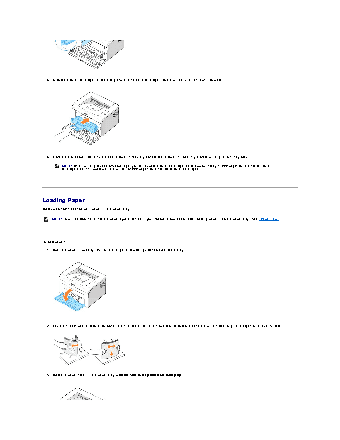
To print a demo page   In Ready mode, press and hold    for 2 seconds until both LEDs blink slowly, and release.
Manual feeding   Press    each time you load a sheet of paper in the tray, when you select Manual Feed for Source from your software
application.
For detailed information, see "Using Manual Feed Mode".
To cancel a print job   Press    during printing.    blinks red while the print job is cleared from both the printer and the computer, and the printer
then returns to Ready mode. This may take some time depending on the size of the print job.
In Manual Feed mode, you can't cancel the print job by pressing   .
Manual Duplex feeding   Press    each time you load the paper back in the tray after the first side of your job has printed while manual duplex printing.
For detailed information, see "Printing on Both Sides of Paper (Manual Duplex)".
Installing the Starter Toner Cartridge
1.  Open the front cover.
2.  Unpack the starter toner cartridge from its package and thoroughly shake the cartridge from side-to-side 5 or 6 times to distribute the toner evenly
inside the cartridge.
Thoroughly rolling the cartridge will assure maximum copies per cartridge.
NOTE: If toner comes into contact with your clothing, wipe the toner off with a dry cloth and wash your clothing in cold water. Hot water
sets toner into fabric.
2.
CAUTION: To prevent damage to the toner cartridge, do not expose the toner cartridge to light for more than a few minutes.
CAUTION: Do not touch the green underside of the toner cartridge. Use the handle on the cartridge to avoid touching this area.
3.  Pull the tape to remove the protective paper.
4.  Locate the cartridge slots inside the printer, one on each side.