На сайте 123408 инструкций общим размером 499.34 Гб , которые состоят из 6235299 страниц
Фото

Руководство пользователя PHILIPS Satinelle BRE610. Основные функции, характеристики и условия эксплуатации изложены на 8 страницах документа в pdf формате.
Доступно к просмотру 8 страниц. Рекомендуем вам скачать файл инструкции, поскольку онлайн просмотр документа может сильно отличаться от оригинала.
BRE65x, BRE64x, BRE63x, BRE62x, BRE61x
>75% recycled paper
>75% papier recycle
© 2015 Koninklijke Philips N.V.
All rights reserved
4222.003.0142.2 (1/2016)
2              3              4              5
1        2
6              7              8              9
10             11             12            13
14             15             16            17
18             19             20            21
22
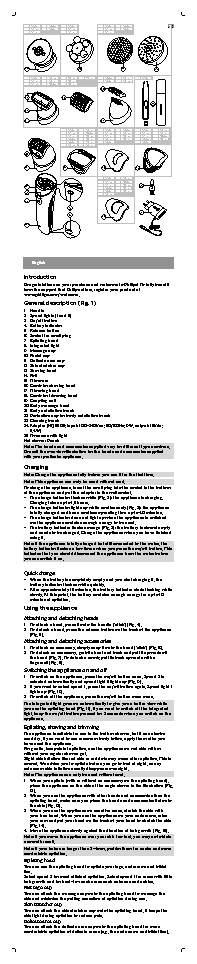
BRE651/00 BRE644/10 BRE651/00  BRE651/00 BRE644/10  1
BRE650/10 BRE644/00 BRE650/10  BRE650/10 BRE644/00
BRE650/00    BRE650/00    BRE650/00
19                 20              21          22
BRE651/00 BRE640/10 BRE630/10 BRE620/00 BRE644/10 BRE640/00  BRE651/00
BRE650/00 BRE640/00 BRE630/01  BRE644/00 BRE640/10
BRE650/10 BRE634/10 BRE630/00
18
15           16
25
14
13                         17
BRE651/00 BRE640/00 BRE651/00 BRE644/10 BRE651/00 BRE640/10
BRE650/10 BRE634/10 BRE650/10 BRE640/10 BRE650/10 BRE640/00
BRE650/00 BRE630/10 BRE650/00 BRE630/10 BRE650/00 BRE634/10
BRE644/10 BRE630/00 BRE640/00 BRE630/00 BRE644/10 BRE630/01
BRE644/00 BRE620/00 BRE644/00  BRE644/00
BRE640/10 BRE610/00
8
7             9             10          12
BRE651/00 BRE640/00
BRE650/10 BRE634/10
BRE650/00 BRE630/10
1                         BRE644/10 BRE630/01  23
BRE644/00 BRE630/00
2
BRE640/10
3
5
24
6
11
4
English
Introduction
Congratulations on your purchase and welcome to Philips  To fully benefit
from the support that Philips offers  register your product at
www philips com welcome
General description  Fig
Handle
Speed lights  I and II
On off button
Battery indicator
Release button
Socket for small plug
Epilating head
Integrated light
Massage cap
5acial cap
Delicate area cap
Skin stretcher cap
Shaving head
5oil
Trimmers
Comb for shaving head
Trimming head
Comb for trimming head
Coupling unit
Body massage head
Body exfoliation brush
Protection cap for body exfoliation brush
Cleaning brush
dapter  HQ      input         Vac       Hz   W  output    Vdc
W
Tweezers with light
Not shown  Pouch
Note  The heads and accessories supplied vary for different type numbers
Consult the overview illustration for the heads and accessories supplied
with your particular appliance
Charging
Note  Charge the appliance fully before you use it for the first time
Note  This appliance can only be used without cord
To charge the appliance  insert the small plug into the socket in the bottom
of the appliance and put the adapter in the wall socket
The charge indicator flashes white  5ig      the appliance is charging
Charging takes up to     hours
The charge indicator lights up white continuously  5ig      the appliance
is fully charged and has a cordless operating time up to    minutes
The charge indicator does not light up when the appliance is switched
on  the appliance contains enough energy to be used
The battery indicator flashes orange  5ig      the battery is almost empty
and needs to be charged  Charge the appliance when you have finished
using it
Note  If the appliance is fully charged but still connected to the mains  the
battery indicator flashes a few times when you press the on off button  This
indicates that you should disconnect the appliance from the mains before
you can switch it on
Quick charge
When the battery is completely empty and you start charging it  the
battery indicator flashes white quickly
fter approximately    minutes  the battery indicator starts flashing white
slowly   t this point  the battery contains enough energy for up to
minutes of epilation
Using the appliance
ttaching and detaching heads
To attach a head  press it onto the handle   click    5ig
To detach a head  press the release button on the back of the appliance
5ig
ttaching and detaching accessories
To attach an accessory  simply snap it onto the head   click    5ig
To detach an accessory  grab its front and back and pull it upwards off
the head  5ig      To detach a comb  pull its back upwards with a
fingernail  5ig
Switching the appliance on and off
To switch on the appliance  press the on off button once  Speed   is
selected automatically and speed light II lights up  5ig
If you want to select speed    press the on off button again  Speed light I
lights up  5ig
To switch off the appliance  press the on off button once more
The integrated light goes on automatically to give you a better view while
you use the epilating head  5ig       If you want to switch off the integrated
light  keep the on off button pressed for   seconds when you switch on the
appliance
Epilating  shaving and trimming
The appliance is suitable for use in the bath or shower  but it can also be
used dry  If you want to use creams or body lotion  apply them after you
have used the appliance
5or gentle  less painful epilation  use the appliance on wet skin with or
without your regular shower gel
Slight skin irritation like red skin or red dots may occur after epilation  This is
normal  We advise you to epilate before you go to bed at night  as any
redness or skin irritation usually disappears overnight
Note  The appliance can only be used without cord
When you epilate  with or without an accessory on the epilating head
place the appliance on the skin at the angle shown in the illustration  5ig
When you use the appliance with other heads and accessories than the
epilating head  make sure you place the heads and accessories flat onto
the skin  5ig
When you use the appliance on sensitive areas  stretch the skin with
your free hand  When you use the appliance on your underarms  raise
your arm and put your hand on the back of your head to stretch the skin
5ig
Move the appliance slowly against the direction of hair growth  5ig
Note  If you move the appliance over your skin too fast  you may not obtain
a smooth result
Note  If your hairs are longer than    mm  pretrim them for easier and more
comfortable epilation
Epilating head
You can use the epilating head to epilate your legs  underarms and bikini
line
Select speed   for most efficient epilation  Select speed   for areas with little
hair growth and for hard to reach areas such as knees and ankles
Massage cap
You can attach the massage cap onto the epilating head to massage the
skin and minimize the pulling sensation of epilation during use
Skin stretcher cap
You can attach the skin stretcher cap onto the epilating head  It keeps the
skin tight during epilation to reduce pain
Delicate area cap
You can attach the delicate area cap onto the epilating head for more
comfortable epilation of delicate areas  e g  the underarms and bikini line
Facial cap
You can attach the facial cap onto the epilating head for precise epilation of
facial hair  e g  above your upper lip
Do not use the appliance to epilate eyelashes  eyebrows or scalp
hair
Shaving head
You can use the shaving head to shave your legs and body
Note  The appliance can be moved in two directions  for easier shaving of
underarms
Note   lways check the foil before use  If it is damaged in any way  replace
the cutting unit right away  see  Replacement
Comb for shaving head
You can attach the comb onto the shaving head to trim hairs to a length of
mm
Trimming head
You can use the trimming head to trim hard to reach areas in the bikini
zone
Place the trimming head flat onto the skin to trim  5ig       Place the
trimming head perpendicularly onto the skin for styling and shaping  5ig
Comb for trimming head
You can attach the comb onto the trimming head to trim hairs in the bikini
area to a length of  mm  5ig
Body massage head
The body massage head rotates firmly to relax your muscles
Note  You have to put the body massage head on the coupling unit before
you can attach it onto the handle  5ig
Body exfoliation brush
You can use the body exfoliation brush to remove dead skin cells
Do not use the body exfoliation brush on your face
Note  You have to put the body exfoliation brush on the coupling unit
before you can attach it onto the handle  5ig
Cleaning and storage
Keep the adapter dry
To clean the epilating head  hold the appliance upside down  switch it
on and rinse it with cold water for    seconds after every use  5ig
To clean the shaving head  if supplied   Use the cleaning brush to brush
away any hairs that have collected under the trimmers  6rab the two
trimmers of the cutting unit and pull the cutting unit out of the shaving
head  5ig       Clean all parts of the shaving head with the cleaning
brush  except the foil
Note  Lubricate trimmer teeth and foils with a drop of sewing machine oil
every six weeks for optimal performance
Rinse the cutting unit  heads and accessories under the tap  Shake them
firmly to remove water drops
Let all parts dry completely
Place the cutting unit back into the shaving head   click
Put protection caps or combs on the heads to prevent damage to the
heads when you store them
Store the appliance  its heads and accessories in the pouch
Note  Lubricate trimmer teeth and foils with a drop of sewing machine oil
every six weeks for optimal performance
Replacement
To buy accessories or spare parts  visit www shop philips com service or go
to your Philips dealer  You can also contact the Philips Consumer Care
Centre in your country  see the worldwide guarantee leaflet for contact
details
Shaving head  if supplied   5or optimal performance  we advise you to
replace the cutting unit of the shaving head every two years  If you use the
shaving head twice or more times a week  replace the cutting unit more
often   lways replace the cutting unit with one of the original type  BRL
Body exfoliation brush  if supplied   If you use the body exfoliation brush
times a week  it lasts approximately   months  Replace the body
exfoliation brush every   months with one of the original type  BRE
Troubleshooting
This chapter summarises the most common problems you could encounter
with the appliance  If you are unable to solve the problem with the
information below  visit www philips com support for a list of frequently
asked questions or contact the Consumer Care Centre in your country
Problem        Solution
The appliance  Make sure you hold the appliance at the correct
does not work as  angle  5ig      and move it across the skin slowly
well as it should   against the direction of hair growth
Clean the heads and accessories after every use
fter charging  the  The appliance is still connected to the mains  In this
battery indicator  case  the battery indicator flashes to indicate that
flashes when I  you should disconnect the appliance from the mains
press the on off  before you can switch it on
button  but the
appliance does not
switch on
During use  the  The overheat protection has been activated  The
appliance      overheat protection switches off the appliance
becomes hot and  automatically if it becomes too hot  To reset the
suddenly stops  overheat protection  let the appliance cool down and
operating  Then the then switch it on again  To avoid overheating of the
speed lights and  appliance  do not press it too hard onto you skin
the battery
indicator flash red
for    seconds
My skin is irritated  Slight skin irritation like red skin or red dots may
after I have used  occur  This is normal  To avoid irritated skin  make
the appliance   sure that you gently move the appliance against the
direction of hair growth  Do not apply too much
pressure  If the irritation lasts longer than   days  we
advise you to consult a doctor
lways stretch the skin with your free hand  When
you use the appliance on your underarms  raise your
arm and put your hand on the back of your head to
stretch the skin  5ig
???????
???????
??? ????? ????? ?????????? ???????????? ???? Philips ???????????? ???
????????  Philips ???????? ???????? ????? ????????? ???? ??????
www philips com welcome ????????? ????????
????? ?????????    ?????
???
????????? ???????  I ???? II
???? ????? ???????
??????? ??????????
?????? ???????
???? ????? ???????? ???????
???????? ????
????? ?????????? ???
?????? ???
?????? ???
????? ????? ???
???? ?????? ???????
??????? ????
??????
??????????
??????? ??????? ??????
??? ????
??????? ??????? ??????
????????????
???? ?????????? ????
??????? ???? ???????
??????? ???? ?????????? ???????? ???
?????
???????  HQ      ?????          ? ???????? ???        ??    ??
?????     ? ??????? ???      ??
?????? ??? ?????????
?????????????  ?????
???????  ?????????? ??????? ????? ??? ???????????? ?? ????? ????????
???? ?????? ????? ??????  ??????? ??? ?????????? ?????????? ???????
????? ??? ???????????? ???? ???? ??????? ???????
????????
???????  ??????? ??????? ??? ???????? ???????  ??? ????????? ????????
??????
???????  ??? ????????? ??? ?????? ??????????? ??????
????????? ???????? ???? ??????? ?????????? ???????? ????????? ????
??????  ????????? ??????????? ????????? ????????
????? ?????????? ?? ??????  ?????    ????????????  ?????
???????????  ???????? ?? ????     ????? ?????
????? ?????????? ?? ????? ???????? ??????  ?????     ???????
??????????     ??????? ????? ?????? ????? ???????
??????? ?????? ????? ????? ?????????? ????????  ?????????
??????????? ?????????? ??????? ???
??????? ?????????? ??????? ???? ??????  ?????    ????????????
??????? ?????? ??? ???? ?????????? ?????  ?????????? ?????? ?????
????????? ??????????
???????  ???? ????? ????????? ??????????  ????? ?????? ?????? ??? ??
?????? ?????  ???? ????? ???????? ?????? ????? ??????? ??????????
??????? ??? ????????????  ??? ???? ??????? ????????? ?????? ???????
??????? ?????????? ?????????