На сайте 123387 инструкций общим размером 499.28 Гб , которые состоят из 6234324 страниц
Фото
Руководство пользователя PHILIPS HQ6071/16 Reflex Action. Основные функции, характеристики и условия эксплуатации изложены на 4 страницах документа в pdf формате.
Доступно к просмотру 4 страницы. Рекомендуем вам скачать файл инструкции, поскольку онлайн просмотр документа может сильно отличаться от оригинала.
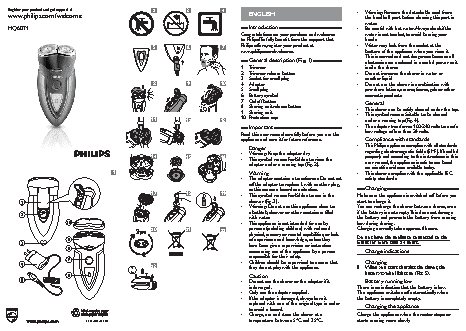
Register your product and get support at            2           3            4                                                  -  Warning: Remove the detachable cord from
www.philips.com/welcome                                                                English                                   the handheld part before cleaning this part in
water.
HQ6071                                                                                 introduction                             -  Be careful with hot water. Always check if the
Congratulations on your purchase and welcome    water is not too hot, to avoid burning your
to Philips! To fully benefit from the support that   hands.
5           6            7      Philips offers, register your product at      -  Water may leak from the socket at the
www.philips.com/welcome.                     bottom of the appliance when you rinse it.
This is normal and not dangerous because all
general description (Fig. 1)              electronics are enclosed in a sealed power unit
1  Trimmer                                   inside the shaver.
2  Trimmer release button                   -  Do not immerse the shaver in water or
3  Socket for small plug                     another liquid
8           9           10      4  Adapter                                  -  Do not use the shaver in combination with
5  Small plug                                pre-shave lotions, creams, foams, gels or other
6  Battery symbol                            cosmetic products.
7  On/off button                             general
8  Shaving unit release button              -  This shaver can be safely cleaned under the tap.
9  Shaving unit                             -  This symbol means: Suitable to be cleaned
11          12          13      10  Protection cap                           under a running tap (Fig. 4).
important                                -  The adapter transforms 100-240 volts to a safe
Read this user manual carefully before you use the   low voltage of less than 24 volts.
appliance and save it for future reference.  Compliance with standards
-  This Philips appliance complies with all standards
Danger
-  Warning: Keep the adapter dry.          regarding electromagnetic fields (EMF). If handled
14          15          16        -  This symbol means: Forbidden to rinse the   properly and according to the instructions in this
adapter under a running tap (Fig. 2).     user manual, the appliance is safe to use based
on scientific evidence available today.
1                                                Warning                                  -  This shaver complies with the applicable IEC
-  The adapter contains a transformer. Do not cut   safety standards.
off the adapter to replace it with another plug,
as this causes a hazardous situation.     Charging
17          18          19        -  This symbol means: Forbidden to use in the   Make sure the appliance is switched off before you
shower (Fig. 3).                       start to charge it.
-  Warning: Do not use this appliance close to    You can recharge the shaver between shaves, even
a bathtub, shower or other containers filled   if the battery is not empty. This does not damage
with water.                            the battery and prevents the battery from running
-  This appliance is not intended for use by   low during shaving.
20          21          22         persons (including children) with reduced   Charging normally takes approx. 8 hours.
physical, sensory or mental capabilities, or lack   Do not leave the appliance connected to the
of experience and knowledge, unless they   mains for more than 24 hours.
have been given supervision or instruction
concerning use of the appliance by a person   Charge indications
responsible for their safety.
-  Children should be supervised to ensure that   Charging
23                                 they do not play with the appliance.      When you start charging the shaver, the
,
battery symbol lights up (Fig. 5).
Caution
-  Do not use the shaver or the adapter if it    Battery running low
is damaged.                            There is no indication that the battery is low.
-  Only use the adapter supplied.       The appliance switches off automatically when
-  If the adapter is damaged, always have it   the battery is completely empty.
replaced with one of the original type in order   Charging the appliance
to avoid a hazard.
-  Charge, use and store the shaver at a   Charge the appliance when the motor stops or
4222.002.5459.1                                            temperature between 5°C and 35°C.      starts running more slowly.
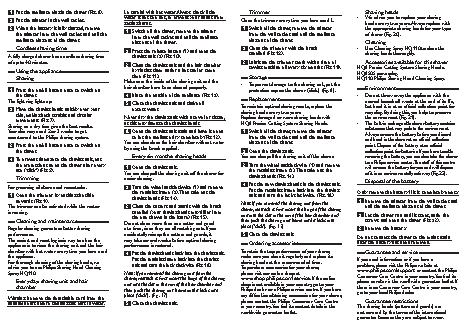
1  Put the appliance plug in the shaver (Fig. 6).  Be careful with hot water. Always check if the   Trimmer                     shaving heads
water is not too hot, to prevent your hands from                                      -  We advise you to replace your shaving
2  Put the adapter in the wall socket.                                             Clean the trimmer every time you have used it.
getting burnt.                                                                         heads every two years. Always replace with
3  When the battery is fully charged, remove    1  Switch off the shaver, remove the adapter    1  Switch off the shaver, remove the adapter   the appropriate shaving heads for your type
the adapter from the wall socket and pull the   from the wall socket and pull the appliance   from the wall socket and pull the appliance   of shaver (Fig. 20).
appliance plug out of the shaver.                                                   plug out of the shaver.
plug out of the shaver.                                                             Cleaning
Cordless shaving time                                                             2  Clean the trimmer with the brush        -  Use Cleaning Spray HQ110 to clean the
2  Press the release button (1) and open the
A fully charged shaver has a cordless shaving time   shaving unit (2) (Fig. 10).       supplied (Fig. 18).                       shaving heads thoroughly.
of up to 40 minutes.                                                                 3  Lubricate the trimmer teeth with a drop of   Accessories available for this shaver
3  Clean the shaving unit and the hair chamber   sewing machine oil every six months (Fig. 19).  HQ8 Precise Cutting System Shaving Heads.
Using the appliance                       by rinsing them under a hot tap for some                                         HQ8505 powerplug.
shaving                                   time (Fig. 11).                           storage                                HQ110 Philips Shaving Head Cleaning Spray.
Make sure the inside of the shaving unit and the     -  To prevent damage to the shaving unit, put the
hair chamber have been cleaned properly.                                               Environment
1  Press the on/off button once to switch on                                          protection cap on the shaver (‘click’) (Fig. 8).
the shaver.                             4  Rinse the outside of the appliance (Fig. 12).                                     -  Do not throw away the appliance with the
The light ring lights up.                                                              Replacement                               normal household waste at the end of its life,
5  Close the shaving unit and shake off
2  Move the shaving heads quickly over your   excess water.                        To maintain optimal shaving results, replace the   but hand it in at an official collection point for
recycling. By doing this, you help to preserve
shaving heads every two years.
skin, making both straight and circular   Never dry the shaving unit with a towel or tissue,   Replace damaged or worn shaving heads with   the environment (Fig. 21).
movements (Fig. 7).
Shaving on a dry face gives the best results.  as this may damage the shaving heads.  HQ8 Precise Cutting System Shaving Heads.    -  The built-in rechargeable shaver battery contains
substances that may pollute the environment.
Your skin may need 2 or 3 weeks to get     6  Open the shaving unit again and leave it open    1  Switch off the shaver, remove the adapter   Always remove the battery before you discard
accustomed to the Philips shaving system.    to let the appliance dry completely (Fig. 13).  from the wall socket and pull the appliance   and hand in the shaver at an official collection
You can also clean the hair chamber without water   plug out of the shaver.
3  Press the on/off button once to switch on    by using the brush supplied.                                                    point. Dispose of the battery at an official
the shaver.                                                                       2  Open the shaving unit.                   collection point for batteries. If you have trouble
Every six months: shaving heads        You can also pull the shaving unit off the shaver.  removing the battery, you can also take the shaver
4  To prevent damage to the shaving unit, put                                                                                   to a Philips service centre. The staff of this centre
the protection cap on the shaver after every    1  Open the shaving unit.         3  Turn the wheel anticlockwise (1) and remove   will remove the battery for you and will dispose
use (‘click’) (Fig. 8).                                                             the retaining frame (2). Then take out the
You can also pull the shaving unit off the shaver for                                  of it in an environmentally safe way (Fig. 22).
Trimming                               easier cleaning.                             shaving heads (Fig. 14).                  Disposal of the battery
4  Put the new shaving heads in the shaving unit.
For grooming sideburns and moustache.      2  Turn the wheel anticlockwise (1) and remove   Put the retaining frame back into the shaving
the retaining frame (2). Then take out the                                       Only remove the battery if it is completely empty.
1  Open the trimmer by pushing the slide    shaving heads (Fig. 14).                  unit and turn the lock clockwise.  (Fig. 16)
upwards (Fig. 9).                                                                                                           1  Remove the adapter from the wall socket and
The trimmer can be activated while the motor     3  Clean the cutters and guards with the brush   Note: If you removed the shaving unit from the   pull the appliance plug out of the shaver.
shaver, reattach it. First insert the hinge of the shaving
is running.                                  supplied (your shaving heads may differ from   unit into the slot in the rim of the hair chamber and    2  Let the shaver run until it stops, undo the
the one shown in the figure) (Fig. 15).
Cleaning and maintenance               Do not clean more than one cutter and guard   then push the shaving unit home until it locks into   screws and open the shaver (Fig. 23).
Regular cleaning guarantees better shaving   at a time, since they are all matching sets. If you   place (‘click’).  (Fig. 17)   3  Remove the battery.
performance.                              accidentally mix up the cutters and guards, it    5  Close the shaving unit.        Do not connect the shaver to the mains again
The easiest and most hygienic way to clean the   may take several weeks before optimal shaving                                after the battery has been removed.
appliance is to rinse the shaving unit and the hair   performance is restored.         Ordering accessories
chamber with hot water every time you have used    4  Put the shaving heads back into the shaving unit.   To retain the top performance of your shaver,    guarantee and service
the appliance.                               Put the retaining frame back into the shaving   make sure you clean it regularly and replace its   If you need information or if you have a
For thorough cleaning of the shaving heads, we   unit and turn the lock clockwise (Fig. 16).  shaving heads at the recommended time.  problem, please visit the Philips website at
advise you to use Philips Shaving Head Cleaning                                     To purchase accessories for your shaver,    www.philips.com/support or contact the Philips
Spray HQ110.                              Note: If you removed the shaving unit from the   please visit our online shop at    Consumer Care Centre in your country. You find its
shaver, reattach it. First insert the hinge of the shaving   www.shop.philips.com/service. If the online
Every day: shaving unit and hair       unit into the slot in the rim of the hair chamber and   shop is not available in your country, go to your   phone number in the worldwide guarantee leaflet. If
chamber                                                                                                                    there is no Consumer Care Centre in your country,
then push the shaving unit home until it locks into   Philips dealer or a Philips service centre. If you have   go to your local Philips dealer.
place (‘click’).  (Fig. 17)               any difficulties obtaining accessories for your shaver,
Warning: Remove the detachable cord from the                                        please contact the Philips Consumer Care Centre   guarantee restrictions
handheld part before cleaning this part in water.   5  Close the shaving unit.
in your country. You find its contact details in the   The shaving heads (cutters and guards) are
worldwide guarantee leaflet.              not covered by the terms of the international
guarantee because they are subject to wear.
Troubleshooting                        9  Бритвенный блок                          -  Запрещается погружать бритву в воду или    3  После полной зарядки аккумулятора
This chapter summarises the most common   10  Защитный колпачок                       -  другую жидкость.                        отключите адаптер от розетки и
отсоедините штекер прибора от бритвы.
При использовании бритвы не наносите на
problems you could encounter with the appliance.   Важная информация                   кожу лосьоны, крем, пену, гель или другие
If you are unable to solve the problem with the   Перед использованием прибора внимательно   косметические средства для бритья.  Время автономного бритья
information below, visit www.philips.com/support   ознакомьтесь с руководством пользователя и                                 Полностью заряженная бритва может работать
for a list of frequently asked questions or contact   сохраните его для дальнейшего использования   Общие сведения            до 40мин. без подключения к электросети.
the Consumer Care Centre in your country.                                             -  Эту бритву можно промывать под
в качестве справочного материала.            струей воды.
Problem   Solution                                                                                                              Использование прибора
Опасно!                                  -  Этот символ означает, что прибор можно
The shaver  You may not have cleaned       -  Осторожно! Не допускайте попадания      промывать под струей воды (Рис. 4).       Бритье
does not   the appliance properly. Clean    жидкости на адаптер.                     -  Адаптер преобразует напряжение 100–   1  Нажмите кнопку включения/выключения
shave as   the shaving heads thoroughly     -  Этот символ означает, что адаптер      240 вольт в безопасное напряжение ниже    для включения прибора.
well as it   (see chapter ‘Cleaning and     запрещено ополаскивать под струей         24 вольт.                              Загорится индикатор.
used to.  maintenance’).                    водопроводной воды (Рис. 2).
Соответствие стандартам
Long hairs may be obstructing the   Предупреждение                          -  Данный прибор Philips соответствует    2  Быстро перемещайте бритвенные головки
по коже, совершая как прямые, так и
shaving heads. Clean the cutters     -  В конструкцию адаптера входит трансформа-  стандартам по электромагнитным полям   круговые движения (Рис. 7).
and guards properly with the brush   тор. Запрещается заменять адаптер или при-  (ЭМП). При правильном обращении    Наилучшие результаты бритья достигаются при
supplied (see chapter ‘Cleaning and   соединять к нему другие штекеры: это опасно.  согласно инструкциям, приведенным   сухой коже.
maintenance’).                    -  Этот символ означает, что использование в   в руководстве по эксплуатации,     Для адаптации к бритвенной системе Philips
ванне/душе запрещено (Рис. 3).            использование прибора безопасно в
The shaving heads may be          -  Осторожно! Не используйте прибор рядом   соответствии с современными научными   вашей коже может потребоваться 2-3 недели.
damaged or worn. Replace           с ванной, душем или емкостью с водой.     данными.                                3  Нажмите кнопку включения/выключения
the shaving heads (see chapter     -  Данный прибор не предназначен для ис-    -  Эта бритва соответствует применимым   для включения прибора.
‘Replacement’).
пользования лицами (включая детей) с      стандартам безопасности IEC.
The shaver  The battery may be empty.       ограниченными возможностями сенсорной                                             4  Во избежание повреждения бритвенного
блока после каждого использования
does not   Recharge the battery (see chapter   системы или ограниченными умственными   Зарядка                                  надевайте на бритву защитный колпачок
switch on   ‘Charging’).                    или физическими способностями, а также   Перед тем как начать зарядку аккумулятора,   (прозвучит щелчок) (Рис. 8).
when I                                      лицами с недостаточным опытом и знаниями,   убедитесь, что прибор выключен. Чтобы
press the                                   кроме как под контролем и руководством   бритва не разрядилась во время бритья, ее   Подравнивание
on/off                                      лиц, ответственных за их безопасность.  можно заряжать между сеансами бритья, даже   Для подравнивания висков и ухода за усами.
button.                                    -  Не позволяйте детям играть с прибором.  если аккумулятор еще не разряжен. Это не
приведет к повреждению аккумулятора. Зарядка    1  Откройте триммер, сдвинув ползунковый
The shaving  Simply reattach the shaving unit    Внимание!                         аккумулятора занимает приблизительно 8 часов.  переключатель вверх (Рис. 9).
unit has   by pressing it onto the shaver      -  Не используйте бритву или адаптер, если                                    Триммер работает при включенной бритве.
come off   (see chapter ‘Replacement’, step 5).  они повреждены.                   Не оставляйте прибор подключенным к
the shaver.                                -  Пользуйтесь только тем адаптером,    электросети более, чем на 24 часа.           Очистка и уход
который входит в комплект поставки.
-  Если адаптер поврежден, заменяйте его   Индикация зарядки                      Регулярная очистка обеспечивает лучшие
результаты бритья. Наиболее простой и
РуССкИй                                    только таким же адаптером, чтобы обеспе-  Зарядка                                гигиеничный способ очистки электробритвы
чить безопасную эксплуатацию прибора.     ,  Когда начинается зарядка прибора,   — это промывка горячей водой бритвенного
Введение                                 -  Использование прибора, его зарядка и    загорается значок батареи (Рис. 5).    блока и отсека для волос после каждого сеанса
Поздравляем с покупкой продукции Philips! Для   хранение должны производиться при      Низкий уровень заряда аккумулятора     бритья. Для тщательной очистки бритвенных
температуре от 5 °C до 35 °C.
получения полной поддержки, оказываемой     -  Осторожно! Перед тем как промыть водой   При разрядке аккумулятора соответствующие   головок рекомендуется использовать чистящий
компанией Philips, зарегистрируйте прибор на   часть бритвы, за которую вы держите   предупреждения не подаются. После полной   спрей для бритвенных головок Philips HQ110.
веб-сайте www.philips.com/welcome.                                                  разрядки аккумулятора прибор выключится
прибор, отсоедините шнур.              автоматически.                               Ежедневно: бритвенный блок и отсек
Общее описание (Рис. 1)                  -  Соблюдайте осторожность при обращении                                             для волос
1  Триммер                                   с горячей водой. Проверяйте температуру   Зарядка аккумулятора                   Осторожно! Перед тем как промыть водой
воды, чтобы избежать ожогов.
2  Кнопка отсоединения триммера             -  При промывании бритвы из гнезда штекера   Если мотор начинает работать медленнее   часть бритвы, за которую вы держите прибор,
3  Гнездо для маленького штекера             может вытекать вода. Это нормально и не   или останавливается, аккумулятор прибора   отсоедините шнур.
4  Адаптер                                   представляет опасности при использовании   необходимо зарядить.
5  Маленький штекер                          бритвы, так как электроэлементы внутри    1  Подключите штекер шнура к           Соблюдайте осторожность при обращении с
6  Значок аккумулятора                       бритвы находятся в герметичном блоке      электробритве (Рис. 6).                горячей водой. Проверяйте температуру воды,
7  Кнопка включения/выключения               питания.                                                                         чтобы избежать ожогов.
8  Кнопка отсоединения бритвенного блока                                             2  Подключите адаптер к розетке электросети.