На сайте 123367 инструкций общим размером 499.25 Гб , которые состоят из 6233554 страниц
Фото
Руководство пользователя PHILIPS BRL140/00. Основные функции, характеристики и условия эксплуатации изложены на 7 страницах документа в pdf формате.
Доступно к просмотру 7 страниц. Рекомендуем вам скачать файл инструкции, поскольку онлайн просмотр документа может сильно отличаться от оригинала.
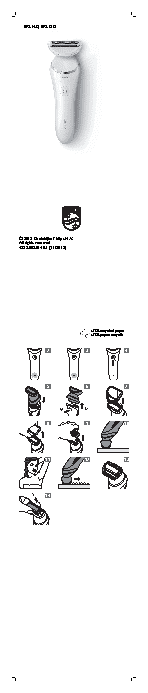
BRL140, BRL130
© 2015 Koninklijke Philips N.V.
All rights reserved
4222.003.0148.1 (11/2015)
>75% recycled paper
>75% papier recycle
2             3             4
5             6             7
1        2
8             9             10
11             12            13
14
BRL140 1
8
7
10
6 9
11
1
2 4
12 13
5
3
English
Introduction
Congratulations on your purchase and welcome to
Philips! To fully benefit from the support that
Philips offers, register your product at
www.philips.com/welcome.
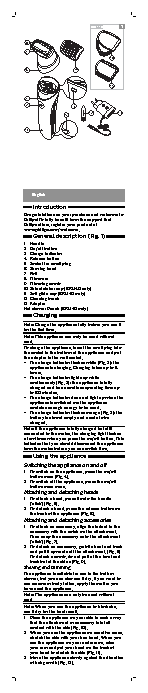
General description (Fig. 1)
1 Handle
2 On/off button
3 Charge indicator
4 Release button
5 Socket for small plug
6 Shaving head
7 Foil
8 Trimmers
9 Trimming comb
10 Skin stetcher cap (BRL140 only)
11 Soft glide cap (BRL140 only)
12 Cleaning brush
13 Adapter
Not shown: Pouch (BRL140 only)
Charging
Note: Charge the appliance fully before you use it
for the first time.
Note: This appliance can only be used without
cord.
To charge the appliance, insert the small plug into
the socket in the bottom of the appliance and put
the adapter in the wall socket.
- The charge indicator flashes white (Fig. 2): the
appliance is charging. Charging takes up to 8
hours.
- The charge indicator lights up white
continuously (Fig. 3): the appliance is fully
charged and has a cordless operating time up
to 60 minutes.
- The charge indicator does not light up when the
appliance is switched on: the appliance
contains enough energy to be used.
- The charge indicator flashes orange (Fig. 2): the
battery is almost empty and needs to be
charged.
Note: If the appliance is fully charged but still
connected to the mains, the charging light flashes
a few times when you press the on/off button. This
indicates that you should disconnect the appliance
from the mains before you can switch it on.
Using the appliance
Switching the appliance on and off
1 To switch on the appliance, press the on/off
button once (Fig. 4).
2 To switch off the appliance, press the on/off
button once more.
Attaching and detaching heads
1 To attach a head, press it onto the handle
('click') (Fig. 5).
2 To detach a head, press the release button on
the back of the appliance (Fig. 6).
Attaching and detaching accessories
1 To attach an accessory, align the indent in the
accessory with the notch on the attachment.
Then snap the accessory onto the attachment
('click') (Fig. 7).
2 To detach an accessory, grab its front and back
and pull it upwards off the attachment. (Fig. 8)
To detach a comb, do not pull at the front and
back but at the sides (Fig. 9).
Shaving and trimming
The appliance is suitable for use in the bath or
shower, but you can also use it dry. If you want to
use creams or body lotion, apply them after you
have used the appliance.
Note: The appliance can only be used without
cord.
Note: When you use the appliance to trim hairs,
use it dry for the best result.
1 Place the appliance on your skin in such a way
that the attachment or accessory is in full
contact with the skin (Fig. 10).
2 When you use the appliance on sensitive areas,
stretch the skin with your free hand. When you
use the appliance on your underarms, raise
your arm and put your hand on the back of
your head to stretch the skin (Fig. 11).
3 Move the appliance slowly against the direction
of hair growth (Fig. 12).Note: If you move the appliance over your skin too
fast, you may not obtain a smooth result.
Shaving head
You can use the shaving head to shave your legs
and body.
Note: The appliance can be moved in two
directions, for easier shaving of underarms.
Note: Always check the foil before use. If it is
damaged in any way, replace the cutting unit right
away (see 'Replacement').
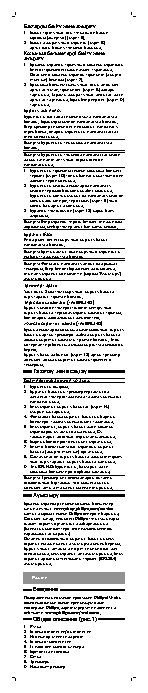
Trimming comb
You can attach the trimming comb onto the
shaving head to trim hairs to a length of 3mm.
Skin stretcher cap (BRL140 only)
You can attach the skin stretcher cap onto the
shaving head to make the hairs stand upright
during shaving. This makes it easier to remove
them.
Soft glide cap (BRL140 only)
You can attach the soft glide cap onto the shaving
head to cover the back trimmer of the shaving
head for extra safety in curvy areas. The smooth
material makes it glide effortlessly over your skin.
Make sure that you attach the soft glide cap in
such a way that the back trimmer of the shaving
head is covered (Fig. 13).
Cleaning and storage
Keep the adapter dry.
1 Switch off the appliance.
2 Use the cleaning brush to brush away any hairs
that have collected under the trimmers of the
shaving head.
3 Pull the cutting unit out of the shaving head
(Fig. 14).
4 Clean all parts of the shaving head with the
cleaning brush, except the foil.
5 Rinse the cutting unit, shaving head and
accessories under the tap. Shake them firmly to
remove water drops.
6 Let all parts dry completely.
7 Place the cutting unit back into the shaving
head ('click').
8 Put the trimming comb on the shaving head to
prevent damage to the shaving head when you
store it.
9 BRL140 only: Store the appliance, its heads and
accessories in the pouch.
Note: Lubricate trimmer teeth and foils with a drop
of sewing machine oil every six weeks for optimal
performance.
Replacement
To buy accessories or spare parts, visit
www.shop.philips.com/service or go to your Philips
dealer. You can also contact the Philips Consumer
Care Centre in your country (see the worldwide
guarantee leaflet for contact details)
For optimal performance, we advise you to replace
the cutting unit of the shaving head every two
years. If you use the shaving head twice or more
times a week, replace the cutting unit more often.
Always replace the cutting unit with one of the
original type (BRL384).
?аза?ша
Кіріспе
Осы затты сатып алуы?ызбен ??тты?таймыз ж?не
Philips компаниясына ?ош келді?із! Philips
?сынатын ?олдауды толы? пайдалану ?шін ?німді
www.philips.com/welcome торабында тірке?із.
Жалпы сипаттама (1-сурет)
1 Сап
2 ?осу/?шіру т?ймесі
3 Зарядтау к?рсеткіші
4 Босату т?ймесі
5 Кіші аша?а арнал?ан розетка
6 ?ыратын басы
7 Фольга
8 Триммерлер
9 Триммер тара?ы
10 Тері соз?ыш ?а?па?ы (тек BRL140)
11 Ж?мса? сыр?итын ?а?па? (тек BRL140)
12 Щетка
13 Адаптер
К?рсетілмеген: ?алта (Тек BRL140)
Зарядтау
Ескерту: ??ралды ал?аш?ы рет ?олданар алдында,
оны толы?ымен зарядтап алы?ыз.
Ескерту: Б?л ??рыл?ыны тек сымсыз пайдалану?а
болады.
??рыл?ыны зарядтау ?шін кішкене штепсельді
??ралды? т?біндегі ?я?а жал?ап, адаптерді
?абыр?ада?ы розетка?а жал?а?ыз.
- Заряд индикаторы а? т?спен (сурет 2)
жыпылы?тайды: ??рал зарядталуда. Зарядтау
е? к?бі 8 са?ат алады.
- Заряд индикаторы а? т?сте ?здіксіз жанады
(сурет 3): ??рыл?ы зарядталып, 60 минут?а
дейін сымсыз ж?мыс істейді.
- ??рыл?ы ?осулы кезде заряд индикаторы
жанбайды: ??рыл?ыда пайдалану?а жеткілікті
энергия бар.
- Заряд индикаторы ?ыз?ылт сары т?спен (сурет
2) жыпылы?тайды: батарея заряды бос ж?не
зарядталуы керек.
Ескерту: Егер ??рал толы?ымен зарядталса, біра?
электр тогына ?лі де ?осулы болса, ?осу/?шіру
т?ймесін бас?ан кезде заряд шамы бірнеше рет
жыпылы?тайды. Б?л ?осу алдында ??рыл?ыны
электр тогынан ажырату керектігін к?рсетеді.
??рыл?ыны пайдалану
??ралды ?осу ж?не ?шіру
1 ??рыл?ыны ?осу ?шін ?осу/?шіру т?ймесін бір
рет (сурет 4) басы?ыз.
2 ??рыл?ыны ?шіру ?шін ?осу/?шіру т?ймесін та?ы
бір рет басы?ыз.